React七案例中
代码下载
地图找房模块
顶部导航栏
封装NavHeader组件实现城市选择,地图找房页面的复用,在 components 目录中创建组件 NavHeader,把之前城市列表写过的样式复制到 NavHeader.scss 下,在该组件中封装 antd-mobile 组件库中的 NavBar组件:
import { NavBar } from "antd-mobile";import { useNavigate } from "react-router-dom";import "./NavHeader.scss";export default function NavHeader({onBack, children}) {const navigate = useNavigate()function backAction() {navigate(-1)}return (<NavBar style={{'--height': '44px','--border-bottom': '1px #eee solid','color': '#333','backgroundColor': '#f6f5f6'}} onBack={onBack || backAction} backIcon={<i className="iconfont icon-back"></i>}>{children}</NavBar>)}
由于头部的左侧按钮不一定是返回上一个页面的功能,所以需要把左侧点击逻辑处理需要通过父组件传递进来,如果说外界传递了,那么就直接使用外界的行为,如果没有传递,那么就用默认的行为。
添加props校验
封装好了的组件可能会提供给别人去使用,然而别人在使用的时候不清楚需要传递怎样的props,所以可以通过添加 props 校验,来提示使用者,应该怎样正确的传递 props:
- 安装
yarn add prop-types或者npm i prop-types - 导入 PropTypes
- 给NavHeader组件的 children 和 onLeftClick添加props校验
import PropTypes from "prop-types";……NavHeader.propTypes = {children: PropTypes.string.isRequired,onBack: PropTypes.func}
在 CityList.js 文件中,引入 NavHeader 组件,把之前 NavBar 组件去掉,使用封装好的NavHeader组件。在 Map.js 文件中使用 NavHeader 组件:
<NavHeader>地图找房</NavHeader>
组件之间样式覆盖问题
在配置路由的时候,多个组件都会被导入到路由中,那么只要组件被导入,那么相关的样式也会被导入进来,如果两个组件的样式名称相同,那么就会影响另外一个组件的样式。默认情况下,只要导入了组件,不管组件有没有显示在页面中,组件的样式就会生效。解决方式:
- 写不同的类名
- CSS IN JS
CSS IN JS 是使用JavaScript 编写 CSS 的统称,用来解决CSS样式冲突,覆盖等问题;CSS IN JS 的具体实现有50多种,比如:CSS Modules、styled-components等。推荐使用 CSS Modules(React脚手架已经集成进来了,可以直接使用)。
CSS Modules
- CSS Modules 通过对CSS类名重命名,保证每一个类名的唯一性,从而避免样式冲突问题
- 实现方式:webpack的css-loader 插件
- 命名采用:BEM(Block块、Element元素、Modifier三部分组成)命名规范。比如: .list_item_active
- 在React脚手架中演化成:文件名、类名、hash(随机)三部分,只需要指定类名即可
/* 自动生成的类名,我们只需要提供 classname 即可 */[filename]_[classname]__[hash]// 类名.error {}// 生成的类名为:.Button_error__ax7yz
使用步骤:
- 创建名为 name.module.css 的样式文件(React脚手架中的约定,与普通CSS区分开)
- 组件中导入该样式文件(注意语法)
import styles from './index.module.css' - 通过 styles 对象访问对象中的样式名来设置样式
<div className={styles.test}></div>
使用CSS Modules修改 NavHeader 样式
在 components 目录中创建 NavHeader.module.css 的样式文件,在样式文件中修改当前组件的样式(使用单个类名设置样式,不使用嵌套样式):
:globle(.adm-nav-bar-title) {color: #333;}
对于组件库中已经有的全局样式,需要使用:global() 来指定,在修改NavBar里面文字颜色的时候,用到了一个类名叫:adm-nav-bar-title 这个类名是组件库中定义的,所以对于这一类需要这样去设置 :global(.adm-nav-bar-title){}
修改 Map 组件中样式
将 Map.css 修改为 Map.moudle.css,并将样式调整为如下:
.map {height: 100%;padding-top: 44px;}#container {height: 100%;}.map :global(.adm-nav-bar) {margin-top: -44px;}
导入 Map.moudle.css 样式,调整类名:
import styles from './Map.module.css'……// 页面结构<div className={styles.map}><NavHeader>地图找房</NavHeader><div id={styles.container}></div></div>
根据定位展示当前城市
在 utils 文件夹创建 useCurrentCity.js 文件,自定义获取当前定位城市信息的 HOOK:
import { useEffect, useState } from "react";import requestCurrentCity from "./requestCurrentCity.js";export default function useCurrentCity() {const [city, setCity] = useState(localStorage.getItem('localCity'))const [error, setError] = useState(null)const [loading, setLoading] = useState(city ? true : false)useEffect(() => {let ignore = falseif (city) {} else {requestCurrentCity().then((data) => {if (!ignore) {setCity(JSON.stringify(data))setLoading(false)}}).catch((error) => {if (!ignore) {setError(error)setLoading(false)}})}return () => ignore = true}, [city])return {currentCity: JSON.parse(city), error, loading}}
在 Home、CityList 组件中,使用 useCurrentCity 获取当前城市。
Map 组件处理逻辑:
- 使用 useCurrentCity 获取当前定位城市
- 在 useEffect 中使用 地址解析器 解析当前城市坐标
- 调用 centerAndZoom() 方法在地图中展示当前城市,并设置缩放级别为11
- 在地图中添加比例尺和平移缩放控件
// 获取当前城市定位const { currentCity } = useCurrentCity()console.log('currentCity: ', currentCity);// 创建地图const { label: currentLabel, value: currentValue } = currentCityuseEffect(() => {let ignore = false// 定位成功if (currentLabel) {// 创建地图实例 var map = new window.BMapGL.Map(styles.container); //开启鼠标滚轮缩放 map.enableScrollWheelZoom(true); // 添加比例尺控件var scaleCtrl = new window.BMapGL.ScaleControl(); map.addControl(scaleCtrl);// 添加缩放控件var zoomCtrl = new window.BMapGL.ZoomControl(); map.addControl(zoomCtrl);//创建地址解析器实例var myGeo = new window.BMapGL.Geocoder();// 将地址解析结果显示在地图上,并调整地图视野myGeo.getPoint(currentLabel, function(point){let p = nullif(point){console.log('point: ', point);// map.addOverlay(new window.BMapGL.Marker(point, {title: '北京市海淀区上地10街'}))// 地址解析成功p = point}else{alert('您选择的地址没有解析到结果!');// 地址解析失败,创建默认点坐标 (北京)p = new window.BMapGL.Point(116.404, 39.915); }// 设置中心点坐标和地图级别map.centerAndZoom(p, 11); }, currentLabel)}return () => ignore = true}, [currentLabel])
说明:React Effect 使用
Object.is比较依赖项的值,如果依赖项为 对象,则比较的是是否在内存中为同一对象,所以将 currentCity 解构。
地图中展示房源信息
这些房源信息其实就是用文本覆盖物来实现的,所以先查看百度开发文档,先创建文本覆盖物
创建文本覆盖物:
- 创建Label 示例对象
- 掉用setStyle() 方法设置样式
- 在map对象上调用 addOverlay() 方法,讲文本覆盖物添加到地图中
var point = new BMapGL.Point(116.404, 39.915);var content = "label";var label = new BMapGL.Label(content, { // 创建文本标注position: point, // 设置标注的地理位置offset: new BMapGL.Size(10, 20) // 设置标注的偏移量}) map.addOverlay(label); // 将标注添加到地图中
绘制房源覆盖物
1、 引入 axios,获取房源数据
import axios from "axios";……// 获取房源信息axios.get('area/map?id=' + currentCity.value).then((data) => {})
2、遍历数据,创建覆盖物,给每一个覆盖物添加唯一标识
// 获取房源信息axios.get('area/map?id=' + currentCity.value).then((data) => {// 文本覆盖物data && data.body.forEach((item) => {// 覆盖物内容结构var content = `<div class=${styles.bubble}><p class="${styles.name}">${item.label}</p><p>${item.count}套</p></div>`;// 创建文本标注var label = new BMapGL.Label(content, { // 设置标注的地理位置position: new BMapGL.Point(item.coord.longitude, item.coord.latitude), // 设置标注的偏移量offset: new BMapGL.Size(10, 20) }) // 给label添加唯一标识label.id = item.valuemap.addOverlay(label); // 设置label的样式label.setStyle({ cursor: 'pointer',fontSize: '12px',textAlign: 'center'border: '0',padding: '0'})})})
由于默认提供的本文覆盖物与需要的效果不符合,所以要进行重新的绘制,调用 Label 的 setContent 方法或创建创建覆盖物时,传入html结构,修改HTML的内容样式;(注意:调用了setContent 那么里面文本的内容就失效了)
3、在 Map.module.css 文件中,设置覆盖物内容的样式:
/* 覆盖物样式 */.bubble {width: 70px;height: 70px;line-height: 1;display: inline-block;position: absolute;border-radius: 100%;background: rgba(12, 181, 106, 0.9);color: #fff;border: 2px solid rgba(255, 255, 255, 0.8);text-align: center;cursor: pointer;}.name {padding: 5px 0 0 0;}
房源覆盖物点击逻辑
点击覆盖物——放大地图 -> 获取数据,渲染下一级覆盖物:
- 点击区、镇覆盖物,清除现有的覆盖物,获取下一级数据,创建新的覆盖物
- 点击小区覆盖物,不清楚覆盖物,移动地图,展示该小区下的房源信息
给覆盖物添加点击事件,并在事件中清除覆盖物:
// 添加点击label.addEventListener('click', () => {// 清除覆盖物map.clearOverlays()})
封装流程
到目前为止才完成地图找房的一环,也就是获取了区的房源信息,然后可以点击对应区的房源,清除地图上的覆盖物,而再实现镇的时候也是相同的逻辑,实现小区的时候,逻辑流程也是相似的,所以可以对此进行一层封装,提高代码复用性:
- renderOverlays() 作为入口:接收区域id参数,获取该区域下的房源数据;接收当前地图级别 zoom 参数,调用对应方法,创建覆盖物,到底是创建区镇的覆盖物还是小区覆盖物
- createCircle() 方法:根据传入的数据创建覆盖物,绑定事件(放大地图,清除覆盖物,渲染下一级房源数据)
- createReact() 方法:根据传入的数据创建覆盖物,绑定事件(移动地图,渲染房源列表)
// 解决脚手架中全局变量访问的问题const BMapGL = window.BMapGLfunction renderOverlays(id, zoom, map, setHouseList) {// 获取房源信息axios.get('area/map?id=' + id).then((data) => {console.log('house data: ', data);// 文本覆盖物data && data.body.forEach((item) => {if (zoom === 11 ) {createCircle(item, 13, map, setHouseList)} else if (zoom === 13) {createCircle(item, 15, map, setHouseList)} else if (zoom === 15) {console.log('setHouseList: ', setHouseList);createRect(item, map, setHouseList)}})})}// 覆盖物样式const labelStyle = { cursor: 'pointer',fontSize: '12px',textAlign: 'center',border: '0',padding: '0'}function createCircle(item, zoom, map, setHouseList) {// 覆盖物内容结构var content = `<div class=${styles.bubble}><p class="${styles.name}">${item.label}</p><p>${item.count}套</p></div>`;const point = new BMapGL.Point(item.coord.longitude, item.coord.latitude)// 创建文本标注var label = new BMapGL.Label(content, { // 设置标注的地理位置position: point, // 设置标注的偏移量offset: new BMapGL.Size(-35, -35) }) // 给label添加唯一标识label.id = item.value// 添加点击label.addEventListener('click', () => {// 清除覆盖物map.clearOverlays()// 设置中心点坐标和地图级别map.centerAndZoom(point, zoom)// 渲染下一级覆盖物renderOverlays(item.value, zoom, map, setHouseList)})map.addOverlay(label); // 设置label的样式label.setStyle(labelStyle)}function createRect(item, map, setHouseList) {// 覆盖物内容结构var content = `<div class=${styles.rect}><span class="${styles.housename}">${item.label}</span><span class="${styles.housenum}">${item.count}套</span><i class="${styles.arrow}"></i></div>`;const point = new BMapGL.Point(item.coord.longitude, item.coord.latitude)// 创建文本标注var label = new BMapGL.Label(content, { // 设置标注的地理位置position: point, // 设置标注的偏移量offset: new BMapGL.Size(-50, -28) }) // 给label添加唯一标识label.id = item.value// 添加点击label.addEventListener('click', (e) => {// 获取小区房源信息axios.get('houses?cityId=' + item.value).then((data) => {console.log('house data: ', data);// 保存数据,刷新组件setHouseList(data.body.list)// 调整地图位置(让点击的房源在中心位置)const x = window.innerWidth/2 - label.domElement.offsetLeft - 50const y = (window.innerHeight - 350)/2 - label.domElement.offsetTop - 28map.panBy(x, y)})})map.addOverlay(label); // 设置label的样式label.setStyle(labelStyle)}
使用地图的 panBy() 方法,移动地图到中间位置。
样式:
/* 覆盖物样式 *//* 区、镇的覆盖物样式: */.bubble {width: 70px;height: 70px;line-height: 1;display: inline-block;position: absolute;border-radius: 100%;background: rgba(12, 181, 106, 0.9);color: #fff;border: 2px solid rgba(255, 255, 255, 0.8);text-align: center;cursor: pointer;}.name {padding: 5px 0 0 0;}/* 小区覆盖物样式 */.rect {height: 20px;line-height: 19px;width: 100px;padding: 0 3px;border-radius: 3px;position: absolute;background: rgba(12, 181, 106, 0.9);cursor: pointer;white-space: nowrap;}.arrow {display: block;width: 0;height: 0;margin: 0 auto;border: 4px solid transparent;border-top-width: 4px;border-top-color: #00a75b;}.housename {display: inline-block;width: 70px;vertical-align: middle;overflow: hidden;text-overflow: ellipsis;white-space: nowrap;}.housenum {display: inline-block;width: 20px;}/* 房源列表样式 */.houseList {/* 覆盖在地图上 */position: fixed;z-index: 999;left: 0;bottom: 0;width: 100%;height: 350px;background-color: #fff;transition: transform 0.35s;transform: translate(0, 350px);}.show {transform: translate(0, 0);}.listWrap {padding: 0 15px;background-color: #c0c0c2;border-top: 1px solid #c8c8c8;width: 100%;height: 44px;position: relative;display: flex;justify-content: space-between;align-items: center;}.listTitle {font-size: 16px;text-align: center;flex-grow: 1;text-align: left;}.listMore {font-size: 14px;color: #1e1e1e;text-decoration: none;}/* 房源列表项样式 */.houseItems {width: 100%;height: 100%;padding-bottom: 44px;overflow-y: auto;}.houseItem {width: 100%;height: 110px;padding: 15px;display: flex;align-items: center;}.itemLeft {width: 106px;height: 80px;}.itemRight {margin-left: 15px;height: 100%;overflow: hidden;flex-grow: 1;}.itemTitle {overflow: hidden;text-overflow: ellipsis;white-space: nowrap;font-size: 15px;color: #394043;}.itemDesc {overflow: hidden;text-overflow: ellipsis;white-space: nowrap;vertical-align: middle;font-size: 12px;color: #afb2b3;}.price {font-size: 12px;color: #fa5741;}.priceNum {font-size: 16px;font-weight: bolder;}.tags {display: inline-block;font-size: 12px;border-radius: 3px;padding: 4px 5px;margin-right: 5px;line-height: 12px;}.tag1 {color: #39becd;background: #e1f5f8;}.tag2 {color: #3fc28c;background: #e1f5ed;}.tag3 {color: #5aabfd;background: #e6f2ff;}
axios优化&环境变量
每一次请求接口的时候,每一次都需要写相同的 baseUrl。例如 http://localhost:8080,这样太繁琐,所以可以对网络请求进行优化,接口域名、图片域名、分为开发环境和生产环境,直接写在代码中,项目发布时,很难替换。
// 通过脚手架的环境变量来解决 开发环境
在开发环境变量文件 .env.development 中,配置 REACT_APP_URL= http://localhost:8080// 通过脚手架的环境变量解决, 生产环境
在生产环境变量文件 .env.production 中,配置 REACT_APP_URL=线上接口地址
配置生产环境和开发环境
在react中,默认支持.env文件,可以根据不同的环境使用不同的配置文件,如下所示:
.env:默认配置文件(类似全局可以使用).env.development:开发环境配置文件(特定环境使用).env.production:生产环境配置文件(特定环境使用).env.test:测试环境配置文件(特定环境使用).env.local:本地加载这个文件覆盖默认配置文件使用.env.development.local、.env.production.local、.env.test.local:本地覆盖特定环境使用
1、在项目根目录中创建文件 .env.development
2、在该文件中添加环境变量 REACT_APP_URL(注意:环境变量约定 REACT_APP 开头),设置 REACT_APP_URL = http://localhost:8080
3、重新启动脚手架,脚手架在运行的时候就会解析这个文件
4、在 utils/constValue.js 中,创建 baseUrl 变量,设置值为 process.env.REACT_APP_URL,导出 baseUrl
export const baseUrl = process.env.REACT_APP_URL
5、在需要时引入就能使用了 import { baseUrl } from "../utils/constValue";
axios 优化
- 在
.env.development文件中,新增网络超时的时间变量REACT_APP_TIME_OUT = 10000,并在在utils/constValue.js中,创建 timeOut 变量,设置值为process.env.REACT_APP_TIME_OUT,导出 timeOut - 在 utils 中新建
api.js文件,导入 axios 、baseUrl 和 timeOut - 调用 axios.create() 方法创建一个axios实例。给 create 方法,添加配置 baseURL 值为 baseUrl、配置 timeout 值为 timeOut。导出API对象
import axios from "axios";import { baseUrl, timeOut } from "./constValue";// 创建配置对象const config = {baseURL: baseUrl,timeout: timeOut}// 根据create 方法来构建axios对象export const instance = axios.create(config)
导入API,代替之前直接利用 axois 请求的代码:
import {instance} from '../../utils/api.js'
添加Loading效果
利用 Toast 来实现,请求开始的时候开启 loading,请求结束后关闭 loading。最好的时机就是在请求拦截器中开启 loading,在响应拦截器中关闭 loading:
import { Toast } from "antd-mobile";// 请求拦截器instance.interceptors.request.use((config) => {Toast.show({icon: 'loading', duration: 0, content: '加载中…', maskClickable: false})return config})// 响应拦截器instance.interceptors.response.use((res) => {console.log('data: ', res);Toast.clear()return res.data}, (error) => {console.log('error: ', error);Toast.clear()})
列表找房功能
顶部搜索导航栏
封装搜索导航栏组件
在components 目录中创建组件 SearchHeader,把之前写过的结构拷贝到这个文件中,然后把跟首页相关的数据去掉,标题,城市名称,通过props来进行传递:
import PropTypes from "prop-types";import "../pages/Home.scss";import { useNavigate } from "react-router-dom";export default function SearchHeader({cityName, className, onClickLoction, onClickSearch, onClickMap}) {const navigate = useNavigate()function locationAction() {navigate('/cityList')}function searchAction() {navigate('/search')}function mapAction() {navigate('/map')}return <div className={'headerSearch' + (className ? ' ' + className : '')}><div className='search'><div className='location' onClick={onClickLoction || locationAction}><span className="name">{cityName}</span><i className="iconfont icon-arrow" /></div><div className='form' onClick={onClickSearch || searchAction}><i className="iconfont icon-seach" /><span className="text">请输入小区或地址</span></div></div><div className="iconfont icon-map" onClick={onClickMap || mapAction}></div></div>}SearchHeader.propTypes = {cityName: PropTypes.string.isRequired,onClickLoction: PropTypes.func,onClickSearch: PropTypes.func,onClickMap: PropTypes.func}
需要在外部调整组件样式,所以还需要传递 className 的属性进去。
把搜索导航栏引入到 House 中,调整相应样式
给 SearchHeader 组件传递 className 属性,来调整组件样式,让其适应找房页面效果,下面是 House 的头布局:
import SearchHeader from "../components/SearchHeader";import useCurrentCity from "../utils/useCurrentCity";import "./House.module.css";export default function House() {// 获取当前城市定位const { currentCity } = useCurrentCity()return (<div ref={scollRef} className={styles.root}><SearchHeader className={styles.header} cityName={currentCity.label ? currentCity.label : '--'}></SearchHeader></div>)}
创建 house.module.css,设置相应的样式,修改了一些组件中的全局样式,所以需要通过 :global 来设置:
.root {width: 100%;height: 100%;position: relative;padding-top: 20px;}/* 搜索导航栏样式 */.header {background-color: #f5f6f5;position: static;}/* 控制右侧的图标 */.header :global(.icon-map) {color: #00ae66;}/* 控制search输入框 */.header :global(.search) {height: 34px;}
条件筛选
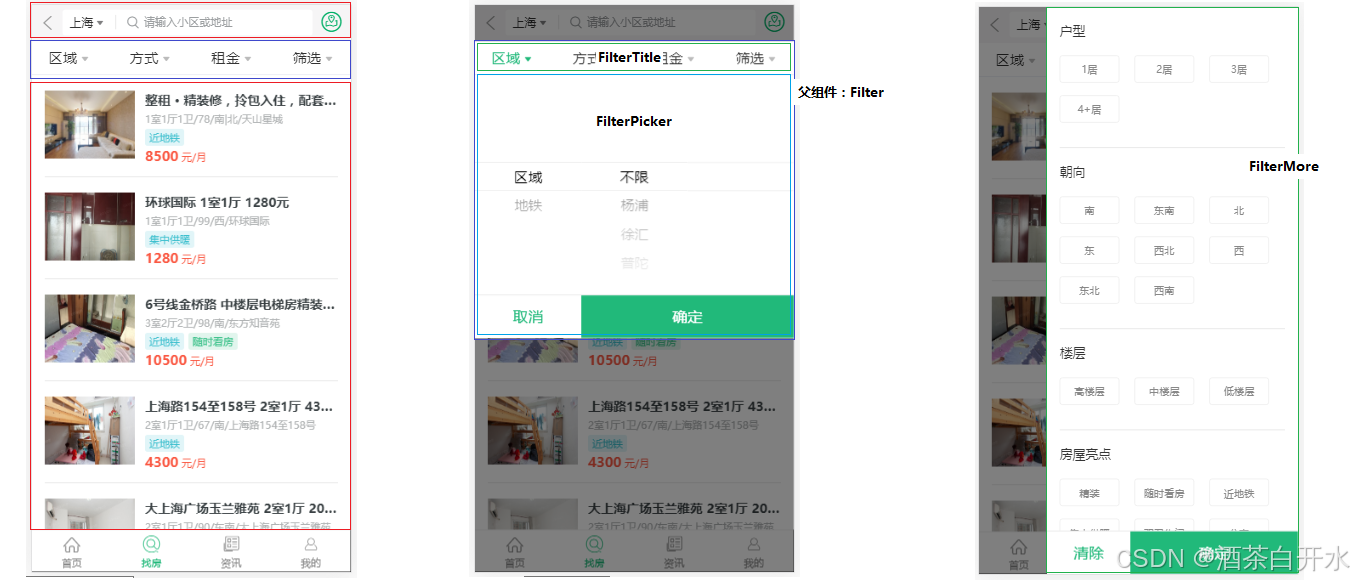
结构分析:
- 父组件:Filter
- 子组件:FilterTitle 标题菜单组件
- 子组件:FilterPicker 前三个菜单对应的内容组件
- 子组件:FilterMore 最后一个菜单对应的内容组件
功能分析:
- 点击 FilterTitle 组件菜单,展开该条件筛选对话框,被点击的标题高亮
- 点击取消按钮或空白区域,隐藏对话框,取消标题高亮
- 选择筛选条件后,点击确定按钮,隐藏对话框,当前标题高亮
- 打开对话框时,如果有选择的条件,那么默认显示已选择的条件
- 打开对话框以及隐藏对话框有动画效果
- 吸顶功能
FilterTitle 组件实现
根据标题菜单数据,渲染标题列表;标题可以被点击,点击时标题高亮:
- 标题高亮状态:提升至父组件Filter中,由父组件提供高亮状态,子组件通过props接受状态来实现高亮
- 原则:单一数据源,也就是说,状态只应该有一个组件提供并且提供操作状态的方法,其他组件直接使用组件中状态和操作状态的方法即可
实现步骤:
- 通过props接受,高亮状态对象 selectedStatus
- 遍历titleList数组,渲染标题列表
- 判断高亮对象中当前标题是否高亮,如果是,添加高亮类
- 给标题项绑定单击事件,在事件中调用父组件传过来的方法 selectAction,将当前标题 item,通过 selectAction 的参数,传递给父组件
import styles from "./FilterTitle.module.css";// 条件筛选栏标题数组:const titleList = [{ title: "区域", type: "area" },{ title: "方式", type: "mode" },{ title: "租金", type: "price" },{ title: "筛选", type: "more" }];export default function FilterTitle({ selectedStatus, selectAction }) {return (<div className={styles.root}>{titleList.map((item) => {// 父组件传递过来的状态const selected = selectedStatus[item.type]return <div key={item.type} className={styles.dropdown + (selected ? ' ' + styles.selected : '')}onClick={() => {selectAction(item)}}><span>{item.title}</span><i className="iconfont icon-arrow"></i></div>})}</div>)}
父组件中接受到当前 status,修改标题的选中状态为 true:
import FilterTitle from "./FilterTitle";import { useState } from "react";import styles from "./Filter.module.css";// 标题高亮状态// true 表示高亮; false 表示不高亮const initStatus = {area: false,mode: false,price: false,more: false}export default function Filter() {const [status, setStatus] = useState(initStatus)return (<div className={styles.root}><div className={styles.content}><FilterTitle selectedStatus={status}selectAction={(item) => {const s = {...status}s[item.type] = truesetStatus(s)}}></FilterTitle></div></div>)}
FilterPicker 组件
思路分析
- 点击前三个标题展示该组件,点击取消的时候隐藏
- 使用PickerView组件来实现页面效果
- 获取到PickerView组件中,选中的筛选条件值
- 点击确定按钮,隐藏该组件,将获取到的筛选条件值传递给父组件
- 展示或隐藏对话框的状态:由父组件提供,通过props传递给子组件
- 筛选条件数据:由父组件提供(因为所有筛选条件是通过一个接口来获取的),通过props传递给子组件
实现步骤
在Filter组件中,提供组件展示或隐藏的状态:openType
const [openType, setOpenType] = useState('')
判断 openType的值为 area/mode/price 时,就显示 FilterPicker组件,以及遮罩层
const showMask = openType === 'area' || openType === 'mode' || openType === 'price'return (<div className={styles.root}>{/* 遮罩 */}{ showMask && <div className={styles.mask}></div> }<div className={styles.content}>……{/* 内容选择器 */}{ showMask && <FilterPicker></FilterPicker> }</div></div>)
在传递给 FilterTitle 组件的 selectAction 方法中,修改状态 openType为当前 type,展示对话框
selectAction={(item) => {const s = {...status}s[item.type] = truesetStatus(s)setOpenType(item.type)}
在Filter组件中,提供 cancelAction、confirmAction 方法(作为取消按钮和遮罩层的事件、确定按钮的事件);在 cancelAction、confirmAction 方法中,修改状态 openType为空,隐藏对话框
function cancelAction() {// 清除标题选择状态const s = {...initStatus}setStatus(s)// 取消时隐藏对话框setOpenType('')}function confirmAction() {// 清除标题选择状态const s = {...initStatus}setStatus(s)// 确认时隐藏对话框setOpenType('')}
将 cancelAction、confirmAction 通过props传递给FilterPicker组件,分别在取消、确定按钮的单击事件中调用该方法
{ showMask && <FilterPicker cancelAction={cancelAction} confirmAction={confirmAction}></FilterPicker> }
FilterPicker 组件实现:
import styles from "./FilterPicker.module.css";import { PickerView } from "antd-mobile";export default function FilterPicker({cancelAction, confirmAction}) {const columns = [['1'], ['2'], ['3']]return (<div className={styles.root}>{/* 选择器 */}<PickerView columns={columns}></PickerView>{/* 底部按钮 */}<div className={styles.bottom}><button className={styles.button + ' ' + styles.cancel} onClick={cancelAction}>取消</button><button className={styles.button + ' ' + styles.confirm} onClick={confirmAction}>确认</button></div></div>)}
获取筛选条件数据
在Filter组件中,发送请求,获取所有筛选条件数据;将数据保存为状态 filtersData:
// 当前城市const {currentCity} = useCurrentCity()// 筛选数据const {data: filtersData} = currentCity && useData.get(`/houses/condition?id=${currentCity.value}`)console.log('filtersData: ', filtersData);
封装方法 renderFilterPicker 来渲染FilterPicker组件;在方法中,根据openType的类型,从 filtersData 中获取需要的数据;将 数据 和 openType 通过 props 传递给 FilterPicker 组件:
// 渲染选择器function renderFilterPicker() {if (showMask && filtersData) {// 数据let data = []switch (openType) {case 'area':data = [filtersData.body['area'], filtersData.body['subway']]break;case 'mode':data = filtersData.body['rentType']break;case 'price':data = filtersData.body['price']break;default:break;}console.log('data: ', data);return <FilterPicker cancelAction={cancelAction} confirmAction={confirmAction} data={data} type={openType}></FilterPicker>}return null}
FilterPicker 组件接收到 数据 和 type 后,将数据处理之后后作为 PickerView 组件的data:
import styles from "./FilterPicker.module.css";import { PickerView } from "antd-mobile";export default function FilterPicker({cancelAction, confirmAction, data, type}) {// 计算选择器数据function calculateColumns(vs) {const result = [data]if (type !== 'area') {return result}if (vs.length > 0) {const v1 = vs[0]if (v1) {const item1 = data.find((value) => value.value === v1)if (item1 && item1.children) {result.push(item1.children)if (vs.length > 1) {const v2 = vs[1]if (v2) {const item2 = item1.children.find((value) => value.value === v2)if (item2 && item2.children) {result.push(item2.children)}}}}}}if (result.length === 1) {result.push([], [])} else if (result.length === 2) {result.push([])}console.log('result: ', result);return result}return (<div className={styles.root}>{/* 选择器 */}<PickerView columns={(v) => {console.log('cv: ', v);return calculateColumns(v)}}></PickerView>{/* 底部按钮 */}<div className={styles.bottom}><button className={styles.button + ' ' + styles.cancel} onClick={cancelAction}>取消</button><button className={styles.button + ' ' + styles.confirm} onClick={confirmAction}>确认</button></div></div>)}
获取选中值
在FilterPicker组件中,添加状态selectedValue(用于获取PickerView组件的选中值)
// 选中值const [selectedValue, setSelectedValue] = useState(null)
给PickerView组件添加配置项 onChange,通过参数获取到选中值,并更新状态 value
{/* 选择器 */}<PickerView columns={(v) => {console.log('cv: ', v);return calculateColumns(v)}} onChange={(v) => {setSelectedValue(v)}}></PickerView>
在确定按钮的事件处理程序中,将 selectedValue 作为参数传递给父组件
<button className={styles.button + ' ' + styles.confirm} onClick={() => confirmAction(selectedValue)}>确认</button>
设置默认选中值
如果是之前选中了的,当再次显示 FilterPicker 的时候,应该展示默认选中项
在Filter组件中,提供选中值状态 selectedValues
// 默认选择器选中值
const initValues = {area: ['area', null],mode: [null],price: [null],more: []
}
……// 选择器选中值const [selectedValues, setSelectedValues] = useState(initValues)
通过 openType 获取到当前类型的选中值,通过 props 传递给 FilterPicker 组件
<FilterPicker cancelAction={cancelAction} confirmAction={confirmAction} data={data} type={openType} defaultValue={selectedValues[openType]}></FilterPicker>
在 FilterPicker 组件中,将当前 defaultValue 设置为 PickerView 组件的默认值 defaultValue
export default function FilterPicker({cancelAction, confirmAction, data, type, defaultValue}) {……{/* 选择器 */}<PickerView columns={(v) => {console.log('cv: ', v);return calculateColumns(v)}} onChange={(v) => {setSelectedValue(v)}}defaultValue={defaultValue}></PickerView>}
在点击确定按钮后,在父组件中更新当前type对应的selectedValues状态值
function confirmAction(selectedValue) {// 保存选中值console.log('selectedValue: ', selectedValue);const vs = {...selectedValues, [openType]: selectedValue}setSelectedValues(vs)// 清除标题选择状态const s = {...initStatus}setStatus(s)// 确认时隐藏对话框setOpenType('')}
问题
- 在前面三个标签之间来回切换时候,默认选中值不会生效,当点击确定,重新打开FilterPicker组件时候,才会生效
- 分析:两种操作方式的区别在于有没有重新创建FilterPicker组件,重新创建的时候,会生效,不重新创建,不会生效
- 原因:React 会在一个组件保持在同一位置时保留它的 state,不重新创建FilterPicker组件时,不会再次执行state初始化,也就拿不到最新的props
- 解决方式:给FilterPicker组件添加 key 值为openType,这样,在不同标题之间切换时候,key值都不相同,React内部会在key不同时候,重新创建该组件
FilterPicker key={openType}cancelAction={cancelAction} confirmAction={confirmAction} data={data} type={openType} defaultValue={selectedValues[openType]}></FilterPicker>
FilterMore 组件
渲染组件数据
在 Filter 组件的 renderFilterPicker 方法中渲染 FilterMore 组件,从filtersData中,获取数据(roomType,oriented,floor,characteristic),通过props传递给FilterMore组件
if (openType === 'more' && filtersData) {return <FilterMore data={{roomType: filtersData.body['roomType'], oriented: filtersData.body['oriented'], floor: filtersData.body['floor'], characteristic: filtersData.body['characteristic']}}></FilterMore>}
将 FilterPicker 组件中下方的取消、确认按钮抽取为一个独立的 FilterFooter 组件
import styles from "./FilterFooter.module.css";export default function FilterFooter({cancelText = '取消',confirmText = '确定',cancelAction,confirmAction,className}) {return (<div className={styles.bottom + (className ? ' ' + className : '')}><button className={styles.button + ' ' + styles.cancel} onClick={cancelAction}>{cancelText}</button><button className={styles.button + ' ' + styles.confirm} onClick={confirmAction}>{confirmText}</button></div>)}
FilterMore组件中,通过props获取到数据,分别将数据传递给renderFilters方法;正在renderFilters方法中,通过参数接收数据,遍历数据,渲染标签
import styles from "./FilterMore.module.css";import FilterFooter from "./FilterFooter";export default function FilterMore({data: {roomType, oriented, floor, characteristic}}) {function renderFilters(data) {return data && data.map((item) => <span key={item.value} className={styles.tag}>{item.label}</span>)}return (<div className={styles.root}><div className={styles.mask}></div><div className={styles.tags}><dl className={styles.dl}><dt className={styles.dt}>户型</dt><dd className={styles.dd}>{renderFilters(roomType)}</dd><dt className={styles.dt}>朝向</dt><dd className={styles.dd}>{renderFilters(oriented)}</dd><dt className={styles.dt}>楼层</dt><dd className={styles.dd}>{renderFilters(floor)}</dd><dt className={styles.dt}>房屋亮点</dt><dd className={styles.dd}>{renderFilters(characteristic)}</dd></dl></div><FilterFooter></FilterFooter></div>)}
获取选中值并且高亮显示
- 在state中添加状态 selectedValues;给标签绑定单击事件,通过参数获取到当前项的value
- 判断selectedValues中是否包含当前value值;如果不包含,就将当前项的value添加到selectedValues数组中;如果包含,就从selectedValues数组中移除(使用数组的splice方法,根据索引号删除)
- 在渲染标签时,判断selectedValues数组中,是否包含当前项的value,包含,就添加高亮类
export default function FilterMore({data: {roomType, oriented, floor, characteristic}}) {const [selectedValues, setSelectedValues] = useState([])function renderFilters(data) {return data && data.map((item) => {const selected = selectedValues.indexOf(item.value) >= 0return <span key={item.value} className={styles.tag + (selected ? ' ' + styles.tagActive : '')}onClick={() => {const result = [...selectedValues]const index = result.indexOf(item.value)if (index >= 0) {// 已选中, 移除result.splice(index, 1)} else {// 未选中,加入result.push(item.value)}setSelectedValues(result)}}>{item.label}</span>})}……}
清除和确定按钮的逻辑处理
设置FilterFooter组件的取消按钮文字为 清除,点击取消按钮时,清空所有选中的项的值(selectedValues:[])
export default function FilterMore({data: {roomType, oriented, floor, characteristic}, cancelAction, confirmAction}) {……<FilterFooter className={styles.footer} cancelText="清除" cancelAction={() => setSelectedValues([])}confirmAction={() => confirmAction(selectedValues)}></FilterFooter>……
给遮罩层绑定事件,在事件中,调用父组件的 cancelAction 关闭 FilterMore 组件
<div className={styles.mask} onClick={cancelAction}></div>
点击确定按钮时,将当前选中项的值,传递给Filter父组件;在Filter组件中的 confirmAction 方法中,接收传递过来的选中值,更新状态selectedValues
return <FilterMore data={{roomType: filtersData.body['roomType'], oriented: filtersData.body['oriented'], floor: filtersData.body['floor'], characteristic: filtersData.body['characteristic']}}cancelAction={cancelAction}confirmAction={confirmAction}></FilterMore>
设置默认选中值
在 Filter 组件渲染 FilterMore 组件时,从selectedValues中,获取到当前选中值 more,通过props讲选中值传递给 FilterMore 组件
<FilterMore data={{roomType: filtersData.body['roomType'], oriented: filtersData.body['oriented'], floor: filtersData.body['floor'], characteristic: filtersData.body['characteristic']}}defaultValues={selectedValues['more']}cancelAction={cancelAction}confirmAction={confirmAction}></FilterMore>
在FilterMore组件中,将获取到的选中值,设置为组件状态selectedValues的默认值
export default function FilterMore({data: {roomType, oriented, floor, characteristic}, defaultValues, cancelAction, confirmAction}) {const [selectedValues, setSelectedValues] = useState(defaultValues)……}
完善 FilterTitle 高亮功能
在 Filter 组件的 confirmAction 方法中,判断当前标题对应的筛选条件有没有选中值(判断当前选中值跟与之默认值是否相同,相同表示没有选中值,不同,表示选中了值),设置选中状态高亮
- selectedValue 表示当前 type 的选中值
- 如果 openType 为 area,此时,
newStatus[openType] = selectedValue[0] !== openType || selectedValue[1] !== null,就表示已经有选中值 - 如果 openType 为 more,此时选中值数组长度不为0的时候,表示FilterMore组件中有选中项,
selectedValue.length > 0,就表示已经有选中值 - 如果 openType 为 mode 或 price,此时,
selectedVal[0] !== 'null',就表示已经有选中值
// 选中了值则修改当前标题为高亮const newStatus = {...status}if (openType === 'area') {newStatus[openType] = selectedValue[0] !== openType || selectedValue[1] !== null} else if (openType === 'more') {newStatus[openType] = selectedValue.length > 0} else {newStatus[openType] = selectedValue[0] !== 'null'}console.log('newStatus: ', newStatus);setStatus(newStatus)
在关闭对话框时(cancelAction),根据 openType 的选中值,判断当前菜单是否高亮,逻辑同 confirmAction,所以抽象出来为一个方法
// 根据选中值更新标题高亮状态function updateTitleStatus(selectedValue) {console.log('status: ', status);console.log('selectedValue: ', selectedValue);const newStatus = {...status}if (openType === 'area') {newStatus[openType] = selectedValue[0] !== openType || selectedValue[1] !== 'null'} else if (openType === 'more') {newStatus[openType] = selectedValue.length > 0} else {newStatus[openType] = selectedValue[0] !== 'null'}console.log('newStatus: ', newStatus);setStatus(newStatus)}function cancelAction() {// 根据原本选中的值则修改当前标题高亮状态const selectedValue = selectedValues[openType]updateTitleStatus(selectedValue)// 取消时隐藏对话框setOpenType('')}
在标题点击事件 onTitleClick事件里面的开始位置,判断 openType 的选中值是否与默认值相同;如果不同则设置该标题的选中状态为true,如果相同则设置该标题的选中状态为false
<FilterTitle selectedStatus={status}selectAction={(item) => {const s = {...status}const selectedValue = selectedValues[openType]if (openType === 'area') {s[openType] = selectedValue[0] !== openType || selectedValue[1] !== 'null'} else if (openType === 'more') {s[openType] = selectedValue.length > 0} else if (openType !== '') {s[openType] = selectedValue[0] !== 'null'}s[item.type] = trueconsole.log('s: ', s);setStatus(s)setOpenType(item.type)}}></FilterTitle>
获取房屋列表数据
组装筛选条件
1、在 Filter 组件的 confirmAction 方法中,根据最新 selectedValues 组装筛选的条件数据 filters,以下是数据格式
- 获取区域数据的参数名:area 或 subway(选中值,数组的第一个元素),数据值(以最后一个value为准)
- 获取方式和租金的值(选中值得第一个元素)
- 获取筛选(more)的值(将选中值数组转换为以逗号分隔的字符串)
2、在 Filter 组件中增加一个 onFilter 的 props, 通过 onFilter 将筛选条件数据 filters 传递给父组件 House
export default function Filter({onFilter}) {function confirmAction(selectedValue) {const vs = {...selectedValues, [openType]: selectedValue}……// 筛选条件数据const filters = {};const { area, mode, price, more } = vs;// 区域filters[area[0]] = area[area.length - 1]// 方式和租金filters['rentType'] = mode[0]filters['price'] = price[0]// 更多filters['more'] = more.join(',')onFilter(filters)}}
获取房屋数据
House 组件中,创建方法 onFilter 传递给子组件 Filter,通过参数接收 filters 数据,并存储useState中
export default function House() {// 获取当前城市定位const { currentCity } = useCurrentCity()console.log('currentCity: ', currentCity);const [ filters, setFilters ] = useState({})return (<><SearchHeader className={styles.header} cityName={currentCity.label ? currentCity.label : '--'}></SearchHeader><Filter onFilter={(filters) => {setFilters(filters)}}></Filter></>)}
在 House 组件顶部,通过之前定义的 useData HOOK 获取房屋列表数据:
// 获取房屋列表数据const { data: listData } = useData.get('/houses', {params: {cityId: currentCity.value,...filters,start: 1,end: 20}})console.log('listData: ', listData);
使用 List 组件渲染数据
封装HouseItem组件,实现 Map 和 House 中,房屋列表项的复用
import styles from "./HouseItem.module.css";import { baseUrl } from "../utils/constValue";export default function HouseItem({item, onClick}) {console.log('item: ', item);return (<div key={item.value} className={styles.houseItem} onClick={onClick}><img className={styles.itemLeft} src={baseUrl + item.houseImg} alt=""></img><div className={styles.itemRight}><div className={styles.itemTitle}>{item.title}</div><div className={styles.itemDesc}>{item.desc}</div><div>{ item.tags && item.tags.map((tag, i) => {const tagClass = 'tag' + (1 + i%3)return <span className={styles.tags + ' ' + styles[tagClass]} key={tag}>{tag}</span>}) }</div><div className={styles.price}><span className={styles.priceNum}>{item.price}</span>元/月</div></div></div>)}
使用 react-virtualized 的 AutoSizer、List 组件渲染房屋列表(参考 CityList 组件的使用)
{/* 房屋列表 */}{ listData && <div className={styles.houseItems}><AutoSizer>{ ({width, height}) => {console.log('width: ', width);console.log('height: ', height);return <Listwidth={width}height={height}rowCount={listData.body.list.length}rowHeight={110}rowRenderer={({index, key, style}) => {console.log('style: ', style);return <div key={key} style={style}><HouseItem item={listData.body.list[index]}></HouseItem></div>}} scrollToAlignment='start'/>} }</AutoSizer></div>}
css 样式:
/* 房源列表项样式 */.houseItems {width: 100%;position: absolute;top: 108px;bottom: 44px;}.houseBody {width: 100%;height: 110px;}
使用 WindowScroller 跟随页面滚动
List组件只让组件自身出现滚动条,无法让整个页面滚动,也就无法实现标题吸顶功能。使用 WindowScroller 高阶组件,让List组件跟随页面滚动(为 List 组件提供状态,同时还需要设置 List 组件的 autoHeight 属性)
注意:WindowScroller 高阶组件只能提供height,无法提供width;在 WindowScroller 组件中使用AutoSizer高阶组件来为List组件提供width
{/* 房屋列表 */}{ listData && <div className={styles.houseItems}><WindowScroller>{({height, isScrolling, scrollTop, registerChild, onChildScroll}) => {return <AutoSizer>{ ({width}) => {return <Listref={registerChild}width={width}height={110*listData.body.list.length}autoHeightrowCount={listData.body.list.length}rowHeight={110}rowRenderer={({index, key, style}) => {return (<div key={key} style={style} className={styles.houseBody}><HouseItem item={listData.body.list[index]}></HouseItem></div>)}} scrollToAlignment='start'isScrolling={isScrolling}scrollTop={scrollTop}onScroll={onChildScroll}/>} }</AutoSizer>}}</WindowScroller></div> }
注意:WindowScroller 组件在使用过程中出现问题,只会渲染前面几条数据,后面的数据就不会渲染了,如果后期解决在做说明。
InfiniteLoader 组件
滚动房屋列表时候,动态加载更多房屋数据,使用InfiniteLoader 组件,来实现滚动列表从而加载更多房屋数据,根据 InfiniteLoader 文档示例,在项目中使用组件:
- isRowLoaded 表示这行数据是否加载完成
- loadMoreRows 加载更多数据的方法,在需要加载更多数据时,会调用该方法
- rowCount 列表数据总条数
- minimumBatchSize 一次要加载的最小行数,此属性可用于批处理请求以减少HTTP请求;默认为10。
- threshold 表示当用户在X行内滚动时数据将开始加载。默认为15。
const [list, setList] = useState([])const listString = JSON.stringify(listData)const filtersString = JSON.stringify(filters)useEffect(() => {if (listString) {const data = JSON.parse(listString)const initList = data ? data.body.list : []console.log('initList: ', initList);setList(() => initList)}return () => setList([])}, [listString, filtersString])const count = listData ? listData.body.count : 0console.log('count: ', count);……{/* 房屋列表 */}<div className={styles.houseItems}><InfiniteLoaderisRowLoaded={({index}) => {console.log('isRowLoaded index: ', index);const isRowLoaded = !!list[index]console.log('isRowLoaded: ', isRowLoaded);return isRowLoaded}}loadMoreRows={({startIndex, stopIndex}) => {console.log('startIndex: ', startIndex);console.log('stopIndex: ', stopIndex);return new Promise((resolve, reject) => {instance.get('/houses', {params: {...filters, cityId: currentCity.value, start: startIndex + 1, end: stopIndex + 1}}).then((moreData) => {if (moreData) {const more = moreData.body.listconst total = list.concat(more)setList(total)console.log('total: ', total);}resolve(moreData)}).catch((error) => reject(error))})}}rowCount={count}minimumBatchSize={20}threshold={1}>{({onRowsRendered, registerChild}) => {return <AutoSizer>{ ({width, height}) => {console.log('width: ', width);console.log('height: ', height);return <div ref={registerChild}><ListonRowsRendered={onRowsRendered}width={width}height={height}rowCount={list.length}rowHeight={110}rowRenderer={({index, key, style}) => {console.log('index: ', index);const item = list[index]if (item) {return (<div key={key} style={style} className={styles.houseBody}><HouseItem item={item}></HouseItem></div>)}return null}} /></div>} }</AutoSizer>}}</InfiniteLoader></div>
说明:
- 在loadMoreRows方法中,根据起始索引和结束索引,发送请求,获取更多房屋数据;获取到最新的数据后,与当前 list 中的数据合并,再更新state,并调用Promise的resolve
- 在 rowRenderer 组件的 rowRenderer 方法中,判断house是否存在;不存在的时候就返回null,存在的时候再渲染HouseItem组件
吸顶功能
实现思路:
- 在页面滚动的时候,判断筛选栏上边是否还在可视区域内;如果在,不需要吸顶;如果不在,就吸顶样式(fixed)
- 吸顶之后,元素脱标,房屋列表会突然往上调动筛选栏的高度,解决这个问题,需要用一个跟筛选栏相同的占位元素,在筛选栏脱标后,代替它撑起高度
1、封装Sticky组件,创建两个ref对象(placeholder,content),分别指向占位元素和内容元素
2、在组件中,使用监听浏览器的scroll事件,通过getBoundingClientRect()方法得到筛选栏占位元素当前位置
useEffect(() => {window.addEventListener('scroll', (e) => {const { top } = placeholderEl.getBoundingClientRect()})return () => window.removeEventListener('scroll')}, [])
由于 WindowScroller 在使用中出现问题,此功能不实现具体略…
列表找房模块优化
1、实现加载房源数据时加载完成的提示,需要解决:
- 没有房源数据时,不弹提示框(判断一下count是否为 0,如果为 0,就不加载提示信息)
- 在首次加载数据是弹提示框,加载更多数据时不弹(在保存列表首次加载数据的 useEffect 中处理)
useEffect(() => {if (listString) {const data = JSON.parse(listString)const initList = data ? data.body.list : []console.log('initList: ', initList);setList(() => initList)if (data && data.body.count !== 0) {Toast.show(`共找到 ${data.body.count} 套房源`)}}return () => setList([])}, [listString, filtersString])
2、找不到房源数据时候的提示,将列表的渲染抽象到 renderList 方法中,通过判断 count 是否为 0来决定渲染内容:
function renderList() {if (count === 0) {return <div className={styles.noData}><img className={styles.img} src={baseUrl + '/img/not-found.png'} alt="暂无数据"/><p className={styles.msg}>没有找到房源,请您换个搜索条件吧~</p></div>}return <InfiniteLoader……</InfiniteLoader>}
3、使用条件筛选查询数据时,页面没有回到列表顶部:
- 首先定义一个 listRef
const listRef = useRef(null)并赋值给 List 组件的 ref 属性 - 在点击条件查询确定按钮的时候,利用
listRef.current.scrollToRow(0)来回到列表顶部
react-spring动画库
展示筛选对话框的时候,实现动画效果,增强用户体验;react-spring是基于spring-physics(弹簧物理)的react动画库,动画效果更加流畅、自然。
优势:
- 几乎可以实现任意UI动画效果
- 组件式使用方式(render-props模式),简单易用,符合react的声明式特性,性能高
资料:
- github地址
- 官方文档
基本使用
- 安装
yarn add react-spring或npm i react-spring - 导入组件
import { animated, useSpring } from '@react-spring/web' - 打开Spring组件文档,使用
animated.div组件包裹要实现动画效果的遮罩层div - 使用
useSpringHOOK 钩子函数构建动画参数props,from指定组件第一次渲染时的动画状态,to指定组件要更新的新动画状态;opacity 就是透明度有 0~1 中变化的值
const styles = useSpring({from: { opacity: 0 },to: { opacity: 1 }})
- 通过
render-props模式,将参数 props 设置为遮罩层 div 的 style
<animated.div style={styles}>{<div>这是实现动画的 div</div>}</animated.div>
实现遮罩层动画
- 修改to属性的值,在遮罩层隐藏时为0,在遮罩层展示为1
const props = useSpring({from: { opacity: 0 },to: { opacity: showMask ? 1 : 0 }})
- 修改渲染遮罩层的逻辑,保证
animated.div组件一直都被渲染(animated.div组件被销毁了,就无法实现动画效果) - 判showMask是否为true,如果为true渲染遮罩层div;如果不为true,就返回null,解决遮罩层遮挡页面导致顶部点击事件失效
{/* 遮罩 */}<animated.div style={props}>{ showMask ? <div className={styles.mask} onClick={cancelAction}></div> : null }</animated.div>
房屋详情模块
改造 NavHeader 组件
修改NavHeader组件(添加了className和rightContent两个props)
import { NavBar } from "antd-mobile";import { useNavigate } from "react-router-dom";import PropTypes from "prop-types";import styles from "./NavHeader.module.css";export default function NavHeader({onBack, children, className, rightContent}) {const navigate = useNavigate()function backAction() {navigate(-1)}return (<NavBar className={styles.navBar + (className ? ' ' + className : '')} style={{'--height': '44px','--border-bottom': '1px #eee solid','color': '#333','backgroundColor': '#f6f5f6'}} onBack={onBack || backAction} backIcon={<i className="iconfont icon-back"></i>} right={rightContent}>{children}</NavBar>)}NavHeader.propTypes = {children: PropTypes.string.isRequired,onBack: PropTypes.func,rightContent: PropTypes.array}
路由参数
- 新建房屋详情组件
HouseDetail,并在根文件中导入import HouseDetail from "./pages/HouseDetail.js"; - 房源有多个,那么URL路径也就有多个,那么需要多少个路由规则来匹配呢?一个还是多个?
- 使用一个路由规则匹配不同的 URL 路径,同时获取到 URL 中不同的内容,利用路由参数来解决
- 让一个路由规则,同时匹配多个符合该规则的URL路径,语法:
/detail/:id,其中:id就是路由参数
<Route path='/detail/:id' element={<HouseDetail></HouseDetail>}></Route>
- 获取路由动态路径传参通过 HOOK 钩子函数
useParams
展示房屋详情
- 在找房页面中,给每一个房源列表添加点击事件,在点击时跳转到房屋详情页面
- 在单击事件中,获取到当前房屋id;根据房屋详情的路由地址,通过
useNavigateHOOK 钩子函数实现路由跳转
const navigate = useNavigate()……<HouseItem item={item} onClick={() => {navigate('/detail/' + item.houseCode)}}></HouseItem>
- 导入自定义 HOOK 钩子函数
useData,通过路由参数获取到当前房屋id,发送请求,获取房屋数据,请求数据:
// 获取路由参数const routerParams = useParams()console.log('routerParams: ', routerParams);// 请求数据const { data } = useData.get('/houses/' + routerParams.id)console.log('data: ', data);
- 解构出需要的数据:
// 结构数据数据const {community,title,price,roomType,size,floor,oriented,supporting,description,houseImg,tags,coord} = data ? data.body : {}
- 渲染小区名称——导航栏:
{/* 导航栏 */}{ community && <NavHeader className={styles.navHeader} rightContent={[<i className="iconfont icon-share" key='share'/>]}>{community}</NavHeader> }
- 渲染轮播图:
{/* 轮播图 */}{ houseImg && <div><Swiperloopautoplaystyle={{'--height': '240px',}}>{houseImg.map((item) => (<Swiper.Item key={item}><a href="https://www.baidu.com/"><img src={baseUrl + item} style={{width: '100%'}} alt=''></img></a></Swiper.Item>))}</Swiper></div> }
- 渲染标题、标签:
{/* 标题、标签 */}{ title && <p className={styles.title}>{title}</p>}{ tags && <div className={styles.tagsBox}>{ tags.map((tag, i) => {const tagClass = 'tag' + (1 + i%3)return <span className={styles.tags + ' ' + styles[tagClass]} key={tag}>{tag}</span>}) }</div> }
- 渲染价格、房型、面积等:
{/* 价格、房型、面积 */}<div className={styles.infoPrice}>{ price && <div className={styles.infoPriceItem}><div>{price}<span className={styles.month}>/月</span></div><div className={styles.infoPriceKey}>租金</div></div> }{ roomType && <div className={styles.infoPriceItem}><div>{roomType}</div><div className={styles.infoPriceKey}>房型</div></div> }{ size && <div className={styles.infoPriceItem}><div>{size}平米</div><div className={styles.infoPriceKey}>面积</div></div> }</div>
- 渲染装修、楼层、朝向等:
{/* 染装修、楼层、朝向等 */}<div className={styles.infoBasic}><div className={styles.infoBasicItem}><div className={styles.infoBasicKey}>装修:</div><div className={styles.infoBasicValue}>精装</div></div>{ floor && <div className={styles.infoBasicItem}><div className={styles.infoBasicKey}>楼层:</div><div className={styles.infoBasicValue}>{floor}</div></div> }{ oriented && <div className={styles.infoBasicItem}><div className={styles.infoBasicKey}>朝向:</div><div className={styles.infoBasicValue}>{oriented.join('、')}</div></div> }<div className={styles.infoBasicItem}><div className={styles.infoBasicKey}>类型:</div><div className={styles.infoBasicValue}>普通住宅</div></div></div>
- 渲染地图:
const {latitude, longitude} = coord ? coord : {}useEffect(() => {let ignore = falseif (!ignore && latitude && longitude) {console.log('------------');// 创建地图实例 var map = new BMapGL.Map(styles.mapContainer); //开启鼠标滚轮缩放 map.enableScrollWheelZoom(true); // 设置中心点坐标和地图级别const point = new BMapGL.Point(longitude, latitude)map.centerAndZoom(point, 17);// 创建文本标注var label = new BMapGL.Label('', { position: point, // 设置标注的地理位置offset: new BMapGL.Size(0, -36) // 设置标注的偏移量}) map.addOverlay(label); // 将标注添加到地图中// 设置label的样式label.setStyle({position: 'absolute',zIndex: -7982820,backgroundColor: 'rgb(238, 93, 91)',color: 'rgb(255, 255, 255)',height: 25,padding: '5px 10px',lineHeight: '14px',borderRadius: 3,boxShadow: 'rgb(204, 204, 204) 2px 2px 2px',whiteSpace: 'nowrap',fontSize: 12,userSelect: 'none'})label.setContent(`<span>${community}</span><div class=${styles.mapArrow}></div>`)}return () => ignore = true}, [latitude, longitude])……{/* 地图 */}<div className={styles.map}>{ community && <div className={styles.mapTitle}>小区:<span>{community}</span></div> }<div id={styles.mapContainer}></div></div>
- 渲染房屋配套:
// 所有房屋配置项const HOUSE_PACKAGE = [{id: 1,name: '衣柜',icon: 'icon-wardrobe'},{id: 2,name: '洗衣机',icon: 'icon-wash'},{id: 3,name: '空调',icon: 'icon-air'},{id: 4,name: '天然气',icon: 'icon-gas'},{id: 5,name: '冰箱',icon: 'icon-ref'},{id: 6,name: '暖气',icon: 'icon-Heat'},{id: 7,name: '电视',icon: 'icon-vid'},{id: 8,name: '热水器',icon: 'icon-heater'},{id: 9,name: '宽带',icon: 'icon-broadband'},{id: 10,name: '沙发',icon: 'icon-sofa'}]……const [selectedNames, setSelectedNames] = useState([])……{/* 渲染房屋配套 */}<div className={styles.about}><div>房屋配套</div><div className={styles.aboutList}>{HOUSE_PACKAGE.map((item, i) => {const si = selectedNames.indexOf(item.name)return <div className={styles.aboutItem + (si > -1 ? ' ' + styles.aboutActive : '')} key={item.id} onClick={() => {console.log('si: ', si);const newNames = [...selectedNames]if (si > -1) {newNames.splice(si, 1)} else {newNames.push(item.name)}setSelectedNames(newNames)}}><p className={styles.aboutValue}><i className={`iconfont ${item.icon} ${styles.icon}`} /></p><div>{item.name}</div></div>})}</div></div>
- 渲染房屋概况:
{/* 房源概况 */}<div className={styles.set}><div className={styles.houseTitle}>房源概况</div><div className={styles.user}><div className={styles.avatar}><img src={baseUrl + '/img/avatar.png'} alt="头像"></img></div><div className={styles.userInfo}><div>王女士</div><div className={styles.userAuth}><i className="iconfont icon-auth" />已认证房主</div></div><div className={styles.userMsg}>发消息</div></div><div className={styles.descText}>{description || '暂无房屋描述'}</div></div>
- 渲染推荐,可以复用 HouseItem组件:
// 猜你喜欢const recommendHouses = [{id: 1,houseImg: '/img/message/1.png',desc: '72.32㎡/南 北/低楼层',title: '安贞西里 3室1厅',price: 4500,tags: ['随时看房']},{id: 2,houseImg: '/img/message/2.png',desc: '83㎡/南/高楼层',title: '天居园 2室1厅',price: 7200,tags: ['近地铁']},{id: 3,houseImg: '/img/message/3.png',desc: '52㎡/西南/低楼层',title: '角门甲4号院 1室1厅',price: 4300,tags: ['集中供暖']}]……{/* 推荐 */}<div className={styles.recommend}><div className={styles.houseTitle}>猜你喜欢</div>{recommendHouses.map((item) => {return <HouseItem item={item}></HouseItem>})}</div>
相关文章:

React七案例中
代码下载 地图找房模块 顶部导航栏 封装NavHeader组件实现城市选择,地图找房页面的复用,在 components 目录中创建组件 NavHeader,把之前城市列表写过的样式复制到 NavHeader.scss 下,在该组件中封装 antd-mobile 组件库中的 N…...

消息中间件篇——RabbitMQ,Kafka
RabbitMQ 如何保证消息不丢失? 生产者确认机制 消息持久化 消费者确认机制 RabbitMQ如何保证消息不丢失? RabbitMQ的重复消费问题如何解决? RabbitMQ中死信交换机(RabbitMQ延迟队列有了解过吗?) 延迟队列…...

HOW - 实现 useClickOutside 或者 useClickAway
场景 在开发过程中经常遇到需要点击除某div范围之外的区域触发回调:比如点击 dialog 外部区域关闭。 手动实现 import { useEffect } from "react"/*** A custom hook to detect clicks outside a specified element.* param ref - A React ref object…...

青少年编程考试 CCF GESP Python七级认证真题 2025年3月
Python 七级 2025 年 03 月 题号 1 2 3 4 5 6 7 8 9 10 11 12 13 14 15 答案 B C A B B A A B C A B B A B A 1 单选题(每题 2 分,共 30 分) 第 1 题 下列哪个选项是python中的关键字? A. function B. class C. method D. object…...

兆讯MH2103系列pin to pin替代STM32F103,并且性能超越
MH2103 是一款高性能的 32 位微控制器,由兆讯恒达推出,主要用于替代 STM32F103 系列产品。以下是关于 MH2103 芯片的详细介绍: 技术规格 内核与主频: 采用高性能 32 位 Cortex-M3 内核,最高工作频率可达 216 MHz。支…...

h5使用dsBridge与原生app通信--桥方法
dsBridge是一个轻量级的 JS 和原生 App 的通信桥梁库,使用起来比原生方便不少支持: 1.H5 调用 Native 方法(JS → Native) 2.Native 调用 H5 方法(Native → JS) 3.支持参数传递和异步回调 4.支持 Android、iOS、以…...

package.json配置项积累
peerDependencies 用途:peerDependencies 主要用于声明一个包在其宿主项目中期望安装的依赖版本。它通常用于确保插件或库与特定版本的其他库兼容。 行为: 在 npm v7之前,如果宿主项目未安装 peerDependencies 中列出的依赖,则不…...

Python安装软件包报错 fatal error: Python.h: No such file or directory
Python安装软件包报错 fatal error: Python.h: No such file or directory Failed to import transformers.integrations.integration_utils because of the following error (look up to see its traceback): Failed to import transformers.modeling_utils because of the f…...
)
数据结构与算法-图论-复习1(单源最短路,全源最短路,最小生成树)
1. 单源最短路 单一边权 BFS 原理:由于边权为单一值,可使用广度优先搜索(BFS)来求解最短路。BFS 会逐层扩展节点,由于边权相同,第一次到达某个节点时的路径长度就是最短路径长度。 用法:适用…...

uniapp:微信小程序,一键获取手机号
<button open-type"getPhoneNumber" getphonenumber"getphonenumber">一键获取</button> <script>export default {methods: {getphonenumber(e){uni.login({provider: weixin,success: (res)> {console.log(res);},});},}} </scr…...

协作焊接机器人
一、核心定义与核心特点 1. 定义 协作焊接机器人是基于协作机器人本体(具备力传感、轻量化、安全停机等特性),集成焊接电源、焊枪、视觉 / 电弧传感器等模块,实现人机共融焊接作业的自动化设备。其核心在于: 安全协作:支持与焊工共同工作,无需物理隔离;柔性适配:快速…...

SpringBoot和微服务学习记录Day2
微服务 微服务将单体应用分割成更小的的独立服务,部署在不同的服务器上。服务间的关联通过暴露的api接口来实现 优点:高内聚低耦合,一个模块有问题不影响整个应用,增加可靠性,更新技术方便 缺点:增加运维…...

【CornerTag组件详解:优雅的角标设计与实现】
CornerTag组件详解:优雅的角标设计与实现 组件完整代码 <template><divclass"corner-tag":style"{background: bgColor,padding: ${paddingY}px 0,fontSize: fontSize px,...customStyle}"><slot /></div> </tem…...

Mybatis-缓存详解
什么是缓存? 存在内存中的临时数据 将用户经常查询的数据放在缓存中,用户去查询数据就不用从磁盘上(关系型数据库数据文件)查询,从缓存中查询,从而提高查询效率,解决了高并发系统的性能问题 经…...

WHAT - React useId vs uuid
目录 uuiduseId适用场景语法示例注意事项 复杂示例示例:动态表单列表 useId解读重点 useId vs uuid一句话总结对比表格示例对比useId 用于表单uuid() 用在 UI 会出问题uuid 的适合场景 总结建议 uuid 在 WHAT - Math.random?伪随机? 中我们…...
)
Leetcode 跳跃游戏 II (贪心算法)
给定一个长度为 n 的 0 索引整数数组 nums。初始位置为 nums[0]。 每个元素 nums[i] 表示从索引 i 向后跳转的最大长度。换句话说,如果你在 nums[i] 处,你可以跳转到任意 nums[i j] 处: 0 < j < nums[i] i j < n 返回到达 nums[n - 1] 的最…...

银河麒麟V10 Ollama+ShellGPT打造Shell AI助手——筑梦之路
环境说明 1. 操作系统版本: 银河麒麟V10 2. CPU架构:X86 3. Python版本:3.12.9 4. 大模型:mistral:7b-instruct 准备工作 1. 编译安装python 3.12 # 下载python 源码wget https://www.python.org/ftp/python/3.12.9/Python-3.12.9.tg…...

【物联网】GPT延时
文章目录 前言一、GPT实现延时1. 定时器介绍2. I.MX6ull GPT定时器介绍1)GPT定时器工作原理2)GPT的输入捕获3)GPT的输出比较 3. 高精度延时实现1)实现思路 前言 使用 GPT 实现延时控制以及基于 PWM 实现蜂鸣器发声与频率调节这两…...

【套题】大沥2019年真题——第4题
04.数字圈 题目描述 当我们写数字时会发现有些数字有封闭区域,有的数字没有封闭区域。 数字 0 有一个封闭区域,数字 1、2、 3 都没有封闭区域,数字 4 有一个封闭区域,数字 5 没有封闭区域,数字 6 有一个封闭区域&#…...

idea 安装 proxyai 后的使用方法
1. 可以默认使用ProxyAi 安装后使用如下配置可以进行代码提示 配置 使用示例 2. 这里有必要说一下,这里要选择提供服务的ai 选择后才可以使用ProxyAI或者Custom openAI 3. 可以使用custom openAi, 要自行配置 1)配置 code completions 这是header …...

构建实时、融合的湖仓一体数据分析平台:基于 Delta Lake 与 Apache Iceberg
1. 执行摘要 挑战: 传统数据仓库在处理现代数据需求时面临诸多限制,包括高昂的存储和计算成本、处理海量多样化数据的能力不足、以及数据从产生到可供分析的端到端延迟过高。同时,虽然数据湖提供了低成本、灵活的存储,但往往缺乏…...

数据库的MVCC机制详解
MVCC(Multi-Version Concurrency Control,多版本并发控制)是数据库系统中常用的并发控制机制,它允许数据库在同一时间点保存数据的多个版本,从而实现非阻塞的读操作,提高并发性能。 MVCC的核心思想是&…...

未来与自然的交响:蓉城生态诗篇
故事背景 故事发生在中国四川成都,描绘了未来城市中科技与自然共生的奇迹。通过六个极具创意的生态场景,展现人类如何以诗意的方式重构与自然的连接,在竹海保育、文化传承、能源循环等维度编织出震撼心灵的未来图景。 故事内容 当晨雾在竹纤维…...

【愚公系列】《高效使用DeepSeek》062-图书库存管理
🌟【技术大咖愚公搬代码:全栈专家的成长之路,你关注的宝藏博主在这里!】🌟 📣开发者圈持续输出高质量干货的"愚公精神"践行者——全网百万开发者都在追更的顶级技术博主! 👉 江湖人称"愚公搬代码",用七年如一日的精神深耕技术领域,以"…...

汽车软件开发常用的建模工具汇总
目录 往期推荐 1.Enterprise Architect(EA) 2.MATLAB/Simulink 3.TargetLink 4.Rational Rhapsody 5.AUTOSAR Builder 6.PREEvision 总结 往期推荐 2025汽车行业新宠:欧企都在用的工具软件ETAS工具链自动化实战指南<一&am…...
)
六、继承(二)
1 继承与友元 如果一个基类中存在友元关系,那么这个友元关系能不能继承呢? 例: #include <iostream> using namespace std; class Student; class Person { public:friend void Display(const Person& p, const Student& s)…...
连接达梦数据库并写入读取数据)
flink部署使用(flink-connector-jdbc)连接达梦数据库并写入读取数据
flink介绍 1)Apache Flink 是一个框架和分布式处理引擎,用于对无界和有界数据流进行有状态计算。Flink 被设计在所有常见的集群环境中运行,以内存执行速度和任意规模来执行计算。 2)在实时计算或离线任务中,往往需要…...

【Rust开发】Rust快速入门,开发出Rust的第一个Hello World
✨✨ 欢迎大家来到景天科技苑✨✨ 🎈🎈 养成好习惯,先赞后看哦~🎈🎈 🏆 作者简介:景天科技苑 🏆《头衔》:大厂架构师,华为云开发者社区专家博主,…...

Flink框架:批处理和流式处理与有界数据和无界数据之间的关系
本文重点 从数据集的类型来看,数据集可以分为有界数据和无界数据两种,从处理方式来看,有批处理和流处理两种。一般而言有界数据常常使用批处理方式,无界数据往往使用流处理方式。 有界数据和无界数据 有界数据有一个明确的开始和…...
)
基于 Spring Boot 瑞吉外卖系统开发(四)
基于 Spring Boot 瑞吉外卖系统开发(四) 新增分类 新增分类UI界面,两个按钮分别对应两个UI界面 两个页面所需的接口都一样,请求参数type值不一样,type1为菜品分类,type2为套餐分类。 请求方法都为POST。…...

患者根据医生编号完成绑定和解绑接口
医疗系统接口文档 一、Controller 层 1. InstitutionDoctorController 医疗机构和医生相关的控制器,提供机构查询、医生查询、绑定解绑医生等功能。 RestController RequestMapping("/institution-doctor") public class InstitutionDoctorController…...

Flutter性能优化终极指南:从JIT到AOT的深度调优
一、Impeller渲染引擎调优策略 1.1 JIT预热智能预编译 // 配置Impeller预编译策略 void configureImpeller() {ImpellerEngine.precacheShaders(shaders: [lib/shaders/skinned_mesh.vert,lib/shaders/particle_system.frag],warmupFrames: 30, // 首屏渲染前预编译帧数cach…...
英特尔 RealSense T265(三))
(1)英特尔 RealSense T265(三)
文章目录 前言 4.4 地面测试 4.5 飞行测试 4.6 室内外实验 4.7 数据闪存记录 4.8 启动时自动运行 4.9 使用 OpticalFlow 进行 EKF3 光源转换 前言 Realsense T265 通过 librealsense 支持 Windows 和 Linux 系统。不同系统的安装过程差异很大,因此请参阅 gi…...
(列表初始化、右值引用和移动语义、类的新默认成员函数、lambda表达式))
【c++11】c++11新特性(上)(列表初始化、右值引用和移动语义、类的新默认成员函数、lambda表达式)
🌟🌟作者主页:ephemerals__ 🌟🌟所属专栏:C 目录 前言 一、列表初始化 1. 大括号初始化 2. initializer_list 二、右值引用和移动语义 1. 左值和右值 2. 左值引用和右值引用 引用延长生命周期 左…...

ArcGIS 给大面内小面字段赋值
文章目录 引言:地理数据处理中的自动化赋值为何重要?实现思路模型实现关键点效果实现步骤1、准备数据2、执行3、完成4、效果引言:地理数据处理中的自动化赋值为何重要? 在地理信息系统(GIS)的日常工作中,空间数据的属性字段赋值是高频且关键的操作,例如在土地利用规划…...
)
计算机网络——传输层(Udp)
udp UDP(User Datagram Protocol,用户数据报协议 )是一种无连接的传输层协议,它在IP协议(互联网协议)之上工作,为应用程序提供了一种发送和接收数据报的基本方式。以下是UDP原理的详细解释&…...
】——生产者消费者同步互斥模型)
【操作系统(Linux)】——生产者消费者同步互斥模型
✅ 一、程序功能概述 我们将做的:实现一个经典的「生产者-消费者问题」多线程同步模型的案例,主要用到 循环缓冲区 POSIX 信号量 sem_t pthread 多线程库,非常适合理解并发控制、线程通信和缓冲区管理。 案例目标:通过多个生产…...

从数据到洞察:探索数据分析与可视化的高级方法
从数据到洞察:探索数据分析与可视化的高级方法 引言 在今天这个数据驱动的时代,海量的数据只有通过科学分析和清晰可视化,才能转化为商业价值和决策依据。然而,数据分析与可视化远不只是制作几个图表,它需要高级技术、深度洞察力以及良好的工具支持。随着大数据领域的快…...

计算机视觉中的数学:几何变换与矩阵运算详解
计算机视觉中的数学:几何变换与矩阵运算详解 一、前言二、基础数学概念回顾2.1 向量与向量运算2.1.1 向量的定义2.1.2 向量运算 2.2 矩阵基础2.2.1 矩阵的定义与表示2.2.2 矩阵运算 三、几何变换基础3.1 平移变换3.1.1 原理3.1.2 代码示例&…...

华为数字芯片机考2025合集3已校正
1. 题目内容 下列说法正确的是()。 1. 解题步骤 1.1 选项分析 选项描述正误依据A异步 FIFO 采用格雷码是为了省功耗✗格雷码用于消除多比特信号跨时钟域的位跳变风险,与功耗无关B单比特信号打两拍可以完全避免亚稳态✗双触发器同步仅降低…...

启山智软的营销方法有哪些优势?
启山智软作为一家科技或软件企业,其营销方法的优势可能体现在以下几个方面,这些优势结合了行业特点与创新策略,帮助其在竞争激烈的市场中占据有利位置: 1. 技术驱动的精准营销 数据挖掘与AI应用: 通…...

openpyxl合并连续相同元素的单元格
文章目录 前言一、openpyxl是什么?二、基础用法1.读取和写入文件2.合并单元格 三、合并单元格实战1.连续相同元素的索引范围2.转换3.获取列合并索引4.整体 总结 前言 python可以很方便的操作各种文档,比如docx,xlsx等。本文主要介绍在xlsx文…...
)
从零开始学java--泛型(二)
泛型 目录 泛型 泛型与多态 泛型方法 泛型的界限 泛型与多态 不只是类,包括接口、抽象类都可以支持泛型: public static void main(String[] args) {Score<String> scorenew Score<>("数学","aa","优秀"…...
)
设计模式 Day 6:深入讲透观察者模式(真实场景 + 回调机制 + 高级理解)
观察者模式(Observer Pattern)是一种设计结构中最实用、最常见的行为模式之一。它的魅力不仅在于简洁的“一对多”事件推送能力,更在于它的解耦能力、模块协作设计、实时响应能力。 本篇作为 Day 6,将带你从理论、底层机制到真实…...

深入理解 Shell:从原理到实战的全方位解析
1. 引言:什么是 Shell? Shell 是操作系统中最基础却最强大的工具之一。它是用户与操作系统之间的接口,一个命令行解释器,它接收用户输入的命令并调用操作系统内核完成相应的操作。 Shell 的含义包括两层: 交互式命令…...

图灵逆向——题六-倚天剑
从第六题开始就要有个先看看请求头的习惯了[doge]。 别问博主为什么要你养成这个习惯,问就是博主被坑过。。。 headers里面有一个加密参数S,然后你就去逆向这个S对吧。 然后一看响应: 好家伙返回的还是个密文,所以要两次逆向咯。…...
)
【WRF理论第十七期】单向/双向嵌套机制(含namelist.input详细介绍)
WRF运行的单向/双向嵌套机制 准备工作:WRF运行的基本流程namelist.input的详细设置&time_control 设置&domain 嵌套结构&bdy_control 配置部分 namelist 其他注意事项 嵌套说明双向嵌套(two-way nesting)单向嵌套(one…...

【Springboot知识】Springboot进阶-Micrometer指标监控深入解析
文章目录 Micrometer 核心概念与标准指标详解**Micrometer 核心概念与标准指标详解****一、Micrometer 核心概念****二、Micrometer 标准指标****1. JVM 监控指标****2. 系统资源监控****3. HTTP 请求监控****4. 数据库监控****5. 缓存监控** **三、配置与自定义指标****1.…...

Linux 的准备工作
1.root用户登录 首先讲一下root账户怎么登陆 直接 ssh root 公ip地址就可以了 比如我的是腾讯云的 这个就是公ip 下面所有普通用户的操作都是在root账户下进行的 2.普通用户创建 创建用户指令 adduser 用户名 比如说这个指令 我创建了一个ly_centos的普通用户 3.普通用…...
LLM实现模型并行训练:deepspeed 是什么; transformers` 怎么实现模型并行训练吗?
LLM实现模型并行训练:deepspeed 是什么 DeepSpeed是一个由微软开发的深度学习优化库,旨在帮助研究人员和工程师更高效地训练大规模神经网络。它提供了一系列的优化技术,包括混合精度训练、模型并行、数据并行、ZeRO优化等,以提高训练速度、减少内存占用,并支持在多个GPU或…...