Model 速通系列(一)nanoGPT
这个是新开的一个系列用来手把手复现一些模型工程,之所以开这个系列是因为有人留言说看到一个工程不知道从哪里读起,出于对自身能力的提升与兴趣,故新开了这个系列。由于主要动机是顺一遍代码并提供注释。
该系列第一篇博客是 nanoGPT ,这个仓库是前OpenAI大佬 karpathy Andrej 的工程,基本是GPT的mini版,虽然最近一次更新是在2年前,部分组件和理念已经有些过时了,但作为入门工程而言是再适合不过的。
- 项目链接:https://github.com/karpathy/nanoGPT
- 代码分支:master
- commit:93a43d9a5c22450bbf06e78da2cb6eeef084b717
- 代码仓库:https://github.com/GaohaoZhou-ops/Model-Reproduction/tree/main/nanoGPT
写在最前面
- 在没有特殊说明的情况下不会对训练和微调进行实际操作,但会包含相关代码;
- 项目中的文件实现顺序以大标题的1,2,3 … 为依据,按照该顺序即可构建出完成工程;
- 文章会尽可能保留原始工程的目录结构,但对于一些git、assets等文件夹就不进行赘述;
- 文章的主要目的是过一遍代码,特别是模型工程的构建流程,如果你想直接使用工程建议还是去拉取原始仓库;
- 每篇文章都会在我的github仓库中对应一个文件夹,建议在阅读时配合代码仓库一起看;
- 期间中会根据情况删除、添加、翻译一些注释;
Github 仓库:https://github.com/GaohaoZhou-ops/Model-Reproduction
1. 模型构建 model.py
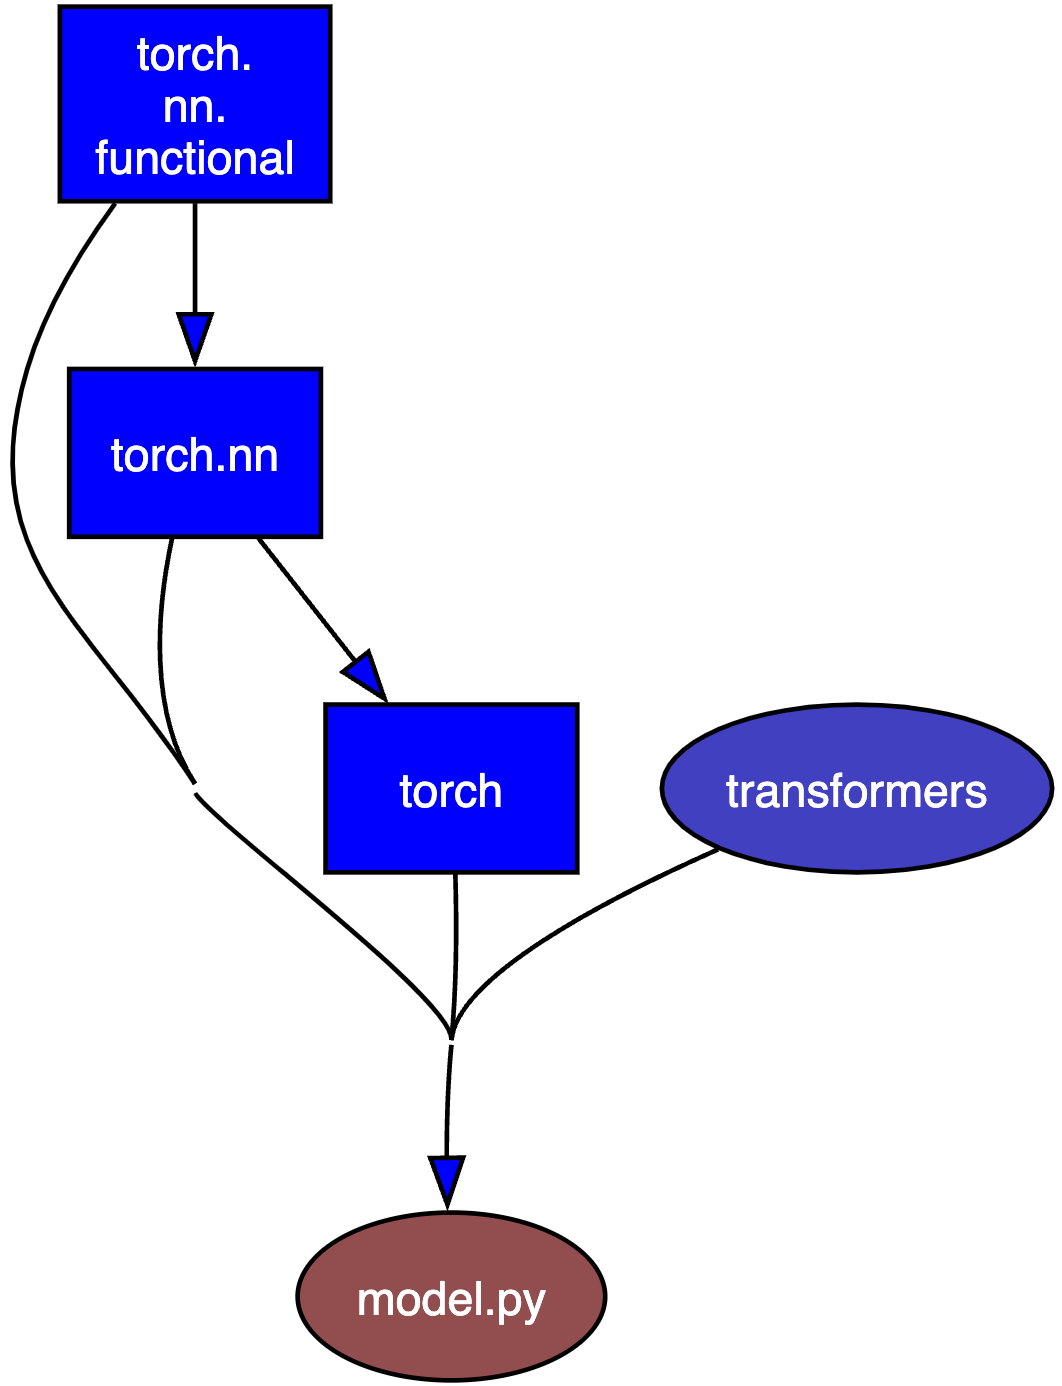
这个工程相对比较简单,在模型构建方面只用到了pytorch的一些基本组件,通过以下命令可以查看原始工程中 model.py 文件的库依赖关系:
【Note】:这一步需要在原始工程文件夹中执行,你也可以不执行只看我的推演过程。
(model) $ pydeps model.py --max-bacon=1
导入必要的包:
import math
import inspect
from dataclasses import dataclassimport torch
import torch.nn as nn
from torch.nn import functional as F
定义归一化层类:
因为torch自带的 layer_norm 对象没有设置 bias 为None 的选项,所以这里需要覆写一下类:
class LayerNorm(nn.Module):def __init__(self, ndim, bias):super().__init__()self.weight = nn.Parameter(torch.ones(ndim))self.bias = nn.Parameter(torch.zeros(ndim)) if bias else Nonedef forward(self, input):return F.layer_norm(input, self.weight.shape, self.weight, self.bias, 1e-5)
定义CausalSelfAttention类:
- 参考文章:https://zhuanlan.zhihu.com/p/663840848
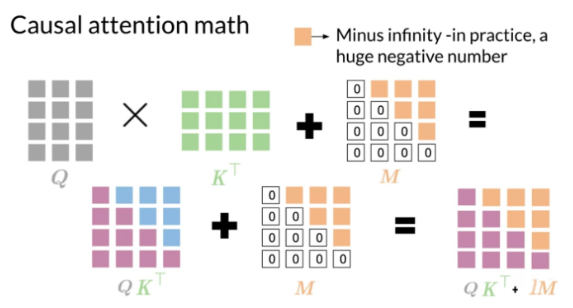
CausalSelfAttention 是一种自注意力机制,主要用于序列到序列的任务中,例如机器翻译、文本摘要等。主要特点如下:
- 仅允许注意力模型 访问当前和之前的输入,不能访问之后的输入,例如在机器翻译任务中,翻译某个词时不能访问该词之后的内容;
- 通过掩盖(masking)未来的输入来实现因果性。具体方法是在计算注意力权重时,对角线以上的权重置零,从而避免模型看到未来的信息;
- 可用于 Transformer 和其变种模型中捕捉序列的时间依赖关系。Transformer 原本是并行计算的,使用
CausalSelfAttention赋予其顺序处理能力; CausalSelfAttention学习到的表示更符合时间顺序,更有利于序列生成任务;- 一般用于编码器端,而解码器端则使用 MaskedSelfAttention,它允许解码器访问编码器输出的所有时刻,以使用整个输入序列的上下文信息;
class CausalSelfAttention(nn.Module):def __init__(self, config) -> None:super().__init__()assert config.n_embd % config.n_head == 0 # 确保嵌入维度(n_embd)能被注意力头数(n_head)整除,每个头将分配到相同大小的子空间self.c_attn = nn.Linear(config.n_embd, 3*config.n_head, bias=config.bias) # 线性变换层,用于生成查询(Q)、键(K)和值(V),将嵌入维度扩展为三倍,以便后续拆分为 Q、K、V。self.c_proj = nn.Linear(config.n_embd, config.n_embd, bias=config.bias) # 将注意力输出重新投影回原始维度self.attn_dropout = nn.Dropout(config.dropout) # 用于注意力矩阵(防止过拟合)self.resid_dropout = nn.Dropout(config.dropout) # 用于残差连接的输出self.n_head = config.n_headself.n_embd = config.n_embdself.dropout = config.dropputself.flash = hasattr(torch.nn.functional, 'scaled_dot_product_attention')if not self.flash: # 判断是否支持GPU 加速的Flash Attentionprint("WARNING: using slow attention. Flash Attention requires PyTorch >= 2.0")# 使用下三角矩阵构建因果掩码,确保只关注左侧信息(即历史信息)self.register_buffer("bias", torch.tril(torch.ones(config.block_size, config.block_size)).view(1,1, config.block_size, config.block_size))def forward(self, x):B,T,C = x.size() # batch_size, token_length, embedding_dimq,k,v = self.c_attn(x).split(self.n_embd, dim=2) # 计算 Q、K、Vk = k.view(B, T, self.n_head, C // self.n_head).transpose(1,2) # shape=(B,nh,T,hs)q = q.view(B, T, self.n_head, C // self.n_head).transpose(1,2) # shape=(B,nh,T,hs)v = v.view(B, T, self.n_head, C // self.n_head).transpose(1,2) # shape=(B,nh,T,hs)if self.flash: # 如果支持GPU加速,则使用flash attentiony = torch.nn.functional.scaled_dot_product_attention(q,k,v, attn_mask=None, dropout_p=self.dropout if self.training else 0, is_causal=True)else: # 否则手动计算att = (q @ k.transpose(-2,-1)) * (1.0 / math.sqrt(k.size(-1)))att = att.masked_fill(self.bias[:,:,:T,:T] == 0, float('-inf')) att = F.softmax(att, dim=-1)att = self.attn_dropout(att)y = att @ v # (B, nh, T, T) x (B, nh, T, hs) -> (B, nh, T, hs)y = y.transpose(1,2).contiguous().view(B,T,C) # 还原为原始形状,便于后续处理y = self.resid_dropout(self.c_proj(y))return y
定义 MLP 类
该类用于线性映射,总体结构非常简单
class MLP(nn.Module):def __init__(self, config) -> None:super().__init__()self.c_fc = nn.Linear(config.n_embd, 4*config.n_embd, bias=config.bias)self.gelu = nn.GELU()self.c_proj = nn.Linear(4*config.n_embd, config.n_embd, bias=config.bias)self.dropout = nn.Dropout(config.dropout)def forward(self, x):x = self.c_fc(x)x = self.gelu(x)x = self.c_proj(x)x = self.dropout(x)return x
定义单个计算单元 Block
class Block(nn.Module):def __init__(self, config) -> None:super().__init__()self.ln_1 = LayerNorm(config.n_embd, bias=config.bias)self.attn = CausalSelfAttention(config)self.ln_2 = LayerNorm(config.n_embd, bias=config.bias)self.mlp = MLP(config)def forward(self, x):x = x + self.attn(self.ln_1(x))x = x + self.mlp(self.ln_2(x))return x
定义GPT类需要的配置对象
@dataclass
class GPTConfig:block_size: int=1024vocab_size: int=50304n_layer: int=12n_head: int=12n_embd: int=768dropout: float=0.0bias: bool=True
定义完整GPT模型
在模型中使用了 AdamW 优化器,相对与Adam的改动其实十分简单,其将权重衰减项从梯度的计算中拿出来直接加在了最后的权重更新步骤上。其提出的动机在于:原先Adam的实现中如果采用了L2权重衰减,则相应的权重衰减项会被直接加在loss里,从而导致动量的一阶与二阶滑动平均均考虑了该权重衰减项,而这影响了Adam的优化效果,而将权重衰减与梯度的计算进行解耦能够显著提升Adam的效果。
目前,AdamW现在已经成为transformer训练中的默认优化器。
- 参考链接:https://www.zhihu.com/question/536185388/answer/83259341287
class GPT(nn.Module):def __init__(self, config:GPTConfig) -> None:super().__init__()assert config.vocab_size is not None # 检查配置中 词汇表大小(vocab_size)和块大小(block_size)是否有效。assert config.block_size is not Noneself.config = configself.transformer = nn.ModuleDict(dict( # Transformer结构wte=nn.Embedding(config.vocab_size, config.n_embd), # 词嵌入(wte):将词索引映射为向量表示,shape=(vocab_size, n_embd)wpe=nn.Embedding(config.block_size, config.n_embd), # 位置嵌入(wpe):将位置索引映射为向量,shape=(block_size, n_embd)drop=nn.Dropout(config.dropout),h=nn.ModuleList([Block(config) for _ in range(config.n_layer)]), # 多个并列的注意力块,每个块由自定义 Block(config) 生成ln_f = LayerNorm(config.n_embd, bias=config.bias), # 最终输出的层归一化))self.lm_head = nn.Linear(config.n_embd, config.vocab_size, bias=False) # 语言模型头:将最后的特征映射回词汇表空间,用于词预测self.transformer.wte.weight = self.lm_head.weight # 权重绑定:词嵌入层和输出投影层共享权重,减少参数量,提高性能self.apply(self._init_weights) # 权重初始化for pn, p in self.named_parameters(): # 对残差连接权重(c_proj)进行特殊初始化,符合 GPT-2 论文规范if pn.endswith('c_proj.weight'):torch.nn.init.normal_(p, mean=0.0, std=0.02/math.sqrt(2*config.n_layer))print("number of parameters: %.2fM" % (self.get_num_params()/1e6,))# 获得参数总量def get_num_params(self, non_embedding=True):n_params = sum(p.numel() for p in self.parameters())if non_embedding:n_params -= self.transformer.wpe.weight.numel()return n_params# 初始化整体权重def _init_weights(self, module):if isinstance(module, nn.Linear):torch.nn.init.normal_(module.weight, mean=0.0, std=0.02)if module.bias is not None:torch.nn.init.zeros_(module.bias)elif isinstance(module, nn.Embedding):torch.nn.init.normal_(module.weight, mean=0.0, std=0.02)def forward(self, idx, targets=None):device = idx.deviceb,t = idx.size()assert t <= self.config.block_size, f"Cannot forward sequence of length {t}, block size is only {self.config.block_size}" # 确保输入序列长度不超过配置的块大小pos = torch.arange(0, t, dtype=torch.long, device=device) # 位置编码,shape=(t)# 嵌入层前向计算:词嵌入 & 位置嵌入tok_emb = self.transformer.wte(idx) # shape=(b, t, n_embd)pos_emb = self.transformer.wpe(pos) # shape=(t, n_embd)x = self.transformer.drop(tok_emb+pos_emb)# 逐层通过多层注意力块(Block),最后进行层归一化for block in self.transformer.h:x = block(x)x = self.transformer.ln_f(x)if targets is not None: # 训练阶段logits = self.lm_head(x) # 计算预测分布(logits):使用语言模型头得到词概率分布loss = F.cross_entropy(logits.view(-1, logits.size(-1)), targets.view(-1), ignore_index=-1) # 交叉熵损失:比较预测值和目标值,忽略填充索引 -1else: # 推理阶段logits = self.lm_head(x[:, [-1], :]) # 仅计算最后一个时间步的预测,减少推理时的计算量loss = Nonereturn logits, lossdef crop_block_size(self, block_size):assert block_size <= self.config.block_sizeself.config.block_size = block_sizeself.transformer.wpe.weight = nn.Parameter(self.transformer.wpe.weight[:block_size])for block in self.transformer.h:if hasattr(block.attn, 'bias'):block.attn.bias = block.attn.bias[:, :, :block_size, :block_size]@classmethoddef from_pretrained(cls, model_type, override_args=None):assert model_type in {'gpt2', 'gpt2-medium', 'gpt2-large', 'gpt2-xl'}override_args = override_args or {}assert all(k=='dropout' for k in override_args)from transformers import GPT2LMHeadModelprint("loading weights from pretrained gpt: %s" % model_type)# 模型配置参数config_args = {'gpt2': dict(n_layer=12, n_head=12, n_embd=768), # 124M params'gpt2-medium': dict(n_layer=24, n_head=16, n_embd=1024), # 350M params'gpt2-large': dict(n_layer=36, n_head=20, n_embd=1280), # 774M params'gpt2-xl': dict(n_layer=48, n_head=25, n_embd=1600), # 1558M params}[model_type]print("forcing vocab_size=50257, block_size=1024, bias=True")config_args['vocab_size'] = 50257config_args['block_size'] = 1024config_args['bias'] = True# 如果 dropout 在参数列表中则对齐进行覆写if 'dropout' in override_args: print(f"overriding dropout rate to {override_args['dropout']}")config_args['dropout'] = override_args['dropout']config = GPTConfig(**config_args)model = GPT(config)sd = model.state_dict()sd_keys = sd.keys()sd_keys = [k for k in sd_keys if not k.endswith('.attn.bias')]# 加载预训练权重model_hf = GPT2LMHeadModel.from_pretrained(model_type)sd_hf = model_hf.state_dict()# 因为这里是nanoGPT,所以只需要从完整GPT模型中拷贝一部分权重即可sd_keys_hf = sd_hf.keys()sd_keys_hf = [k for k in sd_keys_hf if not k.endswith('.attn.masked_bias')]sd_keys_hf = [k for k in sd_keys_hf if not k.endswith('.attn.bias')]transposed = ['attn.c_attn.weight', 'attn.c_proj.weight', 'mlp.c_fc.weight', 'mlp.c_proj.weight']assert len(sd_keys_hf) == len(sd_keys), f"mismatched keys: {len(sd_keys_hf)} != {len(sd_keys)}"for k in sd_keys_hf:if any(k.endswith(w) for w in transposed):assert sd_hf[k].shape[::-1] == sd[k].shapewith torch.no_grad():sd[k].copy_(sd_hf[k].t())else:assert sd_hf[k].shape == sd[k].shapewith torch.no_grad():sd[k].copy_(sd_hf[k])return model # 配置 AdamW 优化器def configure_optimizers(self, weight_decay, learning_rate, betas, device_type):param_dict = {pn: p for pn,p in self.named_parameters()}param_dict = {pn: p for pn,p in param_dict.items() if p.requires_grad}decay_params = [p for n,p in param_dict.items() if p.dim() >= 2]nodecay_params = [p for n,p in param_dict.items() if p.dim() < 2]optim_groups = [{'params': decay_params, 'weight_decay': weight_decay},{'params': nodecay_params, 'weight_decay': 0.0}]num_decay_params = sum(p.numel() for p in decay_params)num_nodecay_params = sum(p.numel() for p in nodecay_params)print(f"num decayed parameter tensors: {len(decay_params)}, with {num_decay_params:,} parameters")print(f"num non-decayed parameter tensors: {len(nodecay_params)}, with {num_nodecay_params:,} parameters")fused_available = 'fused' in inspect.signature(torch.optim.AdamW).parametersuse_fused = fused_available and device_type == 'cuda'extra_args = dict(fused=True) if use_fused else dict()optimizer = torch.optim.AdamW(optim_groups, lr=learning_rate, betas=betas, **extra_args)print(f"using fused AdamW: {use_fused}")return optimizer# 估算模型的GPU利用率def estimate_mfu(self, fwdbwd_per_iter, dt):N = self.get_num_params()cfg = self.configL,H,Q,T = cfg.n_layer, cfg.n_head, cfg.n_embd//cfg.n_head, cfg.block_sizeflops_per_token = 6*N + 12*L*H*Q*Tflops_per_fwdbwd = flops_per_token * Tflops_per_iter = flops_per_fwdbwd * fwdbwd_per_iterflops_achieved = flops_per_iter * (1.0/dt)flops_promised = 312e12mfu = flops_achieved / flops_promisedreturn mfu@torch.no_grad()def generate(self, idx, max_new_tokens, temperature=0.1, top_k=None):for _ in range(max_new_tokens):idx_cond = idx if idx.size(1) <= self.config.block_size else idx [:, -self.config.block_size:]logits, _ = self(idx_cond)logits = logits[:, -1, :] / temperatureif top_k is not None:v, _ = torch.topk(logits, min(top_k, logits.size(-1)))logits[logits < v[:, [-1]]] = -float('Inf')probs = F.softmax(logits, dim=-1)idx_next = torch.multinomial(probs, num_samples=1)idx = torch.cat((idx, idx_next), dim=1)return idx
2. 训练用的快捷配置导入 configuration.py
因为在模型训练时需要导入很多公共配置信息,这里额外给了一个文件用来从 config 文件夹中加载模型配置,这部分就是python简单的文件与sys读取。
具体用法如下:
(model) $ python train.py config/override_file.py --batch_size=32
config 文件夹结构如下:
(model) $ tree -L 2
├── config
│   ├── eval_gpt2.py
│   ├── eval_gpt2_large.py
│   ├── eval_gpt2_medium.py
│   ├── eval_gpt2_xl.py
│   ├── finetune_shakespeare.py
│   ├── train_gpt2.py
│   └── train_shakespeare_char.py
代码如下:
import sys
from ast import literal_evalfor arg in sys.argv[1:]:if '=' not in arg:assert not arg.startswith('--')config_file = argprint(f"Overriding config with {config_file}:")with open(config_file) as f:print(f.read())exec(open(config_file).read())else:assert arg.startswith('--')key, val = arg.split('=')key = key[2:]if key in globals():try:attempt = literal_eval(val)except (SyntaxError, ValueError):attempt = valassert type(attempt) == type(globals()[key])print(f"Overriding: {key} = {attempt}")globals()[key] = attemptelse:raise ValueError(f"Unknown config key: {key}")
3. 训练模型 train.py
定义好模型后通常是进行训练,这里的训练是基于huggingface上的预训练权重进行的。
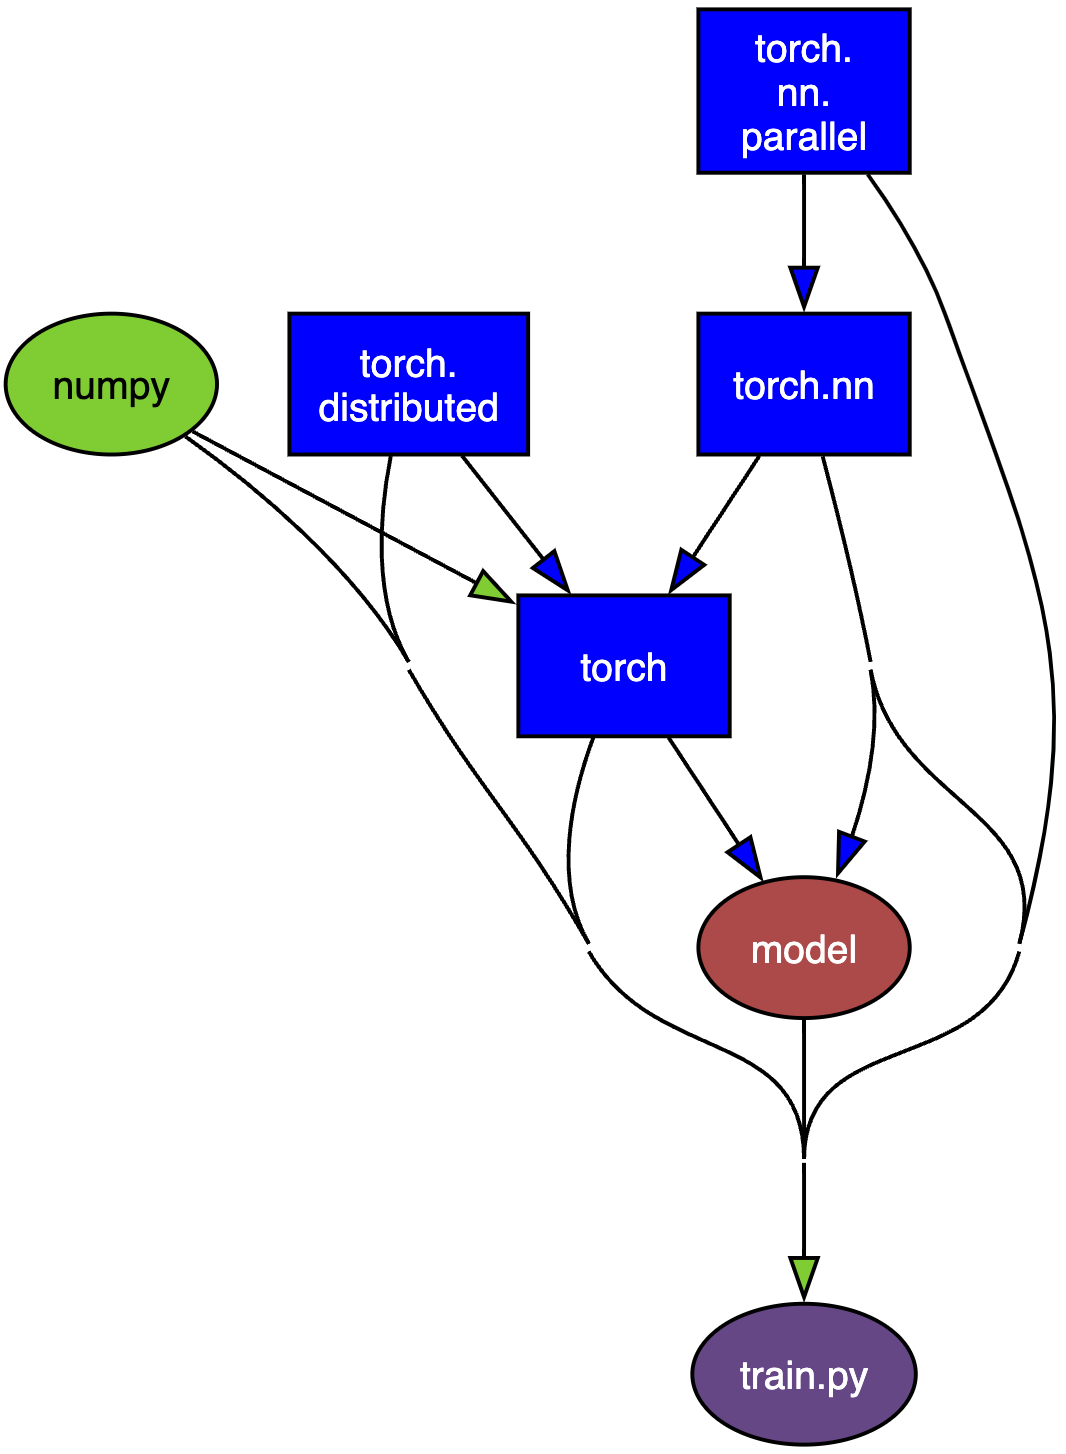
导入必要的包
import os, time, math, pickle
from contextlib import nullcontextimport numpy as np
import torch
from torch.nn.parallel import DistributedDataParallel as DDP
from torch.distributed import init_process_group, destroy_process_groupfrom model import GPTConfig, GPT
配置模型超参数
# I/O 相关
out_dir = 'out'
eval_interval = 2000
log_interval = 1
eval_iters = 200
eval_only = False
always_save_checkpoint = True
init_from = 'scratch' # 'scratch' or 'resume' or 'gpt2*'# wandb logging 日志
wandb_log = False
wandb_project = 'owt'
wandb_run_name = 'gpt2'# data
dataset = 'openwebtext'
gradient_accumulation_steps = 5 * 8
batch_size = 12
block_size = 1024# model
n_layer = 12
n_head = 12
n_embd = 768
dropout = 0.0
bias = False# adamw optimizer
learning_rate = 6e-4
max_iters = 600000
weight_decay = 1e-1
beta1 = 0.9
beta2 = 0.95
grad_clip = 1.0# learning rate 衰减
decay_lr = True
warmup_iters = 2000
lr_decay_iters = 600000
min_lr = 6e-5# DDP settings
backend = 'nccl' # 'nccl', 'gloo', etc.# system
device = 'cuda' # 'cpu', 'cuda', 'cuda:0', 'cuda:1', 'mps'
dtype = 'bfloat16' if torch.cuda.is_available() and torch.cuda.is_bf16_supported() else 'float16' # 'float32', 'bfloat16', 'float16'
compile = True # 使用 PyTorch 2.0 编译得到更快的模型config_keys = [k for k,v in globals().items() if not k.startswith('_') and isinstance(v, (int, float, bool, str))]
exec(open('configurator.py').read())
config = {k: globals()[k] for k in config_keys}
配置多GPU并行计算
ddp = int(os.environ.get('RANK', -1)) != -1
if ddp:init_process_group(backend=backend)ddp_rank = int(os.environ['RANK'])ddp_local_rank = int(os.environ['LOCAL_RANK'])ddp_world_size = int(os.environ['WORLD_SIZE'])device = f'cuda:{ddp_local_rank}'torch.cuda.set_device(device)master_process = ddp_rank == 0seed_offset = ddp_rankassert gradient_accumulation_steps % ddp_world_size == 0gradient_accumulation_steps //= ddp_world_size
else:master_process = Trueseed_offset = 0ddp_world_size = 1
tokens_per_iter = gradient_accumulation_steps * ddp_world_size * batch_size * block_size
print(f"tokens per iteration will be: {tokens_per_iter:,}")
初始化torch的一些训练用配置
if master_process:os.makedirs(out_dir, exist_ok=True)
torch.manual_seed(1337 + seed_offset)
torch.backends.cuda.matmul.allow_tf32 = True
torch.backends.cudnn.allow_tf32 = True
device_type = 'cuda' if 'cuda' in device else 'cpu'
ptdtype = {'float32': torch.float32, 'bfloat16': torch.bfloat16, 'float16': torch.float16}[dtype]
ctx = nullcontext() if device_type == 'cpu' else torch.amp.autocast(device_type=device_type, dtype=ptdtype)data_dir = os.path.join('data', dataset)
def get_batch(split):if split == 'train':data = np.memmap(os.path.join(data_dir, 'train.bin'), dtype=np.uint16, mode='r')else:data = np.memmap(os.path.join(data_dir, 'val.bin'), dtype=np.uint16, mode='r')ix = torch.randint(len(data) - block_size, (batch_size,))x = torch.stack([torch.from_numpy((data[i:i+block_size]).astype(np.int64)) for i in ix])y = torch.stack([torch.from_numpy((data[i+1:i+1+block_size]).astype(np.int64)) for i in ix])if device_type == 'cuda':x, y = x.pin_memory().to(device, non_blocking=True), y.pin_memory().to(device, non_blocking=True)else:x, y = x.to(device), y.to(device)return x, yiter_num = 0
best_val_loss = 1e9meta_path = os.path.join(data_dir, 'meta.pkl')
meta_vocab_size = None
if os.path.exists(meta_path):with open(meta_path, 'rb') as f:meta = pickle.load(f)meta_vocab_size = meta['vocab_size']print(f"found vocab_size = {meta_vocab_size} (inside {meta_path})")
初始化模型
model_args = dict(n_layer=n_layer, n_head=n_head, n_embd=n_embd, block_size=block_size,bias=bias, vocab_size=None, dropout=dropout)# 根据配置信息初始化模型
if init_from == 'scratch':print("Initializing a new model from scratch")if meta_vocab_size is None:print("defaulting to vocab_size of GPT-2 to 50304 (50257 rounded up for efficiency)")model_args['vocab_size'] = meta_vocab_size if meta_vocab_size is not None else 50304gptconf = GPTConfig(**model_args)model = GPT(gptconf)
elif init_from == 'resume':print(f"Resuming training from {out_dir}")ckpt_path = os.path.join(out_dir, 'ckpt.pt')checkpoint = torch.load(ckpt_path, map_location=device)checkpoint_model_args = checkpoint['model_args']for k in ['n_layer', 'n_head', 'n_embd', 'block_size', 'bias', 'vocab_size']:model_args[k] = checkpoint_model_args[k]gptconf = GPTConfig(**model_args)model = GPT(gptconf)state_dict = checkpoint['model']unwanted_prefix = '_orig_mod.'for k,v in list(state_dict.items()):if k.startswith(unwanted_prefix):state_dict[k[len(unwanted_prefix):]] = state_dict.pop(k)model.load_state_dict(state_dict)iter_num = checkpoint['iter_num']best_val_loss = checkpoint['best_val_loss']
elif init_from.startswith('gpt2'):print(f"Initializing from OpenAI GPT-2 weights: {init_from}")override_args = dict(dropout=dropout)model = GPT.from_pretrained(init_from, override_args)for k in ['n_layer', 'n_head', 'n_embd', 'block_size', 'bias', 'vocab_size']:model_args[k] = getattr(model.config, k)if block_size < model.config.block_size:model.crop_block_size(block_size)model_args['block_size'] = block_size
model.to(device)# 初始化 GradScaler
scaler = torch.cuda.amp.GradScaler(enabled=(dtype == 'float16'))
配置优化器
optimizer = model.configure_optimizers(weight_decay, learning_rate, (beta1, beta2), device_type)
if init_from == 'resume':optimizer.load_state_dict(checkpoint['optimizer'])
checkpoint = None
Pytorch 2.0 编译模型(可选)
if compile:print("compiling the model... (takes a ~minute)")unoptimized_model = modelmodel = torch.compile(model)# 配置分布式训练
if ddp:model = DDP(model, device_ids=[ddp_local_rank])
定义评估损失函数
@torch.no_grad()
def estimate_loss():out = {}model.eval()for split in ['train', 'val']:losses = torch.zeros(eval_iters)for k in range(eval_iters):X,Y = get_batch(split)with ctx:logits, loss = model(X,Y)losses[k] = loss.item()out[split] = losses.mean()model.train()return out
定义学习率衰减计划
def get_lr(it):if it < warmup_iters:return learning_rate * (it + 1) / (warmup_iters + 1)if it > warmup_iters:return min_lrdecay_ratio = (it - warmup_iters) / (lr_decay_iters - warmup_iters)assert 0 <= decay_ratio <= 1coeff = 0.5 * (1.0 + math.cos(math.pi * decay_ratio))return min_lr + coeff * (learning_rate - min_lr)
初始化日志
if wandb_log and master_process:import wandbwandb.init(project=wandb_project, name=wandb_run_name, config=config)
启动训练
X, Y = get_batch('train')
t0 = time.time()
local_iter_num = 0
raw_model = model.module if ddp else model
running_mfu = -1.0while True:lr = get_lr(iter_num) if decay_lr else learning_ratefor param_group in optimizer.param_groups:param_group['lr'] = lr# 根据当前迭代的次数进行日志与evalif iter_num % eval_interval == 0 and master_process:losses = estimate_loss()print(f"step {iter_num}: train loss {losses['train']:.4f}, val loss {losses['val']:.4f}")if wandb_log:wandb.log({"iter": iter_num,"train/loss": losses['train'],"val/loss": losses['val'],"lr": lr,"mfu": running_mfu*100, # convert to percentage})if losses['val'] < best_val_loss or always_save_checkpoint:best_val_loss = losses['val']if iter_num > 0:checkpoint = {'model': raw_model.state_dict(),'optimizer': optimizer.state_dict(),'model_args': model_args,'iter_num': iter_num,'best_val_loss': best_val_loss,'config': config,}print(f"saving checkpoint to {out_dir}")torch.save(checkpoint, os.path.join(out_dir, 'ckpt.pt'))if iter_num == 0 and eval_only:break# 前向传播与训练for micro_step in range(gradient_accumulation_steps):if ddp:model.require_backward_grad_sync = (micro_step == gradient_accumulation_steps - 1)with ctx:logits, loss = model(X, Y)loss = loss / gradient_accumulation_stepsX, Y = get_batch('train')# 反向传播更新梯度scaler.scale(loss).backward()# 优化器根据梯度对参数进行更新if grad_clip != 0.0:scaler.unscale_(optimizer)torch.nn.utils.clip_grad_norm_(model.parameters(), grad_clip)scaler.step(optimizer)scaler.update()optimizer.zero_grad(set_to_none=True)# 训练期间的日志与计时t1 = time.time()dt = t1 - t0t0 = t1if iter_num % log_interval == 0 and master_process:lossf = loss.item() * gradient_accumulation_stepsif local_iter_num >= 5: mfu = raw_model.estimate_mfu(batch_size * gradient_accumulation_steps, dt)running_mfu = mfu if running_mfu == -1.0 else 0.9*running_mfu + 0.1*mfuprint(f"iter {iter_num}: loss {lossf:.4f}, time {dt*1000:.2f}ms, mfu {running_mfu*100:.2f}%")iter_num += 1local_iter_num += 1if iter_num > max_iters:break# 终止分布式配置
if ddp:destroy_process_group()
4. 使用示例 sample.py
在定义好模型结构、训练流程后就可以调用使用示例了,这里的使用示例就是一个纯推理。
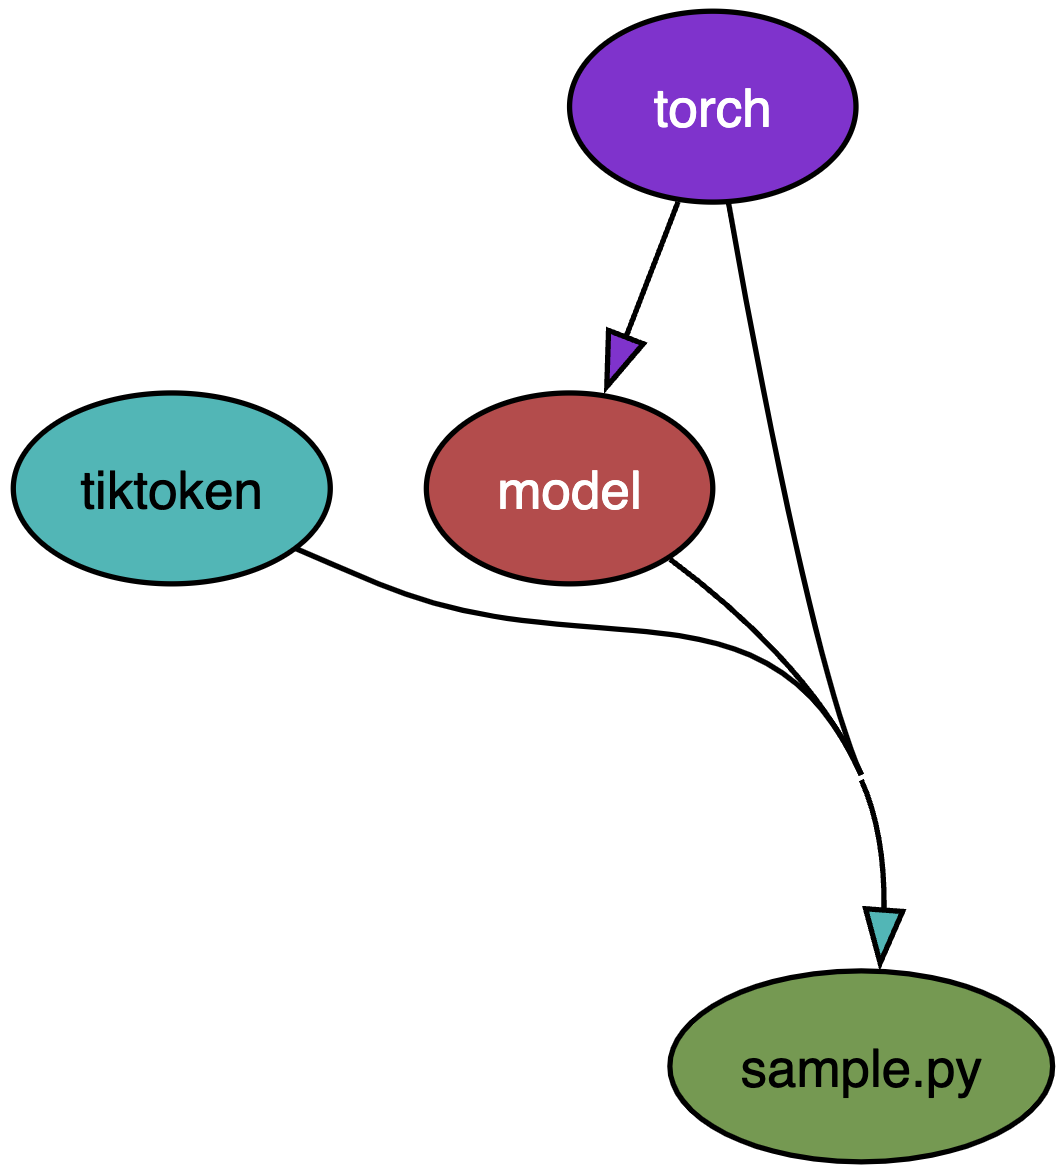
导入必要的包
import os, pickle, torch, tiktoken
from contextlib import nullcontext
from model import GPTConfig, GPT
配置超参数
init_from = 'resume' # 'resume' or 'gpt2-xl'
out_dir = 'out'
start = "\n"
num_samples = 10
max_new_tokens = 500
temperature = 0.8
top_k = 200
seed = 1337
device = 'cuda' # 'cpu', 'cuda', 'cuda:0', 'cuda:1'
dtype = 'bfloat16' if torch.cuda.is_available() and torch.cuda.is_bf16_supported() else 'float16' # 'float32' or 'bfloat16' or 'float16'
compile = False # PyTorch 2.0 加速编译
exec(open('configurator.py').read())
配置torch
torch.manual_seed(seed)
torch.cuda.manual_seed(seed)
torch.backends.cuda.matmul.allow_tf32 = True
torch.backends.cudnn.allow_tf32 = True
device_type = 'cuda' if 'cuda' in device else 'cpu'
ptdtype = {'float32': torch.float32, 'bfloat16': torch.bfloat16, 'float16': torch.float16}[dtype]
ctx = nullcontext() if device_type == 'cpu' else torch.amp.autocast(device_type=device_type, dtype=ptdtype)
初始化模型
if init_from == 'resume':ckpt_path = os.path.join(out_dir, 'ckpt.pt')checkpoint = torch.load(ckpt_path, map_location=device)gptconf = GPTConfig(**checkpoint['model_args'])model = GPT(gptconf)state_dict = checkpoint['model']unwanted_prefix = '_orig_mod.'for k,v in list(state_dict.items()):if k.startswith(unwanted_prefix):state_dict[k[len(unwanted_prefix):]] = state_dict.pop(k)model.load_state_dict(state_dict)
elif init_from.startswith('gpt2'):model = GPT.from_pretrained(init_from, dict(dropout=0.0))model.eval()
model.to(device)
if compile:model = torch.compile(model)
初始化环境
load_meta = False
if init_from == 'resume' and 'config' in checkpoint and 'dataset' in checkpoint['config']:meta_path = os.path.join('data', checkpoint['config']['dataset'], 'meta.pkl')load_meta = os.path.exists(meta_path)
if load_meta:print(f"Loading meta from {meta_path}...")with open(meta_path, 'rb') as f:meta = pickle.load(f)stoi, itos = meta['stoi'], meta['itos']encode = lambda s: [stoi[c] for c in s]decode = lambda l: ''.join([itos[i] for i in l])
else:print("No meta.pkl found, assuming GPT-2 encodings...")enc = tiktoken.get_encoding("gpt2")encode = lambda s: enc.encode(s, allowed_special={"<|endoftext|>"})decode = lambda l: enc.decode(l)
对提示词进行编码
if start.startswith('FILE:'):with open(start[5:], 'r', encoding='utf-8') as f:start = f.read()
start_ids = encode(start)
x = (torch.tensor(start_ids, dtype=torch.long, device=device)[None, ...])
进行测试
with torch.no_grad():with ctx:for k in range(num_samples):y = model.generate(x, max_new_tokens, temperature=temperature, top_k=top_k)print(decode(y[0].tolist()))print('---------------')
5. benchmark评估 bench.py
在训练和测试完模型后通常需要对其进行一次bench评估,如果要发论文的话这步是必不可少的环节。
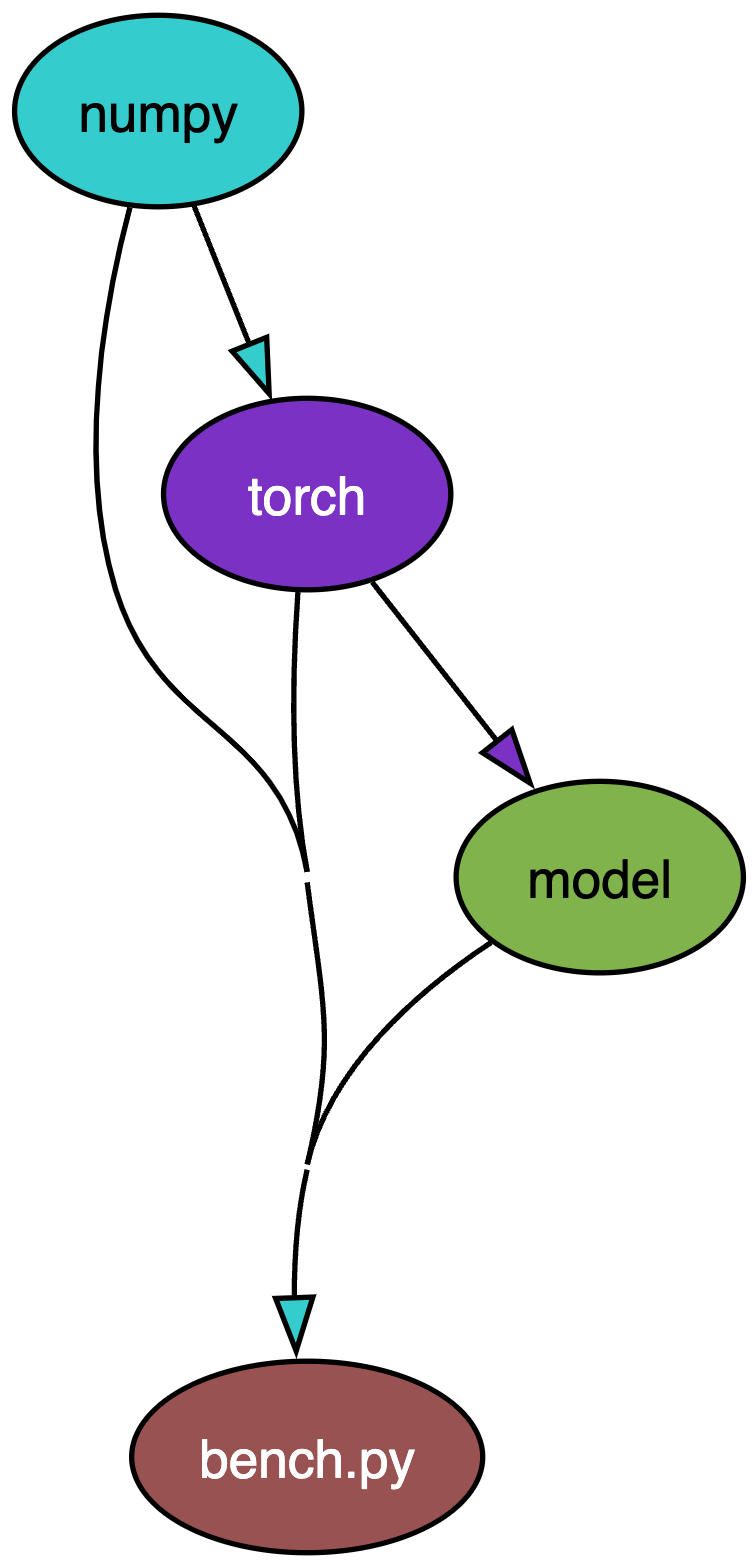
导入必要的包
import os
from contextlib import nullcontext
import numpy as np
import time
import torch
from model import GPTConfig, GPT
配置超参数
batch_size = 12
block_size = 1024
bias = False
real_data = True
seed = 1337
device = 'cuda' # 'cpu', 'cuda', 'cuda:0', 'cuda:1'
dtype = 'bfloat16' if torch.cuda.is_available() and torch.cuda.is_bf16_supported() else 'float16' # 'float32' or 'bfloat16' or 'float16'
compile = True # PyTorch 2.0 加速编译
profile = False # 是否使用 pytorch profiler 或只进行简单评估
exec(open('configurator.py').read())
配置torch
torch.manual_seed(seed)
torch.cuda.manual_seed(seed)
torch.backends.cuda.matmul.allow_tf32 = True
torch.backends.cudnn.allow_tf32 = True
device_type = 'cuda' if 'cuda' in device else 'cpu'
ptdtype = {'float32': torch.float32, 'bfloat16': torch.bfloat16, 'float16': torch.float16}[dtype]
ctx = nullcontext() if device_type == 'cpu' else torch.amp.autocast(device_type=device_type, dtype=ptdtype)
加载数据并初始化 - openwebtext
if real_data:dataset = 'openwebtext'data_dir = os.path.join('data', dataset)train_data = np.memmap(os.path.join(data_dir, 'train.bin'), dtype=np.uint16, mode='r')def get_batch(split):data = train_dataix = torch.randint(len(data) - block_size, (batch_size,))x = torch.stack([torch.from_numpy((data[i:i+block_size]).astype(np.int64)) for i in ix])y = torch.stack([torch.from_numpy((data[i+1:i+1+block_size]).astype(np.int64)) for i in ix])x, y = x.pin_memory().to(device, non_blocking=True), y.pin_memory().to(device, non_blocking=True)return x, y
else:   # 直接给一堆噪声x = torch.randint(50304, (batch_size, block_size), device=device)y = torch.randint(50304, (batch_size, block_size), device=device)get_batch = lambda split: (x, y)
模型初始化
gptconf = GPTConfig(block_size = block_size,n_layer = 12, n_head = 12, n_embd = 768, dropout = 0, bias = bias,
)
model = GPT(gptconf)
model.to(device)optimizer = model.configure_optimizers(weight_decay=1e-2, learning_rate=1e-4, betas=(0.9, 0.95), device_type=device_type)if compile:print("Compiling model...")model = torch.compile(model) # pytorch 2.0
benchmark评估
if profile:wait, warmup, active = 5, 5, 5num_steps = wait + warmup + activewith torch.profiler.profile(activities=[torch.profiler.ProfilerActivity.CPU, torch.profiler.ProfilerActivity.CUDA],schedule=torch.profiler.schedule(wait=wait, warmup=warmup, active=active, repeat=1),on_trace_ready=torch.profiler.tensorboard_trace_handler('./bench_log'),record_shapes=False,profile_memory=False,with_stack=False,with_flops=True,with_modules=False,) as prof:X, Y = get_batch('train')for k in range(num_steps):with ctx:logits, loss = model(X, Y)X, Y = get_batch('train')optimizer.zero_grad(set_to_none=True)loss.backward()optimizer.step()lossf = loss.item()print(f"{k}/{num_steps} loss: {lossf:.4f}")prof.step()
else: # simple benchmarkingtorch.cuda.synchronize()for stage, num_steps in enumerate([10, 20]):t0 = time.time()X, Y = get_batch('train')for k in range(num_steps):with ctx:logits, loss = model(X, Y)X, Y = get_batch('train')optimizer.zero_grad(set_to_none=True)loss.backward()optimizer.step()lossf = loss.item()print(f"{k}/{num_steps} loss: {lossf:.4f}")torch.cuda.synchronize()t1 = time.time()dt = t1-t0mfu = model.estimate_mfu(batch_size * 1 * num_steps, dt)if stage == 1:print(f"time per iteration: {dt/num_steps*1000:.4f}ms, MFU: {mfu*100:.2f}%")
相关文章:
nanoGPT)
Model 速通系列(一)nanoGPT
这个是新开的一个系列用来手把手复现一些模型工程,之所以开这个系列是因为有人留言说看到一个工程不知道从哪里读起,出于对自身能力的提升与兴趣,故新开了这个系列。由于主要动机是顺一遍代码并提供注释。 该系列第一篇博客是 nanoGPT &…...

星际争霸小程序:用Java实现策略模式的星际大战
在游戏开发的世界里,策略模式是一种非常实用的设计模式,它允许我们在运行时动态地选择算法或行为。今天,我将带你走进一场星际争霸的奇幻之旅,用Java实现一个简单的星际争霸小程序,通过策略模式来模拟不同种族单位的战…...

网络Tips20-007
网络威胁会导致非授权访问、信息泄露、数据被破坏等网络安全事件发生, 其常见的网络威胁包括窃听、拒绝服务、病毒、木马、( 数据完整性破坏 )等, 常见的网络安全防范措施包括访问控制、审计、身份认证、数字签名、( 数据加密 )、 包过滤和检测等。 AE…...

2.微服务-配置
引入springcloud的pom配置 <parent><groupId>org.springframework.boot</groupId><artifactId>spring-boot-starter-parent</artifactId><version>2.7.12</version><relativePath/></parent> <dependencyManagemen…...
)
python实现pdf转图片(针对每一页)
from pdf2image import convert_from_path import ospdf_file rC:\Users\\Desktop\拆分\产权证.pdf poppler_path rC:\poppler-24.08.0\Library\bin # 这里改成你自己的路径output_dir rC:\Users\\Desktop\拆分\output_images os.makedirs(output_dir, exist_okTrue)image…...

Python编程从入门到实践 PDF 高清版
各位程序员朋友们,还在为找不到合适的Python学习资料而烦恼吗?还在为晦涩难懂的编程书籍而头疼吗?今天,就给大家带来一份重磅福利——237完整版PDF, 我用网盘分享了「Python编程:从入门到实践__超清版.pdf…...

CVE-2015-3934 Fiyo CMS SQL注入
CVE-2015-3934 Fiyo CMS SQL注入 页面抓登录数据包 构造延时注入语句在user处’%2B(select(0)from(select(sleep(5)))v)%2B’ 存在延时注入,使用脚本即可...

【Pandas】pandas DataFrame mode
Pandas2.2 DataFrame Computations descriptive stats 方法描述DataFrame.abs()用于返回 DataFrame 中每个元素的绝对值DataFrame.all([axis, bool_only, skipna])用于判断 DataFrame 中是否所有元素在指定轴上都为 TrueDataFrame.any(*[, axis, bool_only, skipna])用于判断…...
洛谷 P11232 CSPS2024 超速检测 题解)
(思维题、贪心)洛谷 P11232 CSPS2024 超速检测 题解
这一题在 2024 将我击败,但我怎么现在才补题解 …… 题意 原题 思路 对于每一辆车,我们可以算出,其在距离左端点哪段位置会超速 [ l , r ] [l,r] [l,r],那么这辆车会被 l l l 右侧最近的测速仪到 r r r 左侧最近的测速仪检…...

C#:多线程
一.线程常用概念 线程(Thread):操作系统执行程序的最小单位 进程(Process):程序在内存中的运行实例 并发(Concurrency):多个任务交替执行(单核CPU࿰…...

虚拟币制度钱包开发:功能设计与成本全解析
虚拟币制度钱包开发:功能设计与成本全解析 ——从基础架构到合规风控的完整解决方案 一、开发成本:分层定价与关键影响因素 根据2024-2025年行业数据显示,虚拟币钱包App开发成本跨度较大,主要受功能复杂度、技术架构与合规要求三…...
TransmittableThreadLocal实现上下文传递-笔记
1.TransmittableThreadLocal简介 com.alibaba.ttl.TransmittableThreadLocal(简称 TTL)是阿里巴巴开源的一个工具类,旨在解决 ThreadLocal 在线程池中无法传递上下文变量 的问题。它是对 InheritableThreadLocal 的增强,尤其适用…...

应对WEEE 2025:猎板PCB的区块链追溯与高温基材创新
在全球电子产业加速向循环经济转型的背景下,欧盟《绿色新政》与《WEEE指令》对PCB行业提出更高要求。作为行业先行者,猎板PCB(Hunter PCB)以生物降解基材为核心,结合全球合规体系与产业链协同创新,构建从材…...

大陆资产在香港发行RWA的合规路径与核心限制
大陆资产在香港发行RWA的合规路径与核心限制 ——从“双重合规原则”到资产准入边界的全景解读 一、法律框架:双重合规原则的刚性约束 根据香港金管局Ensemble沙盒项目要求,大陆资产在香港发行RWA需遵循“双重合规原则”,即底层资产需同时符…...

爬虫攻防战:从入门到放弃的完整对抗史与实战解决方案
爬虫攻防战:从入门到放弃的完整对抗史与实战解决方案 这张有趣的图片生动描绘了爬虫开发者与反爬工程师之间的"军备竞赛"。作为技术博主,我将基于这张图的各个阶段,深入分析爬虫技术的演进与对应的反制措施,提供一套完整的反爬解决方案,包括技术原理、实施方法…...
)
Fabric初体验(踩坑笔记)
搭建fabric部署合约学习笔记 环境准备CURl安装docker 参照官网文档实现(2025.05.19)根据前言交代的文章去尝试(失败版)安装fabric-samples安装指定2.2.0版本Fabric二进制文件和配置文件直接手动下载(不建议)…...

区块链blog2_中心化与效率
🌿中心化出现原因 信息/服务分散在各处会浪费时间且不方便使用,由此,把信息/服务集中在一起,便于管理,避免了不必要的效率损失。 即集中资源,使得对信息处理的全过程效率升高。中心化不是网络中产生的&…...

2024年ASOC SCI2区TOP,多机制群优化算法+多风场输电线路巡检中多无人机任务分配与路径规划,深度解析+性能实测
目录 1.摘要2.考虑风场影响的多无人机任务分配3.基于双向蚁群和离散蜜獾算法求解多无人机任务分配问题(BACOHBA)4.考虑风场的多无人机路径规划5.结果展示6.参考文献7.代码获取8.读者交流 1.摘要 随着电力系统规模的不断扩大,复杂环境下的电力线路及设施的巡检与维护…...

智慧赋能光伏运维——无人机巡检+地面监控双链路覆盖,打造光伏电站管理新标杆
一、引言:光伏电站运维的挑战与机遇 在全球能源转型浪潮下,光伏电站作为清洁能源的重要载体,其高效运维管理成为行业核心命题。然而,传统光伏电站运维存在覆盖范围广、设备分散、人工巡检效率低、故障响应慢等痛点。为破解这一难…...

c/c++的opencv开闭操作
OpenCV 中的形态学开运算与闭运算 (C) 在计算机视觉和图像处理领域,形态学操作是用于分析和处理图像形状的一系列非线性操作。OpenCV 作为一个强大的开源计算机视觉库,提供了丰富的形态学转换函数。其中,“开运算”(Opening&…...

Linux利用多线程和线程同步实现一个简单的聊天服务器
1. 概述 本文实现一个基于TCP/IP的简单多人聊天室程序。它包含一个服务器端和一个客户端:服务器能够接收多个客户端的连接,并将任何一个客户端发来的消息广播给所有其他连接的客户端;客户端则可以连接到服务器,发送消息并接收来自…...

无人机遥控器光纤通信模块技术要点!
一、技术要点 1. 长距离低损耗传输 采用单模光纤(如G.654.E光纤),利用光纤的低衰减特性(0.17 dB/km以下),支持10公里以上的远距离通信,突破了传统无线信号因衰减导致的覆盖限制。例如&…...

深入解析OkHttp与Retrofit:Android网络请求的黄金组合
前言 在移动应用开发中,网络请求是连接客户端与服务器的关键桥梁。对于Android开发者而言,OkHttp和Retrofit这对组合已经成为处理网络请求的事实标准。本文将全面剖析这两个框架的设计理念、核心功能、协同关系以及最佳实践,帮助开发者构建高…...

Python操作PDF书签详解 - 添加、修改、提取和删除
目录 简介 使用工具 Python 向 PDF 添加书签 添加书签 添加嵌套书签 Python 修改 PDF 书签 Python 展开或折叠 PDF 书签 Python 提取 PDF 书签 Python 删除 PDF 书签 简介 PDF 书签是 PDF 文件中的导航工具,通常包含一个标题和一个跳转位置(如…...

Spring Boot与Kafka集成实践:从入门到实战
Spring Boot与Kafka集成实践 引言 在现代分布式系统中,消息队列是不可或缺的组件之一。Apache Kafka作为一种高吞吐量的分布式消息系统,广泛应用于日志收集、流处理、事件驱动架构等场景。Spring Boot作为Java生态中最流行的微服务框架,提供…...

luckysheet的使用——17.将表格作为pdf下载到本地
luckysheet源码里面自带有打印按钮,但是功能是无法使用的,所以我把该功能重写了一遍 1.在menuButton.js文件中找到源码打印按钮的触发事件: $("#luckysheet-icon-print").click(function () {}2.使用自己写的挂载方法 window.pr…...

矿井支架LCYVB-6钢丝编织护套连接器介绍
LCYVB-6钢丝编织护套连接器是一种专为矿井支架设计的连接装置,主要用于增强支架的稳定性和安全性。该连接器采用高强度钢丝编织护套,具有优异的抗拉强度和耐磨性,适用于恶劣的矿井环境。 主要特点 高强度钢丝编织护套:采用优质钢…...

git仓库中.git 文件很大,怎么清理掉一部分
查询 .git 文件大小,在 git-bash 里执行(后面有些命令不能执行,也请在 git-bash 里执行) windows11 安装好后右键没有 git bash 命令-CSDN博客 du -sh .git // 592m .git 操作前最好先备份一份,避免推送到远程时出错…...

Qt框架核心组件完全指南:从按钮交互到定时器实现
文章目录 前言一、QAbstractButton 按钮类概述1.1 常用属性1.2 常用信号1.3QButtonGroup 按钮组 二、QComboBox 组合框三、若干与数字相关的组件四、QString 字符串类五、Qt容器类5.1 顺序容器 QList5.2 关联容器 QMap 六、QVariant七、跨平台数据类型7.1 基础数据类型7.2 特殊…...

Axure设计数字乡村可视化大屏:从布局到交互的实战经验分享
乡村治理正从传统模式向“数据驱动”转型。数字乡村可视化大屏作为数据展示的核心载体,不仅能直观呈现乡村发展全貌,还能为决策提供科学依据。本文以Axure为工具,结合实际案例,分享如何从零设计一个功能完备、交互流畅的数字乡村大…...

60天python训练计划----day30
DAY 30 模块和库的导入 知识点回顾: 导入官方库的三种手段导入自定义库/模块的方式导入库/模块的核心逻辑:找到根目录(python解释器的目录和终端的目录不一致) 一.导入官方库 我们复盘下学习python的逻辑,所谓学习pyth…...

HJ3 明明的随机数【牛客网】
文章目录 零、原题链接一、题目描述二、测试用例三、解题思路3.1 快排去重3.2 散列 四、参考代码4.1 快排去重4.2 散列 零、原题链接 HJ3 明明的随机数 一、题目描述 二、测试用例 三、解题思路 3.1 快排去重 基本思路: 先将序列进行快速排序,然后…...

BGP选路
一、拓扑图 二、要求及分析 1.要求 1.使用Preva1策略,确保R4通过R2到达192.168.10.0/24 2、用As Path策略,确保R4通过R3到达192.168.11.0/24 3.配置MED策略,确保R4通过R3到达192.168.12.0/24 4.使用Local Preference策略,确保…...

践行“科学智能”!和鲸打造 AI for Science 专属应用
AI for good, AI for Science. 在传统科研领域,人力与经验的局限始终如影随形。而“AI for Science”正逐渐改变科学研究的模式,以科学数据为基石、以强大算力为支撑,借助人工智能技术,开展计算密集度高且能够实现高效迭代的科学…...

【vs2022的C#窗体项目】打开运行+sql Server改为mysql数据库+发布
1. vs2022打开运行原sql Server的C#窗体项目更改为mysql数据库 1.1. vs2022安装基础模块即可 安装1️⃣vs核心编辑器2️⃣.net桌面开发必选,可选均不安装!!! 为了成功连接mysql数据库,需要安装组件NuGet包管理器 安…...

wpf DataGrid 行选择事件
在WPF中处理DataGrid行选择事件主要有以下几种实现方式: 1.SelectionChanged事件处理 通过直接订阅DataGrid的SelectionChanged事件实现行选择响应: <DataGrid SelectionChanged="DataGridAccurateLocationList_SelectionChanged" .../>后台代码中处理…...

Spring Cloud Seata 深度解析:原理与架构设计
文章目录 前言:为什么我们需要理解分布式事务?一、Seata 核心架构深度拆解1.1 分布式事务核心模型1.2 Seata undo_log 存储结构与版本控制存储结构版本控制核心算法 1.3 Seata 事务模型深度对比与实现原理AT 模式(Auto Transaction࿰…...

从产品展示到工程设计:3DXML 转 STP 的跨流程数据转换技术解析
在数字化设计与制造领域,不同格式的三维模型文件常常需要进行转换,以满足不同软件和工作流程的需求。3DXML 和 STP(STEP AP214/AP242)是工业领域常用的两种三维模型文件格式,3DXML 格式以其轻量化和便于网络传输、可视…...

基于RT-Thread的STM32F4开发第五讲——软件模拟I2C
文章目录 前言一、RT-Thread工程创建二、AT24C02三、函数编写1.I2C_soft.c2.I2C_soft.h3.main.h 四、效果展示五、资源分享总结 前言 本章是基于RT-Thread studio实现软件模拟I2C,开发板是正点原子的STM32F4探索者,使用的RT-Thread驱动是5.1.0࿰…...

pkucpc2025 L:Game on Tree
题意 两个人在一棵无根树上玩游戏,每次可以删掉若干个叶子节点,不能操作的人输。 思路 比赛的时候我去写H Quintuple了,队友貌似在我写的时候把这道题讨论出来了。 后来补题的时候花了大概花了70分钟左右ac这道题。 首先考虑一条链的情况…...

大数据实时分析:ClickHouse、Doris、TiDB 对比分析
随着企业对数据分析实时性、复杂性和多样性的要求越来越高,传统的批处理数仓已经无法满足实时指标看板、流量监控、用户行为分析等场景需求。因此,越来越多的公司开始引入实时分析型数据库系统。 目前,国内外常见的实时分析数据库有: ClickHouse:列式数据库,极致的分析性…...

网络流量分析系统的十大应用场景
在现代企业和组织的IT运维体系中,网络流量分析系统(Network Traffic Analysis, NTA)早已不仅仅是用来查看带宽使用率的“流量计数器”。随着网络环境的复杂化、攻击技术的不断演进,以及对业务连续性要求的提升,网络流量…...

问题 | 代码审查:函数是否包含返回语句
“函数是否包含返回语句”这一问题的核心是:在编程中,函数是否按照设计要求正确使用了 返回语句(如 return、return value),以便向调用者传递结果或控制权。以下是详细解释: 1. 什么是函数的返回语句&#…...

Spring Bean 生命周期中设计模式的应用与解析
Spring Bean 生命周期中使用的设计模式 Spring Bean 的生命周期涉及多个阶段和扩展点,Spring 框架在这一过程中巧妙运用了多种设计模式,以实现强大的功能和灵活性。以下是主要设计模式及其应用场景: 1. 工厂模式(Factory Patter…...

设计模式的原理及深入解析
创建型模式 创建型模式主要关注对象的创建过程,旨在通过不同的方式创建对象,以满足不同的需求。 工厂方法模式 定义:定义一个创建对象的接口,让子类决定实例化哪一个类。 解释:工厂方法模式通过定义一个创建对象的…...

kotlin flow的两种SharingStarted策略的区别
一 两种 SharingStarted 策略的区别: SharingStarted.Eagerly: 立即开始收集上游流,即使没有下游订阅者持续保持活跃状态,直到 ViewModel 被清除优点:响应更快,数据始终保持最新缺点:消耗更多资源&#x…...
)
BGP综合实验(2)
一、实验需求 1、实验拓扑图 2、实验需求 使用 PreVal 策略,让 R4 经 R2 到达 192.168.10.0/24 。 使用 AS_Path 策略,让 R4 经 R3 到达 192.168.11.0/24 。 配置 MED 策略,让 R4 经 R3 到达 192.168.12.0/24 。 使用 Local Preference 策…...

python使用jsonpath-ng库操作json数据
jsonpath-ng 库的详细使用如下: 一、安装与导入 安装 通过 pip 安装库: pip install jsonpath-ng支持 Python 3.6 及以上版本。 导入核心模块 主要使用 parse 函数和 JSONPath 对象: from jsonpath_ng import parse二、基础查询操作 1. 简单…...

通用简洁工作汇报项目评估营销策划工作总结年终汇报PPT模版8套一组分享
工作总结汇报PPT模版8套一组分享:工作总结汇报PPT模版分享https://pan.quark.cn/s/04b7ab7a47c4 第一套PPT模版,主要是黄色和灰色调,上方有大面积黄色不规则形状背景,有“POWERPOINT”和“XXXXPPT模版”字样,左侧是黑…...

掌握Git:版本控制与高效协作指南
一、初始Git 提出问题:无论是在工作还是学习,我们在编写各种文档的时候,更改失误,失误后恢复到原来版本,不得不复制出一个副本。 每个版本由各自的内容,但最终只有一个报告需要被我们使用。 但在此之前的…...