种田游戏的综合尝试
游戏角色
详细教程
一、准备工作
1、场景重命名为Farm
2、导入资源
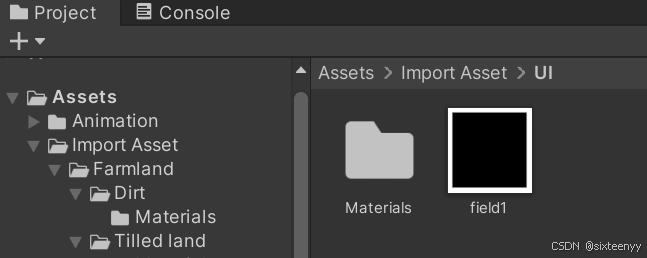
(1) 新建文件夹。Import Asset
(2) 导入:人物、走、跑、休息
3、设置摄像机
二、制作角色预制体
1、增加角色,命名为Player,设置材质、人类角色
2、设置角色的空闲、走、跑的材质等
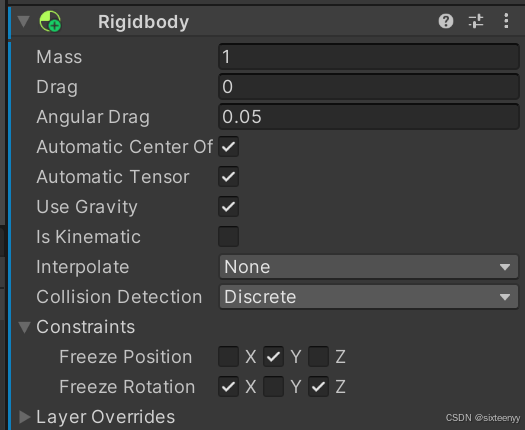
3、添加Rigidbody组件,约束Position上的Y轴AZ,Rotation上的X、Z轴
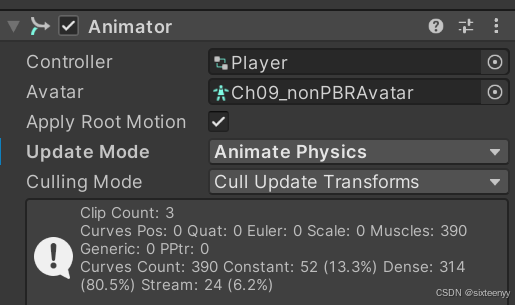
4、设置Update Mode
5、新建Prefabs文件夹,将角色制成预制体
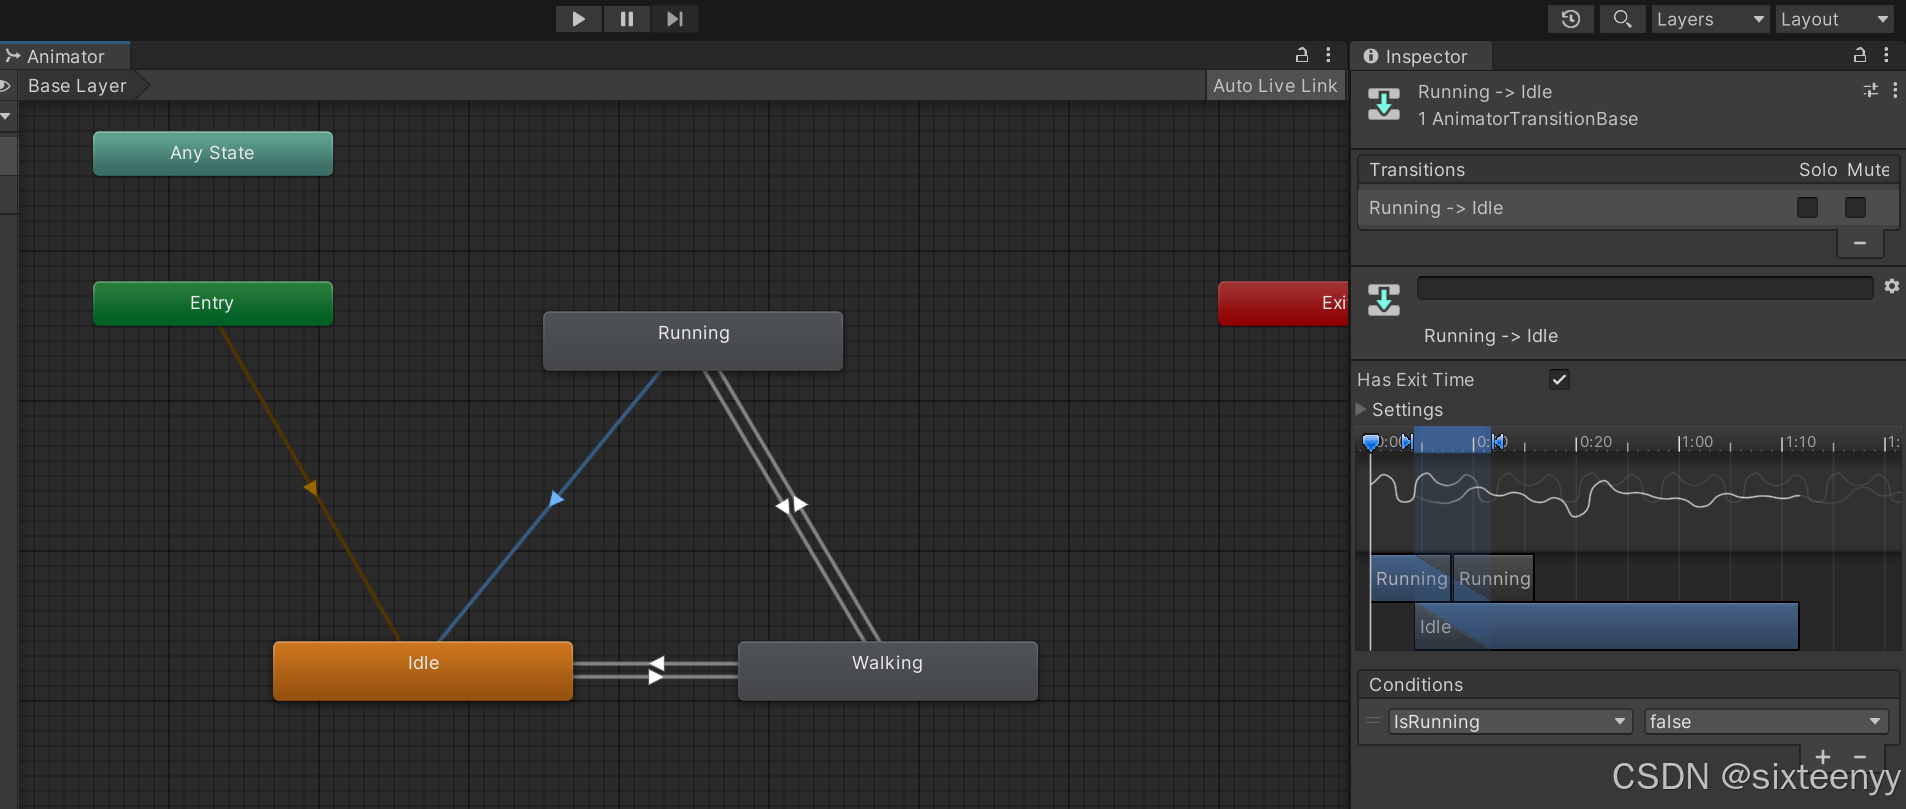
三、设置角色动画
1、新建文件夹Animation,在Animation文件夹下新建文件夹Controllers
2、在Controller文件夹下Create Animator Controller,命名为Player
3、选中Hierarchy中的人物,在Inspector面板中给Animator中的Controller选择Player
4、打开Controller文件夹下的Player,设置动画
(1) 复制mixano.com,分别重命名为Walking、Running和Idle
(2) 将复制的Walking、Running和Idle转移到Animation文件夹
(3) 分别选择Walking、Running和Idle,设置循环播放(Loop Pose也勾选上)
(4) 打开Controller文件夹下的Player,依次将Idle(默认)、Walking、Running拖入新界面
(5) 选择Parameters,添加Bool,Bool,分别命名为IsWalking,Running。不勾选(默认状态)
(6) 选中Idle到Walk的箭头,右侧点加号,出现IsWalking true,取消勾选Hash Exit Time
(7) 同样的方法设定Walking转换为Idle。将IsWalking设置为false。取消勾选Hash Exit Time
(8) 选中动画编辑器中的Idle、Walking、Running,将Speed改为2
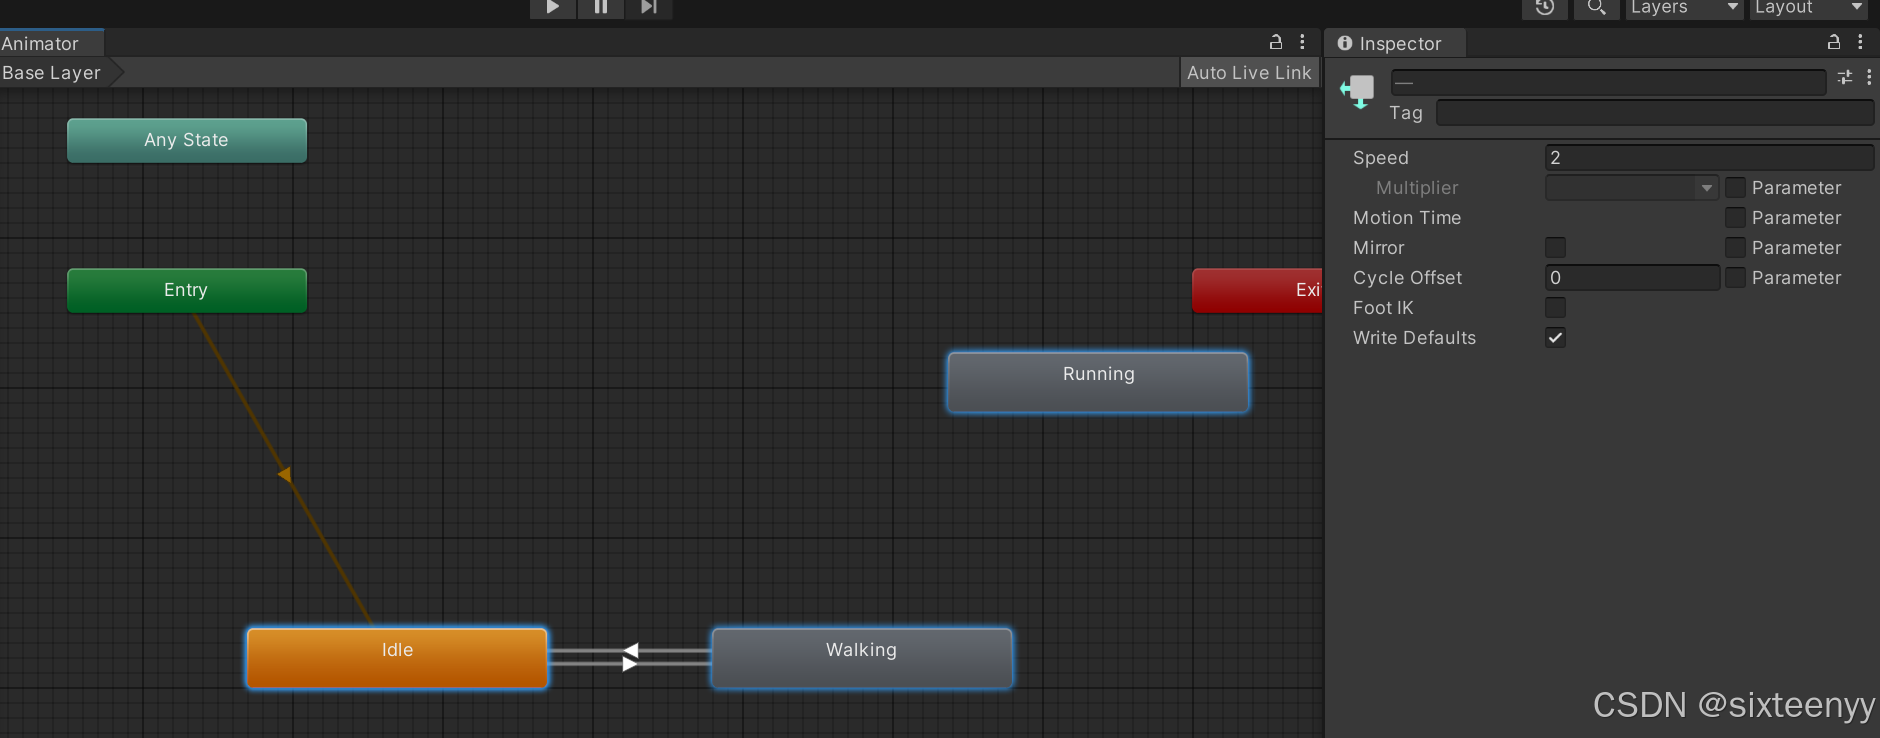
(9) 同样的方法设置Running
四、控制角色行走
1、给角色预制体,添加Character Controller(角色控制器)组件,调节参数至笼罩全身
2、给角色预制体添加PlayerController.cs组件
using System.Collections;
using System.Collections.Generic;
using UnityEngine;public class PlayerController : MonoBehaviour
{public float turnSpeed = 20f;Animator animator;Rigidbody rb;Vector3 movement;Quaternion rotation = Quaternion.identity;[Header("Movement System")]public float walkSpeed = 1f;public float runSpeed = 3f;private void Start(){animator = GetComponent<Animator>();rb = GetComponent<Rigidbody>();}private void FixedUpdate(){float horizontal = Input.GetAxis("Horizontal");float vertical = Input.GetAxis("Vertical");movement.Set(horizontal, 0f, vertical);bool hasHorizontalInput = !Mathf.Approximately(horizontal, 0);bool hasVerticalInput = !Mathf.Approximately(vertical, 0);float movementSpeed = walkSpeed;movement.Normalize();Vector3 desiredForward = Vector3.RotateTowards(transform.forward, movement, turnSpeed * Time.deltaTime, 0f);rotation = Quaternion.LookRotation(desiredForward);rb.MovePosition(rb.position + movement * movementSpeed * Time.deltaTime);}private void OnAnimatorMove(){animator.SetBool("IsWalking", movement.magnitude > 0);rb.MoveRotation(rotation);}
}
3、增加奔跑
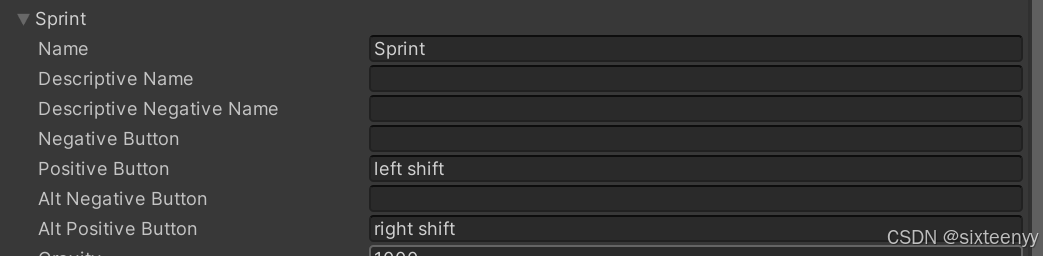
(1) 添加加速键Sprint(left shift right shift)
(2) 回到PlayerController.cs,设置加速和奔跑
using System.Collections;
using System.Collections.Generic;
using UnityEngine;public class PlayerController : MonoBehaviour
{public float turnSpeed = 20f;Animator animator;Rigidbody rb;Vector3 movement;Quaternion rotation = Quaternion.identity;[Header("Movement System")]public float walkSpeed = 1.5f;public float runSpeed = 3f;private void Start(){animator = GetComponent<Animator>();rb = GetComponent<Rigidbody>();}private void FixedUpdate(){float horizontal = Input.GetAxis("Horizontal");float vertical = Input.GetAxis("Vertical");movement.Set(horizontal, 0f, vertical);bool hasHorizontalInput = !Mathf.Approximately(horizontal, 0);bool hasVerticalInput = !Mathf.Approximately(vertical, 0);float movementSpeed = walkSpeed;if (Input.GetButton("Sprint") && (hasHorizontalInput || hasVerticalInput)){movementSpeed = runSpeed;}movement.Normalize();Vector3 desiredForward = Vector3.RotateTowards(transform.forward, movement, turnSpeed * Time.deltaTime, 0f);rotation = Quaternion.LookRotation(desiredForward);rb.MovePosition(rb.position + movement * movementSpeed * Time.deltaTime);}private void OnAnimatorMove(){animator.SetBool("IsWalking", movement.magnitude > 0);animator.SetBool("IsRunning", Input.GetButton("Sprint") && (movement.magnitude > 0));rb.MoveRotation(rotation);}
}
(3) AI提供的优化
using UnityEngine;public class PlayerController : MonoBehaviour
{public float turnSpeed = 20f;public Animator animator;public Rigidbody rb;public Vector3 movement;public Quaternion rotation = Quaternion.identity;private float speed;private bool isInputUpdated;[Header("Movement System")]public float walkSpeed = 6f;public float runSpeed = 12f;void Start(){animator = GetComponent<Animator>();rb = GetComponent<Rigidbody>();}private void FixedUpdate(){float horizontal = Input.GetAxis("Horizontal");float vertical = Input.GetAxis("Vertical");movement.Set(horizontal, 0f, vertical);movement.Normalize();bool hasHorizontalInput = !Mathf.Approximately(horizontal, 0f);bool hasVerticalInput = !Mathf.Approximately(vertical, 0f);if (Input.GetButton("Sprint")){speed = runSpeed;animator.SetBool("IsRunning", true);}else if (hasHorizontalInput || hasVerticalInput){speed = walkSpeed;animator.SetBool("IsWalking", true);}else{speed = 0f;animator.SetBool("IsWalking", false);animator.SetBool("IsRunning", false);}Vector3 desireForward = Vector3.RotateTowards(transform.forward, movement, turnSpeed * Time.fixedDeltaTime, 0f);rotation = Quaternion.LookRotation(desireForward);isInputUpdated = true;}private void OnAnimatorMove(){if (isInputUpdated){Vector3 movementSpeed = movement * speed;rb.MovePosition(rb.position + movementSpeed * Time.fixedDeltaTime);rb.MoveRotation(rotation);isInputUpdated = false; // Reset the flag after applying the input}}
}
五、相机跟随
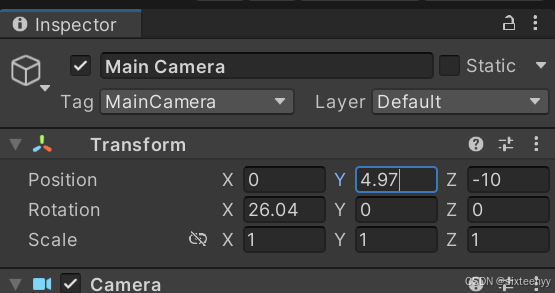
1、调整相机的Transform
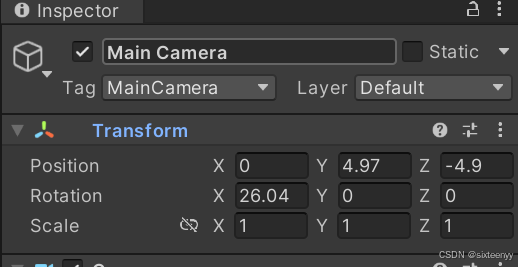
2、给Main Camera增加CameraController.cs组件
using System.Collections;
using System.Collections.Generic;
using UnityEngine;public class CameraController : MonoBehaviour
{public float offsetz = 6f;public float smoothing = 8f;Transform playerPos;void Start(){playerPos = FindObjectOfType<PlayerController>().transform;}void Update(){FollowPlayer();}void FollowPlayer(){Vector3 targetPos = new Vector3(playerPos.position.x,
transform.position.y, playerPos.position.z-offsetz);transform.position = Vector3.Lerp(transform.position, targetPos, smoothing*Time.deltaTime);}
}
农田处理
详细教程
一、准备工作
1、导入资源:在Import Asset文件夹下新建文件夹Farmland
(1) 新建文件夹Dirt,移入aerial_ground相关文件
(2) 新建文件夹Tilled land,移入 brown_mud_dry相关文件
(3) 新建文件夹Watered land,移入brown_mud相关文件
2、设置一块耕地 Land
3、制备预制体 Land(标签Land)
4、在Scripts文件夹下新建Farming 文件夹,其下新建Land.cs
二、制作农田
1、设置三种状态的耕地
(1) 打开Land预制体,给它添加Land.cs组件,使不同类型的土地渲染不同的材质,赋值
using System.Collections;
using System.Collections.Generic;
using UnityEngine;public class Land : MonoBehaviour
{public enum LandStatus { Soil, Farmland, Watered }public LandStatus landStatus;public Material soilMat, farmlandMat, wateredMat;new Renderer renderer;void Start(){renderer = GetComponent<Renderer>();SwitchLandStatus(LandStatus.Soil);}public void SwitchLandStatus(LandStatus statusToSwitch){landStatus = statusToSwitch;Material materialToSwitch = soilMat;switch (statusToSwitch){case LandStatus.Soil: materialToSwitch = soilMat; break;case LandStatus.Farmland: materialToSwitch = farmlandMat; break;case LandStatus.Watered: materialToSwitch = wateredMat; break;}renderer.material = materialToSwitch;}
}
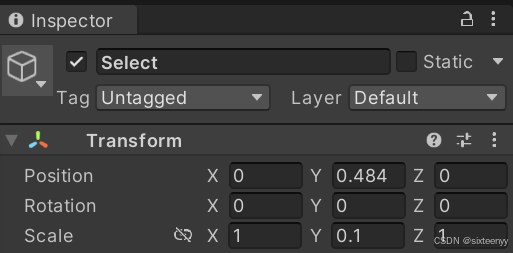
2、设置选中的土地块的形态
(1) 以Land为父物体,3D Object-Cube,命名Select,设置transform,移除Collider组件。
(2) 给Select制作并导入贴图,放在UI文件夹(新建)
(3) 打开Land预制体,选中Select,将贴图拖放到Select上,UI文件夹中出现新的文件夹Materials
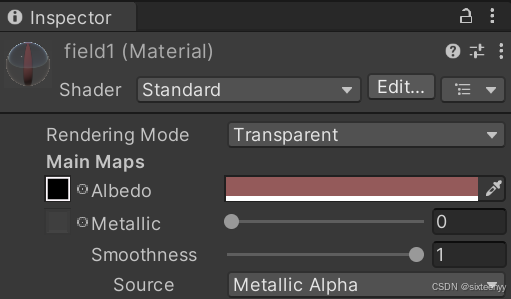
(4) 打开文件夹Materials,选中新生成的材质球,将Rendering Mode更改为Transparent,更改Albedo的颜色,Smoothness设置为1
(5) 隐藏Select或在Land.cs的Start方法中添加select.SetActive(false);或Select(false);
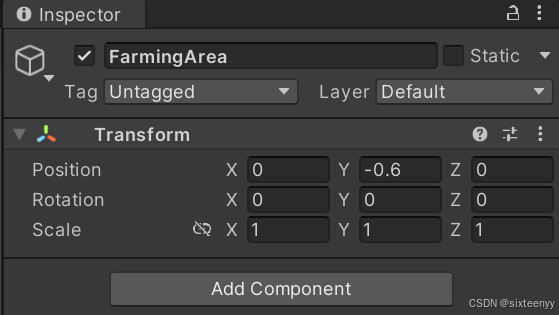
3、回到Unity,复制这个Land,平铺这些田地,并转入FarmingArea空物体中
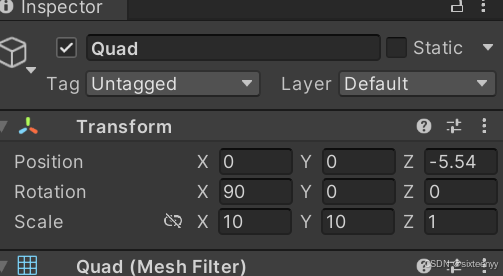
4、创建陆地:3D Object-Quad
三、人与耕地的交互
1、创建和设置检测射线
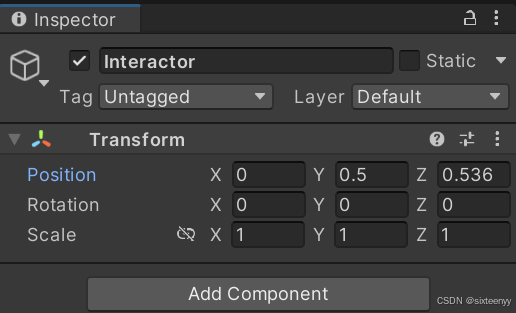
(1) 打开Player预制体,以Player为父物体,Create Empty,命名为 Interactor(发出射线方)
(2) 给Interactor添加PlayerInteraction.cs组件,设置检测射线
using System.Collections;
using System.Collections.Generic;
using UnityEngine;public class PlayerInteraction : MonoBehaviour
{PlayerController playerController;void Start(){playerController = transform.parent.GetComponent<PlayerController>();}void Update(){RaycastHit hit;if(Physics.Raycast(transform.position, Vector3.down, out hit, 1)){OnInteractableHit(hit);}}void OnInteractableHit(RaycastHit hit){Collider other = hit.collider;Debug.Log(other.name);}
}
2、设置选中耕地时,出现选中状态
(1) 编辑Land.cs,增加是否被选中的方法
public GameObject select;void Start()
{renderer = GetComponent<Renderer>();SwitchLandStatus(LandStatus.Soil);Select(false);
}public void Select(bool toggle)
{select.SetActive(toggle);
}
(2) 赋值
(3) 编辑 PlayerInteraction.cs,区分农田和其他土地、设置选中框的显示
using System.Collections;
using System.Collections.Generic;
using UnityEngine;public class PlayerInteraction : MonoBehaviour
{PlayerController playerController;Land selectLand = null;void Start(){playerController = transform.parent.GetComponent<PlayerController>();}void Update(){RaycastHit hit;if (Physics.Raycast(transform.position, Vector3.down, out hit, 1)){OnInteractableHit(hit);}}void OnInteractableHit(RaycastHit hit){Collider other = hit.collider;if (other != null && other.CompareTag("Land")){Land land = other.GetComponent<Land>();if (land != null){SelectLand(land); return;}else { Debug.Log("未选中任何田地"); }}if (selectLand != null){DeselectLand(selectLand);}}void SelectLand(Land land){if (land == null) { Debug.Log("你未选择田地"); return; }if (selectLand != null) { selectLand.Select(false); }selectLand = land;land.Select(true);}void DeselectLand(Land land){if(land == null) { Debug.Log("你没有选择田地");return; }land.Select(false);selectLand = null;}
}
3、建立交互系统
(1) 编辑 Land.cs,添加 Interact 方法
public void Interact()
{SwitchLandStatus(LandStatus.Farmland);
}
(2) 编辑 PlayerInteraction.cs,添加 Interact 方法,调用Land中的Inseract方法
public void Interact()
{if(selectLand != null){selectLand.Interact();return;}Debug.Log("未站在田地上");
}
(3) 编辑 PlayerController.cs,添加 Interact 方法:当点击鼠标或按下左Ctrl键时,调用PlayerInteraction.cs中的Interact方法
PlayerInteraction playerInteraction;
void Start()
{animator = GetComponent<Animator>();rb = GetComponent<Rigidbody>();playerInteraction = GetComponentInChildren<PlayerInteraction>();
}
public void Update()
{Interact();
}
public void Interact()
{if (Input.GetButtonDown("Fire1")){playerInteraction.Interact();}
}
农具管理
详细教程 标题四
水壶 标题一
一、准备工作
1、点击Windows- Package Manager,安装2D Sprite(标题四)
2、导入农具资源到UI 文件夹
3、拆分蔬菜和工具
4、在Scripts下创Inventory文件夹,在该文件夹下新建ItemData.cs
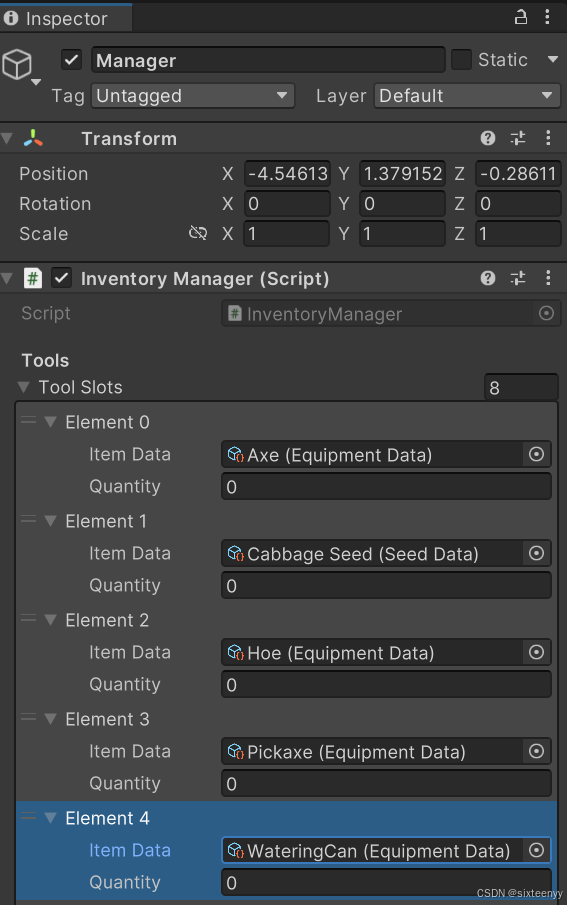
5、在Assets文件下创建Data文件夹,在Data下创建两个文件夹:Items和Tools
6、在Tools文件夹新建文件夹Seeds
二、准备农具模型
1、模型下载
官网资源
模型下载
模型下载
(1) Watering Can https://www.cgtrader.com/free-3d-models/household/other/watering-can-c76fe658-8352-4ed8-8d08-b2bc0b0af9e6
(2) hoe https://www.cgtrader.com/items/4145952/download-page
(3) axe https://www.cgtrader.com/free-3d-models/industrial/tool/axe-lowpoly-pbr-simple
(4) pickaxe https://www.cgtrader.com/free-3d-models/various/various-models/pickaxe-5903c86c-f84f-44bd-af34-8f7ce07666b9
(5) shovel https://www.cgtrader.com/free-3d-models/household/household-tools/shovel-b4035fae-6192-4afe-a238-1c4ec2877a5f
2、改变轴心点的简易方法:
使用Empty GameObject作为容器:在Unity中创建一个空的GameObject,将预制体作为其子对象。然后,在父对象的Transform组件中调整其Position属性,将其移动到期望的位置。父对象的轴心点即是预制体的轴心点
3、导入模型资源
(1) 注意:下载后在各自的文件夹中将需要导入的文件夹名改为Texture
(2) 在Import Asset 文件夹分别新建Tools和Items文件夹
(3) 在Tools文件夹中分别创建WarteringCan,Axe,Pickaxe,Shovel,Hoe文件夹
(4) 导入相应农具(将含有下列资源的Textures文件夹直接拖入相应文件夹)
4、制作模型预制体
(1) Create Empty,命名工具
(2) 以步骤(1) 的物体为父物体,添加子物体农具
(3) 制作预制体
三、创建农具的类(ItemData对象)
1、编辑 ItemData.cs,设置所有农具都具备的节点
using System.Collections;
using System.Collections.Generic;
using UnityEngine;[CreateAssetMenu(menuName = "Items/Item")]
public class ItemData : ScriptableObject
{public string description;public Sprite thumbnail;public GameObject gameModel;
}
2、创建ItemData对象——卷心菜
(1) 在Items文件夹下Create-Item,命名为Cabbage
(2) 选中Cabbage,设置description为A leafy Green vegetable
3、创建工具
(1) 打开Scripts下的Inventory文件夹,新建EquipmentData.cs
using System.Collections;
using System.Collections.Generic;
using UnityEditor.Search;
using UnityEngine;[CreateAssetMenu(menuName = ("Items/Equipment"))]
public class EquipmentData : ItemData
{public enum ToolType { Hoe, WateringCan, Axe, Pickaxt, Shovel}public ToolType Type;
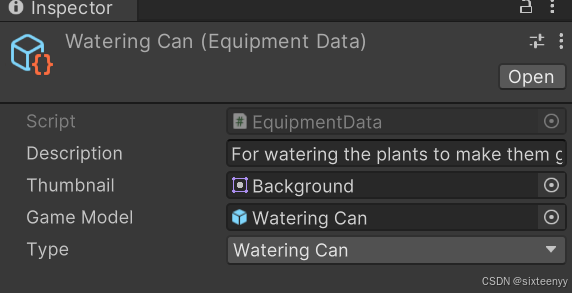
}(2) Tools文件夹Create-Items-Equipment,命名为Hoe,
(3) 同样的方法创建WarteringCan,Axe,Pickaxe,Shovel
(4) 设置它们的description
Axe:For cleaning wood obstacles
Hoe:For tilling the land
Pickaxe:For cleaning rock obstacles
Watering Can:For watering the plants to make them grow
Shovel:Clear plant material
(4) 设置它们的thumbnail:Axe:12;Hoe:13;Pickaxe:11;Shovel:10
4、设置ItemData的Game Model
5、创建种子
(1) 在Scripts下的Inventory文件夹下创建SeedData.cs
using System.Collections;
using System.Collections.Generic;
using UnityEngine;[CreateAssetMenu(menuName =("Items/Seed"))]public class SeedData : ItemData
{public int daysToGrow;public ItemData cropToYield;
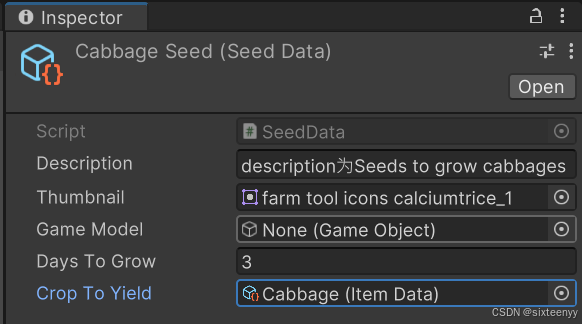
}(2) Seed文件夹下创建Seed文件,命名为Cabbage Seed。description为Seeds to grow cabbages
(3) 设置Cabbage Seed的各节点
UI面板
详细教程 标题六
一、准备工作
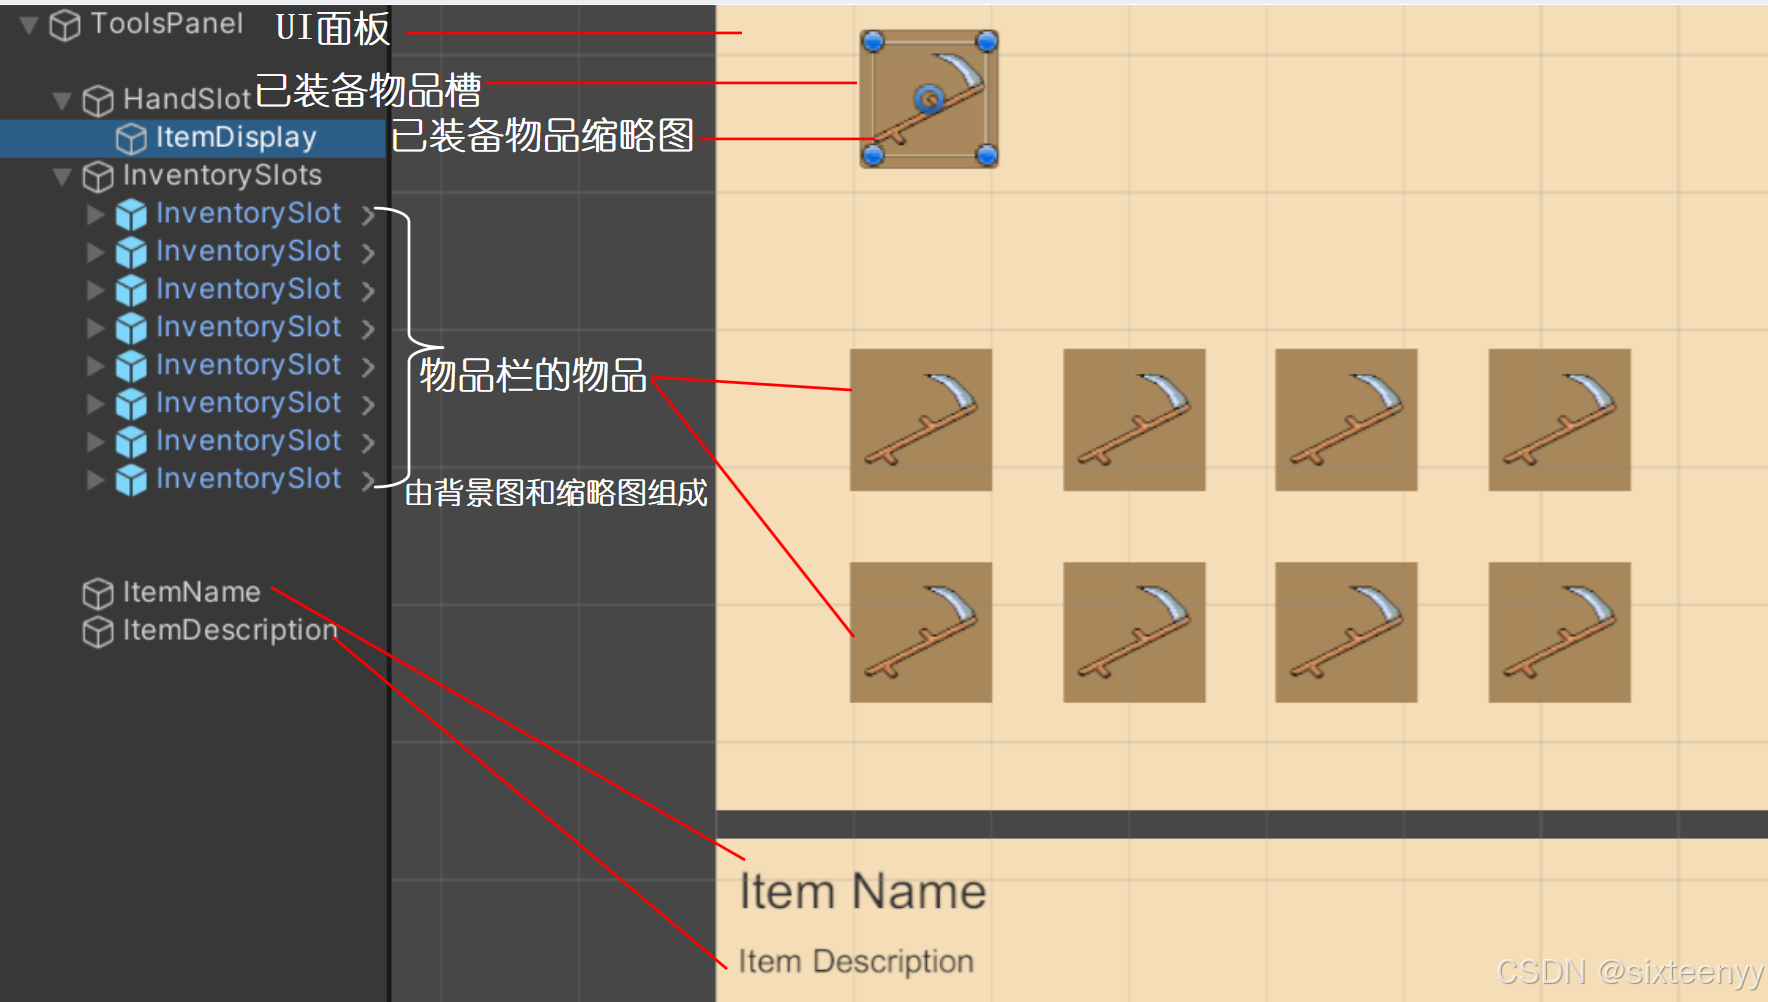
1、Create Empty,命名为Manager
(1) 打开Scripts文件夹,新建UI文件夹
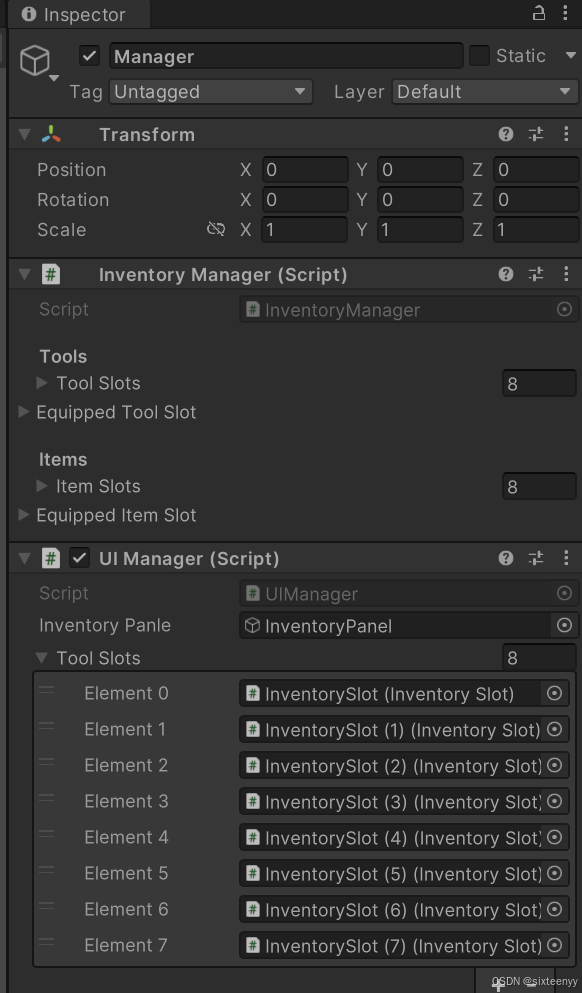
(2) 在UI文件夹中,添加InventoryManager.cs和UIManager.cs
(3) 给 Manager 添加UIManager.cs组件
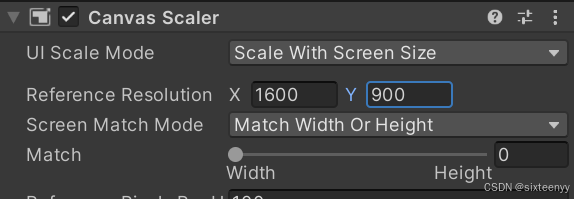
2、新建Canvas:以Manager为父物体,UI-Canvas,设置UI Scale Mode和Reference Resolution
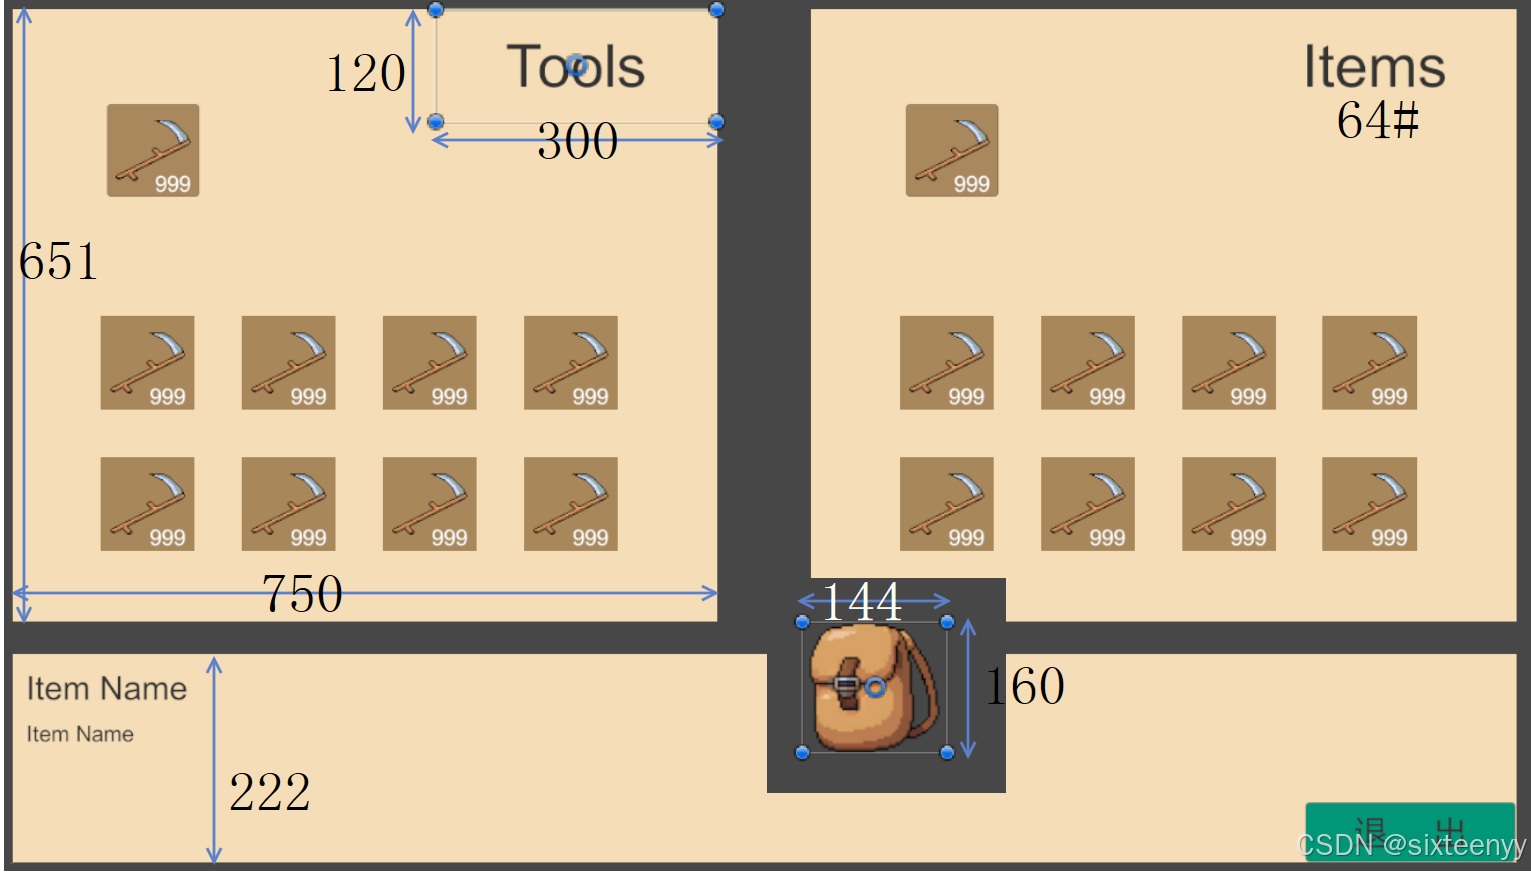
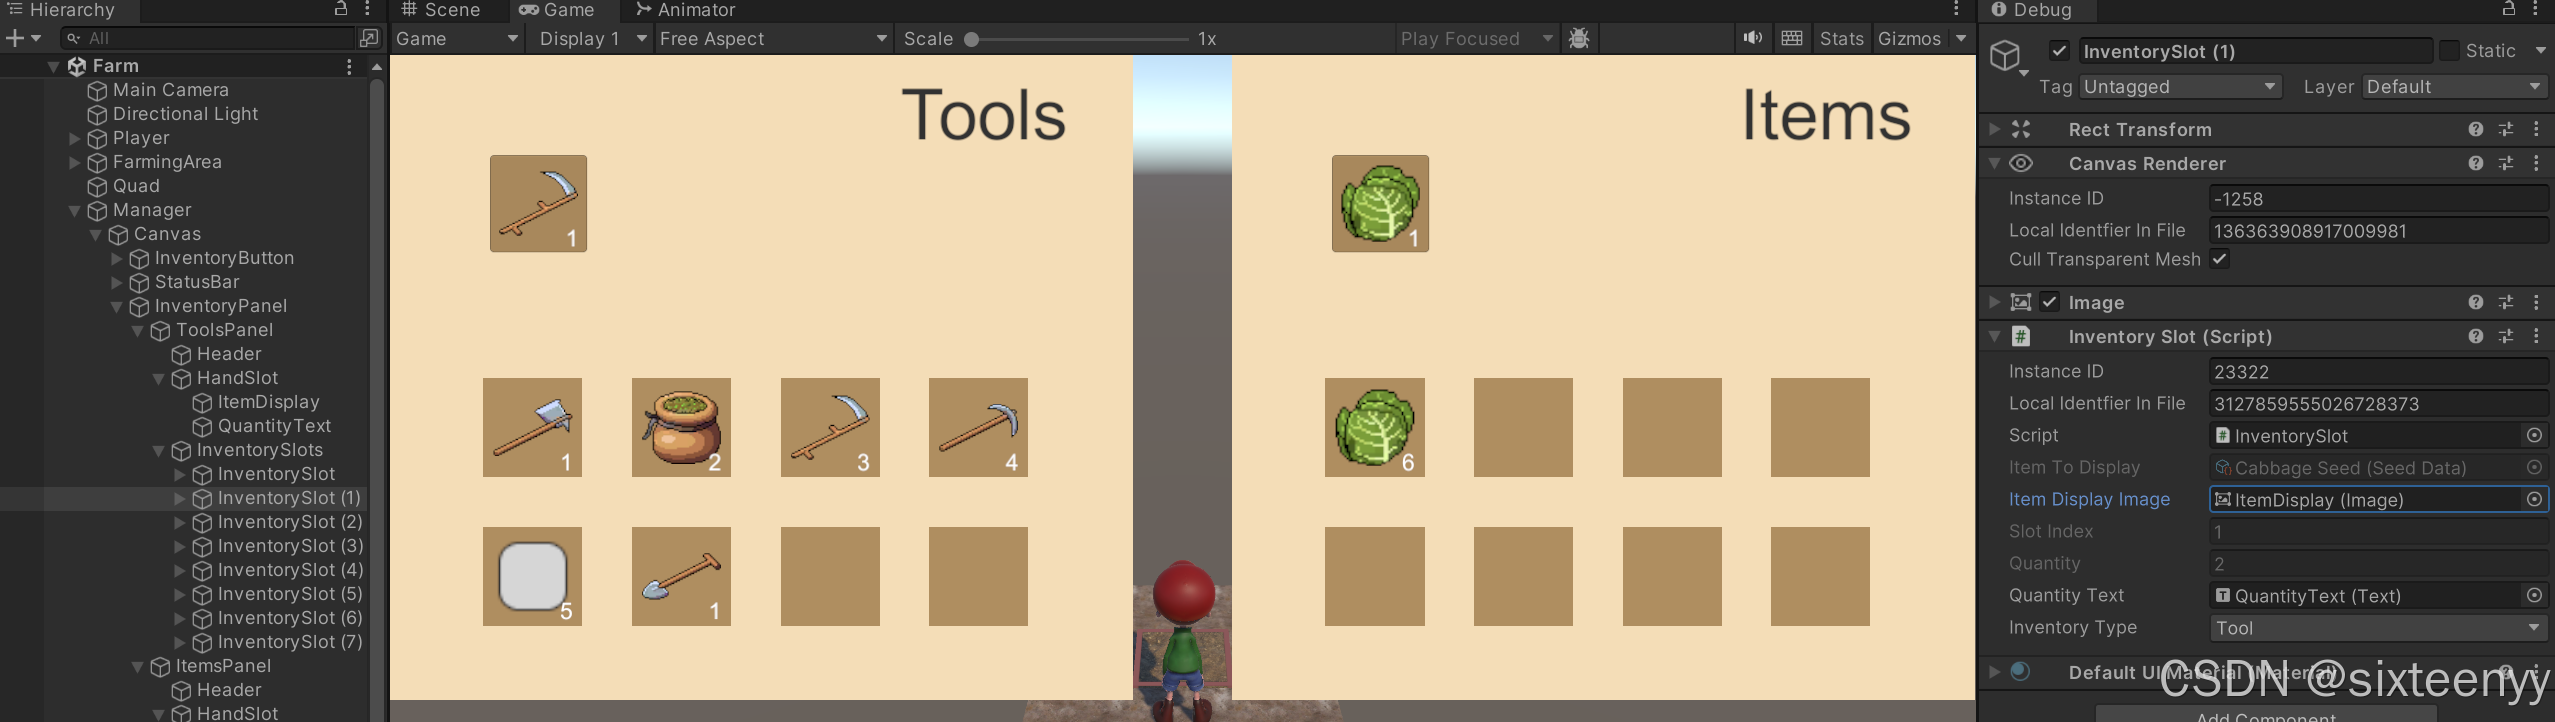
3、创建背包按钮:以Canvas为父物体,创建按钮,命名为InventoryButton,大小160,144
4、以Canvas为父物体,Create Empty。命名为InventoryPanel。Alt+Strech
5、工具栏
(1) 工具栏背景:以InventoryPanel为父物体,UI-Image,命名为ToolsPanel
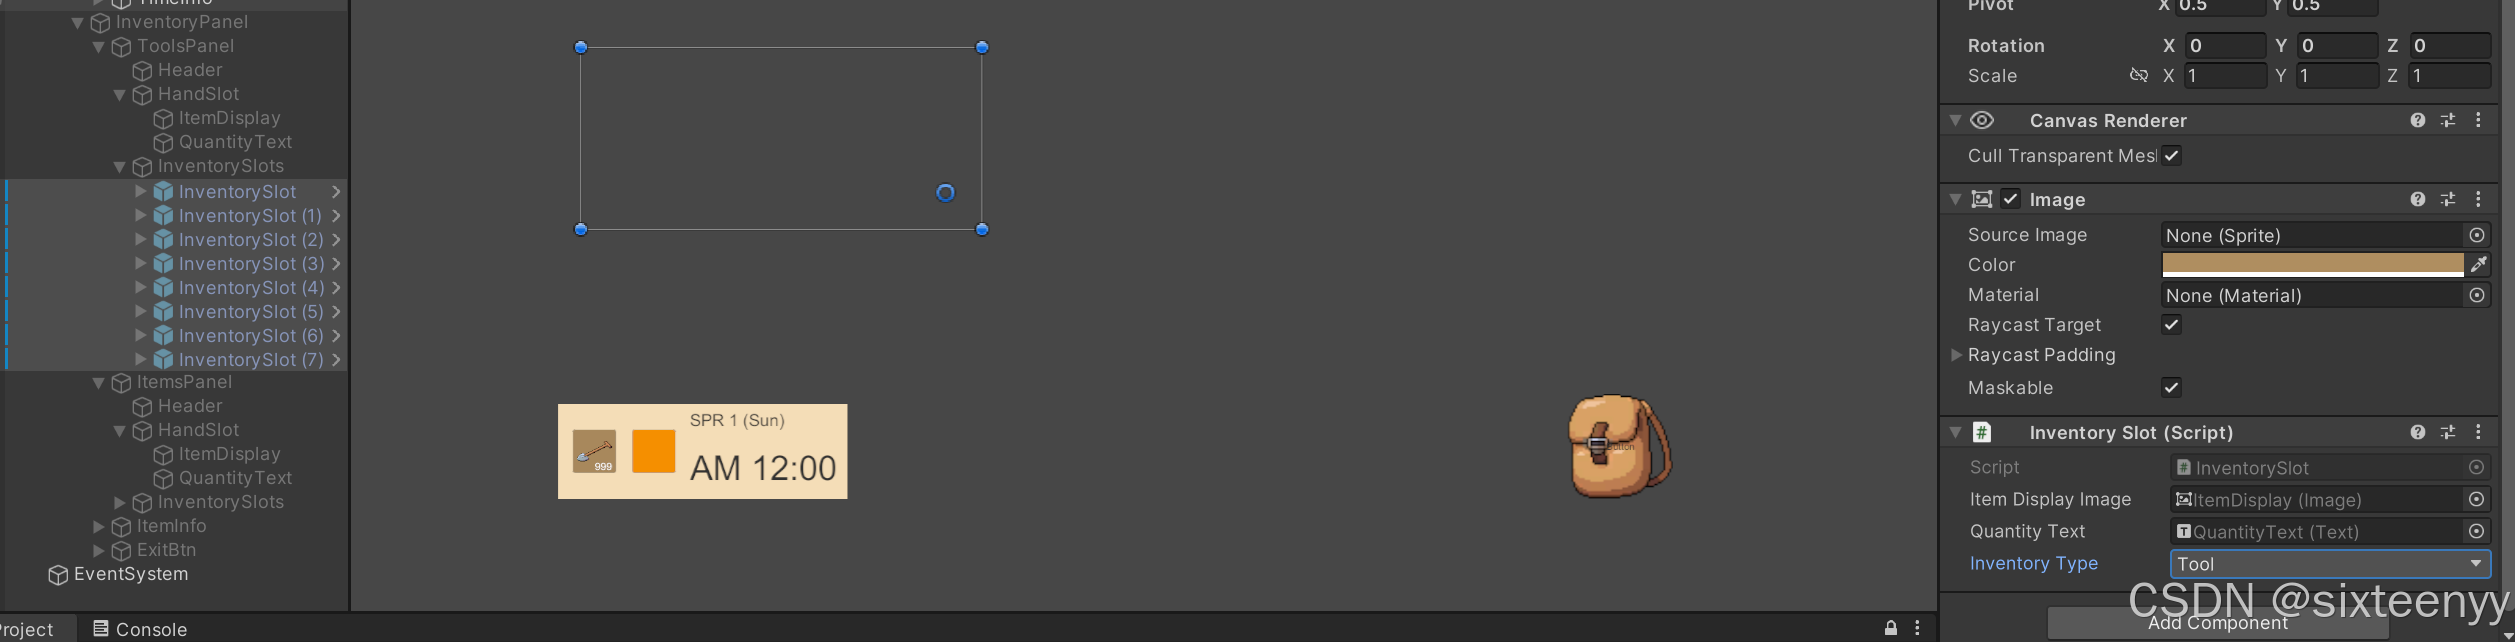
(2) 工具栏名称:以ToolsPanel为父物体,UI-Text,命名为Header
(3) 选中的工具槽:以ToolsPanel为父物体,UI-Image,命名为HandSlot。
(4) 工具槽预制体:
① 工具槽区域:
以ToolsPanel为父物体,Create Empty。命名为InventorySlots
添加Grid Layout Group组件
② 工具槽背景:
以InventorySlots为父物体,UI-Image
复制得到 8 个工具槽。选中InventorySlots,设置Grid Layout Group,使工具槽均匀分列两行
③ 工具槽预制体
删除复制出的Image,保留的Image重命名为InventorySlot,设置颜色AF8E60,
打开Prefabs文件夹,新建UI 文件夹,将InventorySlot制成预制体
④ 工具槽中工具缩略图
以InventorySlot(物品背景)为父物体,UI-Image,命名为ItemDisplay(物品缩略图)。
设置大小位置图片,勾选Preserve Aspect
⑤ 工具槽中的工具位:复制InventorySlot,得到8个工具位
6、物品栏(收获的物品)
(1) 复制ToolsPanel,重命名为ItemsPanel,调整到适当位置
(2) 更改文本Tools为Items
7、说明面板
(1) 背景:以InventoryPanel为父物体,UI-Image。命名为ItemInfo
(2) 说明文本(名称):以ItemInfo为父物体,UI-text,命名为ItemName
(3) 说明文本(描述):复制ItemName,命名为ItemDescription,设置大小字号等
8、隐藏InventoryPanel面板
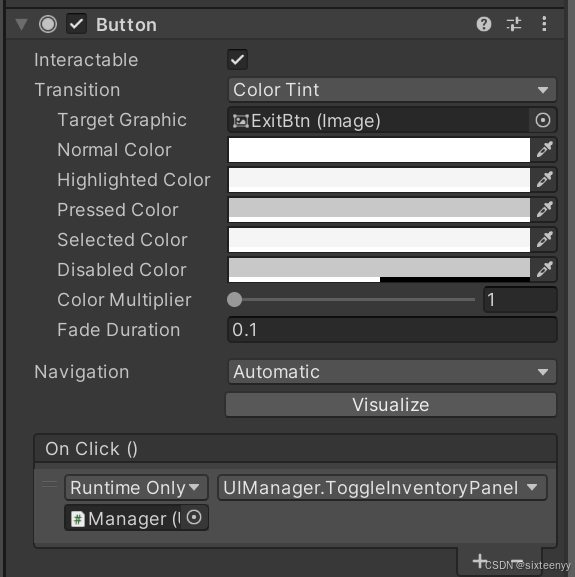
9、创建返回按钮:复制背包按钮,重命名为ExitBtn。放入InventoryPanel面板,设置大小颜色等
10、设置按钮
(1) 编辑UIManager.cs,设置UI面板显示或隐藏
using System.Collections;
using System.Collections.Generic;
using UnityEngine;public class UIManager : MonoBehaviour
{public static UIManager Instance { get; private set; }public GameObject inventoryPanle;private void Awake(){if (Instance != null && Instance != this) { Destroy(gameObject); }else { Instance = this; }}private void OnDestroy(){if (Instance == this) { Instance = null; }}public void ToggleInventoryPanel(){inventoryPanle.SetActive(!inventoryPanle.activeSelf);}
}
(2) 赋值
(3) 设置按钮:背包、返回两个按钮
二、显示物品缩略图
1、管理一个物品槽中的物品的属性和数量
(1) 打开Scripts-Inventory文件新建 ItemSlotData.cs
using System.Collections;
using System.Collections.Generic;
using UnityEngine;[System.Serializable]
public class ItemSlotData
{public ItemData itemData;public int quantity;public ItemSlotData(ItemData itemData, int quantity){this.itemData = itemData;this.quantity = quantity;ValidateQuantity();}public ItemSlotData(ItemData itemData){this.itemData = itemData;quantity = 1;ValidateQuantity();}public void AddQuantity(){AddQuantity(1);}public void AddQuantity(int amountToAdd){quantity += amountToAdd;}public void Remove(){quantity--;ValidateQuantity();}public void ValidateQuantity(){if (quantity <= 0 || itemData ==null){Empty();}}public void Empty(){itemData = null;quantity = 0;}
}
(2) 作用:根据传入的参数不同,创建不同的ItemSlotData对象,并设置该对象的数量
2、显示物品槽中物品的缩略图的方法
(1) 在UI文件夹下新建InventorySlot.cs,给打开预制体InventorySlot,添加这个组件
(2) 编辑InventorySlot.cs,通过Display方法显示物品缩略图
using System.Collections;
using System.Collections.Generic;
using UnityEngine;
using UnityEngine.UI;public class InventorySlot : MonoBehaviour
{ItemData itemToDisplay;public Image itemDisplayImage;public enum InventoryType { Item, Tool }public InventoryType inventoryType;public void Display(ItemSlotData itemSlot){itemToDisplay = itemSlot.itemData;if (itemToDisplay != null && itemToDisplay.thumbnail != null){itemDisplayImage.sprite = itemToDisplay.thumbnail;itemDisplayImage.gameObject.SetActive(true);return;}itemDisplayImage.gameObject.SetActive(false);this.itemToDisplay = null;}
}
(3) 打开InventorySlot 预制体,赋值
(4) 在Hierarchy面板,赋值Type
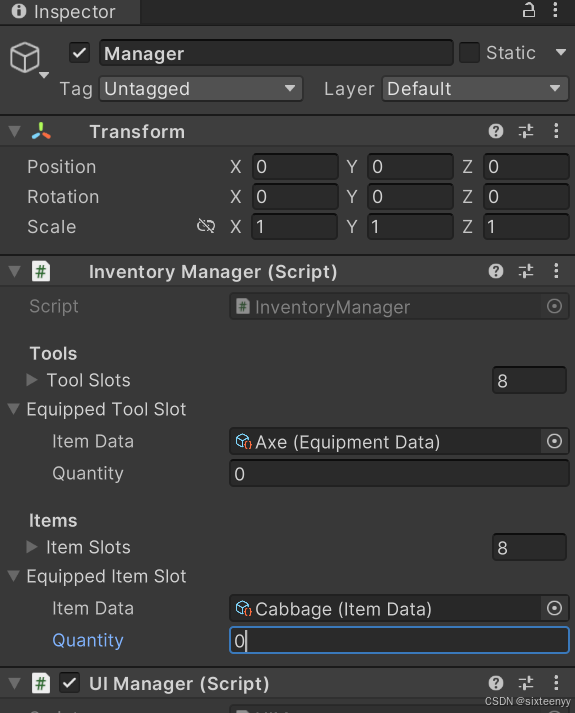
3、编辑InventoryManager.cs
(1) 初始化工具槽数组和工具槽,检查选中物体类型
using System.Collections;
using System.Collections.Generic;
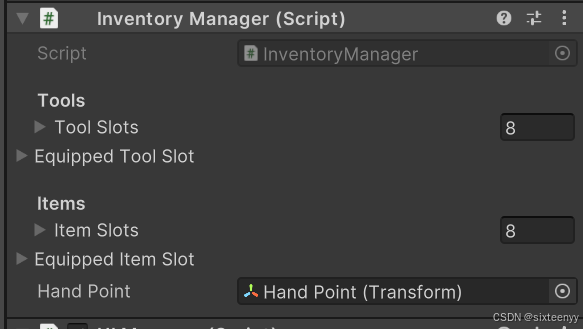
using UnityEngine;public class InventoryManager : MonoBehaviour
{public static InventoryManager Instance { get; private set; }[Header("Tools")][SerializeField] private ItemSlotData[] toolSlots = new ItemSlotData[8];[SerializeField] private ItemSlotData equippedToolSlot = null;[Header("Items")][SerializeField] private ItemSlotData[] itemSlots = new ItemSlotData[8];[SerializeField] private ItemSlotData equippedItemSlot = null;private void Awake(){if (Instance != null && Instance != this) { Destroy(gameObject); }else { Instance = this; }}private void OnDestroy(){if(Instance == this) { Instance = null; }}#region Gets and Checkspublic ItemSlotData[] GetInventorySlots(InventorySlot.InventoryType inventoryType){if(inventoryType == InventorySlot.InventoryType.Item) { return itemSlots; }return toolSlots;}#endregion
}(2) 赋值
4、编辑UIManager.cs
(1) 显示工具栏中工具的缩略图
using System.Collections;
using System.Collections.Generic;
using UnityEngine;public class UIManager : MonoBehaviour
{public static UIManager Instance { get; private set; }public GameObject inventoryPanle;public InventorySlot[] toolSlots;private void Awake(){if (Instance != null && Instance != this) { Destroy(gameObject); }else { Instance = this; }}private void OnDestroy(){if (Instance == this) { Instance = null; }}void Start(){RenderInventory();}public void RenderInventory(){ItemSlotData[] inventoryToolSlots =InventoryManager.Instance.
GetInventorySlots(InventorySlot.InventoryType.Tool);RenderInventoryPanel(inventoryToolSlots,toolSlots);}void RenderInventoryPanel(ItemSlotData[] slots, InventorySlot[] uiSlots){for (int i = 0; i < uiSlots.Length; i++){uiSlots[i].Display(slots[i]);}}public void ToggleInventoryPanel(){inventoryPanle.SetActive(!inventoryPanle.activeSelf);//注意增加更新物品栏内容的方法RenderInventory();}
}
(2) 赋值
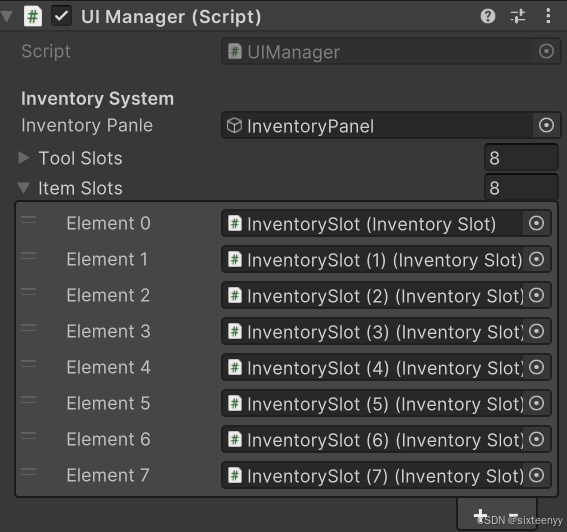
5、显示物品栏(收获物品)缩略图
(1) 编辑UIManager.cs,显示物品栏的缩略图
using System.Collections;
using System.Collections.Generic;
using UnityEngine;public class UIManager : MonoBehaviour
{public static UIManager Instance { get; private set; }//归类管理Unity编辑器的Inspector面板[Header("Inventory System")]public GameObject inventoryPanle;public InventorySlot[] toolSlots;//物品槽public InventorySlot[] itemSlots;private void Awake(){if (Instance != null && Instance != this) { Destroy(gameObject); }else { Instance = this; }}private void OnDestroy(){if (Instance == this) { Instance = null; }}void Start(){RenderInventory();}public void RenderInventory(){ItemSlotData[] inventoryToolSlots = InventoryManager.Instance.GetInventorySlots(InventorySlot.InventoryType.Tool);//物品槽ItemSlotData[] inventoryItemSlots = InventoryManager.Instance.GetInventorySlots(InventorySlot.InventoryType.Item);RenderInventoryPanel(inventoryToolSlots, toolSlots);//物品槽RenderInventoryPanel(inventoryItemSlots, itemSlots);}void RenderInventoryPanel(ItemSlotData[] slots, InventorySlot[] uiSlots){for (int i = 0; i < uiSlots.Length; i++){uiSlots[i].Display(slots[i]);}}public void ToggleInventoryPanel(){inventoryPanle.SetActive(!inventoryPanle.activeSelf);RenderInventory();}
}
(2) 赋值
三、显示物品名称和描述
1、设置文本
(1) 编辑UIManager.cs,设置文本应该显示的信息
//物品名称和描述文本
public Text itemNameText;
public Text itemDescriptionText;
public void DisplayItemInfo(ItemData data)
{if (data == null){itemNameText.text = "";itemDescriptionText.text = "";return;}itemNameText.text = data.name;itemDescriptionText.text = data.description;
}
(2) 赋值
2、编辑InventorySlot.cs, 增加鼠标悬停事件
//增加接口
public class InventorySlot : MonoBehaviour,IPointerEnterHandler,IPointerExitHandler
{public void OnPointerEnter(PointerEventData eventData){UIManager.Instance.DisplayItemInfo(itemToDisplay);}public void OnPointerExit(PointerEventData eventData){UIManager.Instance.DisplayItemInfo(null);}
}
四、显示物品数量
详细教程步骤二
1、添加物品数量文本
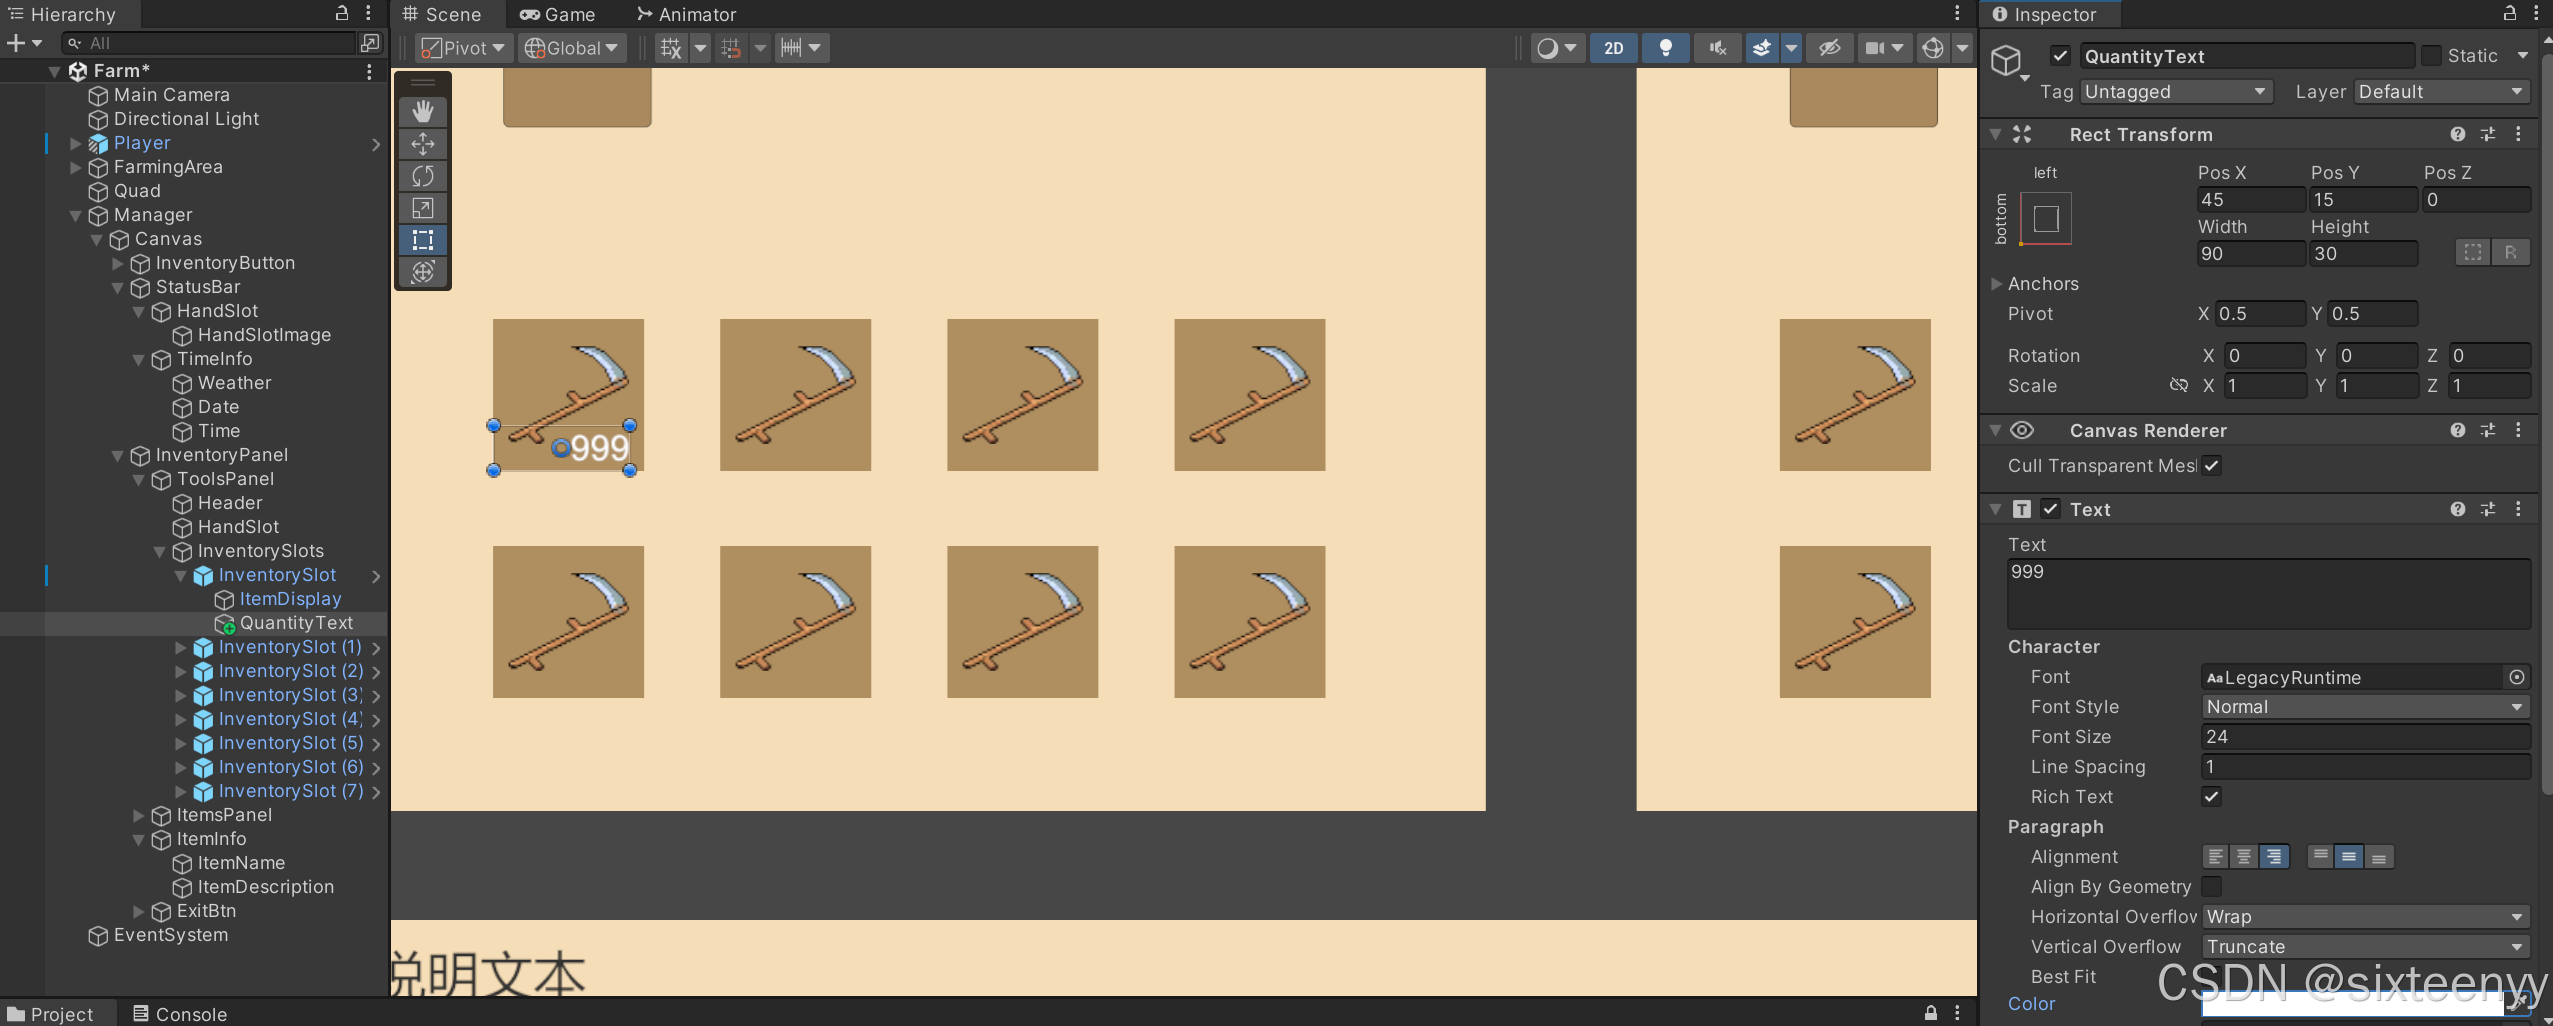
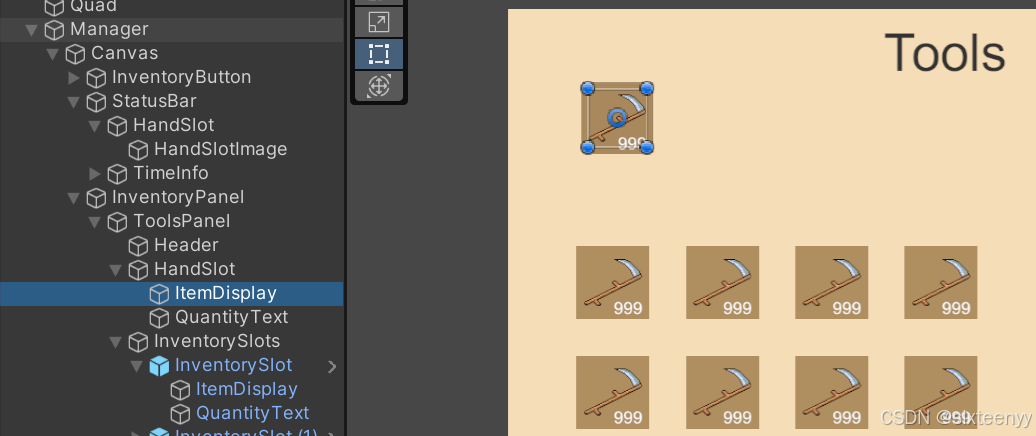
(1) 以HandSlot为父物体,UI-Text,重命名为QuantityText,设置大小位置文本字体段落颜色
(2) Apply 预制体InventorySlot的更改
2、验证物品栏槽位的有效性
(1) 编辑InventoryManager.cs
#region Inventory Slot validation
//在Unity编辑器中当脚本发生变化时自动调用,用于验证物品栏槽位的有效性
public void OnValidate()
{ValidateInventorySlots(itemSlots);ValidateInventorySlots(toolSlots);
}
//验证单个物品栏槽位的有效性。如果物品栏槽位中的物品存在但数量为0,则将数量设置为1
void ValidateInventorySlots(ItemSlotData slot)
{if(slot.itemData != null && slot.quantity == 0){slot.quantity = 1;}
}
//用于验证物品栏槽位数组中的所有槽位的有效性。
//通过循环调用ValidateInventorySlots(ItemSlotData slot)方法来验证每个槽位的有效性
void ValidateInventorySlots(ItemSlotData[] array)
{foreach(ItemSlotData slot in array){ValidateInventorySlots(slot);}
}
#endregion
(2) 假设各物品的初始数量(用于后续测试)
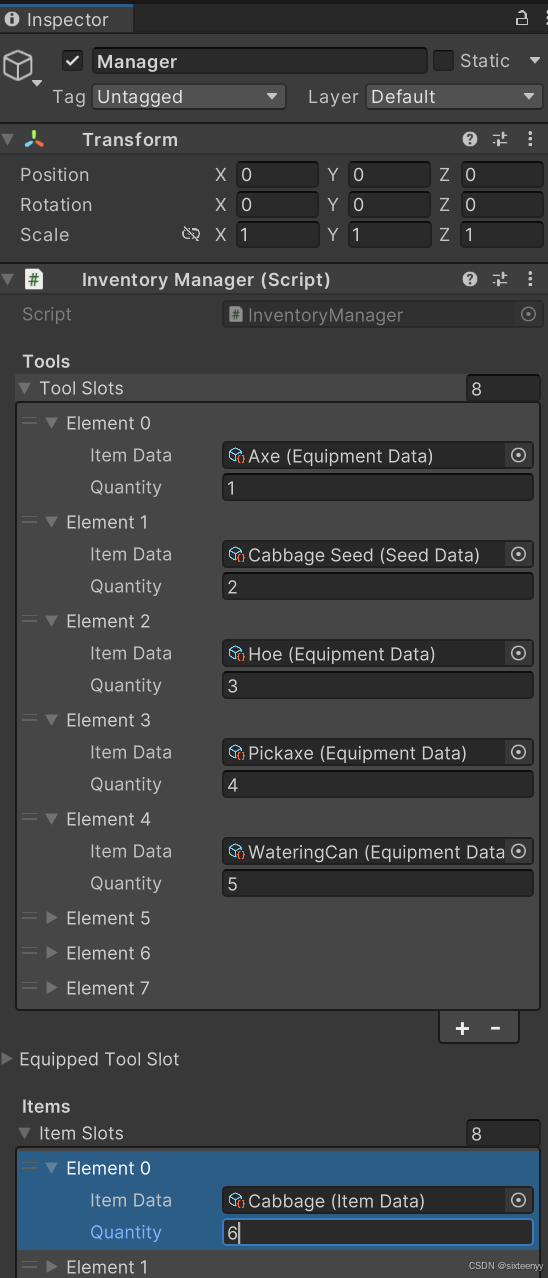
3、显示物品数量
(1) 编辑InventorySlot.cs, 增加需要显示物品的数量
using System.Collections;
using System.Collections.Generic;
using UnityEngine;
using UnityEngine.EventSystems;
using UnityEngine.UI;public class InventorySlot : MonoBehaviour,IPointerEnterHandler,IPointerExitHandler
{ItemData itemToDisplay;public Image itemDisplayImage;//物品数量int quantity;//数量文本public Text quantityText;public enum InventoryType { Item, Tool }public InventoryType inventoryType;public void Display(ItemSlotData itemSlot){itemToDisplay = itemSlot.itemData;//初始化数量quantity = itemSlot.quantity;//初始的数量文本quantityText.text = "";if (itemToDisplay != null && itemToDisplay.thumbnail != null){itemDisplayImage.sprite = itemToDisplay.thumbnail;//数量文本if (quantity > 1){quantityText.text = quantity.ToString();}itemDisplayImage.gameObject.SetActive(true);return;}itemDisplayImage.gameObject.SetActive(false);this.itemToDisplay = null;}public void OnPointerEnter(PointerEventData eventData){UIManager.Instance.DisplayItemInfo(itemToDisplay);}public void OnPointerExit(PointerEventData eventData){UIManager.Instance.DisplayItemInfo(null);}
}
(2) 赋值
物品槽和状态栏UI
详细教程 步骤十一、步骤十四
一、准备工作
1、状态栏背景:UI-Image,命名为StatusBar,调整大小、位置等。颜色F4DDB7
2、手持物品:复制一个HandSlot,作为StatusBar的子物体
3、时间框:以StatusBar为父物体,Create Empty,命名为TimeInfo
4、天气位:复制步骤 2 中的HandSlot,作为TimeInfo的子物体,命名为Weather
5、季节和星期:以TimeInfo为父物体UI-Text,重命名为Date
6、时间:以TimeInfo为父物体UI-Text,重命名为Time
7、在UI文件夹新建 HandInventorySlot.cs 作为InventorySlot.cs的子类
using System.Collections;
using System.Collections.Generic;
using UnityEngine;public class HandInventorySlot : InventorySlot
{}
8、装备物品槽缩略图和数量:
(1) 复制InventorySlot下的ItemDisplay,作为子物体粘贴到ToolPanel下的 HandSlot下
(2) 复制InventorySlot下的QuantityText,作为子物体粘贴到ToolPanel下的 HandSlot下
(3) 给ToolPanel下的 HandSlot 添加HandInventorySlot.cs组件,赋值,更改Inventory Type
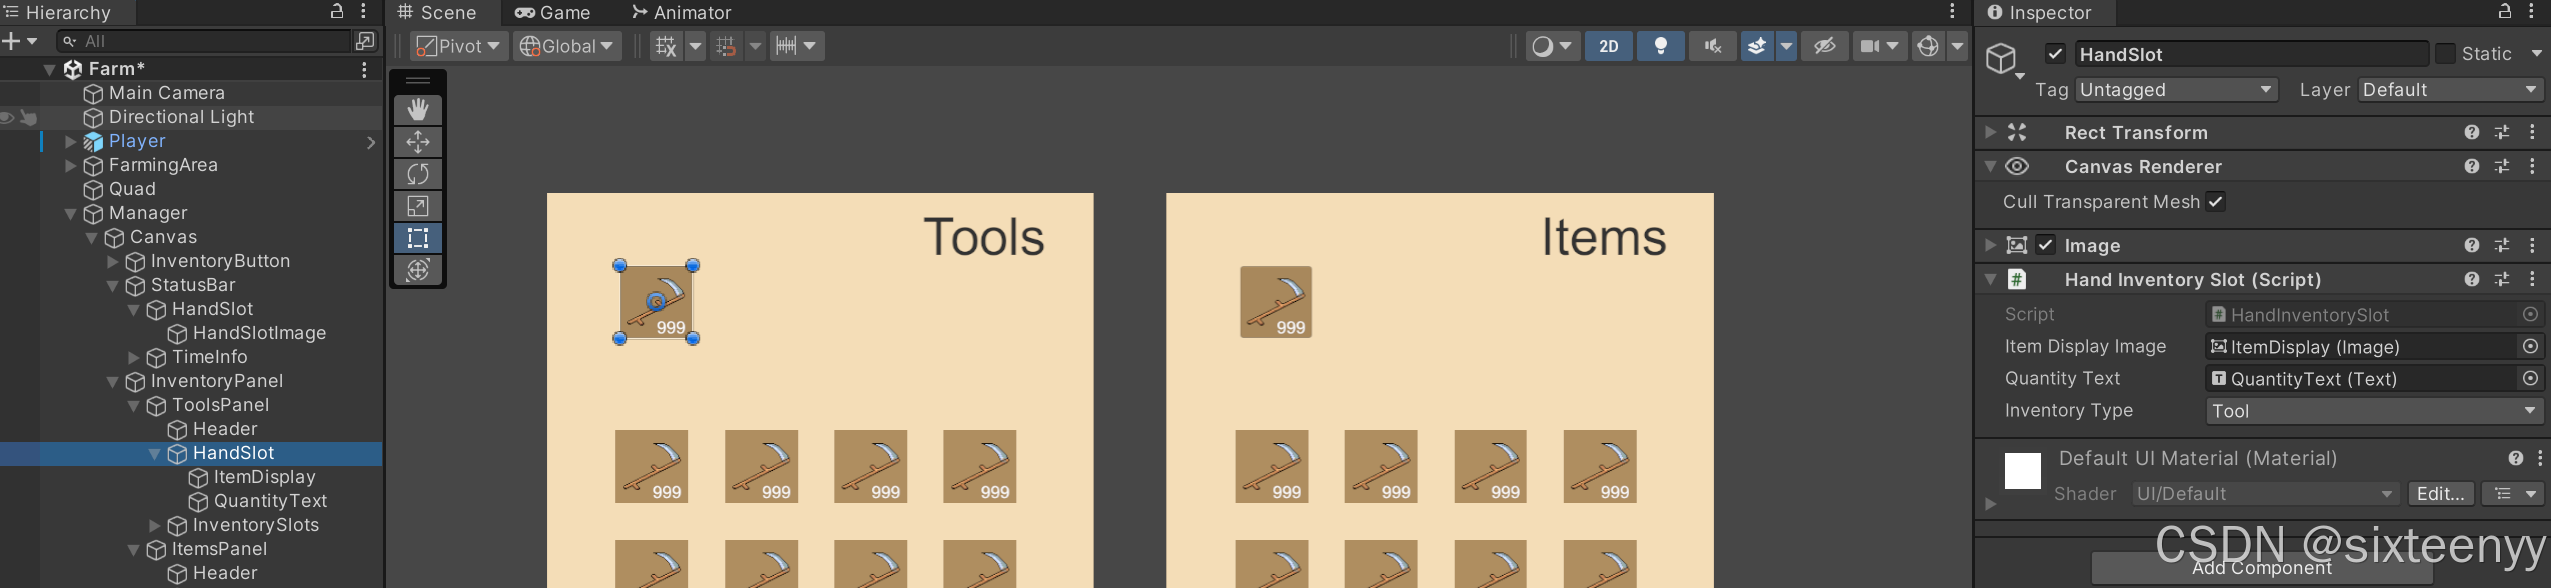
(4) 同样的方法设置ItemPanel下的 HandSlot
9、手持物品缩略图和数量:
(1) 以步骤2的HandSlot为父物体,UI-Image,命名为HandSlotImage
(2) 复制InventorySlot下的QuantityText,作为子物体粘贴到StatusBar下的 HandSlot下,调整大小
(3) 给StatusBar下的 HandSlot 添加HandInventorySlot.cs组件,赋值(注意更改Inventory Type)
二、装备物品槽缩略图
1、设定装备物品槽的类型
(1) 编辑 InventoryManager.cs
#region Gets and Checks
//待装备物品的类型
public ItemSlotData GetEquippedSlot(InventorySlot.InventoryType inventoryType)
{if(inventoryType == InventorySlot.InventoryType.Item){return equippedItemSlot;}return equippedToolSlot;
}
public ItemSlotData[] GetInventorySlots(InventorySlot.InventoryType inventoryType)
{if(inventoryType == InventorySlot.InventoryType.Item) {  return itemSlots; }return toolSlots;
}
#endregion
(2) 赋值
2、显示装备槽中的物品
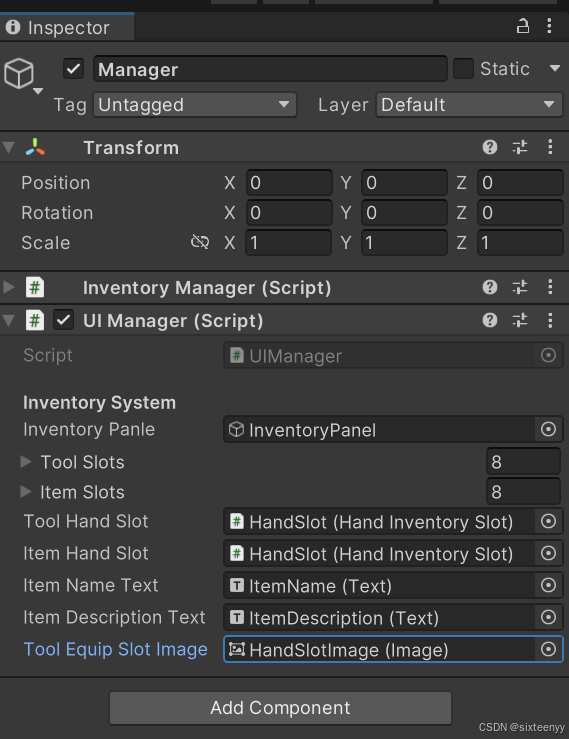
(1) 编辑UIManager.cs
//装备物品槽中的待装备物品
public HandInventorySlot toolHandSlot;
public HandInventorySlot itemHandSlot;
public void RenderInventory()
{ItemSlotData[] inventoryToolSlots = InventoryManager.Instance.GetInventorySlots(InventorySlot.InventoryType.Tool);RenderInventoryPanel(inventoryToolSlots, toolSlots);ItemSlotData[] inventoryItemSlots = InventoryManager.Instance.GetInventorySlots(InventorySlot.InventoryType.Item);RenderInventoryPanel(inventoryItemSlots, itemSlots);//待装备物品toolHandSlot.Display(InventoryManager.Instance.GetEquippedSlot(InventorySlot.InventoryType.Tool));itemHandSlot.Display(InventoryManager.Instance.GetEquippedSlot(InventorySlot.InventoryType.Item));
}
(2) 赋值
三、手持槽物品缩略图
1、设定和检查手持物品槽的类型: 编辑 InventoryManager.cs
#region Gets and Checks//手持槽的类型public ItemData GetEquippedSlotItem(InventorySlot.InventoryType inventoryType){if (inventoryType == InventorySlot.InventoryType.Item){return equippedItemSlot.itemData;}return equippedToolSlot.itemData;}//装备槽的类型public ItemSlotData GetEquippedSlot(InventorySlot.InventoryType inventoryType){if(inventoryType == InventorySlot.InventoryType.Item){return equippedItemSlot;}return equippedToolSlot;}//物品栏中物品槽的类型public ItemSlotData[] GetInventorySlots(InventorySlot.InventoryType inventoryType){if(inventoryType == InventorySlot.InventoryType.Item) { return itemSlots; }return toolSlots;}//工具还是种子public bool IsTool(ItemData item){EquipmentData equipment = item as EquipmentData;if (equipment != null) { return true; }SeedData seed = item as SeedData;return seed != null;}#endregion2、显示手持槽中的物品
(1) 编辑UIManager.cs
//手持物品
public Image toolEquipSlotImage;
public void RenderInventory()
{ItemSlotData[] inventoryToolSlots = InventoryManager.Instance.GetInventorySlots(InventorySlot.InventoryType.Tool);RenderInventoryPanel(inventoryToolSlots, toolSlots);ItemSlotData[] inventoryItemSlots = InventoryManager.Instance.GetInventorySlots(InventorySlot.InventoryType.Item);RenderInventoryPanel(inventoryItemSlots, itemSlots);toolHandSlot.Display(InventoryManager.Instance.GetEquippedSlot(InventorySlot.InventoryType.Tool));itemHandSlot.Display(InventoryManager.Instance.GetEquippedSlot(InventorySlot.InventoryType.Item));//手持槽物品ItemData equippedTool = InventoryManager.Instance.GetEquippedSlotItem(InventorySlot.InventoryType.Tool);if (equippedTool != null){toolEquipSlotImage.sprite = equippedTool.thumbnail;toolEquipSlotImage.gameObject.SetActive(true);return;}toolEquipSlotImage.gameObject.SetActive(false);
}
(2) 赋值
物品交换
一、为物品分配索引值
1、分配被点击物品的索引:编辑InventorySlot.cs,把被点击物品的索引分配给this.slotIndex
//点击的物品槽的索引
int slotIndex;
//把被点击物品的索引分配给this.slotIndex
public void AssignIndex(int slotIndex)
{this.slotIndex = slotIndex;
}
2、为物品栏中的每一个物品分配一个索引值:
(1) 编辑UIManager.cs,创建并在Start方法中调用AssignSlotIndex()方法
void Start()
{RenderInventory();//调用方法AssignSlotIndex();
}
//遍历……数组,并为数组中的每个 InventorySlot 对象分配一个索引值
public void AssignSlotIndex()
{for(int i = 0; i < toolSlots.Length; i++){toolSlots[i].AssignIndex(i);itemSlots[i].AssignIndex(i);}
}
(2) 索引值被传递给InventorySlot.cs中的AssignIndex(int slotIndex)方法,并在slotIndex中显示出来
二、物品槽到装备槽
1、编辑 ItemSlotData.cs
(1) 比较两个物体的itemData属性是否相同(是不是同一种物体——用于堆叠物品)
(2) 判断某itemData是否为空,可结合Empty方法,用于清空物品槽中的物品
using System.Collections;
using System.Collections.Generic;
using UnityEngine;[System.Serializable]
public class ItemSlotData
{public ItemData itemData;public int quantity;public ItemSlotData(ItemData itemData, int quantity){this.itemData = itemData;this.quantity = quantity;ValidateQuantity();}public ItemSlotData(ItemData itemData){this.itemData = itemData;quantity = 1;ValidateQuantity();}public ItemSlotData(ItemSlotData slotToClone){itemData = slotToClone.itemData;quantity = slotToClone.quantity;}public void AddQuantity(){AddQuantity(1);}public void AddQuantity(int amountToAdd){quantity += amountToAdd;}public void Remove(){quantity--;ValidateQuantity();}//比较传入的参数slotToCompare和当前ItemSlotData对象(this)的的itemData属性是否相同//并返回一个布尔值//具体作用:判断二者是否可以叠加//调用方法:A.Stackalbe(B);public bool Stackable(ItemSlotData slotToCompare){return slotToCompare.itemData == itemData;}public void ValidateQuantity(){if (quantity <= 0 || itemData == null){Empty();}}public void Empty(){itemData = null;quantity = 0;}//判断ItemSlotData对象的itemData属性是否为空(null)public bool IsEmpty(){return itemData == null;}
}
2、编辑 InventoryManager.cs
(1) 增加两个物品转移的方法
public void InventoryToHand(int slotIndex,InventorySlot.InventoryType inventoryType)
{Debug.Log("装备物品");
}
public void HandToInventory(InventorySlot.InventoryType inventoryType)
{Debug.Log("收回物品");
}
(2) 检查装备槽位
public void OnValidate()
{//检查装备槽位ValidateInventorySlots(equippedToolSlot);ValidateInventorySlots(equippedItemSlot);//检查物品栏中的物品槽位ValidateInventorySlots(itemSlots);ValidateInventorySlots(toolSlots);
}
(3) 依据选中槽所属的类型,将选中槽赋值给变量handToEquip
public void InventoryToHand(int slotIndex,InventorySlot.InventoryType inventoryType){ItemSlotData handToEquip;ItemSlotData[] inventoryToAlter;if (inventoryType == InventorySlot.InventoryType.Item){handToEquip = equippedItemSlot;inventoryToAlter = itemSlots;}else{handToEquip = equippedToolSlot;inventoryToAlter = toolSlots;}}
(3) 增加将物品槽中的物品复制到装备槽的方法
public void EquipHandSlot(ItemData item)
{if (IsTool(item)){equippedToolSlot = new ItemSlotData(item);}else{equippedItemSlot = new ItemSlotData(item);}
}
//根据物品类型将选中物品由物品槽复制到装备槽
public void EquipHandSlot(ItemSlotData itemSlot)
{//获取选中物品槽的物品数据ItemData item = itemSlot.itemData;//调用IsTool方法检查物品类型if (IsTool(item)){//(物品是工具类型)将 itemSlot 中的物品数据复制到 equippedToolSlot 中equippedToolSlot = new ItemSlotData(itemSlot);}else{//如果物品不是工具类型,将 itemSlot 中的物品数据复制到 equippedItemSlot 中equippedItemSlot = new ItemSlotData(itemSlot);}
}
(4) 工具槽中的物品转移到装备槽(堆叠或转移)
public void InventoryToHand(int slotIndex,InventorySlot.InventoryType inventoryType){ItemSlotData handToEquip;ItemSlotData[] inventoryToAlter;if (inventoryType == InventorySlot.InventoryType.Item){handToEquip = equippedItemSlot;inventoryToAlter = itemSlots;}else{handToEquip = equippedToolSlot;inventoryToAlter = toolSlots;}//(选中槽与装备槽物品相同)可以堆叠,同时清空选中槽物品if (handToEquip.Stackable(inventoryToAlter[slotIndex])){ItemSlotData slotToAlter = inventoryToAlter[slotIndex];handToEquip.AddQuantity(slotToAlter.quantity);slotToAlter.Empty();}//不能堆叠,选中槽物品转移到装备槽,同时清空选中槽物品else{//将 inventoryToAlter 数组中的指定索引 slotIndex 的值赋给临时变量 slotToEquipItemSlotData slotToEquip = new ItemSlotData(inventoryToAlter[slotIndex]);//将 handToEquip 的值赋给 inventoryToAlter 数组中的指定索引 slotIndexinventoryToAlter[slotIndex] = new ItemSlotData(handToEquip);//临时变量中的物品复制到装备槽EquipHandSlot(slotToEquip);//清空handToEquip 的值handToEquip.Empty();}UIManager.Instance.RenderInventory();} 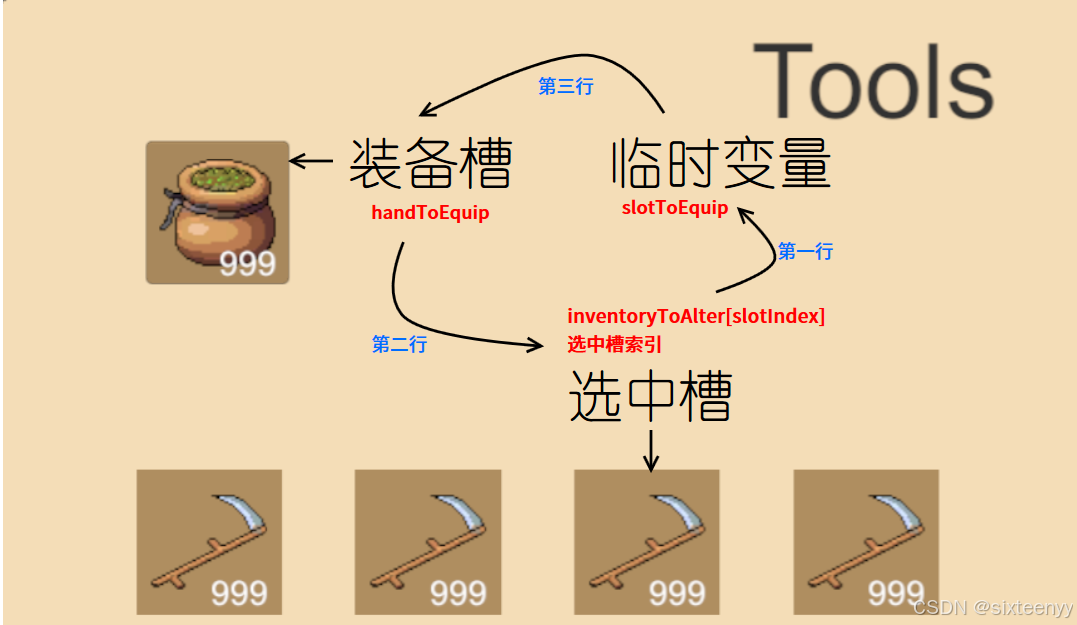
3、编辑 InventorySlot.cs,实现物品转移
(1) 增加鼠标点击事件,调用InventoryManager.cs方法
using System.Collections;
using System.Collections.Generic;
using UnityEngine;
using UnityEngine.EventSystems;
using UnityEngine.UI;//增加点击事件接口
public class InventorySlot : MonoBehaviour,IPointerEnterHandler,IPointerExitHandler,IPointerClickHandler
{ItemData itemToDisplay;public Image itemDisplayImage;//点击的物品槽的索引int slotIndex;int quantity;public Text quantityText;public enum InventoryType { Item, Tool }public InventoryType inventoryType;public void Display(ItemSlotData itemSlot){itemToDisplay = itemSlot.itemData;quantity = itemSlot.quantity;quantityText.text = "";if (itemToDisplay != null && itemToDisplay.thumbnail != null){itemDisplayImage.sprite = itemToDisplay.thumbnail;if (quantity > 1){quantityText.text = quantity.ToString();}itemDisplayImage.gameObject.SetActive(true);return;}itemDisplayImage.gameObject.SetActive(false);this.itemToDisplay = null;}public void AssignIndex(int slotIndex){this.slotIndex = slotIndex;}public void OnPointerEnter(PointerEventData eventData){UIManager.Instance.DisplayItemInfo(itemToDisplay);}public void OnPointerExit(PointerEventData eventData){UIManager.Instance.DisplayItemInfo(null);}//点击事件(注意可重写)public virtual void OnPointerClick(PointerEventData eventData){InventoryManager.Instance.InventoryToHand(slotIndex, inventoryType);}
}
(2) 解析:调用InventoryManager.cs方法。传入的参数:点击的物品槽索引,所处的物品栏类型
4、重写点击事件:
(1) 目的:点击已装备槽时,调用InventoryMagager类中的HandToInventory方法
(2) 编辑HandInventorySlot.cs,传入参数为点击选中槽所属的类型
using System.Collections;
using System.Collections.Generic;
using UnityEngine;
using UnityEngine.EventSystems;public class HandInventorySlot : InventorySlot
{public override void OnPointerClick(PointerEventData eventData){InventoryManager.Instance.HandToInventory(inventoryType);}
}
三、装备槽到物品槽
1、编辑 InventoryManager.cs
(1) 增加装备槽复制到物品槽的方法
#region 物品交换的方法//根据物品类型将装备槽中的物品由装备槽复制到物品槽public bool StackItemToInventory(ItemSlotData itemSlot, ItemSlotData[] inventoryArray){//遍历inventoryArray(某类物品栏的物品槽数组)for (int i = 0; i < inventoryArray.Length; i++){//可以堆叠(装备槽物品与物品栏中的某种物品是同种物品)if (inventoryArray[i].Stackable(itemSlot)){inventoryArray[i].AddQuantity(itemSlot.quantity);itemSlot.Empty();return true;}}return false;}public void EquipHandSlot(ItemSlotData itemSlot){ItemData item = itemSlot.itemData;if (IsTool(item)){equippedToolSlot = new ItemSlotData(itemSlot);}else{equippedItemSlot = new ItemSlotData(itemSlot);}}#endregion(2) 编辑物品由装备槽转移到物品槽的方法
public void HandToInventory(InventorySlot.InventoryType inventoryType){ItemSlotData handSlot;ItemSlotData[] inventoryToAlter;//确定点击物品的类型并赋值if(inventoryType == InventorySlot.InventoryType.Item){handSlot = equippedItemSlot;inventoryToAlter = itemSlots;}else{handSlot = equippedToolSlot;inventoryToAlter = toolSlots;}if(!StackItemToInventory(handSlot, inventoryToAlter)){for(int i = 0; i < inventoryToAlter.Length; i++){if (inventoryToAlter[i].IsEmpty()){inventoryToAlter[i] = new ItemSlotData(handSlot);handSlot.Empty();break;}}}UIManager.Instance.RenderInventory();}
if (!StackItemToInventory(handSlot, inventoryToAlter)){}
① 先执行StackItemToInventory() 方法,返回一个bool值
② 若物品可以堆叠,则StackItemToInventory() 方法返回的值为true,
if (!StackItemToInventory(handSlot, inventoryToAlter)){}该语句不能执行
③ 若物品不能堆叠,则StackItemToInventory() 方法返回的值为false,
执行 if (!StackItemToInventory(handSlot, inventoryToAlter)){}
2、InventoryManager.cs 的完整代码
using System.Collections;
using System.Collections.Generic;
using UnityEngine;public class InventoryManager : MonoBehaviour
{public static InventoryManager Instance { get; private set; }[Header("Tools")][SerializeField] private ItemSlotData[] toolSlots = new ItemSlotData[8];[SerializeField] private ItemSlotData equippedToolSlot = null;[Header("Items")][SerializeField] private ItemSlotData[] itemSlots = new ItemSlotData[8];[SerializeField] private ItemSlotData equippedItemSlot = null;private void Awake(){if (Instance != null && Instance != this) { Destroy(gameObject); }else { Instance = this; }}private void OnDestroy(){if(Instance == this) { Instance = null; }}public void InventoryToHand(int slotIndex,InventorySlot.InventoryType inventoryType){ItemSlotData handToEquip;ItemSlotData[] inventoryToAlter;if (inventoryType == InventorySlot.InventoryType.Item){handToEquip = equippedItemSlot;inventoryToAlter = itemSlots;}else{handToEquip = equippedToolSlot;inventoryToAlter = toolSlots;}if (handToEquip.Stackable(inventoryToAlter[slotIndex])){ItemSlotData slotToAlter = inventoryToAlter[slotIndex];handToEquip.AddQuantity(slotToAlter.quantity);slotToAlter.Empty();}else{ItemSlotData slotToEquip = new ItemSlotData(inventoryToAlter[slotIndex]);inventoryToAlter[slotIndex] = new ItemSlotData(handToEquip);EquipHandSlot(slotToEquip);handToEquip.Empty();}UIManager.Instance.RenderInventory();}public void HandToInventory(InventorySlot.InventoryType inventoryType){ItemSlotData handSlot;ItemSlotData[] inventoryToAlter;if(inventoryType == InventorySlot.InventoryType.Item){handSlot = equippedItemSlot;inventoryToAlter = itemSlots;}else{handSlot = equippedToolSlot;inventoryToAlter = toolSlots;}//将装备槽中的物品堆叠到相应的物品槽中if (!StackItemToInventory(handSlot, inventoryToAlter)){for(int i = 0; i < inventoryToAlter.Length; i++){if (inventoryToAlter[i].IsEmpty()){inventoryToAlter[i] = new ItemSlotData(handSlot);handSlot.Empty();break;}}}UIManager.Instance.RenderInventory();}#region Gets and Checks//手持物品槽的类型public ItemData GetEquippedSlotItem(InventorySlot.InventoryType inventoryType){if (inventoryType == InventorySlot.InventoryType.Item){return equippedItemSlot.itemData;}return equippedToolSlot.itemData;}//选中物品槽的类型public ItemSlotData GetEquippedSlot(InventorySlot.InventoryType inventoryType){if(inventoryType == InventorySlot.InventoryType.Item){return equippedItemSlot;}return equippedToolSlot;}//物品栏中物品槽的类型public ItemSlotData[] GetInventorySlots(InventorySlot.InventoryType inventoryType){if(inventoryType == InventorySlot.InventoryType.Item) {  return itemSlots; }return toolSlots;}//检查特定类型的槽位是否已经装备了物品public bool SlotEquipped(InventorySlot.InventoryType inventoryType){if (inventoryType == InventorySlot.InventoryType.Item){return !equippedItemSlot.IsEmpty();}return !equippedToolSlot.IsEmpty();}//检查给定的物品是否为工具,若为工具或种子,返回为true,否则返回falsepublic bool IsTool(ItemData item){//将 item 强制转换为 EquipmentData 类型,并将结果赋值给 equipment 变量EquipmentData equipment = item as EquipmentData;if (equipment != null){return true;}SeedData seed = item as SeedData;return seed != null;}#endregion#region 物品交换的方法//根据物品类型将装备槽中的物品由装备槽复制到物品槽public bool StackItemToInventory(ItemSlotData itemSlot, ItemSlotData[] inventoryArray){//遍历inventoryArray(某类物品栏的物品槽数组)for (int i = 0; i < inventoryArray.Length; i++){//可以堆叠(装备槽物品与物品栏中的某种物品是同种物品)if (inventoryArray[i].Stackable(itemSlot)){inventoryArray[i].AddQuantity(itemSlot.quantity);itemSlot.Empty();return true;}}return false;}//根据物品类型将选中物品由物品槽复制到装备槽public void EquipHandSlot(ItemSlotData itemSlot){//获取选中物品槽的物品数据ItemData item = itemSlot.itemData;//调用IsTool方法检查物品类型if (IsTool(item)){//(物品是工具类型)将 itemSlot 中的物品数据复制到 equippedToolSlot 中equippedToolSlot = new ItemSlotData(itemSlot);}else{//如果物品不是工具类型,将 itemSlot 中的物品数据复制到 equippedItemSlot 中equippedItemSlot = new ItemSlotData(itemSlot);}}#endregion#region Inventory Slot validation(验证物品栏槽位的有效性)public void OnValidate(){//检查装备槽位ValidateInventorySlots(equippedToolSlot);ValidateInventorySlots(equippedItemSlot);ValidateInventorySlots(itemSlots);ValidateInventorySlots(toolSlots);}void ValidateInventorySlots(ItemSlotData slot){if(slot.itemData != null && slot.quantity == 0){slot.quantity = 1;}}void ValidateInventorySlots(ItemSlotData[] array){foreach(ItemSlotData slot in array){ValidateInventorySlots(slot);}}#endregion
}状态栏物品和数量
1、编辑UIManager.cs
using System.Collections;
using System.Collections.Generic;
using UnityEngine;
using UnityEngine.UI;public class UIManager : MonoBehaviour
{public static UIManager Instance { get; private set; }[Header("Inventory System")]public GameObject inventoryPanle;public InventorySlot[] toolSlots;public InventorySlot[] itemSlots;public HandInventorySlot toolHandSlot;public HandInventorySlot itemHandSlot;public Text itemNameText;public Text itemDescriptionText;//状态栏工具数量public Text toolQuantityText;public Image toolEquipSlotImage;private void Awake(){if (Instance != null && Instance != this) { Destroy(gameObject); }else { Instance = this; }}private void OnDestroy(){if (Instance == this) { Instance = null; }}void Start(){RenderInventory();AssignSlotIndex();}public void AssignSlotIndex(){for(int i = 0; i < toolSlots.Length; i++){toolSlots[i].AssignIndex(i);itemSlots[i].AssignIndex(i);}}public void RenderInventory(){ItemSlotData[] inventoryToolSlots = InventoryManager.Instance.GetInventorySlots
(InventorySlot.InventoryType.Tool);RenderInventoryPanel(inventoryToolSlots, toolSlots);ItemSlotData[] inventoryItemSlots = InventoryManager.Instance.GetInventorySlots
(InventorySlot.InventoryType.Item);RenderInventoryPanel(inventoryItemSlots, itemSlots);toolHandSlot.Display(InventoryManager.Instance.GetEquippedSlot
(InventorySlot.InventoryType.Tool));itemHandSlot.Display(InventoryManager.Instance.GetEquippedSlot
(InventorySlot.InventoryType.Item));//手持槽物品ItemData equippedTool = InventoryManager.Instance.GetEquippedSlotItem
(InventorySlot.InventoryType.Tool);//状态栏工具数量的文本toolQuantityText.text = "";if (equippedTool != null){toolEquipSlotImage.sprite = equippedTool.thumbnail;toolEquipSlotImage.gameObject.SetActive(true);//显示状态栏上的工具的数量int quantity = InventoryManager.Instance.GetEquippedSlot
(InventorySlot.InventoryType.Tool).quantity;if (quantity > 1){toolQuantityText.text = quantity.ToString();}return;}toolEquipSlotImage.gameObject.SetActive(false);}void RenderInventoryPanel(ItemSlotData[] slots, InventorySlot[] uiSlots){for (int i = 0; i < uiSlots.Length; i++){uiSlots[i].Display(slots[i]);}}public void DisplayItemInfo(ItemData data){if (data == null){itemNameText.text = "";itemDescriptionText.text = "";return;}itemNameText.text = data.name;itemDescriptionText.text = data.description;}public void ToggleInventoryPanel(){inventoryPanle.SetActive(!inventoryPanle.activeSelf);RenderInventory();}
}
2、赋值
更换土壤状态
详细教程步骤六、2
一、手持农具
1、编辑Player预制体,添加手持物体的位置
以mixamorig6:RightHand为父物体,Create Empty,重命名为Hand Point
2、添加农具模型
(1) 编辑InventoryManager.cs,创建并调用手持农具的方法
//手持物体的位置
public Transform handPoint;
public void InventoryToHand(int slotIndex,InventorySlot.InventoryType inventoryType)
{//其它代码//手持农具if (inventoryType == InventorySlot.InventoryType.Tool){RenderHand();}UIManager.Instance.RenderInventory();
}
//手持农具的方法
public void RenderHand()
{if (handPoint.childCount > 0){Destroy(handPoint.GetChild(0).gameObject);}if (SlotEquipped(InventorySlot.InventoryType.Tool)){Instantiate(GetEquippedSlotItem(InventorySlot.InventoryType.Tool).gameModel, handPoint);}
}
//检查手持的槽位是否已经装备了物品public bool SlotEquipped(InventorySlot.InventoryType inventoryType){if (inventoryType == InventorySlot.InventoryType.Item){return !equippedItemSlot.IsEmpty();}return !equippedToolSlot.IsEmpty();}
(2) 解析
public bool IsEmpty()
{return itemData == null;
}
equippedToolSlot.IsEmpty() :判断 equippedToolSlot 是否为空,如果为空,IsEmpty()返回 true
public bool SlotEquipped(InventorySlot.InventoryType inventoryType)
{return !equippedToolSlot.IsEmpty();
}
!equippedToolSlot.IsEmpty() :取反。
如果equippedToolSlot为空,IsEmpty()返回 true,SlotEquipped()返回false,即:槽位未装备物品
if (SlotEquipped(InventorySlot.InventoryType.Tool))
{Instantiate(GetEquippedSlotItem(InventorySlot.InventoryType.Tool).gameModel,handPoint);
}
if (SlotEquipped(InventorySlot.InventoryType.Tool)) :如果槽位装备物品,在手持位生成该物品模型
(3) 赋值
3、装备和卸下农具
(1) 编辑InventoryManager.cs
public void HandToInventory(InventorySlot.InventoryType inventoryType){//其它代码//卸下农具if(inventoryType == InventorySlot.InventoryType.Tool){RenderHand();}UIManager.Instance.RenderInventory();}二、更改土壤状态
1、编辑Land.cs
public void Interact(){//根据点击事件决定土壤状态ItemData toolSlot = InventoryManager.Instance.GetEquippedSlotItem(InventorySlot.InventoryType.Tool);if (!InventoryManager.Instance.SlotEquipped(InventorySlot.InventoryType.Tool)){return;}EquipmentData equipmentTool = toolSlot as EquipmentData;if (equipmentTool != null){EquipmentData.ToolType toolType = equipmentTool.Type;switch (toolType){case EquipmentData.ToolType.Hoe: SwitchLandStatus(LandStatus.Farmland); break;case EquipmentData.ToolType.WateringCan: if (landStatus == LandStatus.Farmland||landStatus ==LandStatus.Watered){SwitchLandStatus(LandStatus.Watered);}break;}}}时间管理系统
详细教程 步骤二
一、设置时间逻辑
1、设定年季周、日时分:Scripts文件夹下创建Time 文件夹,其下创建GameTimestamp.cs,
using System.Collections;
using System.Collections.Generic;
using UnityEngine;
[Serializable]
public class GameTimestamp
{public int year;public enum Season { Spring, Summer, Fall, Winter }public Season season;public enum DayOfTheWeek { Saturday, Sunday, Monday, Tuesday, Wednesday, Thursday, Friday }public int day, hour, minute;public GameTimestamp(int year, Season season, int day, int hour, int minute){this.year = year;this.season = season;this.day = day;this.hour = hour;this.minute = minute;}public void UpdateClock(){minute++;if (minute >= 60) { minute = 0; hour++; }if (hour >= 24) { hour = 0; day++; }if (day > 30){day = 1;if (season == Season.Winter){season = Season.Spring;year++;}else{season++;}}}public GameTimestamp(GameTimestamp timestamp){this.year = timestamp.year;this.season = timestamp.season;this.day = timestamp.day;this.hour = timestamp.hour;this.minute = timestamp.minute;}public static int HoursToMinutes(int hour) { return hour * 60; }public static int DaysToHours(int day) { return day * 24; }public static int SeasonsToDays(Season season){int seasonIndex = (int)season;return seasonIndex * 30;}public static int YearsToDays(int year) { return year * 4 * 30; }public DayOfTheWeek GetDayOfTheWeek(){int daysPassed = YearsToDays(year) + SeasonsToDays(season) + day;int dayIndex = daysPassed % 7;return (DayOfTheWeek)dayIndex;}
}
AI的建议
using System;
using System.Collections;
using System.Collections.Generic;
using UnityEngine;[Serializable]
public class GameTimestamp
{// 时间的定义public enum Season { Spring, Summer, Autumn, Winter }public int hour;public Season season;public int day;public int month;public int year;public int minute;public GameTimestamp(int hour, Season season, int day, int month, int year){this.hour = hour;this.season = season;this.day = day;this.month = month;this.year = year;}public void UpdateClock(){minute++;if (minute >= 60){minute = 0;hour++;if (hour >= 24){hour = 0;day++;if (day > GetDaysInMonth(month)){day = 1;month++;if (month > 12){ month = 1;year++; }}}}}private int GetDaysInMonth(int month){switch (month){case 2:return 28;case 4:case 6:case 9:case 11:return 30;default:return 31;}}public static int HoursToMinutes(int hours){return hours * 60;}
}public class TimeManager : MonoBehaviour
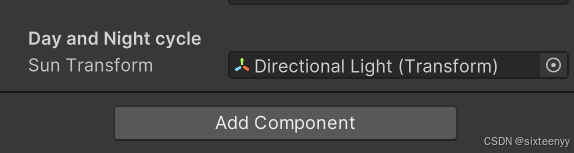
{public static TimeManager Instance { get; private set; }[SerializeField]private GameTimestamp timestamp;public float timeScale = 1.0f;//太阳的位置[Header("Day and Night cycle")]public Transform sunTransform;private void Awake(){if (Instance != null && Instance != this){ Destroy(gameObject); }else { Instance = this; }}private void OnDestroy(){if (Instance == this) { Instance = null; }}void Start(){timestamp = new GameTimestamp(0, GameTimestamp.Season.Spring, 1, 6, 0);StartCoroutine(TimeUpdate());}IEnumerator TimeUpdate(){while (true){Tick();yield return new WaitForSeconds(1f / timeScale);}}public void Tick(){timestamp.UpdateClock();//游戏运行的时间转换成分钟数int timeInminutes = GameTimestamp.HoursToMinutes(timestamp.hour) + timestamp.minute;//太阳与地平线间的夹角float sunAngle = 360f / (24f * 60f) * timeInminutes - 90;//设置太阳的欧拉角(在三维空间中旋转的向量)sunTransform.eulerAngles = new Vector3(sunAngle, 0, 0);}
}2、时间流逝
(1) 给Manager添加TimeManager.cs组件
using System.Collections;
using System.Collections.Generic;
using UnityEngine;public class TimeManager : MonoBehaviour
{public static TimeManager Instance { get; private set; }[SerializeField]public GameTimestamp timestamp;public float timeScale = 1.0f;private void Awake(){if (Instance != null && Instance != this) { Destroy(gameObject); }else { Instance = this; }}private void OnDestroy(){if (Instance == this) { Instance = null; }}void Start(){timestamp = new GameTimestamp(0, GameTimestamp.Season.Spring, 1, 6, 0);StartCoroutine(TimeUpdate());}IEnumerator TimeUpdate(){while (true){Tick();yield return new WaitForSeconds(1 / timeScale);}}public void Tick(){timestamp.UpdateClock();}
}
(2) 流逝逻辑:每隔1秒钟,minute ++;
二、时间与光照
1、编辑TimeManager.cs,设置太阳旋转
//太阳的位置
[Header("Day and Night cycle")]
public Transform sunTransform;void UpdateSunMovement()
{//游戏运行的时间转换成分钟数int timeInminutes = GameTimestamp.HoursToMinutes(timestamp.hour) + timestamp.minute;//太阳与地平线间的夹角float sunAngle = 360f / (24f * 60f) * timeInminutes - 90;//设置太阳的欧拉角(在三维空间中旋转的向量)sunTransform.eulerAngles = new Vector3(sunAngle, 0, 0);
}
public void Tick()
{timestamp.UpdateClock();UpdateSunMovement();
}
2、赋值
3、测试
(1) 编辑PlayerController.cs
public void Update()
{Interact();//时间加速if(Input.GetKey(KeyCode.RightBracket)){TimeManager.Instance.Tick();}
}
(2) 测试:按下右方括号,时间加速
三、时间管理
1、时间接口:新建ITimeTracker.cs
using System.Collections;
using System.Collections.Generic;
using UnityEngine;public interface ITimeTracker
{void ClockUpdate(GameTimestamp timestamp);
}
2、实时更新时间,并将时间信息传递给已注册的时间跟踪器:编辑TimeManager.cs
using System.Collections;
using System.Collections.Generic;
using UnityEngine;public class TimeManager : MonoBehaviour
{public static TimeManager Instance { get; private set; }//内部时钟[Header("Internal Clock")][SerializeField]GameTimestamp timestamp;public float timeScale = 1.0f;[Header("Day and Night cycle")]public Transform sunTransform;//存储所有已注册的时间跟踪器List<ITimeTracker> listeners = new List<ITimeTracker>();public void Tick(){timestamp.UpdateClock();//遍历所有已注册的时间跟踪器foreach(ITimeTracker listener in listeners){listener.ClockUpdate(timestamp);}UpdateSunMovement();}//注册时间跟踪器,并添加到listerns列表中public void RegisterTracker(ITimeTracker listener){listeners.Add(listener);}//注销时间跟踪器,并从列表移除public void UnregisterTracker(ITimeTracker listener){listeners.Remove(listener);}
}
四、显示时间
1、编辑UIManager.cs,更新状态栏上的时间
//接口
public class UIManager : MonoBehaviour, ITimeTracker
//状态栏
[Header("Status Bar")]
public Image toolEquipSlotImage;
public Text toolQuantityText;
//时间文本
public Text timeText;
public Text dateText;
void Start()
{RenderInventory();AssignSlotIndex();//注册时间跟踪器TimeManager.Instance.RegisterTracker(this);
}
//处理UI时间回调
public void ClockUpdate(GameTimestamp timestamp)
{int hours = timestamp.hour;int minutes = timestamp.minute;string prefix = "AM";if (hours > 12) { prefix = "PM"; hours -= 12; }//timeText.text = $"{prefix} {hours:00} :{minutes:00}";timeText.text = prefix + hours + ":" + minutes.ToString("00");int day = timestamp.day;string season = timestamp.season.ToString();string dayOfTheWeek = timestamp.GetDayOfTheWeek().ToString();//dateText.text = $"{season} {day} ({dayOfTheWeek})";dateText.text = season + " " + day + " (" + dayOfTheWeek + ")";
}
2、赋值
五、土壤状态随时间改变
1、比较两个时间戳:编辑GameTimestamp.cs
using System;
using System.Collections;
using System.Collections.Generic;
using UnityEngine;[Serializable]
public class GameTimestamp
{public int year;public enum Season { Spring, Summer, Fall, Winter }public Season season;public enum DayOfTheWeek { Saturday, Sunday, Monday, Tuesday, Wednesday, Thursday, Friday }public int day, hour, minute;public GameTimestamp(int year, Season season, int day, int hour, int minute){this.year = year;this.season = season;this.day = day;this.hour = hour;this.minute = minute;}public void UpdateClock(){minute++;if (minute >= 60) { minute = 0; hour++; }if (hour >= 24) { hour = 0; day++; }if (day > 30){day = 1;if (season == Season.Winter){season = Season.Spring;year++;}else{ season++; }}}public GameTimestamp(GameTimestamp timestamp){this.year = timestamp.year;this.season = timestamp.season;this.day = timestamp.day;this.hour = timestamp.hour;this.minute = timestamp.minute;}public static int HoursToMinutes(int hour) { return hour * 60; }public static int DaysToHours(int day) { return day * 24; }public static int SeasonsToDays(Season season){int seasonIndex = (int)season;return seasonIndex * 30;}public static int YearsToDays(int year) { return year * 4 * 30; }public DayOfTheWeek GetDayOfTheWeek(){int daysPassed = YearsToDays(year) + SeasonsToDays(season) + day;int dayIndex = daysPassed % 7;return (DayOfTheWeek)dayIndex;}//比较两个时间戳public static int CompareTimestamp(GameTimestamp timestamp1, GameTimestamp timestamp2){int timestamp1Hours = DaysToHours(YearsToDays(timestamp1.year))+ DaysToHours(SeasonsToDays(timestamp1.season))+ DaysToHours(timestamp1.day) + timestamp1.hour;int timestamp2Hours = DaysToHours(YearsToDays(timestamp2.year))+ DaysToHours(SeasonsToDays(timestamp2.season))+ DaysToHours(timestamp2.day)+ timestamp2.hour;int differnce = timestamp2Hours - timestamp1Hours;//返回 difference 的绝对值return Mathf.Abs(differnce);}
}
2、获取时间戳(timestamp):编辑TimeManager.cs
using System.Collections;
using System.Collections.Generic;
using UnityEngine;public class TimeManager : MonoBehaviour
{public static TimeManager Instance { get; private set; }[SerializeField][Header("Internal Clock")]GameTimestamp timestamp;public float timeScale = 1.0f;[Header("Day and Night cycle")]public Transform sunTransform;List<ITimeTracker> listeners = new List<ITimeTracker>();private void Awake(){if (Instance != null && Instance != this) { Destroy(gameObject); }else { Instance = this; }}private void OnDestroy(){if (Instance == this) { Instance = null; }}void Start(){timestamp = new GameTimestamp(0, GameTimestamp.Season.Spring, 1, 6, 0);StartCoroutine(TimeUpdate());}IEnumerator TimeUpdate(){while (true){Tick();yield return new WaitForSeconds(1 / timeScale);}}void UpdateSunMovement(){int timeInminutes = GameTimestamp.HoursToMinutes(timestamp.hour) + timestamp.minute;float sunAngle = 360f / (24f * 60f) * timeInminutes - 90;sunTransform.eulerAngles = new Vector3(sunAngle, 0, 0);}public void Tick(){timestamp.UpdateClock();foreach(ITimeTracker listener in listeners){listener.ClockUpdate(timestamp);}UpdateSunMovement();}public void RegisterTracker(ITimeTracker listener){listeners.Add(listener);}public void UnregisterTracker(ITimeTracker listener){listeners.Remove(listener);}//获取新的时间戳public GameTimestamp GetGameTimestamp(){return new GameTimestamp(timestamp);}
}
3、土壤状态的改变
(1) 编辑Land.cs,
//接口
public class Land : MonoBehaviour,ITimeTracker
{//灌溉时间GameTimestamp timeWatered;void Start(){renderer = GetComponent<Renderer>();SwitchLandStatus(LandStatus.Soil);Select(false);//注册时间戳TimeManager.Instance.RegisterTracker(this);}public void SwitchLandStatus(LandStatus statusToSwitch){landStatus = statusToSwitch;Material materialToSwitch = soilMat;switch (statusToSwitch){case LandStatus.Soil: materialToSwitch = soilMat; break;case LandStatus.Farmland: materialToSwitch = farmlandMat; break;case LandStatus.Watered: materialToSwitch = wateredMat; //灌溉的时间戳timeWatered = TimeManager.Instance.GetGameTimestamp();break;}renderer.material = materialToSwitch;}//灌溉后土壤状态的变化public void ClockUpdate(GameTimestamp timestamp){if(landStatus == LandStatus.Watered){int hoursElapsed = GameTimestamp.CompareTimestamp(timeWatered, timestamp);if(hoursElapsed > 24){SwitchLandStatus(LandStatus.Farmland);}}}
}
作物管理
详细教程
一、准备工作
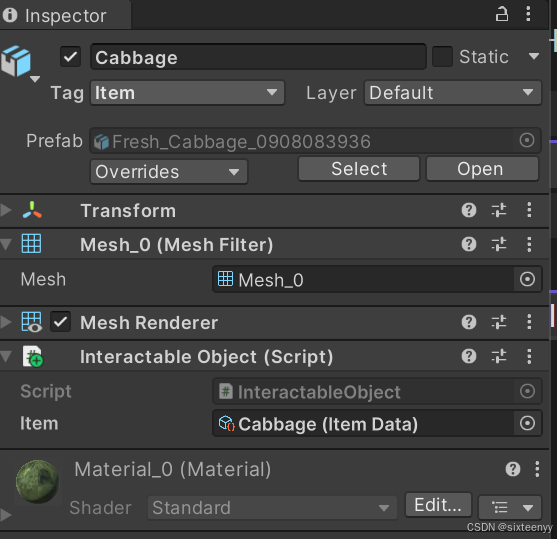
1、制作Cabbage预制体,并给预制体Cabbage添加Mesh Collider,勾选Convex和Is Trigger
2、打开Asset-Data-Items,选择Cabbage,设置GameModle
3、素材准备
(1) 导入Cartoon_Farm_Crops(来自Unity官网)
(2) 把Standard Asset文件夹拖到Cartoon_Farm_Crops文件夹中
(3) 把Cartoon_Farm_Crops文件夹转移到Assets-Import Assets文件夹中
3、准备幼苗预制体
(1) 打开Assets-Import Assets-Cartoon_Farm_Crops-Prefabs-Standard文件夹
(2) 复制Carrot_Plant粘贴到Asset-Prefabs文件夹中。重命名为Cabbage Seedling
二、制作卷心菜
1、制作种子预制体
(1) Create Empty,重命名为Crop,Reset它的Transform
(2) 给Crop添加子物体Dirt_Pile、Cabbage Seeding和Cabbage,表示卷心菜的三个阶段
(3) 将Dirt_Pile重命名为Seed,将Crop制成预制体,把相关的预制体都放在新建的文件夹Crops中
(4) 打开Crop预制体,删除子物体Seed的Mesh Collider组件
(5) 删除Hierarchy面板上的Crop
2、设置Item对象Cabbage Seed(卷心菜)
(1) 编辑SeedData.cs,增加卷心菜的幼苗状态
using System.Collections;
using System.Collections.Generic;
using UnityEngine;[CreateAssetMenu(menuName =("Items/Seed"))]public class SeedData : ItemData
{public int daysToGrow;public ItemData cropToYield;//幼苗public GameObject seedling;
}
(2) 保留预制体Crop的子物体中的Seed,删除预制体Crop下的其他子物体
3、作物生长的状态
(1) 给预制体Crop添加CropBehaviour.cs组件
using System.Collections;
using System.Collections.Generic;
using UnityEngine;public class CropBehaviour : MonoBehaviour
{SeedData seedToGrow;[Header("Stages of Life")]public GameObject seed;private GameObject seedling;private GameObject harvestable;public CropStage cropStage;public enum CropStage { Seed, Seedling, Havestable }public void Plant(SeedData seedToGrow){this.seedToGrow = seedToGrow;seedling = Instantiate(seedToGrow.seedling, transform);ItemData CropToYield = seedToGrow.cropToYield;harvestable = Instantiate(CropToYield.gameModel, transform);SwitchState(CropStage.Seed);}void SwitchState(CropStage stateToSwitch){seed.SetActive(false);seedling.SetActive(false);harvestable.SetActive(false);switch (stateToSwitch){case CropStage.Seed: seed.SetActive(true); break;case CropStage.Seedling: seedling.SetActive(true); break;case CropStage.Havestable: harvestable.SetActive(true); break;}cropStage = stateToSwitch;}
}
(2) 赋值
三、制作番茄
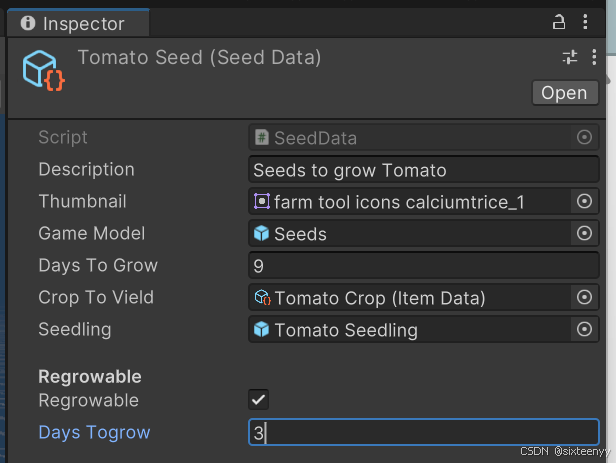
1、ItemData对象——番茄种子
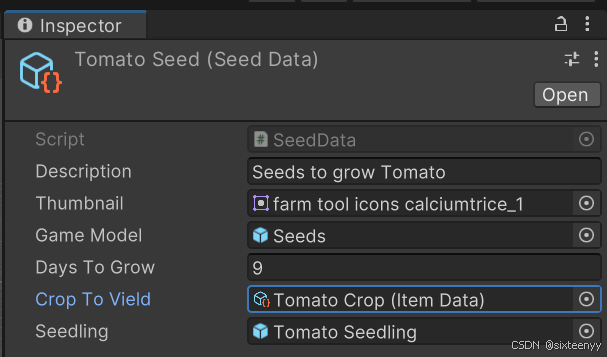
(1) 打开Data-Tools-Seeds文件夹,Create-Items-Seed。命名为Tomato Seed
(2) 编辑 SeedData.cs
using System.Collections;
using System.Collections.Generic;
using UnityEngine;
[CreateAssetMenu(menuName =("Items/Seed"))]
public class SeedData : ItemData
{public int daysToGrow;public ItemData cropToVield;public GameObject seedling;//重新生长[Header("Regrowable")]public bool regrowable;public int daysTogrow;
}
(3) 设置ItemData对象番茄种子的属性(Seeds to grow Tomato)
2、果实
(1) 预制体
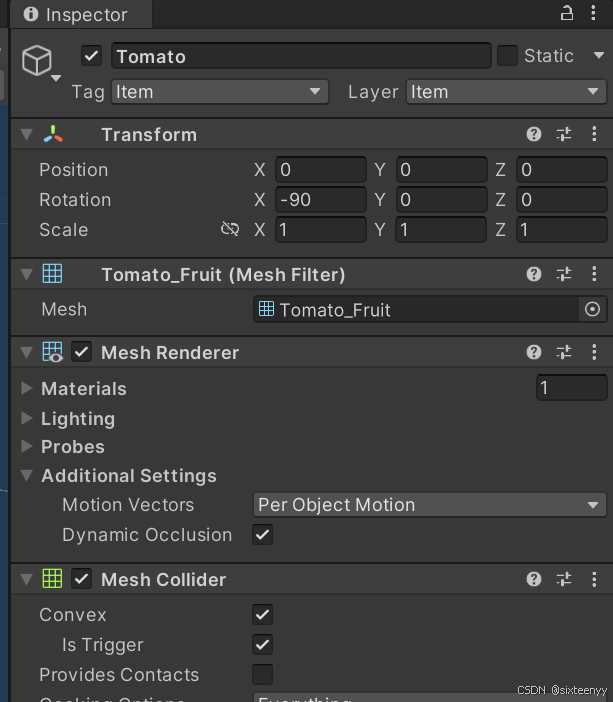
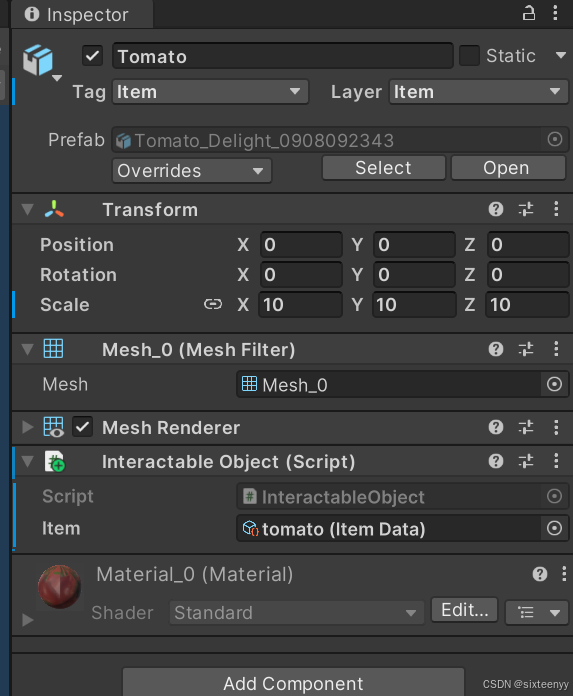
① 将Tomato_Fruit拖放到Hierarchy,更改标签为Item,Layer为Item,
重置Transform,旋转 x=-90。 名Tomato
② 将Tomato制成预制体,删除Hierarchy面板上的Tomato
③ 勾选Mesh Collide中的 Convex和Is Trigger
(2) ItemData对象 :
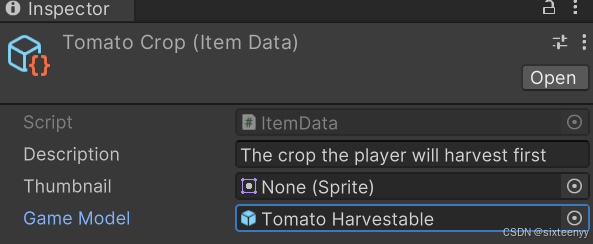
① 打开Data-Item文件夹,Create-Items-Item ,创建一个新项目 Tomato Crop,
The crop the player will harvest first
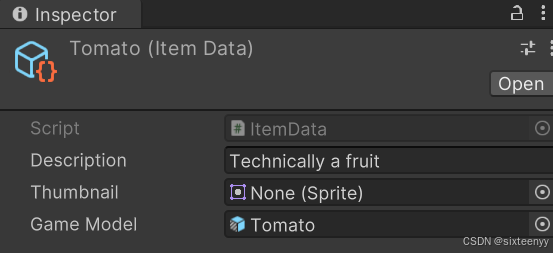
② 打开Data-Item文件夹,Create-Items-Item ,创建 Tomato(Technically a fruit)
③ 打开Data-Tools-Seed文件夹,设置Tomato Seed
(3) 编辑 Tomato预制体,添加InteractableObject.cs组件,赋值
using System.Collections;
using System.Collections.Generic;
using UnityEngine;public class InteractableObject : MonoBehaviour
{public ItemData item;public virtual void Pickup(){InventoryManager.Instance.EquipHandSlot(item);InventoryManager.Instance.RenderHand();Destroy(gameObject);}
}
3、幼苗预制体
(1) 打开Import Asset/Cartoon_Farm_Crops/Prefabs/Standard文件夹
(2) 将Tomato_Plant拖放到Hierarchy,重命名为Tomato Seedling
(3) 移除Tomato_Seedling上的Mesh Collider。制成预制体
(4) 设置ItemData对象 Tomato Seed(番茄种子)的幼苗属性
4、成熟植株预制体
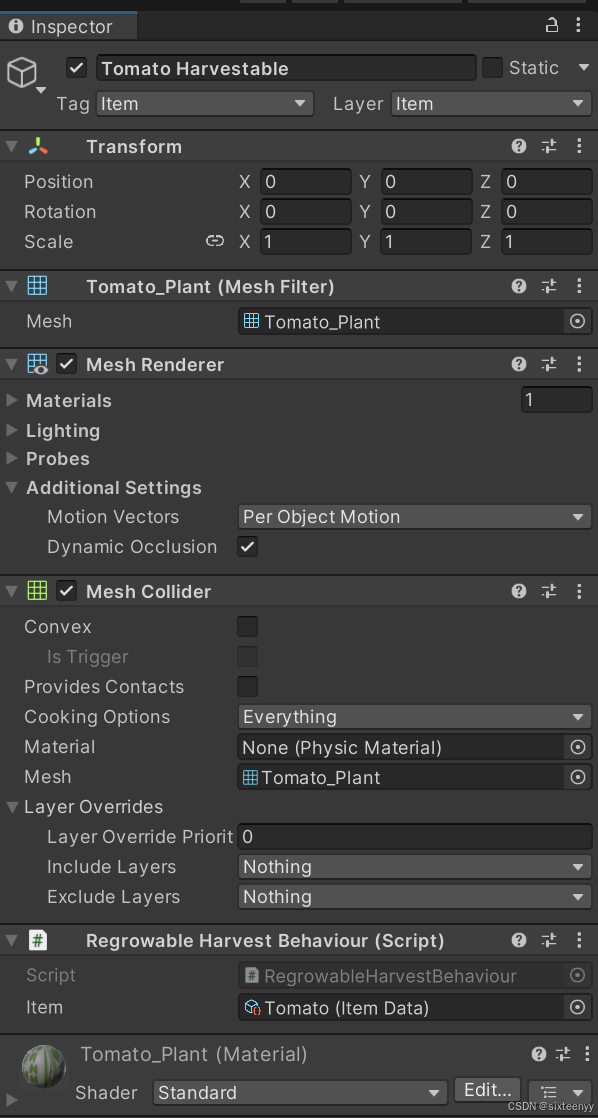
(1) 复制Hierarchy面板上的Tomato_Seedling,重命名为Tomato Harvestable,制成预制体
(2) 编辑Tomato Harvestable预制体
① 添加子物体Tomato

② 更改标签和Layer为 Item
(3) 为Tomato Harvestable预制体添加 Mesh Collider组件
(4) 删除面板上的幼苗植株果实
5、设置ItemData对象番茄种子和番茄
四、播种
1、编辑Land.cs
//种子
[Header("Crops")]
public GameObject cropPrefab;
CropBehaviour cropPlanted = null;
public void Interact()
{ItemData toolSlot = InventoryManager.Instance.GetEquippedSlotItem(InventorySlot.InventoryType.Tool);if (!InventoryManager.Instance.SlotEquipped(InventorySlot.InventoryType.Tool)){return;}EquipmentData equipmentTool = toolSlot as EquipmentData;if (equipmentTool != null){EquipmentData.ToolType toolType = equipmentTool.Type;switch (toolType){case EquipmentData.ToolType.Hoe: SwitchLandStatus(LandStatus.Farmland); break;case EquipmentData.ToolType.WateringCan: SwitchLandStatus(LandStatus.Watered); break;}//返回return;}//播种SeedData seedTool = toolSlot as SeedData;if (seedTool != null && landStatus != LandStatus.Soil && cropPlanted == null){GameObject cropObject = Instantiate(cropPrefab, transform);cropObject.transform.position =new Vector3(transform.position.x, 0f, transform.position.z);cropPlanted = cropObject.GetComponent<CropBehaviour>();cropPlanted.Plant(seedTool);}
}
2、赋值
五、生长
1、编辑CropBehaviour.cs
using System.Collections;
using System.Collections.Generic;
using UnityEngine;public class CropBehaviour : MonoBehaviour
{SeedData seedToGrow;[Header("Stages of Life")]public GameObject seed;private GameObject seedling;private GameObject harvestable;public CropStage cropStage;public enum CropStage { Seed, Seedling, Havestable }//生长int growth;int maxGrowth;public void Plant(SeedData seedToGrow){this.seedToGrow = seedToGrow;seedling = Instantiate(seedToGrow.seedling, transform);ItemData CropToYield = seedToGrow.cropToYield;harvestable = Instantiate(CropToYield.gameModel, transform);//生长时间int hoursToGrow = GameTimestamp.DaysToHours(seedToGrow.daysToGrow);maxGrowth = GameTimestamp.HoursToMinutes(hoursToGrow);SwitchState(CropStage.Seed);}void SwitchState(CropStage stateToSwitch){seed.SetActive(false);seedling.SetActive(false);harvestable.SetActive(false);switch (stateToSwitch){case CropStage.Seed: seed.SetActive(true); break;case CropStage.Seedling: seedling.SetActive(true); break;case CropStage: harvestable.SetActive(true); break;}cropStage = stateToSwitch;}//生长public void Grow(){growth++;//幼苗if (growth >= maxGrowth / 2 && cropStage == CropStage.Seed){SwitchState(CropStage.Seedling);}//成熟if (growth >= maxGrowth && cropStage == CropStage.Seedling){SwitchState(CropStage.Havestable);}}
}
2、 编辑Land.cs,灌溉后作物生长
public void ClockUpdate(GameTimestamp timestamp){if (landStatus == LandStatus.Watered){int hoursElapsed = GameTimestamp.CompareTimestamp(timeWatered, timestamp);//作物生长if (cropPlanted != null){cropPlanted.Grow();}if (hoursElapsed > 24){SwitchLandStatus(LandStatus.Farmland);}}}
六、收获果实后幼苗再生
1、创建一个具有可重生收获行为的对象
(1) 打开Farming文件夹,新建RegrowableHarvestBehaviour.cs
(2) 编辑Tomato Harvestable预制体,添加RegrowableHarvestBehaviour.cs组件
using System.Collections;
using System.Collections.Generic;
using UnityEngine;public class RegrowableHarvestBehaviour : InteractableObject
{CropBehaviour parentCrop;public void SetParent(CropBehaviour parentCrop){this.parentCrop = parentCrop;}public override void Pickup(){InventoryManager.Instance.EquipHandSlot(item);InventoryManager.Instance.RenderHand();}
}
(3) 赋值
2、将植株重置为幼苗状态
(1) 编辑CropBehaviour.cs
public void Plant(SeedData seedToGrow){//其他代码//第一次种植时,检查它是否能生长if (seedToGrow.regrowable){RegrowableHarvestBehaviour regrowableHarvest = harvestable.GetComponent<RegrowableHarvestBehaviour>();// 将可再生收获行为的父物体设置为当前物体 regrowableHarvest.SetParent(this);}SwitchStage(CropStage.Seed);}void SwitchStage(CropStage stateToSwitch){seed.SetActive(false);seedling.SetActive(false);harvestable.SetActive(false);//其他代码switch (stateToSwitch){ case CropStage.Havestable:harvestable.SetActive(true);//如果种子不可再生,将可收获的种子与该作物游戏对象分离并销毁它if (!seedToGrow.regrowable){harvestable.transform.parent = null;Destroy(gameObject);}break;}cropStage = stateToSwitch;}//当玩家收获可再生作物时调用。将植物状态重置为幼苗public void Regrow(){int hoursToRegrow = GameTimestamp.DaysToHours(seedToGrow.daysToGrow);growth = maxGrowth -GameTimestamp.HoursToMinutes(hoursToRegrow);//切换回幼苗状态SwitchStage(CropStage.Seedling);}(2) 编辑RegrowableHarvestBehaviour.cs
using System.Collections;
using System.Collections.Generic;
using UnityEngine;public class RegrowableHarvestBehaviour : InteractableObject
{CropBehaviour parentCrop;public void SetParent(CropBehaviour parentCrop){this.parentCrop = parentCrop;}public override void Pickup(){InventoryManager.Instance.EquipHandSlot(item);InventoryManager.Instance.RenderHand();//将亲本作物重置为幼苗状态parentCrop.Regrow();}
}
七、枯萎
详细教程 步骤十一
1、制作枯萎的植物的材质
(1) 打开Assets-Import Assets-Farmland-Dirt-Materials,复制Dirt材质,重命名为Wilted Plant
(2) 更改Wilted Plant材质的颜色9A2603,去掉光滑度
2、制作枯萎的植物:编辑Crop预制体
(1) 打开Assets-Import Assets-Cartoon_Farm_Crops-Prefabs-Standard文件夹,将Pumpkin_Plant作为子物体拖放到Crop下,重命名为wilted,将Wilted Plant材质设置给Wilted
(2) 设置它的transform
3、设置枯萎系统:
(1) 编辑CropBehaviour.cs
using System.Collections;
using System.Collections.Generic;
using UnityEngine;public class CropBehaviour : MonoBehaviour
{SeedData seedToGrow;[Header("Stages of Life")]public GameObject seed;private GameObject seedling;private GameObject harvestable;//枯萎状态的植株public GameObject wilted;//枯萎状态public enum CropStage { Seed, Seedling, Havestable, Wilted }public CropStage cropStage;int growth;int maxGrowth;//正常生长的最大时间(48小时)int maxHealth = GameTimestamp.HoursToMinutes(48);int health;public void Plant(SeedData seedToGrow){this.seedToGrow = seedToGrow;seedling = Instantiate(seedToGrow.seedling, transform);ItemData cropToYield = seedToGrow.cropToVield;harvestable = Instantiate(cropToYield.gameModel, transform);int hoursToGrow = GameTimestamp.DaysToHours(seedToGrow.daysToGrow);maxGrowth = GameTimestamp.HoursToMinutes(hoursToGrow);//第一次种植时,检查它是否能生长if (seedToGrow.regrowable){RegrowableHarvestBehaviour regrowableHarvest = harvestable.GetComponent<RegrowableHarvestBehaviour>();// 将可再生收获行为的父物体设置为当前物体 regrowableHarvest.SetParent(this);}SwitchStage(CropStage.Seed);}void SwitchStage(CropStage stateToSwitch){seed.SetActive(false);seedling.SetActive(false);harvestable.SetActive(false);//枯萎状态wilted.SetActive(false);switch (stateToSwitch){case CropStage.Seed: seed.SetActive(true); break;case CropStage.Seedling:seedling.SetActive(true);//48小时的正常生长时间health = maxHealth;break;case CropStage.Havestable:harvestable.SetActive(true);//如果种子不可再生,将可收获的种子与该作物游戏对象分离并销毁它if (!seedToGrow.regrowable){harvestable.transform.parent = null;Destroy(gameObject);}break;//枯萎植株选择case CropStage Wilted: wilted.SetActive(true); break;}cropStage = stateToSwitch;}public void Grow(){growth++;//枯萎前的健康时长if (health < maxHealth){health++;}if (growth >= maxGrowth / 2 && cropStage == CropStage.Seed){SwitchStage(CropStage.Seedling);}if (growth >= maxGrowth && cropStage == CropStage.Seedling){SwitchStage(CropStage.Havestable);}}//枯萎逻辑public void Wilted(){health--;if (health <= 0 && cropStage != CropStage.Seed){SwitchStage(CropStage.Wilted);}}//当玩家收获可再生作物时调用。将植物状态重置为幼苗public void Regrow(){int hoursToRegrow = GameTimestamp.DaysToHours(seedToGrow.daysToGrow);growth = maxGrowth -GameTimestamp.HoursToMinutes(hoursToRegrow);//切换回幼苗状态SwitchStage(CropStage.Seedling);}
}
(2) 赋值
4、编辑Land.cs
public void ClockUpdate(GameTimestamp timestamp){if (landStatus == LandStatus.Watered){int hoursElapsed = GameTimestamp.CompareTimestamp(timeWatered, timestamp);if (cropPlanted != null){cropPlanted.Grow();}if (hoursElapsed > 24){SwitchLandStatus(LandStatus.Farmland);}}//枯萎if (landStatus != LandStatus.Watered && cropPlanted != null){if(cropPlanted.cropStage !=CropBehaviour.CropStage.Seed){cropPlanted.Wilted();}}}八、收割后重新生长
1、编辑SeedData.cs
using System.Collections;
using System.Collections.Generic;
using UnityEngine;[CreateAssetMenu(menuName =("Items/Seed"))]public class SeedData : ItemData
{public int daysToGrow;public ItemData cropToYield;public GameObject seedling;//重新生长[Header("Regrowable")]public bool regrowable;public int daysTogrow;
}
农田交互
一、收获
1、增加提示文本
2、编辑PlayerInteraction.cs
六、收割
1、销毁作物:编辑CropBehaviour.cs
void SwitchState(CropStage stateToSwitch){seed.SetActive(false);seedling.SetActive(false);harvestable.SetActive(false);switch (stateToSwitch){case CropStage.Seed: seed.SetActive(true); break;case CropStage.Seedling: seedling.SetActive(true); break;case CropStage: harvestable.SetActive(true);//收割harvestable.transform.parent = null;Destroy(gameObject);break;}cropStage = stateToSwitch;}2、收获作物:编辑InventoryManager.cs
using System.Collections;
using System.Collections.Generic;
using UnityEngine;public class InventoryManager : MonoBehaviour
{    public void InventoryToHand(int slotIndex,InventorySlot.InventoryType inventoryType){//其他代码##//手持收获物if(inventoryType == InventorySlot.InventoryType.Item){RenderHand();}UIManager.Instance.RenderInventory();}public void HandToInventory(InventorySlot.InventoryType inventoryType){//其他代码##//手持收获物if(inventoryType == InventorySlot.InventoryType.Item){RenderHand();}UIManager.Instance.RenderInventory();}public void RenderHand(){//其他代码//收获物if (SlotEquipped(InventorySlot.InventoryType.Item)){Instantiate(GetEquippedSlotItem(InventorySlot.InventoryType.Item).gameModel, handPoint);}}
}
3、拾起作物
(1) 编辑InventoryManager.cs,复制物体
#region 物品交换的方法
//根据物品类型将选中物体复制到对应位置
public void EquipHandSlot(ItemData item)
{if (IsTool(item)){equippedToolSlot = new ItemSlotData(item);}else{equippedItemSlot = new ItemSlotData(item);}
}
//其他代码
#endregion
(2) 创建拾取方法:
① 在Scripts-Inventory文件夹下新建InteractableObject.cs
using System.Collections;
using System.Collections.Generic;
using UnityEngine;public class InteractableObject : MonoBehaviour
{public ItemData item;public virtual void Pickup(){InventoryManager.Instance.EquipHandSlot(item);}
}
② 给预制体Cabbage和Tomato,添加InteractableObject.cs组件,赋值,添加标签Item
农田交互
:编辑SeedData.cs
一、收获
1、增加提示文本
2、编辑PlayerInteraction.cs
using System.Collections;
using System.Collections.Generic;
using UnityEngine;
using UnityEngine.UI;public class PlayerInteraction : MonoBehaviour
{PlayerController playerController;Land selectLand = null;//选中的待收获作物InteractableObject selectInteractable = null;//提示文本public Text textComponent;void Start(){playerController = transform.parent.GetComponent<PlayerController>();}void Update(){RaycastHit hit;if (Physics.Raycast(transform.position, Vector3.down, out hit, 1)){OnInteractableHit(hit);}}void OnInteractableHit(RaycastHit hit){Collider other = hit.collider;if (other != null && other.CompareTag("Land")){Land land = other.GetComponent<Land>();if (land != null){SelectLand(land); return;}else { Debug.Log("未选中任何田地"); }}//选中的待收获作物if (other.CompareTag("Item")){selectInteractable = other.GetComponent<InteractableObject>();return;}if (selectInteractable != null){selectInteractable = null;}if (selectLand != null){DeselectLand(selectLand);}}public void Interact(){textComponent.text = "";//禁用工具if (InventoryManager.Instance.SlotEquipped(InventorySlot.InventoryType.Item)){textComponent.text = "你腾不出手来!";return;}if (selectLand != null){selectLand.Interact(); return;}Debug.Log("未站在田地上");}void SelectLand(Land land){if (land == null) { Debug.Log("你未选择田地"); return; }if (selectLand != null) { selectLand.Select(false); }selectLand = land;land.Select(true);}void DeselectLand(Land land){if (land == null) { Debug.Log("你没有选择田地"); return; }land.Select(false);selectLand = null;}//收割交互public void ItemIneract(){if (InventoryManager.Instance.SlotEquipped(InventorySlot.InventoryType.Item)){InventoryManager.Instance.HandToInventory(InventorySlot.InventoryType.Item);return;}//拾取作物if (selectInteractable != null){selectInteractable.Pickup();}}
}
2、编辑PlayerController.cs,点击 左Alt键,物品返回物品栏
using UnityEngine;public class PlayerController : MonoBehaviour
{PlayerInteraction playerInteraction;public float turnSpeed = 20f;Animator animator;bool isWalking = false;bool isRunning = false;Rigidbody rb;Vector3 movement;Quaternion rotation = Quaternion.identity;private float speed;[Header("Movement System")]public float walkSpeed = 6f;public float runSpeed = 12f;void Start(){animator = GetComponent<Animator>();rb = GetComponent<Rigidbody>();playerInteraction = GetComponentInChildren<PlayerInteraction>();}private void FixedUpdate(){float horizontal = Input.GetAxis("Horizontal");float vertical = Input.GetAxis("Vertical");movement.Set(horizontal, 0f, vertical);movement.Normalize();bool hasHorizontalInput = !Mathf.Approximately(horizontal, 0f);bool hasVerticalInput = !Mathf.Approximately(vertical, 0f);if (Input.GetButton("Sprint")){speed = runSpeed;isRunning = true;}else if (hasHorizontalInput || hasVerticalInput){isWalking = true;isRunning = false;speed = walkSpeed;}else{isWalking = false;isRunning = false;speed = 0f;}Vector3 desireForward = Vector3.RotateTowards(transform.forward, movement, turnSpeed * Time.deltaTime, 0f);rotation = Quaternion.LookRotation(desireForward);}public void Update(){Interact();if (Input.GetKey(KeyCode.RightBracket)){TimeManager.Instance.Tick();}}public void Interact(){if (Input.GetButtonDown("Fire1")){playerInteraction.Interact();}//左Altif (Input.GetButtonDown("Fire2")){playerInteraction.ItemIneract();}}private void OnAnimatorMove(){animator.SetBool("IsWalking", isWalking);animator.SetBool("IsRunning", isRunning);Vector3 movementSpeed = movement * speed;rb.MovePosition(rb.position + movementSpeed * animator.deltaPosition.magnitude);rb.MoveRotation(rotation);}
}
二、禁止角色上升
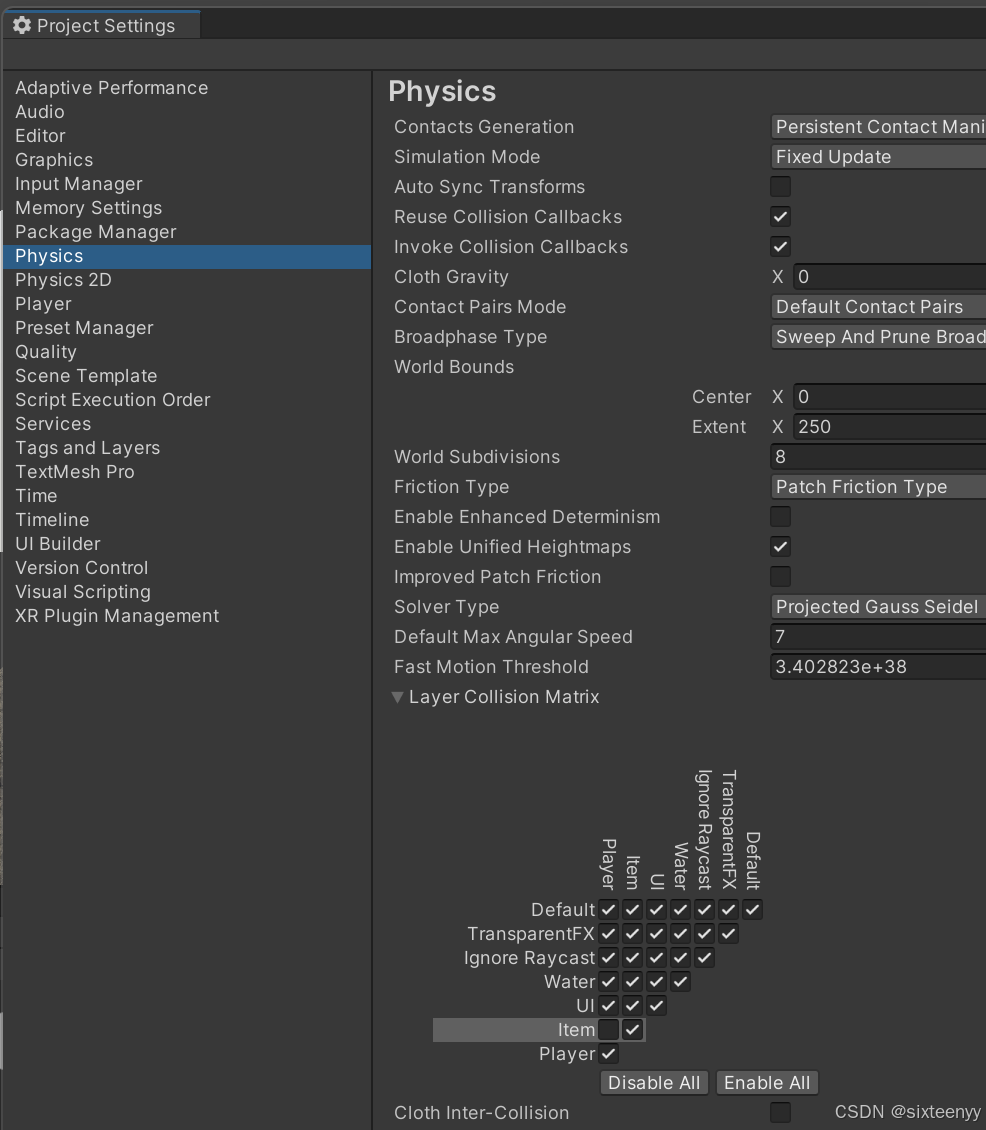
1、编辑预制体Cabbage和Player,分别为二者添加新Layer
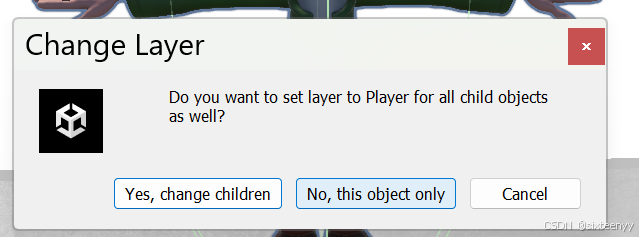
2、禁用Item与Player层的交互
(1)
(2)
(3)
(4)
(1)
(2)
(3)
(4)
(4)
(4)
相关文章:

种田游戏的综合尝试
游戏角色 详细教程 一、准备工作 1、场景重命名为Farm 2、导入资源 (1) 新建文件夹。Import Asset (2) 导入:人物、走、跑、休息 3、设置摄像机 二、制作角色预制体 1、增加角色,命名为Player,设置材质、人类角色 2、设置角色的空闲…...

uniapp解决上架华为应用市场审核要求-监听权限的申请
支持android平台全局监听权限的申请。当申请权限时,会在页面顶部显示申请权限的目的。主要解决上架华为应用市场审核要求:APP在调用终端权限时,应同步告知用户申请该权限的目的。 因为如果不提示,你上架应用市场会被打打回来 Tip…...

【结肠息肉AI论文集】ASPS: Augmented Segment Anything Model for Polyp Segmentation
摘要 息肉分割在结直肠癌诊断中起着关键作用。最近,Segment Anything Model(SAM)的出现为息肉分割带来了前所未有的潜力,其在大规模数据集上的强大预训练能力使其备受关注。然而,由于自然图像和内窥镜图像之间存在领域…...

MHA详解
MHA(Master High Availability)是一个用于 MySQL 数据库的高可用性解决方案。它基于 MySQL 主从复制机制实现,通过自动化的方式进行故障检测和自动故障转移操作,确保在 MySQL 主节点(Master)发生故障时&…...

蓝桥杯单片机刷题——通过按键触发串口传输电压值
设计要求 通过内部ADC完成电位器RB2的输出电压检测,并显示在数码管上; 通过串口向PC端返回当前检测的电压值。 按键“S4”定义为发送按键,按下按键S4,串口向PC端发送当前检测的电压值。 串口发送格式: U:1.25V\r\…...

github fatal Authentication failed for解决
常用的生成令牌方式不多介绍,参考1 得到令牌后替换url 格式为 https://你的令牌github.com/<USERNAME>/<REPO>.git查看仓库url git remote -v假如为 https://github.com/jiang/megatron.git 令牌为CCCC 则将“令牌”插入github之前 使用 git remote …...

计算机网络基础知识
🧑 博主简介:CSDN博客专家,历代文学网(PC端可以访问:https://literature.sinhy.com/#/literature?__c1000,移动端可微信小程序搜索“历代文学”)总架构师,15年工作经验,…...

Debian/Ubuntu Server高效禁用海外IP访问的一种方法
面对越来越多的海外IP扫描、攻击,让服务器损失大量的性能,影响服务器提供正常的对外服务,同时给自己的服务器处理风险之中,本文讲述了一种使用ufw防火墙的方式高效阻止海外IP的一种方法。 阻止IP访问的方法有很多种,这…...

2025年4月第2周 github的AI科技工具汇总
以下是2025年4月第2周GitHub上值得关注的AI科技工具与生态动态汇总,结合官方发布及开发者社区热点整理: AI编程工具升级 GitHub Copilot Agent Mode 全量发布 核心功能:在VS Code中启用后,可自主完成多文件代码重构、测试驱动开发…...

RIP V2路由协议配置实验CISCO
1.RIP V2简介: RIP V2(Routing Information Protocol Version 2)是 RIP 路由协议的第二版,属于距离矢量路由协议,主要用于中小型网络环境。相较于 RIP V1,RIP V2 在功能和性能上进行了多项改进,…...

Python-Django+vue二手电子设备交易平台功能说明
❥(^_-) 上千个精美定制模板,各类成品Java、Python、PHP、Android毕设项目,欢迎咨询。 ❥(^_-) 程序开发、技术解答、代码讲解、文档,💖文末获取源码+数据库+文档💖 💖软件下载 | 实战案例 💖文章底部二维码,可以联系获取软件下载链接,及项目演示视频。 本项目…...
 : MCTargetDesc 核心模块有哪些?)
DeepSeek 教我LLVM(2) : MCTargetDesc 核心模块有哪些?
在 LLVM 中,MCTargetDesc(Machine Code Target Description)是描述目标架构机器代码生成的核心模块,其核心组件可分为以下几类: 一、目标架构元数据 MCInstrInfo 功能:定义指令的元数据(操作数、…...

Linux:shell运行原理+权限
1.shell的运行原理 如果我们打开了命令终端或者是xshell进行远程登录服务器,就会看到命令行,如下图所示: 这个命令行本身也是系统中一个运行起来的程序,它用来接收用户的输入,帮用户来执行指令,将运行结果展…...

英伟达Llama-3.1-Nemotron-Ultra-253B-v1语言模型论文快读:FFN Fusion
FFN Fusion: Rethinking Sequential Computation in Large Language Models 代表模型:Llama-3.1-Nemotron-Ultra-253B-v1 1. 摘要 本文介绍了一种名为 FFN Fusion 的架构优化技术,旨在通过识别和利用自然并行化机会来减少大型语言模型(LLM…...

什么是A2A协议?什么是MCP协议?A2A和MCP协议哪个更好?
什么是A2A协议?什么是MCP协议?A2A和MCP协议哪个更好? 摘要 在人工智能领域,A2A协议(Agent-to-Agent协议)和MCP协议(Model Context Protocol)是两个重要的标准,它们分别…...
C++版——day12)
剑指Offer(数据结构与算法面试题精讲)C++版——day12
剑指Offer(数据结构与算法面试题精讲)C版——day12 题目一:小行星碰撞题目二:每日温度题目三:直方图最大矩形面积附录:源码gitee仓库 题目一:小行星碰撞 由题意可知,这里我们可使用栈…...

Leetcode131:分割回文串——回溯算法
Leetcode131:分割回文串——回溯算法 给一个字符串aab, 如何分割,使得子串 都是回文串,返回所有的分割方案。 答:1、aa,b。 2、a,a, b. 重点,想想树怎么画的。 发现:所有…...

Nginx常用工具
Nginx常用工具 Nginx常用工具vscode配置Nginx插件在线生成Nginx配置文件Nginx可视化配置工具 Nginx常用工具 编写Nginx配置时,使用VSCodeNginx插件,能实现自动补全格式化配置. vscode配置Nginx插件 Nginx代码高亮插件: nginx-formatter Nginx代码格式化插件&#…...

算法——回溯
学习目标: 掌握算法入门知识 学习内容: 回溯的定义例题详细步骤讲解(求子集、求全排列) 1. 回溯的定义 回溯法是一种通过 试探性搜索 来求解问题的算法思想。一个复杂问题的解决方案是由若干个小的决策步骤组成的决策序列&…...

【图片识别改名工具】如何识别图片中文字内容,并根据文字对图片批量重命名批量改名,基于WPF和腾讯OCR的完整实现
办公场景 批量处理图片文件:用户有一批图片文件,图片中包含文字信息(如编号、日期、名称等),需要根据图片中的文字内容对图片进行重命名。自动化办公:在办公场景中,用户需要将图片文件按内容分类或归档,手动重命名效率低下,自动化工具可以大幅…...
)
C语言超详细指针知识(一)
通过前面一段学习C语言的学习,我们了解了数组,函数,操作符等相关知识,今天我们将要进行指针学习,这是C语言中较难的一个部分,我将带你由浅入深慢慢学习。 1.内存与地址 在正式学习指针前,我们首…...

【实战手册】8000w数据迁移实践:MySQL到MongoDB的完整解决方案
🔥 本文将带你深入解析大规模数据迁移的实践方案,从架构设计到代码实现,手把手教你解决数据迁移过程中的各种挑战。 📚博主其他匠心之作,强推专栏: 小游戏开发【博主强推 匠心之作 拿来即用无门槛】文章目录 一、场景引入1. 问题背景2. 场景分析为什么需要消息队列?为…...

本地部署DeepSeek-R1,搭建本地知识库
本地部署DeepSeek-R1,搭建本地知识库 本章节内容是参照哔哩哔哩上的【一拳S7】作者分享的视频教程(【喂饭教程】20分钟教会你本地部署DeepSeek-R1,并搭建自己的知识库!小白也能轻松上手!!)搭建的。 概述:本…...

多链协议和跨链桥
文章目录 多链协议和跨链桥一、核心功能与分类二、主流协议技术对比三、关键技术机制四、典型应用场景五、核心风险与挑战 多链协议和跨链桥 一、核心功能与分类 多链协议与跨链桥旨在解决区块链生态的孤岛效应,实现资产与数据的跨链互通。 主要分为两类…...

2025.4.9 华为机考 第1题-补丁版本升级
目录 题目内容样例1样例2思考思路算法思路实现代码(封装Class中) 题目内容 样例1 样例2 思考思路 题目让我们找出所有迭代次数最多的补丁版本,并且按字典序排列输出。迭代次数指的是从该版本到根节点的路径长度,而根节点的迭代次…...

Qt平台+三维建模+动画演示+工业风展示
三维建模不止于形,界面定制不止于皮,实时交互不止于快。 我们专注程序界面定制,尤其擅长: 🔧 Qt平台 精准开发 🧊 三维建模 动画演示 工业风展示 ⚡ 实时交互系统 支持多线程响应、动态数据绑定 …...
: 神烦狗(DOGE))
通付盾风控智能体(RiskAgent): 神烦狗(DOGE)
在数字化业务高速发展的今天,风控系统已成为企业抵御黑产、欺诈、保障交易安全的核心防线。然而传统风控面临人力依赖高与策略滞后性等挑战,数据分析师需每日从海量数据中手动提炼风险特征、设计防护规则,耗时费力;新策略从发现到…...

Anaconda环境管理及 pycharm、jupyter notebook 的配置
为什么要Anaconda环境管理,因为不同的项目可能使用的环境是不一样的,比如说有一个项目要用到pytorch0.4,另一个要用到pytorch1.0,我们不可能在一个环境中既装pytorch0.4,又装pytorch1.0,因此我们在用pytorc…...

DevOps与功能安全:Perforce ALM通过ISO 26262合规认证,简化安全关键系统开发流程
本文来源perforce.com,由Perforce中国授权合作伙伴、DevSecOps解决方案提供商-龙智翻译整理。 近日,Perforce ALM(原Helix ALM)通过了国际权威认证机构 TV SD的ISO 26262功能安全流程认证!该认证涵盖Perforce ALM解决方…...

OpenCV 伪彩色处理
伪彩色处理是将灰度图像通过颜色映射转换为彩色图像的技术,常用于增强可视化效果或突出显示特定灰度范围。OpenCV 提供了多种方法实现伪彩色处理。 1. 使用 applyColorMap 函数 OpenCV 提供了 cv::applyColorMap() 函数,支持多种预定义的色彩映射&…...

【物联网】PWM控制蜂鸣器
文章目录 一、PWM介绍1.PWM的频率2.PWM的周期 二、PWM工作原理分析三、I.MX6ull PWM介绍1.时钟信号2.工作原理3.FIFO 四、PWM重点寄存器介绍1.PWM Control Register (PWMx_PWMCR)2.PWM Counter Register (PWMx_PWMCNR)3.PWM Period Register (PWMx_PWMPR)4.PWM Sample Register…...

centos-stream-9上安装nvidia驱动和cuda-toolkit
这里写目录标题 驱动安装1. 更新系统2. NVIDIA GPU安装检查系统是否安装了 NVIDIA GPU2.1 首先,使用以下命令更新 DNF 软件包存储库缓存:2.2 安装编译 NVIDIA 内核模块所需的依赖项和构建工具2.3 在 CentOS Stream 9 上添加官方 NVIDIA CUDA 软件包存储库…...

嵌入式---烧录器
一、核心定义与本质功能 烧录器(Programmer)是一种将用户编写的程序代码(如.hex/.bin文件)写入单片机内部存储器(Flash/EEPROM/ROM)的专用工具,核心功能包括: 程序烧写:…...

centos-LLM-生物信息-BioGPT-使用1
参考: GitHub - microsoft/BioGPT https://github.com/microsoft/BioGPT BioGPT:用于生物医学文本生成和挖掘的生成式预训练转换器 |生物信息学简报 |牛津学术 — BioGPT: generative pre-trained transformer for biomedical text generation and mini…...

Golang|协程
文章目录 go func 和 WaitGroup协程 v.s. 线程GMP 并发模型 go func 和 WaitGroup 在 Go 语言中,协程(goroutine)之间并没有严格的父子关系。一个协程中可以启动其他协程,即使启动它的协程已经结束,所启动的新协程仍会…...

免费下载地图切片数据以及通过CesiumEarth在Windows和安卓本地浏览
免费下载地图切片数据 本文概述 互联网存在许多免费的地图资源,但是这些资源都需要在互联网环境下使用,如果使用场景是在离线或本地设备上,没有在线调用地图的途径,这时如果没有自己制作地图的能力,只能提前下载地…...

Enovia许可使用限制
在数字化时代,企业的研发与创新活动越来越依赖于先进的软件工具。Enovia,作为一款功能强大的产品生命周期管理(PLM)解决方案,为众多行业的企业提供了从概念到生产的全方位支持。然而,为了确保软件的合规性与…...

“米其林.网址”中文域名仲裁案:知名企业如何保护网络知产权益?
中文域名与商标协同保护经典案例解析 近期,国际知名的轮胎制造商米其林公司(Compagnie Gnrale des tablissements Michelin)通过仲裁程序成功夺回了被抢注的中文域名<米其林.网址>。这一案件再次引发了公众对企业网络知识产权保护和域名…...

TCP专题
一、TCP连接建立 1、TCP的四元组 TCP属于面向连接——在发送数据之前,需要先建立一条点到点的连接。 TCP的四元组:源IP地址、目标IP地址、源端口、目标端口。可以唯一的区分和标识一条TCP的连接。 2、TCP报文结构 序列号:TCP是基于”字节…...

力扣热题100刷题day63|49.字母异位词分组
一、哈希表相关理论 代码随想录刷题day15|(哈希表篇)242.有效的字母异位词、383.赎金信-CSDN博客 二、思路 首先,创建一个map集合,遍历字符串数组,对数组中每一个字符串(单词)比如"abc&…...

BERT - 今日头条新闻分类任务实战
1. 自定义模型组件 MultiHeadAttention 类 实现了多头自注意力机制。 通过将输入分割成多个“头”,从不同角度学习输入数据的特征。 注意力分数计算后应用了缩放点积注意力,并支持掩码操作。 class MultiHeadAttention(nn.Module):def __init__(se…...

leetcode-419.棋盘上的战舰
leetcode-419.棋盘上的战舰 文章目录 leetcode-419.棋盘上的战舰一.题目描述二.第一次代码提交三.第二次代码提交 一.题目描述 二.第一次代码提交 class Solution { public:int countBattleships(vector<vector<char>>& board) {int m board.size(); //列数i…...

Python爬虫第11节-解析库Beautiful Soup的使用上篇
目录 前言 一、Beautiful Soup 简介 1.1 Beautiful Soup概述 1.2 准备工作 1.3 解析器 二、基本使用 三、节点选择器的使用 3.1 选择元素 3.2 提取信息 3.2.1 获取名称 3.2.2 获取属性 3.2.3 获取内容 3.3 嵌套选择 3.4 关联选择 3.4.1 子节点和子孙节点 3.4.2…...

host模式容器compose建立记录
需要一个host模式的容器,用来跑gpu程序。同时最好使用ssh来直接远程连接。 以前是直接建立容器然后手动安装ssh的。但是最近突然又不行了,不知道为什么。我知道原因是容器的systmctl不能使用。但是为什么以前能用呢? 一、安装结构 总之换成…...
_39)
LeetCode算法题(Go语言实现)_39
题目 给定一个二叉树的根节点 root,想象自己站在它的右侧,按照从顶部到底部的顺序,返回从右侧所能看到的节点值。 一、代码实现 type TreeNode struct {Val intLeft *TreeNodeRight *TreeNode }func rightSideView(root *TreeNode) []int {i…...
——简单多状态问题)
算法训练之动态规划(五)——简单多状态问题
♥♥♥~~~~~~欢迎光临知星小度博客空间~~~~~~♥♥♥ ♥♥♥零星地变得优秀~也能拼凑出星河~♥♥♥ ♥♥♥我们一起努力成为更好的自己~♥♥♥ ♥♥♥如果这一篇博客对你有帮助~别忘了点赞分享哦~♥♥♥ ♥♥♥如果有什么问题可以评论区留言或者私信我哦~♥♥♥ ✨✨✨✨✨✨ 个…...

深度学习-156-RAG技术之在ubuntu中的安装部署RAGFlow和简单应用
文章目录 1 ubuntu中安装RAGFlow1.1 RAGFlow简介1.2 安装部署1.2.1 硬件要求1.2.2 修改max_map_count1.2.3 下载仓库代码1.2.4 自动拉取镜像1.2.5 查看端口占用(如果提示的话)1.2.6 启动与关闭RAGFlow2 访问应用2.1 添加模型2.2 创建知识库2.2.1 输入名称点击确定2.2.2 填写相关…...
- 2.1 Simscape Multibody 模块之关节(运动副))
自学Matlab-Simscape(初级)- 2.1 Simscape Multibody 模块之关节(运动副)
Matlab-Simscape自学系列文章目录 1.了解Simscape Multibody Link模块 2.掌握Simscape Multibody 模块 3.掌握Simscape Electrical模块 4.掌握Simscape Driveline 模块 5.了解Simscape Fluids模块 6.了解Simscape Battery模块 7.掌握Simscape Mechanical Interfaces 模块 8.掌…...

再次重拾jmeter之踩坑
1.添加“csv数据文件设置”,运行时提示 java.lang.IllegalArgumentException: Filename must not be null or empty检查多次后才发现因为我运行的是整个线程组,所以对应http请求下不能包括空的csv文件 2. 填写ip时不能加/,要在路径里加&…...

第六周作业
好的,这是移除外层代码块,并保留内部 Markdown 格式的作业内容: SQL 注入作业 1、联合注入实现“库名-表名-字段名-数据”的注入过程 (1)前端注入 尝试使用 database() 这个函数进行库名爆破 1 union select 1,data…...