docker安装elk6.7.1-搜集nginx-json日志
docker安装elk6.7.1-搜集nginx-json日志
如果对运维课程感兴趣,可以在b站上、A站或csdn上搜索我的账号: 运维实战课程,可以关注我,学习更多免费的运维实战技术视频
0.规划
192.168.171.130 nginx+filebeat
192.168.171.131 nginx+filebeat
192.168.171.128 redis
192.168.171.129 logstash
192.168.171.128 es1
192.168.171.129 es2
192.168.171.132 kibana

1.docker安装es集群-6.7.1 和head插件(在192.168.171.128-es1和192.168.171.129-es2)
在192.168.171.128上安装es6.7.1和es6.7.1-head插件:
1)安装docker19.03.2:
[root@localhost ~]# docker info
.......
Server Version: 19.03.2
[root@localhost ~]# sysctl -w vm.max_map_count=262144 #设置elasticsearch用户拥有的内存权限太小,至少需要262144
[root@localhost ~]# sysctl -a |grep vm.max_map_count #查看
vm.max_map_count = 262144
[root@localhost ~]# vim /etc/sysctl.conf
vm.max_map_count=262144
2)安装es6.7.1:
上传相关es的压缩包到/data目录:
[root@localhost ~]# cd /data/
[root@localhost data]# ls es-6.7.1.tar.gz
es-6.7.1.tar.gz
[root@localhost data]# tar -zxf es-6.7.1.tar.gz
[root@localhost data]# cd es-6.7.1
[root@localhost es-6.7.1]# ls
config image scripts
[root@localhost es-6.7.1]# ls config/
es.yml
[root@localhost es-6.7.1]# ls image/
elasticsearch_6.7.1.tar
[root@localhost es-6.7.1]# ls scripts/
run_es_6.7.1.sh
[root@localhost es-6.7.1]# docker load -i image/elasticsearch_6.7.1.tar
[root@localhost es-6.7.1]# docker images |grep elasticsearch
elasticsearch 6.7.1 e2667f5db289 11 months ago 812MB
[root@localhost es-6.7.1]# cat config/es.yml
cluster.name: elasticsearch-cluster
node.name: es-node1
network.host: 0.0.0.0
network.publish_host: 192.168.171.128
http.port: 9200
transport.tcp.port: 9300
http.cors.enabled: true
http.cors.allow-origin: "*"
node.master: true
node.data: true
discovery.zen.ping.unicast.hosts: ["192.168.171.128:9300","192.168.171.129:9300"]
discovery.zen.minimum_master_nodes: 1
#cluster.name 集群的名称,可以自定义名字,但两个es必须一样,就是通过是不是同一个名称判断是不是一个集群
#node.name 本机的节点名,可自定义,没必要必须hosts解析或配置该主机名
#下面两个是默认基础上新加的,允许跨域访问
#http.cors.enabled: true
#http.cors.allow-origin: '*'
##注意:容器里有两个端口,9200是:ES节点和外部通讯使用,9300是:ES节点之间通讯使用
[root@localhost es-6.7.1]# cat scripts/run_es_6.7.1.sh
#!/bin/bash
docker run -e ES_JAVA_OPTS="-Xms1024m -Xmx1024m" -d --net=host --restart=always -v /data/es-6.7.1/config/es.yml:/usr/share/elasticsearch/config/elasticsearch.yml -v /data/es6.7.1_data:/usr/share/elasticsearch/data -v /data/es6.7.1_logs:/usr/share/elasticsearch/logs --name es6.7.1 elasticsearch:6.7.1
#注意:容器里有两个端口,9200是:ES节点和外部通讯使用,9300是:ES节点之间通讯使用
[root@localhost es-6.7.1]# mkdir /data/es6.7.1_data
[root@localhost es-6.7.1]# mkdir /data/es6.7.1_logs
[root@localhost es-6.7.1]# chmod -R 777 /data/es6.7.1_data/ #需要es用户能写入,否则无法映射
[root@localhost es-6.7.1]# chmod -R 777 /data/es6.7.1_logs/ #需要es用户能写入,否则无法映射
[root@localhost es-6.7.1]# sh scripts/run_es_6.7.1.sh
[root@localhost es-6.7.1]# docker ps
CONTAINER ID IMAGE COMMAND CREATED STATUS PORTS NAMES
988abe7eedac elasticsearch:6.7.1 "/usr/local/bin/dock…" 23 seconds ago Up 19 seconds es6.7.1
[root@localhost es-6.7.1]# netstat -anput |grep 9200
tcp6 0 0 :::9200 :::* LISTEN 16196/java
[root@localhost es-6.7.1]# netstat -anput |grep 9300
tcp6 0 0 :::9300 :::* LISTEN 16196/java
[root@localhost es-6.7.1]# cd
浏览器访问es服务:http://192.168.171.128:9200/

3)安装es6.7.1-head插件:
上传相关es-head插件的压缩包到/data目录
[root@localhost ~]# cd /data/
[root@localhost data]# ls es-6.7.1-head.tar.gz
es-6.7.1-head.tar.gz
[root@localhost data]# tar -zxf es-6.7.1-head.tar.gz
[root@localhost data]# cd es-6.7.1-head
[root@localhost es-6.7.1-head]# ls
conf image scripts
[root@localhost es-6.7.1-head]# ls conf/
app.js Gruntfile.js
[root@localhost es-6.7.1-head]# ls image/
elasticsearch-head_6.7.1.tar
[root@localhost es-6.7.1-head]# ls scripts/
run_es-head.sh
[root@localhost es-6.7.1-head]# docker load -i image/elasticsearch-head_6.7.1.tar
[root@localhost es-6.7.1-head]# docker images
REPOSITORY TAG IMAGE ID CREATED SIZE
elasticsearch 6.7.1 e2667f5db289 11 months ago 812MB
elasticsearch-head 6.7.1 b19a5c98e43b 3 years ago 824MB
[root@localhost es-6.7.1-head]# vim conf/app.js
.....
this.base_uri = this.config.base_uri || this.prefs.get("app-base_uri") || "http://192.168.171.128:9200"; #修改为本机ip
....
[root@localhost es-6.7.1-head]# vim conf/Gruntfile.js
....
connect: {
server: {
options: {
hostname: '*', #添加
port: 9100,
base: '.',
keepalive: true
}
}
....
[root@localhost es-6.7.1-head]# cat scripts/run_es-head.sh
#!/bin/bash
docker run -d --name es-head-6.7.1 --net=host --restart=always -v /data/es-6.7.1-head/conf/Gruntfile.js:/usr/src/app/Gruntfile.js -v /data/es-6.7.1-head/conf/app.js:/usr/src/app/_site/app.js elasticsearch-head:6.7.1
#容器端口是9100,是es的管理端口
[root@localhost es-6.7.1-head]# sh scripts/run_es-head.sh
[root@localhost es-6.7.1-head]# docker ps
CONTAINER ID IMAGE COMMAND CREATED STATUS PORTS NAMES
c46189c3338b elasticsearch-head:6.7.1 "/bin/sh -c 'grunt s…" 42 seconds ago Up 37 seconds es-head-6.7.1
988abe7eedac elasticsearch:6.7.1 "/usr/local/bin/dock…" 9 minutes ago Up 9 minutes es6.7.1
[root@localhost es-6.7.1-head]# netstat -anput |grep 9100
tcp6 0 0 :::9100 :::* LISTEN 16840/grunt
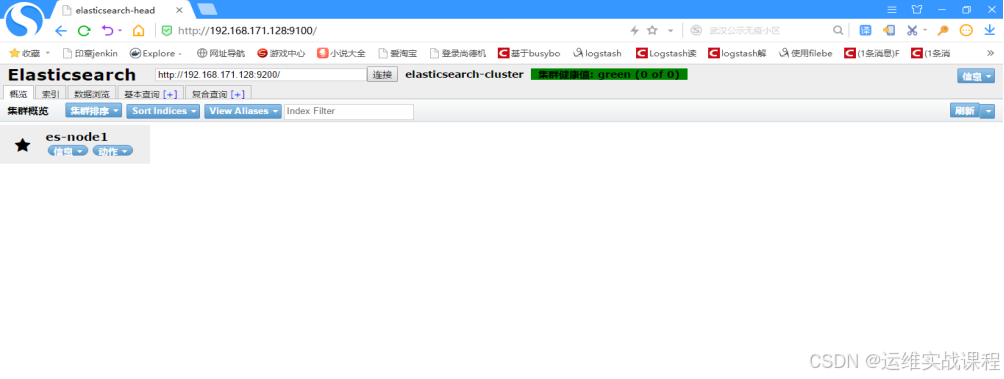
浏览器访问es-head插件:http://192.168.171.128:9100/
在192.168.171.129上安装es6.7.1和es6.7.1-head插件:
1)安装docker19.03.2:
[root@localhost ~]# docker info
Client:
Debug Mode: false
Server:
Containers: 2
Running: 2
Paused: 0
Stopped: 0
Images: 2
Server Version: 19.03.2
[root@localhost ~]# sysctl -w vm.max_map_count=262144 #设置elasticsearch用户拥有的内存权限太小,至少需要262144
[root@localhost ~]# sysctl -a |grep vm.max_map_count #查看
vm.max_map_count = 262144
[root@localhost ~]# vim /etc/sysctl.conf
vm.max_map_count=262144
2)安装es6.7.1:
上传相关es的压缩包到/data目录:
[root@localhost ~]# cd /data/
[root@localhost data]# ls es-6.7.1.tar.gz
es-6.7.1.tar.gz
[root@localhost data]# tar -zxf es-6.7.1.tar.gz
[root@localhost data]# cd es-6.7.1
[root@localhost es-6.7.1]# ls
config image scripts
[root@localhost es-6.7.1]# ls config/
es.yml
[root@localhost es-6.7.1]# ls image/
elasticsearch_6.7.1.tar
[root@localhost es-6.7.1]# ls scripts/
run_es_6.7.1.sh
[root@localhost es-6.7.1]# docker load -i image/elasticsearch_6.7.1.tar
[root@localhost es-6.7.1]# docker images |grep elasticsearch
elasticsearch 6.7.1 e2667f5db289 11 months ago 812MB
[root@localhost es-6.7.1]# vim config/es.yml
cluster.name: elasticsearch-cluster
node.name: es-node2
network.host: 0.0.0.0
network.publish_host: 192.168.171.129
http.port: 9200
transport.tcp.port: 9300
http.cors.enabled: true
http.cors.allow-origin: "*"
node.master: true
node.data: true
discovery.zen.ping.unicast.hosts: ["192.168.171.128:9300","192.168.171.129:9300"]
discovery.zen.minimum_master_nodes: 1
#cluster.name 集群的名称,可以自定义名字,但两个es必须一样,就是通过是不是同一个名称判断是不是一个集群
#node.name 本机的节点名,可自定义,没必要必须hosts解析或配置该主机名
#下面两个是默认基础上新加的,允许跨域访问
#http.cors.enabled: true
#http.cors.allow-origin: '*'
##注意:容器里有两个端口,9200是:ES节点和外部通讯使用,9300是:ES节点之间通讯使用
[root@localhost es-6.7.1]# cat scripts/run_es_6.7.1.sh
#!/bin/bash
docker run -e ES_JAVA_OPTS="-Xms1024m -Xmx1024m" -d --net=host --restart=always -v /data/es-6.7.1/config/es.yml:/usr/share/elasticsearch/config/elasticsearch.yml -v /data/es6.7.1_data:/usr/share/elasticsearch/data -v /data/es6.7.1_logs:/usr/share/elasticsearch/logs --name es6.7.1 elasticsearch:6.7.1
#注意:容器里有两个端口,9200是:ES节点和外部通讯使用,9300是:ES节点之间通讯使用
[root@localhost es-6.7.1]# mkdir /data/es6.7.1_data
[root@localhost es-6.7.1]# mkdir /data/es6.7.1_logs
[root@localhost es-6.7.1]# chmod -R 777 /data/es6.7.1_data/ #需要es用户能写入,否则无法映射
[root@localhost es-6.7.1]# chmod -R 777 /data/es6.7.1_logs/ #需要es用户能写入,否则无法映射
[root@localhost es-6.7.1]# sh scripts/run_es_6.7.1.sh
[root@localhost es-6.7.1]# docker ps
CONTAINER ID IMAGE COMMAND CREATED STATUS PORTS NAMES
a3b0a0187db8 elasticsearch:6.7.1 "/usr/local/bin/dock…" 9 seconds ago Up 7 seconds es6.7.1
[root@localhost es-6.7.1]# netstat -anput |grep 9200
tcp6 0 0 :::9200 :::* LISTEN 14171/java
[root@localhost es-6.7.1]# netstat -anput |grep 9300
tcp6 0 0 :::9300 :::* LISTEN 14171/java
[root@localhost es-6.7.1]# cd
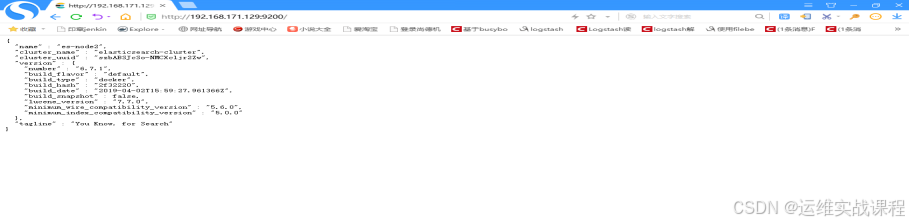
浏览器访问es服务:http://192.168.171.129:9200/
3)安装es6.7.1-head插件:
上传相关es-head插件的压缩包到/data目录
[root@localhost ~]# cd /data/
[root@localhost data]# ls es-6.7.1-head.tar.gz
es-6.7.1-head.tar.gz
[root@localhost data]# tar -zxf es-6.7.1-head.tar.gz
[root@localhost data]# cd es-6.7.1-head
[root@localhost es-6.7.1-head]# ls
conf image scripts
[root@localhost es-6.7.1-head]# ls conf/
app.js Gruntfile.js
[root@localhost es-6.7.1-head]# ls image/
elasticsearch-head_6.7.1.tar
[root@localhost es-6.7.1-head]# ls scripts/
run_es-head.sh
[root@localhost es-6.7.1-head]# docker load -i image/elasticsearch-head_6.7.1.tar
[root@localhost es-6.7.1-head]# docker images
REPOSITORY TAG IMAGE ID CREATED SIZE
elasticsearch 6.7.1 e2667f5db289 11 months ago 812MB
elasticsearch-head 6.7.1 b19a5c98e43b 3 years ago 824MB
[root@localhost es-6.7.1-head]# vim conf/app.js
.....
this.base_uri = this.config.base_uri || this.prefs.get("app-base_uri") || "http://192.168.171.129:9200"; #修改为本机ip
....
[root@localhost es-6.7.1-head]# vim conf/Gruntfile.js
....
connect: {
server: {
options: {
hostname: '*', #添加
port: 9100,
base: '.',
keepalive: true
}
}
....
[root@localhost es-6.7.1-head]# cat scripts/run_es-head.sh
#!/bin/bash
docker run -d --name es-head-6.7.1 --net=host --restart=always -v /data/es-6.7.1-head/conf/Gruntfile.js:/usr/src/app/Gruntfile.js -v /data/es-6.7.1-head/conf/app.js:/usr/src/app/_site/app.js elasticsearch-head:6.7.1
#容器端口是9100,是es的管理端口
[root@localhost es-6.7.1-head]# sh scripts/run_es-head.sh
[root@localhost es-6.7.1-head]# docker ps
CONTAINER ID IMAGE COMMAND CREATED STATUS PORTS NAMES
f4f5c967754b elasticsearch-head:6.7.1 "/bin/sh -c 'grunt s…" 12 seconds ago Up 7 seconds es-head-6.7.1
a3b0a0187db8 elasticsearch:6.7.1 "/usr/local/bin/dock…" 7 minutes ago Up 7 minutes es6.7.1
[root@localhost es-6.7.1-head]# netstat -anput |grep 9100
tcp6 0 0 :::9100 :::* LISTEN 14838/grunt
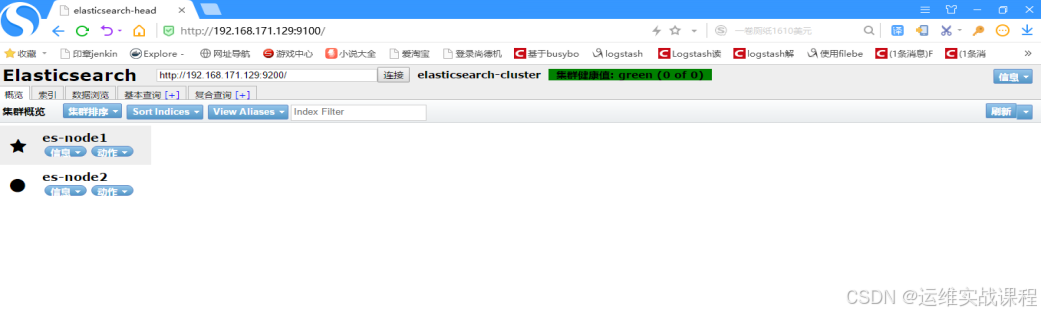
浏览器访问es-head插件:http://192.168.171.129:9100/
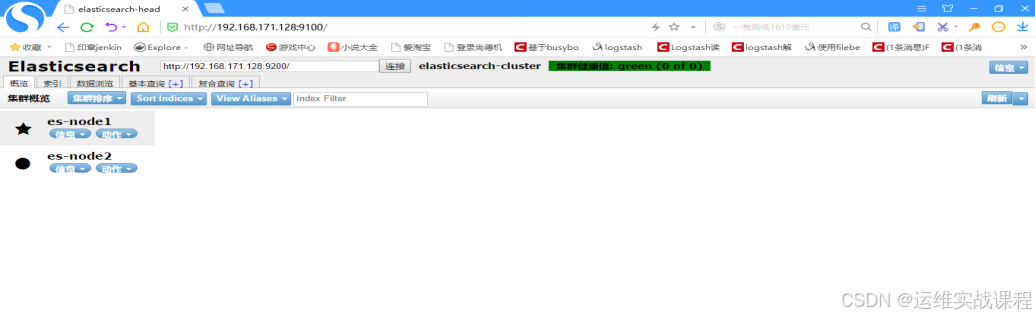
同样在机器192.168.171.128的head插件也能查看到状态,因为插件管理工具都是一样的,如下:
http://192.168.171.128:9100/
2.docker安装redis4.0.10(在192.168.171.128上)
上传redis4.0.10镜像:
[root@localhost ~]# ls redis_4.0.10.tar
redis_4.0.10.tar
[root@localhost ~]# docker load -i redis_4.0.10.tar
[root@localhost ~]# docker images |grep redis
gmprd.baiwang-inner.com/redis 4.0.10 f713a14c7f9b 13 months ago 425MB
[root@localhost ~]# mkdir -p /data/redis/conf #创建配置文件目录
[root@localhost ~]# vim /data/redis/conf/redis.conf #自定义配置文件
protected-mode no
port 6379
bind 0.0.0.0
tcp-backlog 511
timeout 0
tcp-keepalive 300
supervised no
pidfile "/usr/local/redis/redis_6379.pid"
loglevel notice
logfile "/opt/redis/logs/redis.log"
databases 16
save 900 1
save 300 10
save 60 10000
stop-writes-on-bgsave-error yes
rdbcompression yes
rdbchecksum yes
dbfilename "dump.rdb"
dir "/"
slave-serve-stale-data yes
slave-read-only yes
repl-diskless-sync no
repl-diskless-sync-delay 5
repl-disable-tcp-nodelay no
slave-priority 100
requirepass 123456
appendonly yes
dir "/opt/redis/data"
logfile "/opt/redis/logs/redis.log"
appendfilename "appendonly.aof"
appendfsync everysec
no-appendfsync-on-rewrite no
auto-aof-rewrite-percentage 100
auto-aof-rewrite-min-size 64mb
aof-load-truncated yes
lua-time-limit 5000
slowlog-log-slower-than 10000
slowlog-max-len 128
latency-monitor-threshold 0
notify-keyspace-events ""
hash-max-ziplist-entries 512
hash-max-ziplist-value 64
list-max-ziplist-size -2
list-compress-depth 0
set-max-intset-entries 512
zset-max-ziplist-entries 128
zset-max-ziplist-value 64
hll-sparse-max-bytes 3000
activerehashing yes
client-output-buffer-limit normal 0 0 0
client-output-buffer-limit slave 256mb 64mb 60
client-output-buffer-limit pubsub 32mb 8mb 60
hz 10
aof-rewrite-incremental-fsync yes
maxclients 4064
#appendonly yes 是开启数据持久化
#dir "/opt/redis/data" #持久化到的容器里的目录
#logfile "/opt/redis/logs/redis.log" #持久化到的容器里的目录,此处写的必须是文件路径,目录路径不行
[root@localhost ~]# docker run -d --net=host --restart=always --name=redis4.0.10 -v /data/redis/conf/redis.conf:/opt/redis/conf/redis.conf -v /data/redis_data:/opt/redis/data -v /data/redis_logs:/opt/redis/logs gmprd.baiwang-inner.com/redis:4.0.10
[root@localhost ~]# docker ps |grep redis
735fb213ee41 gmprd.baiwang-inner.com/redis:4.0.10 "redis-server /opt/r…" 9 seconds ago Up 8 seconds redis4.0.10
[root@localhost ~]# netstat -anput |grep 6379
tcp 0 0 0.0.0.0:6379 0.0.0.0:* LISTEN 16988/redis-server
[root@localhost ~]# ls /data/redis_data/
appendonly.aof
[root@localhost ~]# ls /data/redis_logs/
redis.log
[root@localhost ~]# docker exec -it redis4.0.10 bash
[root@localhost /]# redis-cli -a 123456
127.0.0.1:6379> set k1 v1
OK
127.0.0.1:6379> keys *
1) "k1"
127.0.0.1:6379> get k1
"v1"
127.0.0.1:6379> quit
[root@localhost /]# exit
3.docker安装nginx1.15.9和配置json日志格式和filebeat6.7.1 (192.168.171.130和192.168.171.131)
在192.168.171.130上:
安装nginx1.15.9:
[root@localhost ~]# cd /data/
[root@localhost data]# ls nginx1.15.9.tar.gz
nginx1.15.9.tar.gz
[root@localhost data]# tar -zxf nginx1.15.9.tar.gz
[root@localhost data]# cd nginx1.15.9
[root@localhost nginx1.15.9]# ls
conf image scripts
[root@localhost nginx1.15.9]# ls conf/
nginx.conf
[root@localhost nginx1.15.9]# ls image/
nginx1.15.9-0711.tar
[root@localhost nginx1.15.9]# ls scripts/
run_nginx.sh
[root@localhost nginx1.15.9]# docker load -i image/nginx1.15.9-0711.tar
[root@localhost nginx1.15.9]# docker images |grep nginx
nginx 1.15.9 881bd08c0b08 12 months ago 109MB
[root@localhost nginx1.15.9]# cat conf/nginx.conf
user root;
worker_processes 4;
events {
worker_connections 10240;
}
http {
include mime.types;
default_type application/octet-stream;
log_format json '{ "@timestamp": "$time_iso8601", '
'"remote_addr": "$remote_addr", '
'"remote_user": "$remote_user", '
'"body_bytes_sent": "$body_bytes_sent", '
'"request_time": "$request_time", '
'"status": "$status", '
'"request_uri": "$request_uri", '
'"request_method": "$request_method", '
'"http_referrer": "$http_referer", '
'"http_x_forwarded_for": "$http_x_forwarded_for", '
'"http_user_agent": "$http_user_agent"}';
access_log /var/log/nginx/access.log json;
client_max_body_size 128m;
sendfile on;
keepalive_timeout 65;
gzip on;
gzip_min_length 1k;
gzip_buffers 4 16k;
gzip_comp_level 4;
gzip_types text/plain text/javascript application/x-javascript text/css application/xml application/xml+rss;
ssi on;
server_tokens off;
server {
listen 80;
#listen 5080 ssl;
#ssl_certificate /data/ssl/server.crt;
#ssl_certificate_key /data/ssl/server.key;
#ssl_session_timeout 5m;
server_name localhost;
location / {
root registry/static_root;
index index.html index.htm;
}
location = /404.html {
root html;
index 404.html;
}
error_page 500 502 503 504 /50x.html;
location = /50x.html {
root html;
}
}
}
[root@localhost nginx1.15.9]# cat scripts/run_nginx.sh
#!/bin/bash
docker run -d --net=host --restart=always --name=nginx -v /data/nginx1.15.9/conf/nginx.conf:/etc/nginx/nginx.conf -v /data/nginx/logs:/var/log/nginx -v /data/nginx/registry:/etc/nginx/registry nginx:1.15.9
[root@localhost nginx1.15.9]# sh scripts/run_nginx.sh
[root@localhost nginx1.15.9]# docker ps |grep nginx
a920b3487d8d nginx:1.15.9 "nginx -g 'daemon of…" 20 seconds ago Up 19 seconds nginx
[root@localhost nginx1.15.9]# netstat -anput |grep 80
tcp 0 0 0.0.0.0:80 0.0.0.0:* LISTEN 27454/nginx: master
[root@localhost nginx1.15.9]# ls /data/nginx
logs registry
[root@localhost nginx1.15.9]# ls /data/nginx/logs/
access.log error.log
[root@localhost nginx1.15.9]# ls /data/nginx/registry/
空
[root@localhost nginx1.15.9]# mkdir /data/nginx/registry/static_root
[root@localhost nginx1.15.9]# echo 111 > /data/nginx/registry/static_root/index.html
[root@localhost nginx1.15.9]# curl localhost
111
[root@localhost nginx1.15.9]# curl localhost
111
[root@localhost nginx1.15.9]# curl localhost
111
[root@localhost nginx1.15.9]# curl 192.168.171.130
111
[root@localhost nginx1.15.9]# cat /data/nginx/logs/access.log
{ "@timestamp": "2020-03-08T11:01:12+00:00", "remote_addr": "127.0.0.1", "remote_user": "-", "body_bytes_sent": "14", "request_time": "0.000", "status": "200", "request_uri": "/", "request_method": "GET", "http_referrer": "-", "http_x_forwarded_for": "-", "http_user_agent": "curl/7.29.0"}
{ "@timestamp": "2020-03-08T11:01:13+00:00", "remote_addr": "127.0.0.1", "remote_user": "-", "body_bytes_sent": "14", "request_time": "0.000", "status": "200", "request_uri": "/", "request_method": "GET", "http_referrer": "-", "http_x_forwarded_for": "-", "http_user_agent": "curl/7.29.0"}
{ "@timestamp": "2020-03-08T11:01:43+00:00", "remote_addr": "127.0.0.1", "remote_user": "-", "body_bytes_sent": "14", "request_time": "0.000", "status": "200", "request_uri": "/", "request_method": "GET", "http_referrer": "-", "http_x_forwarded_for": "-", "http_user_agent": "curl/7.29.0"}
{ "@timestamp": "2020-03-08T11:03:44+00:00", "remote_addr": "192.168.171.130", "remote_user": "-", "body_bytes_sent": "14", "request_time": "0.000", "status": "200", "request_uri": "/", "request_method": "GET", "http_referrer": "-", "http_x_forwarded_for": "-", "http_user_agent": "curl/7.29.0"}
[root@localhost nginx1.15.9]# cd
安装filebeat6.7.1:
[root@localhost ~]# cd /data/
[root@localhost data]# ls filebeat6.7.1.tar.gz
filebeat6.7.1.tar.gz
[root@localhost data]# tar -zxf filebeat6.7.1.tar.gz
[root@localhost data]# cd filebeat6.7.1
[root@localhost filebeat6.7.1]# ls
conf image scripts
[root@localhost filebeat6.7.1]# ls conf/
filebeat.yml filebeat.yml.bak
[root@localhost filebeat6.7.1]# ls image/
filebeat_6.7.1.tar
[root@localhost filebeat6.7.1]# ls scripts/
run_filebeat6.7.1.sh
[root@localhost filebeat6.7.1]# docker load -i image/filebeat_6.7.1.tar
[root@localhost filebeat6.7.1]# docker images |grep filebeat
docker.elastic.co/beats/filebeat 6.7.1 04fcff75b160 11 months ago 279MB
[root@localhost filebeat6.7.1]# cat conf/filebeat.yml
filebeat.inputs:
- type: log
enabled: true
paths:
- /usr/share/filebeat/logs/*.log
fields:
log_source: nginx-access-log-171.130
filebeat.config.modules:
path: ${path.config}/modules.d/*.yml
reload.enabled: false
setup.template.settings:
index.number_of_shards: 3
setup.kibana:
#下面是直接写入es中:
#output.elasticsearch:
# hosts: ["192.168.171.128:9200"]
#下面是写入redis中:
#下面的filebeat-common是自定的key,要和logstash中从redis里对应的key要要一致,多个节点的nginx的都可以该key写入,但需要定义log_source以作为区分,logstash读取的时候以区分的标志来分开存放索引到es中
output.redis:
hosts: ["192.168.171.128"]
port: 6379
password: "123456"
key: "filebeat-common"
db: 0
datatype: list
processors:
- add_host_metadata: ~
- add_cloud_metadata: ~
#注意:因为默认情况下,宿主机日志路径和容器内日志路径是不一致的,所以配置文件里配置的路径如果是宿主机日志路径,容器里则找不到
##所以采取措施是:配置文件里配置成容器里的日志路径,再把宿主机的日志目录和容器日志目录做一个映射就可以了
#/usr/share/filebeat/logs/*.log 是容器里的日志路径
[root@localhost filebeat6.7.1]# cat scripts/run_filebeat6.7.1.sh
#!/bin/bash
docker run -d --name filebeat6.7.1 --net=host --restart=always --user=root -v /data/filebeat6.7.1/conf/filebeat.yml:/usr/share/filebeat/filebeat.yml -v /data/nginx/logs:/usr/share/filebeat/logs docker.elastic.co/beats/filebeat:6.7.1
#注意:因为默认情况下,宿主机日志路径和容器内日志路径是不一致的,所以配置文件里配置的路径如果是宿主机日志路径,容器里则找不到
#所以采取措施是:配置文件里配置成容器里的日志路径,再把宿主机的日志目录和容器日志目录做一个映射就可以了
[root@localhost filebeat6.7.1]# sh scripts/run_filebeat6.7.1.sh #运行后则开始收集日志到redis
[root@localhost filebeat6.7.1]# docker ps |grep filebeat
63d423126963 docker.elastic.co/beats/filebeat:6.7.1 "/usr/local/bin/dock…" 9 seconds ago Up 7 seconds filebeat6.7.1
[root@localhost filebeat6.7.1]# cd
在192.168.171.131上:
安装nginx1.15.9:
[root@localhost ~]# cd /data/
[root@localhost data]# ls nginx1.15.9.tar.gz
nginx1.15.9.tar.gz
[root@localhost data]# tar -zxf nginx1.15.9.tar.gz
[root@localhost data]# cd nginx1.15.9
[root@localhost nginx1.15.9]# ls
conf image scripts
[root@localhost nginx1.15.9]# ls conf/
nginx.conf
[root@localhost nginx1.15.9]# ls image/
nginx1.15.9-0711.tar
[root@localhost nginx1.15.9]# ls scripts/
run_nginx.sh
[root@localhost nginx1.15.9]# docker load -i image/nginx1.15.9-0711.tar
[root@localhost nginx1.15.9]# docker images |grep nginx
nginx 1.15.9 881bd08c0b08 12 months ago 109MB
[root@localhost nginx1.15.9]# cat conf/nginx.conf
user root;
worker_processes 4;
events {
worker_connections 10240;
}
http {
include mime.types;
default_type application/octet-stream;
log_format json '{ "@timestamp": "$time_iso8601", '
'"remote_addr": "$remote_addr", '
'"remote_user": "$remote_user", '
'"body_bytes_sent": "$body_bytes_sent", '
'"request_time": "$request_time", '
'"status": "$status", '
'"request_uri": "$request_uri", '
'"request_method": "$request_method", '
'"http_referrer": "$http_referer", '
'"http_x_forwarded_for": "$http_x_forwarded_for", '
'"http_user_agent": "$http_user_agent"}';
access_log /var/log/nginx/access.log json;
client_max_body_size 128m;
sendfile on;
keepalive_timeout 65;
gzip on;
gzip_min_length 1k;
gzip_buffers 4 16k;
gzip_comp_level 4;
gzip_types text/plain text/javascript application/x-javascript text/css application/xml application/xml+rss;
ssi on;
server_tokens off;
server {
listen 80;
#listen 5080 ssl;
#ssl_certificate /data/ssl/server.crt;
#ssl_certificate_key /data/ssl/server.key;
#ssl_session_timeout 5m;
server_name localhost;
location / {
root registry/static_root;
index index.html index.htm;
}
location = /404.html {
root html;
index 404.html;
}
error_page 500 502 503 504 /50x.html;
location = /50x.html {
root html;
}
}
}
[root@localhost nginx1.15.9]# cat scripts/run_nginx.sh
#!/bin/bash
docker run -d --net=host --restart=always --name=nginx -v /data/nginx1.15.9/conf/nginx.conf:/etc/nginx/nginx.conf -v /data/nginx/logs:/var/log/nginx -v /data/nginx/registry:/etc/nginx/registry nginx:1.15.9
[root@localhost nginx1.15.9]# sh scripts/run_nginx.sh
[root@localhost nginx1.15.9]# docker ps |grep nginx
95f424816b9c nginx:1.15.9 "nginx -g 'daemon of…" 16 seconds ago Up 15 seconds nginx
[root@localhost nginx1.15.9]# netstat -anput |grep 80
tcp 0 0 0.0.0.0:80 0.0.0.0:* LISTEN 21698/nginx: master
[root@localhost nginx1.15.9]# ls /data/nginx
logs registry
[root@localhost nginx1.15.9]# ls /data/nginx/logs/
access.log error.log
[root@localhost nginx1.15.9]# ls /data/nginx/registry/
空
[root@localhost nginx1.15.9]# mkdir /data/nginx/registry/static_root
[root@localhost nginx1.15.9]# echo 222 > /data/nginx/registry/static_root/index.html
[root@localhost nginx1.15.9]# curl localhost
222
[root@localhost nginx1.15.9]# curl localhost
222
[root@localhost nginx1.15.9]# curl 192.168.171.131
222
[root@localhost nginx1.15.9]# cat /data/nginx/logs/access.log
{ "@timestamp": "2020-03-08T11:27:09+00:00", "remote_addr": "127.0.0.1", "remote_user": "-", "body_bytes_sent": "14", "request_time": "0.000", "status": "200", "request_uri": "/", "request_method": "GET", "http_referrer": "-", "http_x_forwarded_for": "-", "http_user_agent": "curl/7.29.0"}
{ "@timestamp": "2020-03-08T11:27:11+00:00", "remote_addr": "127.0.0.1", "remote_user": "-", "body_bytes_sent": "14", "request_time": "0.000", "status": "200", "request_uri": "/", "request_method": "GET", "http_referrer": "-", "http_x_forwarded_for": "-", "http_user_agent": "curl/7.29.0"}
{ "@timestamp": "2020-03-08T11:27:34+00:00", "remote_addr": "192.168.171.131", "remote_user": "-", "body_bytes_sent": "14", "request_time": "0.000", "status": "200", "request_uri": "/", "request_method": "GET", "http_referrer": "-", "http_x_forwarded_for": "-", "http_user_agent": "curl/7.29.0"}
[root@localhost nginx1.15.9]# cd
安装filebeat6.7.1:
[root@localhost ~]# cd /data/
[root@localhost data]# ls filebeat6.7.1.tar.gz
filebeat6.7.1.tar.gz
[root@localhost data]# tar -zxf filebeat6.7.1.tar.gz
[root@localhost data]# cd filebeat6.7.1
[root@localhost filebeat6.7.1]# ls
conf image scripts
[root@localhost filebeat6.7.1]# ls conf/
filebeat.yml filebeat.yml.bak
[root@localhost filebeat6.7.1]# ls image/
filebeat_6.7.1.tar
[root@localhost filebeat6.7.1]# ls scripts/
run_filebeat6.7.1.sh
[root@localhost filebeat6.7.1]# docker load -i image/filebeat_6.7.1.tar
[root@localhost filebeat6.7.1]# docker images |grep filebeat
docker.elastic.co/beats/filebeat 6.7.1 04fcff75b160 11 months ago 279MB
[root@localhost filebeat6.7.1]# cat conf/filebeat.yml
filebeat.inputs:
- type: log
enabled: true
paths:
- /usr/share/filebeat/logs/*.log
fields:
log_source: nginx-access-log-171.131
filebeat.config.modules:
path: ${path.config}/modules.d/*.yml
reload.enabled: false
setup.template.settings:
index.number_of_shards: 3
setup.kibana:
#下面是直接写入es中:
#output.elasticsearch:
# hosts: ["192.168.171.128:9200"]
#下面是写入redis中:
#下面的filebeat-common是自定的key,要和logstash中从redis里对应的key要要一致,多个节点的nginx的都可以该key写入,但需要定义log_source以作为区分,logstash读>取的时候以区分的标志来分开存放索引到es中
output.redis:
hosts: ["192.168.171.128"]
port: 6379
password: "123456"
key: "filebeat-common"
db: 0
datatype: list
processors:
- add_host_metadata: ~
- add_cloud_metadata: ~
#注意:因为默认情况下,宿主机日志路径和容器内日志路径是不一致的,所以配置文件里配置的路径如果是宿主机日志路径,容器里则找不到
##所以采取措施是:配置文件里配置成容器里的日志路径,再把宿主机的日志目录和容器日志目录做一个映射就可以了
#/usr/share/filebeat/logs/*.log 是容器里的日志路径
[root@localhost filebeat6.7.1]# cat scripts/run_filebeat6.7.1.sh
#!/bin/bash
docker run -d --name filebeat6.7.1 --net=host --restart=always --user=root -v /data/filebeat6.7.1/conf/filebeat.yml:/usr/share/filebeat/filebeat.yml -v /data/nginx/logs:/usr/share/filebeat/logs docker.elastic.co/beats/filebeat:6.7.1
#注意:因为默认情况下,宿主机日志路径和容器内日志路径是不一致的,所以配置文件里配置的路径如果是宿主机日志路径,容器里则找不到
#所以采取措施是:配置文件里配置成容器里的日志路径,再把宿主机的日志目录和容器日志目录做一个映射就可以了
[root@localhost filebeat6.7.1]# sh scripts/run_filebeat6.7.1.sh #运行后则开始收集日志到redis
[root@localhost filebeat6.7.1]# docker ps |grep filebeat
06cda99b62ef docker.elastic.co/beats/filebeat:6.7.1 "/usr/local/bin/dock…" 9 seconds ago Up 8 seconds filebeat6.7.1
[root@localhost filebeat6.7.1]# cd
到redis里查看是否以写入日志:(192.168.171.128)
[root@localhost ~]# docker exec -it redis4.0.10 bash
[root@localhost /]# redis-cli -a 123456
127.0.0.1:6379> KEYS *
1)"filebeat-common"
127.0.0.1:6379> quit
[root@localhost /]# exit
4.docker安装logstash6.7.1(在192.168.171.129上)——从redis读出日志,写入es集群
[root@localhost ~]# cd /data/
[root@localhost data]# ls logstash6.7.1.tar.gz
logstash6.7.1.tar.gz
[root@localhost data]# tar -zxf logstash6.7.1.tar.gz
[root@localhost data]# cd logstash6.7.1
[root@localhost logstash6.7.1]# ls
config image scripts
[root@localhost logstash6.7.1]# ls config/
GeoLite2-City.mmdb log4j2.properties logstash.yml pipelines.yml_bak startup.options
jvm.options logstash-sample.conf pipelines.yml redis_out_es_in.conf
[root@localhost logstash6.7.1]# ls image/
logstash_6.7.1.tar
[root@localhost logstash6.7.1]# ls scripts/
run_logstash6.7.1.sh
[root@localhost logstash6.7.1]# docker load -i image/logstash_6.7.1.tar
[root@localhost logstash6.7.1]# docker images |grep logstash
logstash 6.7.1 1f5e249719fc 11 months ago 778MB
[root@localhost logstash6.7.1]# cat config/pipelines.yml #确认配置,引用的conf目录
# This file is where you define your pipelines. You can define multiple.
# For more information on multiple pipelines, see the documentation:
# https://www.elastic.co/guide/en/logstash/current/multiple-pipelines.html
- pipeline.id: main
path.config: "/usr/share/logstash/config/*.conf" #容器内的目录
pipeline.workers: 3
[root@localhost logstash6.7.1]# cat config/redis_out_es_in.conf #查看和确认配置
input {
redis {
host => "192.168.171.128"
port => "6379"
password => "123456"
db => "0"
data_type => "list"
key => "filebeat-common"
}
}
filter {
json {
source => "message"
remove_field => ["message"]
}
geoip {
source => "remote_addr"
target => "geoip"
database => "/usr/share/logstash/config/GeoLite2-City.mmdb"
add_field => ["[geoip][coordinates]", "%{[geoip][longitude]}"]
add_field => ["[geoip][coordinates]", "%{[geoip][latitude]}"]
}
mutate {
convert => ["[geoip][coordinates]", "float"]
}
#date {
# locale => "en"
# match => ["time_local", "dd/MMM/yyyy:HH:mm:ss Z"]
#}
}
#上面filter还有一个作用是引入地理坐标数据库,可分析ip在全球的分布
#默认target是@timestamp,所以time_local会更新@timestamp时间。
#上面filter的date插件作用: 当第一次收集或使用缓存写入时候,会发现入库时间比日志实际时间有延时,导致时间不准确,最好加入date插件,
#使得入库时间和日志实际时间保持一致.上面因为nginx配置文件配置成json格式时候,已经覆盖了入库时间,已经和日志实际时间保持了一致,所以上面date可以不用
output {
if [fields][log_source] == 'nginx-access-log-171.130' {
elasticsearch {
hosts => ["192.168.171.128:9200"]
index => "logstash-nginx-access-log-171.130-%{+YYYY.MM.dd}"
}
}
if [fields][log_source] == 'nginx-access-log-171.131' {
elasticsearch {
hosts => ["192.168.171.128:9200"]
index => "logstash-nginx-access-log-171.131-%{+YYYY.MM.dd}"
}
}
}
[root@localhost logstash6.7.1]# cat scripts/run_logstash6.7.1.sh
#!/bin/bash
docker run -d --name logstash6.7.1 --net=host --restart=always -v /data/logstash6.7.1/config:/usr/share/logstash/config logstash:6.7.1
[root@localhost logstash6.7.1]# sh scripts/run_logstash6.7.1.sh #从redis读取日志,写入es
[root@localhost logstash6.7.1]# docker ps |grep logstash
725e1136bcef logstash:6.7.1 "/usr/local/bin/dock…" About a minute ago Up About a minute logstash6.7.1
到es集群查看,如下:

到redis查看,数据已经读取走,为空了:
[root@localhost ~]# docker exec -it redis4.0.10 bash
[root@localhost /]# redis-cli -a 123456
127.0.0.1:6379> KEYS *
(empty list or set)
127.0.0.1:6379> quit
5.docker安装kibana6.7.1(在192.168.171.132上)从es中读取日志展示出来
[root@localhost ~]# cd /data/
[root@localhost data]# ls kibana6.7.1.tar.gz
kibana6.7.1.tar.gz
[root@localhost data]# tar -zxf kibana6.7.1.tar.gz
[root@localhost data]# cd kibana6.7.1
[root@localhost kibana6.7.1]# ls
config image scripts
[root@localhost kibana6.7.1]# ls config/
kibana.yml
[root@localhost kibana6.7.1]# ls image/
kibana_6.7.1.tar
[root@localhost kibana6.7.1]# ls scripts/
run_kibana6.7.1.sh
[root@localhost kibana6.7.1]# docker load -i image/kibana_6.7.1.tar
[root@localhost kibana6.7.1]# docker images |grep kibana
kibana 6.7.1 860831fbf9e7 11 months ago 677MB
[root@localhost kibana6.7.1]# cat config/kibana.yml
#
# ** THIS IS AN AUTO-GENERATED FILE **
#
# Default Kibana configuration for docker target
server.name: kibana
server.host: "0"
elasticsearch.hosts: [ "http://192.168.171.128:9200" ]
xpack.monitoring.ui.container.elasticsearch.enabled: true
[root@localhost kibana6.7.1]# cat scripts/run_kibana6.7.1.sh
#!/bin/bash
docker run -d --name kibana6.7.1 --net=host --restart=always -v /data/kibana6.7.1/config/kibana.yml:/usr/share/kibana/config/kibana.yml kibana:6.7.1
[root@localhost kibana6.7.1]# sh scripts/run_kibana6.7.1.sh #运行,从es读取展示到kibana中
[root@localhost kibana6.7.1]# docker ps
CONTAINER ID IMAGE COMMAND CREATED STATUS PORTS NAMES
01a60ab36f01 kibana:6.7.1 "/usr/local/bin/kiba…" 35 seconds ago Up 33 seconds kibana6.7.1
[root@localhost kibana6.7.1]# netstat -anput |grep 5601 #kibana端口
tcp 0 0 0.0.0.0:5601 0.0.0.0:* LISTEN 2547/node
浏览器访问kibana: http://192.168.171.132:5601

kibana创建索引(尽量和es里索引名对应,方便查找)——查询和展示es里的数据
先创建-*索引: 点击management,如下:
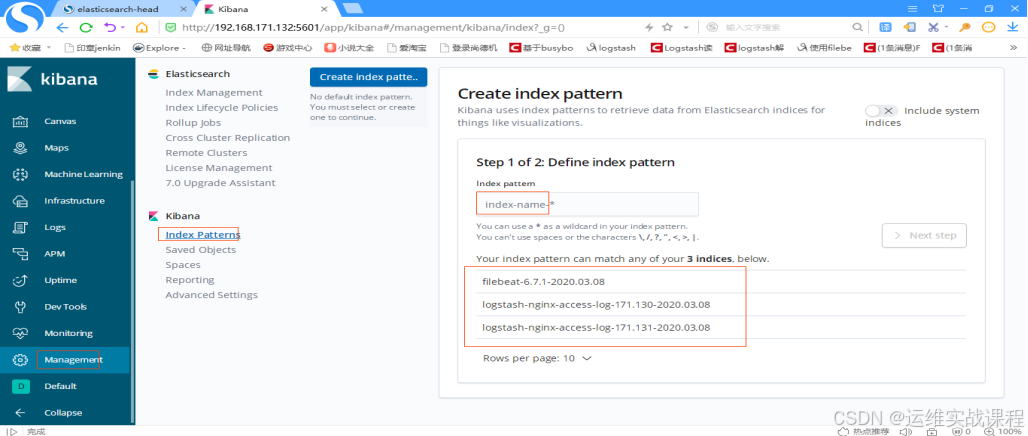
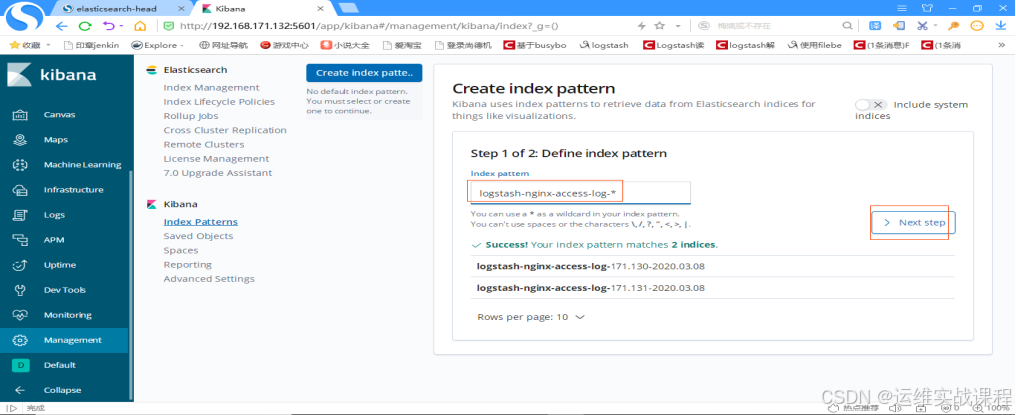
输入索引名:logstash-nginx-access-log-*,点击下一步,如下:
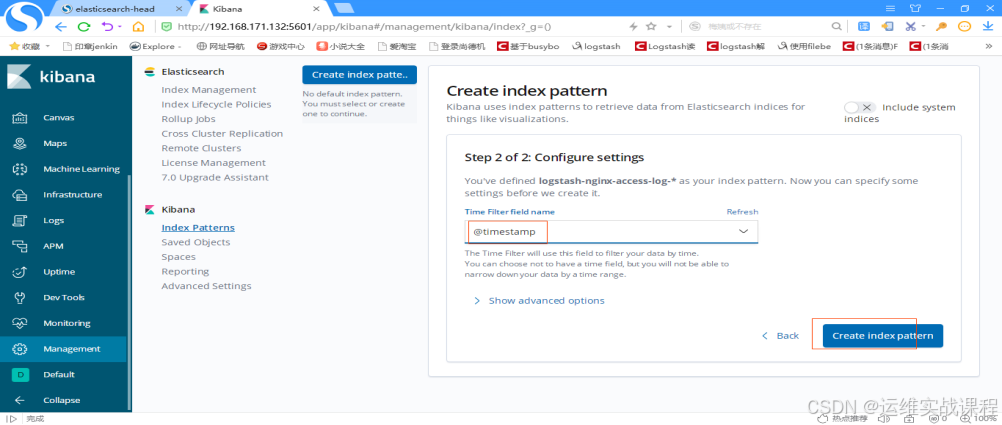
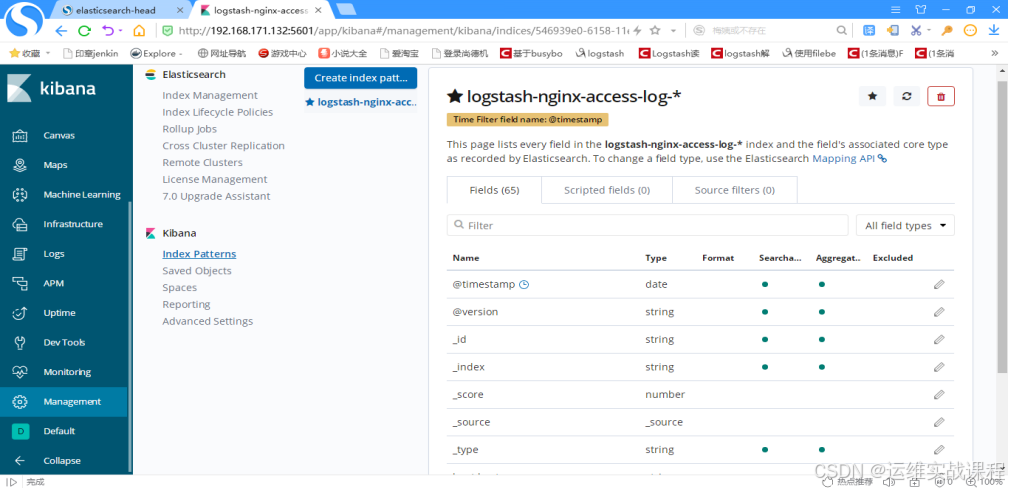
选择时间戳: @timestamp,点击创建索引,如下:
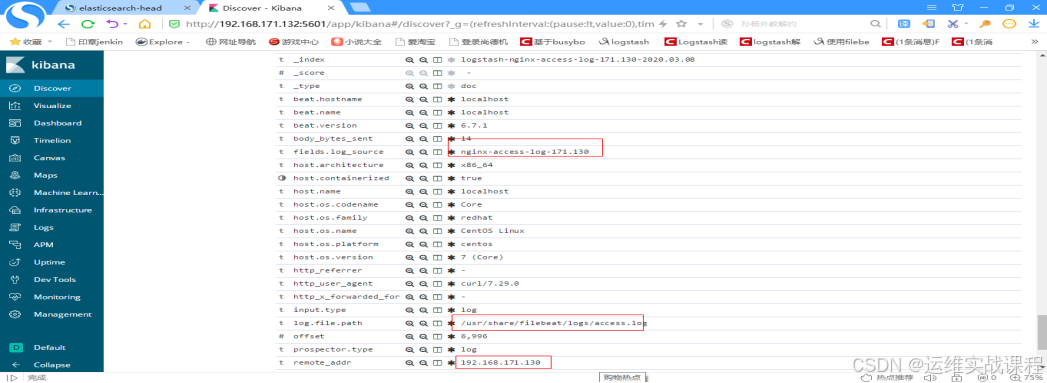
查看日志,点击discover,如下: #注意:由于之前搭建时候nginx测试访问日志量少,后面又多访问了几次两个nginx,方便测试。

点击箭头,即可展开,如下:

如果对运维课程感兴趣,可以在b站上、A站或csdn上搜索我的账号: 运维实战课程,可以关注我,学习更多免费的运维实战技术视频
相关文章:

docker安装elk6.7.1-搜集nginx-json日志
docker安装elk6.7.1-搜集nginx-json日志 如果对运维课程感兴趣,可以在b站上、A站或csdn上搜索我的账号: 运维实战课程,可以关注我,学习更多免费的运维实战技术视频 0.规划 192.168.171.130 nginxfilebeat 192.168.171.131 …...

常见的社交媒体平台有哪些?
社交媒体平台有哪些?在跨境电商和全球营销的过程中,海外社交媒体平台是提高品牌曝光率的重要工具。为了有效管理多个平台的账户,并防止账户之间的关联问题,OKBrow指纹指纹浏览器凭借其强大的多账户管理、防关联技术和隐私保护功能…...

nslookup在内网渗透的使用
1. 什么是 nslookup? nslookup(Name Server Lookup)是一个用于查询 DNS(域名系统)记录的命令行工具。通过该工具,用户可以查询域名的解析结果,例如获取某个域名对应的 IP 地址或查找域名的相关记…...

Linux:修改用户名
Linux:修改用户名 0. 注意事项1.创建并切到临时用户tempuser2.更改用户名3.删除临时用户tempuser 更多内容:XiaoJ的知识星球 在Ubuntu系统中,更改用户名。 0. 注意事项 备份重要数据:在更改用户名之前,建议备份重要数…...

IP协议特性
在网络层中,最重要的协议就是IP协议,IP协议也有两个特性,即地址管理和路由选择。 1、地址管理 由于IPv4地址为4个字节,所以最多可以支持42亿个地址,但在现在,42亿明显不够用了。这就衍生出下面几个机制。…...
)
开发环境搭建-3:配置 nodejs 开发环境 (fnm+ node + pnpm)
在 WSL 环境中配置:WSL2 (2.3.26.0) Oracle Linux 8.7 官方镜像 node 官网:https://nodejs.org/zh-cn/download 点击【下载】,选择想要的 node 版本、操作系统、node 版本管理器、npm包管理器 根据下面代码提示依次执行对应代码即可 基本概…...

14_音乐播放服务_字典缓存避免重复加载
首先在游戏根入口下创建空节点 F2重命名为BGAudio 作为播放 背景音乐的对象 在BGAudio对象上挂载组件 AudioSource 关掉PlayOnAwake 因为我们需要通过代码来控制音效 音量大小设置为0.5 Ctrl d 再复制一份背景播放对象BGAudio 重命名为UIAudio 作为UI窗口操作的播放对象 创建…...

pgsql中处理数组类型字段
1、代码中存入和读取 需要使用自定义转换器 Slf4j public class ArrayTypeHandler extends BaseTypeHandler<List<String>> {Overridepublic void setNonNullParameter(PreparedStatement ps, int i, List<String> parameter, JdbcType jdbcType)throws SQL…...
)
新年好(Dijkstra+dfs/全排列)
1135. 新年好 - AcWing题库 思路: 1.先预处理出1,a,b,c,d,e到其他点的单源最短路,也就是进行6次Dijkstra 2.计算以1为起点的这6个数的全排列,哪种排列方式所得距离最小,也可以使用dfs 1.Dijkstradfs #define int long longusing …...

vscode导入模块不显示类型注解
目录结构: utils.py: import random def select_Jrandom(i:int, m:int) -> int:"""随机选择一个不等于 i 的整数"""j iwhile j i:j int(random.uniform(0, m))return jdef clip_alpha(alpha_j:float, H:float, L:f…...

Stable diffusion 都支持哪些模型
Stable Diffusion 支持多种模型,主要包括以下几类: 官方基础模型: SD 1.x 系列(如 Stable Diffusion 1.4、1.5):这是最经典的模型,适合多种通用场景,使用简单且易于上手。SD 2.x 系列…...
)
C语言操作符(上)
操作符 一,操作符的分类1,算数操作符2,赋值操作符3,逻辑操作符4,条件操作符4,单目操作符5,函数调用和下表访问操作符 二,原码反码补码三,移位操作符1,左移操作…...

Linux TCP 之 RTT 采集与 RTO 计算
我们来看看 Linux TCP 采集 RTT 的函数 tcp_rtt_estimator,看注释,充满了胶着。 但在那个谨慎的年代,这些意味着什么? RTT 最初仅用于 RTO 的计算而不是用于调速,RTO 的计算存在两个问题,如果过估&#x…...
)
智慧水务管网在线监测平台(Axure高保真原型)
智慧水务管网在线监测平台是一种集成了物联网、大数据、云计算和人工智能等技术的综合管理系统。平台的主要目的是提高水务管理的效率和安全,确保供水系统的稳定运行。 智慧水务管网在线监测平台的主要特点和功能: 综合监测与管理:智慧水务平…...

Kubernetes 架构图和组件
🧑 博主简介:CSDN博客专家,历代文学网(PC端可以访问:历代文学,移动端可微信小程序搜索“历代文学”)总架构师,15年工作经验,精通Java编程,高并发设计…...

不建模,无代码,如何构建一个3D虚拟展厅?
在数字化浪潮的推动下,众多企业正积极探索线上3D虚拟展厅这一新型展示平台,旨在以更加生动、直观的方式呈现其产品、环境与综合实力。然而,构建一个既专业又吸引人的3D虚拟展厅并非易事,它不仅需要深厚的技术支持,还需…...
——Mask R-CNN深度探索与实战指南)
MMDetection学习系列(5)——Mask R-CNN深度探索与实战指南
目录 实例分割 R-CNN系列 R-CNN Fast R-CNN Faster R-CNN Mask R-CNN Mask R-CNN 头部结构细节 两阶段架构 损失函数 掩码 RoIAlign Faster R-CNN中的RoIPool Mask R-CNN 中的RoIAlign 实例分割实验 消融研究 定性结果 SOTA 方法比较 Coovally AI模型训练与…...
Oracle SQL: TRANSLATE 和 REGEXP_LIKE 的知识点详细分析
目录 前言1. TRANSLATE2. REGEXP_LIKE3. 实战 前言 🤟 找工作,来万码优才:👉 #小程序://万码优才/r6rqmzDaXpYkJZF 1. TRANSLATE TRANSLATE 用于替换字符串中指定字符集的每个字符,返回替换后的字符串 逐一映射输入字…...

PHP语言的软件工程
PHP语言的软件工程 引言 软件工程是计算机科学中的一个重要分支,它涉及软件的规划、开发、测试和维护。在现代开发中,PHP作为一种流行的服务器端脚本语言,广泛应用于网页开发和各种企业应用中。本文将深入探讨PHP语言在软件工程中的应用&am…...

量变引起质变
量变引起质变,这个是最本质的规律,重复进行一件事情,这件事情就会越来越完善,越来越完美,哪怕是菜鸟,重复多了就是大佬。 我从说话结结巴巴,到说话流畅,只是用了15天直播写代码&…...
)
【专题】为2025制定可付诸实践的IT战略规划报告汇总PDF洞察(附原数据表)
原文链接:https://tecdat.cn/?p39055 在当今瞬息万变的商业环境中,制定有效的 IT 战略规划对于企业的成功与可持续发展至关重要。本报告深入探讨了制定 IT 战略规划的关键活动,旨在为企业和决策者提供全面且实用的指导。 Gartner的《为202…...

Linux内核 -- Linux 的 BIO框架
深入理解 Linux 的 BIO 在 Linux 内核中,BIO(Block I/O)是块层(block layer)用于描述块设备 I/O 请求的核心数据结构。它在文件系统与块设备驱动程序之间充当“载体”,负责把数据页及相关元数据从上层提交…...

Spring WebFlux 和 Spring MVC 的主要区别是什么?
Spring WebFlux 和 Spring MVC 都是 Spring 框架中用于构建 Web 应用的模块,但它们在设计理念、编程模型、性能特性等方面存在显著区别。以下是它们的主要区别: ### 1. **编程模型** - **Spring MVC**: - **同步和阻塞**:Spri…...

卸载和安装Git小乌龟、git基本命令
卸载 Git 打开控制面板: 按 Win R 打开运行对话框,输入 control 并按回车键。或直接在功能搜索里搜索“控制面板”。在控制面板中,选择“程序”或“程序和功能”。 查找并卸载 Git: 在程序列表中找到“Git”或“Git for Windows…...

正向代理与反向代理的主要区别
正向代理与反向代理的主要区别 正向代理与反向代理都是中间服务器 特性正向代理反向代理位置客户端和目标服务器之间客户端和后端服务器之间客户端感知客户端知道代理的存在,并主动连接代理客户端不知道代理的存在,认为直接连接目标服务器主要用途隐藏…...
)
vue组件学习三(插槽)
目录 1、匿名插槽2、渲染作用域3、默认内容4、具名插槽5、条件插槽6、作用域插槽7、具名作用域插槽最后 1、匿名插槽 父组件调用Mycomponet1组件 <Mycomponet1>click me </Mycomponet1>子组件为 <button><slot></slot> </button>最后结…...

Django 的 `Meta` 类和外键的使用
Django 的 Meta 类和外键的使用 1. Meta 类的常用选项2. 外键(ForeignKey)字段的使用2.1 基本用法2.2 ForeignKey 参数2.3 外键删除选项(on_delete) 3. 外键和查询3.1 获取作者的所有书籍3.2 通过书籍查找作者3.3 使用 select_rel…...

DP动态规划字典版递归
https://blog.csdn.net/m0_74408723/article/details/145303575?spm1001.2014.3001.5501 一只青蛙,可以一次跳上1级台阶,也可以一次跳上2级台阶。求这只青蛙跳10级台阶有多少种跳法? 优化上一篇青蛙跳台阶问题。可以采用Map字典存放f(n-1)f(…...

图论 八字码
我们可能惊异于某些技巧。我们认为这个技巧真是巧妙啊。或者有人认为我依靠自己的直觉想出了这个表示方法。非常自豪。我认为假设是很小的时候,比如说小学初中,还是不错的。到高中大学,就有一些不成熟了。因为这实际上是一个竞技。很多东西前…...

Vscode:问题解决办法 及 Tips 总结
Visual Studio Code(简称VSCode)是一个功能强大的开源代码编辑器,广泛用于各种编程语言和开发场景,本博客主要记录在使用 VSCode 进行verilog开发时遇到的问题及解决办法,使用过程中的技巧 文章目录 扩展安装失败调试配…...
)
Excel 技巧15 - 在Excel中抠图头像,换背景色(★★)
本文讲了如何在Excel中抠图头像,换背景色。 1,如何在Excel中抠图头像,换背景色 大家都知道在PS中可以很容易抠图头像,换背景色,其实Excel中也可以抠简单的图,换背景色。 ※所用头像图片为百度搜索&#x…...

vue项目动态div滚动条滑动到指定位置效果
标题首先我们得明确几个知识点 element.scrollIntoView this.$el.querySelector 文档对象模型Document引用的 querySelector() 方法返回文档中与指定选择器或选择器组匹配的第一个 Element对象。如果找不到匹配项,则返回null。 用来匹配动态document 代码 // t…...

2K高刷电竞显示器怎么选?
2K高刷电竞显示器怎么选?哪个价格适合你?哪个配置适合你呢? 1.HKC G27H2Pro - 2K高刷电竞显示器怎么选 外观设计 - HKC G27H2Pro 2K高刷电竞显示器 电竞风拉满:作为猎鹰系列的一员,背部 “鹰翼图腾” 切割线搭配炎红…...
-C题(树上两个节点不同边数最大值))
Codeforces Round 1000 (Div. 2)-C题(树上两个节点不同边数最大值)
https://codeforces.com/contest/2063/problem/C 牢记一棵树上两个节点如果相邻,它们有一条边会重叠,两个节点延伸出去的所有不同边是两个节点入度之和-1而不是入度之和,那么如果这棵树上有三个节点它们的入度都相同,那么优先选择非相邻的两个节点才能使所有不同边的数量最大!!…...
 - 寻找符合要求的最长子串(JavaScriptJava PythonC/C++))
【2024年华为OD机试】 (E卷,200分) - 寻找符合要求的最长子串(JavaScriptJava PythonC/C++)
一、问题描述 给定一个字符串 s,找出满足以下条件的最长子串: 任意一个字符最多出现2次:子串中的每个字符在子串中出现的次数不能超过2次。子串不包含指定字符:子串不能包含输入的指定字符。 请找出满足该条件的最长子串的长度…...

c++常见设计模式之装饰器模式
基础介绍 装饰器模式是结构型设计模式,从字面意思看装饰器设计模式就是用来解决在原有的实现基础上添加一些额外的实现的问题。那么正统的概念是什么呢?装饰器模式允许我们动态的向对象添加新的 行为,同时不改变其原有的结构。它是一种比继承…...

如何在Python中进行数据分析?
数据分析是现代数据科学中的核心环节之一,它能够帮助我们从数据中提取有价值的信息,并为决策提供依据。在Python中,进行数据分析非常方便,因为Python有着丰富的库和工具,能够帮助处理和分析各种类型的数据。本篇文章将…...

linux网络 | 传输层TCP | 认识tcp报头字段与分离
前言: 本节内容继续传输层的讲解, 本节讲解的是tcp协议。 tcp协议是我们日常中最常用的协议。就比如我们浏览网页,我们知道网页时http或者https协议。 其实http或者https底层就是用的tcp协议。tcp协议,全名又称为传输控制协议&…...

定位,用最通俗易懂的方法2.1:CRLB实例
二郎就不设置什么VIP可见啥的了,这样大家都能看到。 如果觉得受益,可以给予一些打赏,也算对原创的一些鼓励,谢谢。 钱的用途:1)布施给他人;2)二郎会有更多空闲时间写教程 起因&…...

深入内核讲明白Android Binder【三】
深入内核讲明白Android Binder【三】 前言一、服务的获取过程内核源码解析1. 客户端获取服务的用户态源码回顾2. 客户端获取服务的内核源码分析2.1 客户端向service_manager发送数据1. binder_ioctl2. binder_ioctl_write_read3. binder_thread_write4. binder_transaction4.1 …...

vim如何显示行号
:set nu 显示行号 :set nonu 不显示行号...

【线性代数】列主元法求矩阵的逆
列主元方法是一种用于求解矩阵逆的数值方法,特别适用于在计算机上实现。其基本思想是通过高斯消元法将矩阵转换为上三角矩阵,然后通过回代求解矩阵的逆。以下是列主元方法求解矩阵 A A A 的逆的步骤: [精确算法] 列主元高斯消元法 步骤 1&am…...

T-SQL语言的数据库编程
T-SQL语言的数据库编程 1. 引言 在信息化迅速发展的今天,数据库已经成为数据管理和使用的重要工具。其中,T-SQL(Transact-SQL)作为微软SQL Server的扩展SQL语言,不仅用于数据查询和管理,还能够进行复杂的…...
)
【Linux】18.Linux进程控制(2)
文章目录 3. 进程程序替换3.1 单进程版 -- 看看程序替换3.2 替换原理3.3 替换函数函数解释命名理解 3.4 多进程版 -- 验证各种程序替换接口3.5 自定义shell 3. 进程程序替换 3.1 单进程版 – 看看程序替换 makefile mycommand:mycommand.cgcc -o $ $^ -stdc99 .PHONY:clean …...

在 Ubuntu 上安装 MySQL 的详细指南
在Ubuntu环境中安装 mysql-server 以及 MySQL 开发包(包括头文件和动态库文件),并处理最新版本MySQL初始自动生成的用户名和密码,可以通过官方的APT包管理器轻松完成。以下是详细的步骤指南,包括从官方仓库和MySQL官方…...
,元数据的存储,Hive和Hadoop的关系)
Hive: Hive的优缺点,使用方式,判断Hive是否启动(jps),元数据的存储,Hive和Hadoop的关系
hive 是一个构建在 Hadoop 上的数据仓库 工具 ( 框架 ) ,可以将结构化的数据文件映射成一张数据表,并可以使用类sql 的方式来对这样的数据文件进行读,写以及管理(包括元数据)。这套 HIVE SQL 简称 HQL。 hive 的执行引…...

Social LSTM:Human Trajectory Prediction in Crowded Spaces | 文献翻译
概要 行人遵循不同轨迹以避免障碍物和容纳同行者。任何在这种场景中巡航的自动驾驶车辆都需要能够遇见行人的未来位置并相应地调整其路线以避免碰撞。轨迹预测问题能够被看作一个顺序生成任务,其中我们对基于行人过去的位置预测其未来的轨迹感兴趣。根据最近RNN&am…...

前后端交互过程
一、前后端交互过程 前后端交互是指客户端(前端)与服务器(后端)之间的数据通信。以下是一个典型的前后端交互流程: 前端请求: 用户在浏览器上与前端界面交互,如点击按钮、提交表单。前端使用 A…...

【计算机视觉】人脸识别
一、简介 人脸识别是将图像或者视频帧中的人脸与数据库中的人脸进行对比,判断输入人脸是否与数据库中的某一张人脸匹配,即判断输入人脸是谁或者判断输入人脸是否是数据库中的某个人。 人脸识别属于1:N的比对,输入人脸身份是1&…...

Spark Streaming的核心功能及其示例PySpark代码
Spark Streaming是Apache Spark中用于实时流数据处理的模块。以下是一些常见功能的实用PySpark代码示例: 基础流处理:从TCP套接字读取数据并统计单词数量 from pyspark import SparkContext from pyspark.streaming import StreamingContext# 创建Spar…...