【君正T31开发记录】8.了解rtsp协议及设计模式
前边搞定了驱动,先不着急直接上手撸应用层的代码,先了解一下大致要用到的东西。
设计PC端先用vlc rtsp暂时H264编码(vlc好像不支持h265,这个后边我试试)的视频流,先需要支持上rtsp server,了解rtsp协议是必须的,然后设计这个server,带入一些设计模式的思想优化整体框架设计。
RTSP协议
实时流传输协议(Real-Time Streaming Protocol,简称RTSP)是一种应用层协议。用于C/S模型,基于文本。其网络包不带具体流媒体负载,只用于建立流媒体传输管道及控制流媒体传输,具体流媒体负载一般用RTP (Real-time Transport Potocol) 实时传输协议传输实时数据的。协议文档RFC2326供参考
交互
请求-响应 模型,client发起请求,server返回响应。
流程:
- 初始化会话:client发送控制请求,server响应并建立会话,返回session;
- 控制:client请求流媒体资源的描述,设置传输参数等;
- 传输:建立RTP传输信道,通过RTP传输流媒体负载。
RTSP的方法相关:

文档描述了RTSP的方法,用于流媒体传输的控制,标记了必须、可选、建议三种类型,必须的method在传输控制中必须实现。
在摄像头传输中,摄像头模组端作为server,遵循标准server状态机状态转换要求:

定制我们自己的状态机(摄像头实时录像,不支持回放、暂停),根据需要配置可选method:
| state | method | next state |
|---|---|---|
| init | SETUP | Ready |
| TEARDOWN | Init | |
| Ready | PLAY | Playing |
| SETUP | Ready | |
| TEARDOWN | Init | |
| Playing | PLAY | Playing |
| TEARDOWN | Init | |
| SETUP | Playing |
协议字段
了解下具体协议字段:
OPTIONS(必须)
OPTIONS可以在任何时候发出,不影响server状态,这是文档所说,应该就是类似于心跳包保活机制用。

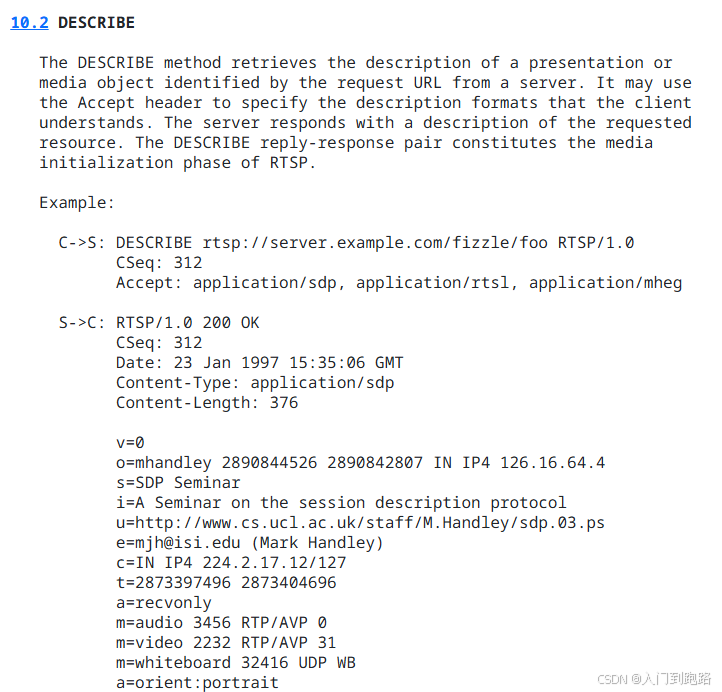
DESCRIBE(建议)
主要是client将rtsp 的 URL传到server,server根据URL找到具体媒体资源,也就是说client可以通过不同的URL从同一个server拉出不同的媒体资源,比如从同一台摄像头根据不同的URL区分主码流、辅码流。
server回复包含媒体的具体信息,client通过这些信息设置播放参数,包括编码类型、帧率啥的。
ANNOUNCE(可选)
非rtsp协议标准的一部分,client向server发送SDP描述,是client控制server的手段,常用于推流通知、更新设备状态。可定制。

SETUP(必需)
client向server确定媒体的具体传输方法,根据URL识别。client请求包含server媒体流的URL和接收RTP的端口及RTCP的端口;server回复应答机补充发送端口。server不支持的URL回复 错误码455-method not valid in this state。

PALY(必需)
client通过 PLAY 请求来播放一个或全部媒体流,PLAY 请求可以发送一次或多次,发送一次时,URL 为包含所有媒体流的地址,发送多次时,每一次请求携带的 URL 只包含一个相应的媒体流。PLAY 请求中可指定播放的 range,若未指定,则从媒体流的开始播放到结束,如果媒体流在播放过程中被暂停,则可在暂停处重新启动流的播放。


PAUSE(建议)
暂停正在播放的媒体

TEARDOWN(必需)
结束会话请求,该请求会停止所有媒体流,并释放服务器上的相关会话数据。

GET_PARAMETER(可选)
client通过发送这个命令,申请询问server相关媒体参数

SET_PARAMETER(可选)
client通过这个命令修改server媒体参数。

REDIRECT(可选)
server向client发送的命令,用于场景:1.负载均衡,server引导client连接低负载server;2.迁移服务器,引导client迁移到新的服务器地址;3.网络拓扑变化,引导client重新适应新网络

RECORD(可选)
client通知server端开始录像,储存在server端,非client记录当前播放的媒体。

状态码相关
细节还是查询文档比较好,成功回复状态码和回复格式基本是确定的-200

设计模式(带C++代码示例)
参考原文,敲一遍代码深入理解一下。
创建型
关注对象的创建过程,旨在隐藏创建逻辑以提高代码灵活性和可维护性
1.单例模式
确保一个类只有一个实例,并提供一个全局访问点。(全局只有一个实例,中心思想是私有构造函数,使对象创建只有一个入口)
代码:
#include <iostream>
using namespace std;class Singleton{private:Singleton(){//私有构造函数 cout << "Singleton()" << endl;};//私有构造函数 static Singleton* instance;static int cnt;public:static Singleton* getInstance(){//静态方法,获取实例 if(instance==nullptr){instance = new Singleton();}return instance; }
};Singleton* Singleton::instance = nullptr;
int Singleton::cnt = 0;int main(){//Singleton* normal = new Singleton(); //不支持直接实例化 Singleton* s1 = Singleton::getInstance();Singleton* s2 = Singleton::getInstance();//s1 s2指向同一个实例 return 0;
}
运行:

2.工厂方法模式
定义一个创建对象的接口,但是是由子类确定实例化哪一个类。(不同的工厂生产不同的产品,工厂各自的产品方法各自实现)
代码:
#include<iostream>
using namespace std;//抽象产品 class Product {public:virtual void operation() = 0;}; //具体产品class ProductA : public Product{public:void operation() override{cout << "product A" << endl;}}; class ProductB : public Product{public:void operation() override{cout << "product B" << endl;}};//抽象工厂class Factory{public:virtual Product* factoryMethod() = 0;}; //具体工厂class FactoryA : public Factory{public:Product* factoryMethod() override{return new ProductA;  	}};class FactoryB : public Factory{public:Product* factoryMethod() override{return new ProductB;  	}}; int main(){Factory* factoryA = new FactoryA();Product* productA = factoryA->factoryMethod();productA->operation();Factory* factoryB = new FactoryB;Product* productB = factoryB->factoryMethod();productB->operation();delete factoryA;delete productA;delete factoryB;delete productB;return 0;}
运行:

3.抽象工厂模式
提供一个创建一系列相关或互相依赖对象的的接口,而无需指定它们具体的类。(工厂方法抽象,具体工厂实现各自的产品,创建产品的路径一致)
代码:
#include<iostream>
using namespace std;//抽象产品
class ProductA{public:virtual void operation() = 0;
};
class ProductB{public:virtual void operation() = 0;
};//具体产品
class ConProductA : public ProductA {public:void operation() override{cout << "concreate productA" << endl;}
};  class ConProductB1 : public ProductB {public:void operation() override{cout << "concreate productB1" << endl;}
};
class ConProductB2 : public ProductB {public:void operation() override{cout << "concreate productB2" << endl;}
}; //抽象工厂
class Factory{public:virtual ProductA* createA() = 0;virtual ProductB* createB() = 0;
}; //具体工厂
class ConFactory1 : public Factory{public:ProductA* createA() override{return new ConProductA;}ProductB* createB() override{return new ConProductB1;}
};
class ConFactory2 : public Factory{public:ProductA* createA() override{return new ConProductA;}ProductB* createB() override{return new ConProductB2;}
}; int main()
{Factory* factory1 = new ConFactory1;ProductA* a1 = factory1->createA();ProductB* b1 = factory1->createB();a1->operation();b1->operation();Factory* factory2 = new ConFactory2;ProductA* a2 = factory2->createA();ProductB* b2 = factory2->createB();a2->operation();b2->operation();delete factory1;delete a1;delete b1;delete factory2;delete a2;delete b2;return 0;
}
运行:

4.建造者模式
将一个复杂对象的构建和它的表示分离,使得同样的构建过程可以创建不同的表
示。
代码:
#include <iostream>
using namespace std;//产品
class Product{public:void setParam(const string& str){param = str;}void show(){cout << param << endl;}private:string param;
};//抽象建造者
class Builder{public:virtual void buildSet() = 0;virtual Product* build() = 0;
};//具体建造者
class ConBuilder : public Builder{public:ConBuilder(){product = new Product;};void buildSet() override{product->setParam("product1");}Product* build() override{return product;};private:Product* product;
};
class ConBuilder2 : public Builder{public:ConBuilder2(){product = new Product;};void buildSet() override{product->setParam("product2");}Product* build() override{return product;};private:Product* product;
};
//指挥者,调用具体建造过程
class Director{public:void construct(Builder* builder){builder->buildSet();}
}; int main(){Director* director = new Director();Builder* b1 = new ConBuilder();director->construct(b1);	Product* p1 = b1->build();p1->show();Builder* b2 = new ConBuilder2();director->construct(b2);Product* p2 = b2->build();p2->show();delete director;return 0;
}
运行:

5.原型模式
用原型实例指定创建对象的种类,并通过拷贝这些原型创建新的对象。
实现:定义一个原型接口,具体原型类实现该接口并clone自身方法。
代码:
#include <iostream>
using namespace std;//抽象原型接口类
class Prototype{public:virtual Prototype* clone() = 0;void setVal(int val){this->val = val;}void show(){cout << val << endl;}private:int val;
};//浅拷贝方法实现原型克隆
class ConPrototype : public Prototype{public:ConPrototype(int val){setVal(val);}Prototype* clone(){return (Prototype*)this;}
};
class ConPrototype2 : public Prototype{public:ConPrototype2(int val){setVal(val);}Prototype* clone(){return new ConPrototype2(*this);}
};
//深拷贝实现原型克隆 int main(){Prototype* p1 = new ConPrototype(3);p1->show();//克隆 Prototype* p2 = p1->clone();p2->show();Prototype* p3 = new ConPrototype(4);p3->show();//克隆 Prototype* p4 = p1->clone();p4->show();return 0;
}
运行:

结构型
关注类和对象的组合,旨在通过继承和组合实现更大的灵活性和可拓展性。
1.适配器模式
将一个类的接口转换成客户希望的另一个接口,使得原本由于接口而不兼容的那些类可以一起工作。
代码:
#include <iostream>
using namespace std;//目标接口
class Target{public:virtual void targetTodo() = 0;
};//需要适配的类
class LibClass{public:void todo(){cout << "do something" << endl;}
};//适配器类
class Adapter : public Target{public:void targetTodo() override{lib.todo();}private:LibClass lib;
}; int main(){Target* target = new Adapter;target->targetTodo();//通过适配器类直接访问目标接口 return 0;
}
实现:

2.桥接模式
将抽象部分与它的实现部分分离,使得他们可以独立变化。
代码:
#include <iostream>
#include <memory>
using namespace std;//实例说明,以不同的操作系统为例
//抽象接口,假定一个需要跨操作系统的接口
class  TargetPlat{public:virtual void targetTodo() = 0;
};//Linux实现
class Linux : public TargetPlat{public:void  targetTodo() override {cout << "linux do" << endl;}
};
//Windows实现
class Win : public TargetPlat{public:void  targetTodo() override {cout << "win do" << endl;}
};//桥
class Bridge{protected:TargetPlat* plat;public:Bridge(TargetPlat* plat){this->plat = plat;}virtual	void func1() = 0;
};//一个需要跨平台是具体功能
class Func : public Bridge{public:Func(TargetPlat* plat) : Bridge(plat){}void func1() override {cout << "func1" << endl;plat->targetTodo();}
};int main(){unique_ptr<TargetPlat> plat = make_unique<Linux>();unique_ptr<Bridge> birdge = make_unique<Func>(plat.get());birdge->func1();//通过桥,将具体动作映射到Linux return 0;
}
运行:

3.组合模式
将对象组合成树形结构以表示“部分-整体”的层次结构,使得用户对单个对象和组合对象的使用具有一致性。
代码:
#include <iostream>
#include <memory>
#include <vector>
using namespace std;//定义抽象组件基类
class Component{public:virtual void operation() = 0;//业务
};//业务实现
class Leaf : public Component{private:string leafName;public:Leaf(const string& str) : leafName(str){}void operation() override{cout << leafName << "-->operation" << endl;}
};//组合类,对子组件管理
class Compsite : public Component{public:void operation() override{cout << "compsite operation" << endl;for(Component* c : children){c->operation();}}void add(Component* component){//子组件添加接口 children.push_back(component);}void remove(Component* component){//子组件移除接口for (vector<Component*>::iterator it = children.begin(); it<children.end(); it++){if (*it == component){children.erase(it);}}}private:vector<Component*> children;//存储业务子组件
};int main(){//新建两个叶子子组件,各自实现各自功能shared_ptr<Component> l1 = make_shared<Leaf>("leaf1");shared_ptr<Component> l2 = make_shared<Leaf>("leaf2");shared_ptr<Compsite> c = make_shared<Compsite>();//组合节点//添加子操作到组合节点 c->add(l1.get());c->add(l2.get());c->operation();cout << "*******************" << endl;shared_ptr<Compsite> root = make_shared<Compsite>();//创建更上层的节点shared_ptr<Component> l3 = make_shared<Leaf>("leaf3");root->add(l3.get());root->add(c.get());root->operation();return 0;
}
运行:

4.装饰模式
动态的给一个对象添加一些额外的职责,就增加功能来说,装饰模式比生成子类更灵活。
代码:
#include <iostream>
#include <memory>
#include <vector>
using namespace std;//定义一个控制类抽象组件基类
class Control{public:virtual void operation() = 0;//业务
};//控制业务实现组件
class SpecControl : public Control{public:void operation() override{cout << "SpecControl operation" << endl;}
};//创建装饰者基类
class Decorator : public Control{public:Decorator(Control* ctrl) : ctrl(ctrl){}virtual void operation(){ctrl->operation();//虚函数,具体控制动作看具体对象 }	private:Control* ctrl;
};//实现具体装饰者
class  Decorator1 : public Decorator{public:Decorator1(Control* ctrl) : Decorator(ctrl){}virtual void operation(){Decorator::operation();cout << "add Decorator1 self operation" << endl;//在父类基础上添加自己的实现 }
};
class  Decorator2 : public Decorator{public:Decorator2(Control* ctrl) : Decorator(ctrl){}virtual void operation(){Decorator::operation();cout << "add Decorator2 self operation" << endl;}
};int main(){shared_ptr<Control> ctrl = make_shared<SpecControl>();//创建普通控制类 shared_ptr<Control> d1 = make_shared<Decorator1>(ctrl.get());//在普通类基础上,创建有Decorator1自己方法的实例 d1->operation();cout << "*********************" << endl;shared_ptr<Control> d2 = make_shared<Decorator2>(ctrl.get());d2->operation();cout << "*********************" << endl;shared_ptr<Control> d3 = make_shared<Decorator2>(d1.get());//在d1已添加Decorator1方法的基础上,再添加Decorator2方法 d3->operation();return 0;
}
运行:

适用场景:
- 需要动态添加功能的场景:如图形控件,动态加很多边框、拖拉条等控件;
- 避免类膨胀:组合型功能实现,避免大量子类继承;
- 场景组合类:对象功能需要动态组合,装饰者可以灵活组合大量功能;
- 开闭源原则
5.外观模式
为子系统中的一组接口提供一个一致的界面,外观模式定义一个高层接口,这个接口使得这一子系统更容易使用。
代码:
#include <iostream>
#include <memory>
#include <vector>
using namespace std;//存在多个子系统
class SubSystem1{public:void method(){cout << "SubSystem1 method" << endl;}
};
class SubSystem2{public:void method(){cout << "SubSystem2 method" << endl;}
}; //外观类,融合子系统
class Facade{private:SubSystem1* sys1;SubSystem2* sys2;public:Facade(){sys1 = new SubSystem1;sys2 = new SubSystem2;}~Facade(){delete sys1;delete sys2;}void operation(){sys1->method();sys2->method();}
};int main(){Facade f;f.operation();return 0;
}
运行:

适用场景:
- 简化复杂系统:融合多个子系统功能,提供一致性访问接口;
- 封装遗留代码:将老接口封装在一起,简化调用过程;
- 降低耦合:有统一调度接口的前提下,不通过class封装子系统,有灵活性,耦合度低。
6.享元模式
运用共享技术,有效支持大量细粒度的对象。
代码:典型运用为下棋
#include <iostream>
#include <memory>
#include <map>
using namespace std;enum Color//颜色
{white,black
};struct Position//位置
{int x;int y;Position(int x, int y) : x(x),y(y){}
};//棋子绘制
class Piece{private:Color color;public:Piece(Color color) : color(color){}void draw(Position pos){if (color == white)cout << "dram white at(" << pos.x << ":" << pos.y << ")" << endl;elsecout << "dram black at(" << pos.x << ":" << pos.y << ")" << endl;}
};//享元工厂,批量生产棋子
class PieceFac{public:Piece* getFlyWight(Color color){map<Color, Piece*>::iterator it = flyWightMap.find(color);if(it == flyWightMap.end()){shared_ptr<Piece> tmpP = make_shared<Piece>(color);flyWightMap.insert(make_pair(color,tmpP.get()));return tmpP.get();}else{return it->second;} }private:map<Color, Piece*> flyWightMap;
}; int main(){//批量生成不同位置的黑白棋 unique_ptr<PieceFac> fac = make_unique<PieceFac>();Piece* p1 = fac->getFlyWight(white);p1->draw(Position(2,3));Piece* p2 = fac->getFlyWight(black);p2->draw(Position(2,4));Piece* p3 = fac->getFlyWight(black);p3->draw(Position(3,6));return 0;
}
运行:

7.代理模式
为其他对象提供一种代理,用以控制这个对象的访问。
代码:
#include <iostream>
#include <memory>
#include <map>
using namespace std;//抽象基类
class Subject{public:virtual void request() = 0;
};//被代理目标1
class Subject1 : public Subject{public:void request(){cout << "Subject1 request" << endl;}
};
//被代理目标2
class Subject2 : public Subject{public:void request(){cout << "Subject2 request" << endl;}
};//代理类
class Proxy : public Subject{private:Subject* subject;public:Proxy(Subject* subject) : subject(subject){}virtual void request(){subject->request();}
};int main(){unique_ptr<Subject1> sub1 = make_unique<Subject1>();unique_ptr<Subject2> sub2 = make_unique<Subject2>();unique_ptr<Proxy> proxy = make_unique<Proxy>(sub1.get());//代理访问 Subject1proxy->request();unique_ptr<Proxy> proxy2 = make_unique<Proxy>(sub2.get());//代理访问 Subject2proxy2->request();return 0;
}
运行:

行为型
关注对象之间的通信,旨在通过定义对象间的交互以提高系统灵活性和可维护性
1.责任链模式
使多个对象都有机会处理请求,从而避免请求的发送者和接收者之间的耦合关系。
代码:
//典型责任链-流程审批
#include <iostream>
#include <memory>
using namespace std;//定义处理者接口,定义一个流程请求
class Request{public:int level;Request(int level) : level(level){}void request(){cout << "request" << endl;	};
};//审批者基类
class  Approve{protected:void toNext(Request* req){//交给下一级处理 if(m_next != nullptr){//存在下一级审批 m_next->processRequest(req);}else{//没有下一级审批者 cout << "nobody can do" << endl;}}public:void setNext(Approve* next){m_next = next;}//链接下一个审批者virtual void processRequest(Request* req) = 0;//本层级处理private:Approve* m_next;
};//创建具体审批者,假定两级审批关系
class  ApproveLow : public Approve{void processRequest(Request* req){if(req->level <100 ){//假定低级处理者智能处理小于100权值的任务 cout << "deal by ApproveLow" << endl;}else{//大于权限的,给下一级审批者 toNext(req);} }
};
class  ApproveHigh : public Approve{void processRequest(Request* req){if(req->level <300 ){//假定低级处理者智能处理小于100权值的任务 cout << "deal by ApproveHigh" << endl;}else{//大于权限的,给下一级审批者 toNext(req);} }
};int main(){unique_ptr<Approve> low = make_unique<ApproveLow>();unique_ptr<Approve> high = make_unique<ApproveHigh>();//两个具体审批者实例 low->setNext(high.get()); //建立审批链,low->highRequest r1(60);Request r2(120);Request r3(320);//三个集体审批请求,需要审批权限cout << "r1:60 req" << endl;low->processRequest(&r1);cout << "r1:120 req" << endl;low->processRequest(&r2);cout << "r1:320 req" << endl;low->processRequest(&r3);//统一递交给最低级审批者return 0;
}
运行:

2.命令模式
将一个请求封装成一个对象,从而使你可以用不同的请求对客户进行初始化。
代码:
#include <iostream>
#include <memory>
using namespace std;class Receiver;
//命令基类
class Commond{public:virtual void setRec(Receiver* rec) = 0;virtual void execute() = 0;
}; //命令接收者基类
class Receiver{public:virtual void receiveTodo() = 0;
};
//具体命令接收者
class Receiver1 : public Receiver{void receiveTodo() override{cout << "Receiver1 get cmd, to do" << endl;}
};
class Receiver2 : public Receiver{void receiveTodo() override{cout << "Receiver2 get cmd, to do" << endl;}
}; //实现命令
class ConCommond : public Commond{private:Receiver* rec;public:ConCommond(Receiver* rec) : rec(rec){}void execute() override{rec->receiveTodo();}void setRec(Receiver* rec) override{this->rec = rec;}
};//创建调用者
class Invoker{private:Commond* cmd;public:Invoker(Commond* cmd) : cmd(cmd){}void executeCmd(){cmd->execute();}
}; int main(){unique_ptr<Receiver> rec = make_unique<Receiver1>();unique_ptr<Commond> cmd = make_unique<ConCommond>(rec.get());Invoker inv(cmd.get());inv.executeCmd();//调用者具体执行 //更换命令接收者unique_ptr<Receiver> rec2 = make_unique<Receiver2>();cmd->setRec(rec2.get());inv.executeCmd();return 0;
}
运行:

3.解释器模式
给定一个语言,定义它的语法的实现,并定义一个解释器用于调用具体实现。
代码:
//解释器模型典型--计算器,为了简单,暂时只做加法
#include <iostream>
#include <memory>
#include <stack>
#include <sstream>
using namespace std;//计算器表达式基类
class Expression{public:virtual ~Expression(){}virtual int interpret() = 0;
};
//数字表达式类
class NumExpression : public Expression{public:NumExpression(int num) : num(num){}int interpret() override {return num;}private:int num;
};
//符号表达式,这里仅加法
class AddExpression : public Expression{public:~AddExpression(){delete left;delete right;}AddExpression(Expression* l, Expression* r) : left(l),right(r){}int interpret(){return left->interpret() + right->interpret();}private:Expression* left;Expression* right;
}; //解释器类
class  Context{public:Expression* exaluate(const string& expression){stack<Expression*> st;stringstream ss(expression);string token;while(getline(ss,token, ' ')){if (token == "+"){cout << "this +" << endl;Expression* addExp = new AddExpression(nullptr,nullptr);st.push(addExp);}else if(token == "="){cout << "this =" << endl;Expression* r = st.top(); st.pop();delete st.top(); st.pop();//推出符号,这个已经知道是+ Expression* l = st.top(); st.pop();Expression* addExp = new AddExpression(l,r);st.push(addExp);}else{int num = stoi(token);cout << "this " << num << endl;Expression* numExp = new NumExpression(num);st.push(numExp);}}return st.top();}};int main(){Context con;shared_ptr<Expression> exp(con.exaluate("2 + 4 ="));int res = exp->interpret();cout << "result:" << res << endl;return 0;
}
运行:

4.迭代器模式
提供一种方法顺序访问一个聚合对象中的各个元素,而又不暴露该对象内部表示。
代码:
//典型实现--STL的迭代器,这里实现一个简单的string使用迭代器
#include <iostream>
#include <string.h>
using namespace std;class StringBase{public:virtual int getSize() = 0;virtual char getItem(int pos) = 0;virtual int begin() = 0;virtual int end() = 0;
};//实现迭代器
class Myiterator{public:Myiterator(StringBase& str) : str(str){}Myiterator& operator ++(){//基础向后移动,前置运算符 pos++;return *this;}char operator *(){//取值 return str.getItem(pos);}void operator =(int a){pos = a;}bool operator <=(int other){return pos <= other;}private:StringBase& str;int pos;//记录位置
};//String容器实现
class String : public StringBase{private:char *str;int size;public:String(const char *str){size = strlen(str);this->str = new char[size];memcpy(this->str, str, size);} ~String(){delete[] this->str;}int getSize() override{return size;}char getItem(int pos) override{return str[pos];}int begin() override{return 0;}int end() override{return size;}
};int main(){String str("test str");Myiterator it(str);for(it=str.begin();it<=str.end();++it){//使用迭代器 cout << *it << endl;}return 0;
}
运行:

5.中介者模式
用一个中介对象来封装一系列对象的交互,中介者使得各个对象不需要显式相互引用,实现解耦,且可以独立改变它们之间的交互。
代码:
//创建两个测试类,通过中介者实现通信
#include <iostream>
#include <string.h>
#include <vector>
using namespace std;class PeopleBase;
//抽象中介
class AbstractMediator{public:virtual void registerPeople(PeopleBase* people) = 0;//给中介介绍peoplevirtual void sendMsg(const string& msg, PeopleBase* people) = 0;//中介传送消息
};
//抽象测试类
class PeopleBase{protected:AbstractMediator* mediator;//中介 public:PeopleBase(AbstractMediator* mediator) : mediator(mediator){}virtual void sendMsg(const string& msg) = 0;virtual void receiveMsg(const string& msg) = 0;
}; //中介
class ConMediator : public AbstractMediator{private:vector<PeopleBase*> peoples;//存放有中介需求的元素 public:void registerPeople(PeopleBase* people) override{peoples.push_back(people);}void sendMsg(const string& msg, class PeopleBase* people) override{for(PeopleBase* p : peoples){if(p != people){p->receiveMsg(msg);}}}
}; //测试类
class People : public PeopleBase{private:string name;public:People(AbstractMediator* mediator, string name) : PeopleBase(mediator),name(name){}void sendMsg(const string& msg) override{mediator->sendMsg(msg, this);}void receiveMsg(const string& msg) override{cout << name << " receive msg:" << msg << endl;}
};int main(){ConMediator mediator;People p1(&mediator, "people1");People p2(&mediator, "people2");People p3(&mediator, "people3");mediator.registerPeople(&p1);mediator.registerPeople(&p2);mediator.registerPeople(&p3);p1.sendMsg("people1 send");//一发多收,中介者是中间处理层 return 0;
}
运行:

6.备忘录模式
在不破坏封装性的前提下,捕获一个对象的内部状态,并在对象外保存这个状态。
代码:
//游戏过程中保存游戏状态,快照
#include <iostream>
#include <string.h>
#include <vector>
using namespace std;//备忘录类
class GameState{private:vector<string> histories;public:GameState(){}GameState(GameState* other){histories = other->getHistory();}void addHistory(string& history){histories.push_back(history);}string getState(){return histories[histories.size()-1];}vector<string>& getHistory(){return histories;}
}; //测试游戏类
class Game{private:GameState* state;public:Game(){state = new GameState;}Game(GameState* state) : state(state){}~Game(){delete state;}GameState* getState(){return state;}//游戏具体操作方法void operation(string opera){cout << "game operation : " << opera << endl;state->addHistory(opera);}string getCurrentState(){return state->getState();}
}; int main(){Game game;game.operation("move left");game.operation("fire");game.operation("stop");GameState state(game.getState());//另一个对象保存当前游戏状态 Game newGame(&state);//新建游戏,继承之前的游戏状态 string cState = newGame.getCurrentState();cout << "new game state : " << cState << endl;return 0;
}
运行:

7.观察者模式
定义对象间的一种一对多的依赖关系,当一个对象状态发生改变时,所有依赖于它的对象都被通知到并被自动更新。
代码:
//一个更改,全部通知
#include <iostream>
#include <string.h>
#include <vector>
using namespace std;class ObserverBase;//抽象目标
class TargetBase{public:virtual void notify() = 0;virtual void attach(ObserverBase* ob) = 0;
}; //抽象观察者
class ObserverBase{public:ObserverBase(TargetBase* tar){tar->attach(this);} virtual void update() = 0;
}; //具体目标
class  Target : public TargetBase{private:int val;vector<ObserverBase*> observers;public:void set(int val){this->val = val;notify();}int get(){return val;}void notify() override{//群发通知cout << "notify" << endl;for(ObserverBase* ob : observers){ob->update();} }void attach(ObserverBase* ob) override{observers.push_back(ob);}
};//具体观察者
class Observer : public ObserverBase{private:Target* target;string name;public:Observer(Target* target,string name) : ObserverBase(target),target(target),name(name){}void update() override{cout << name << "->target val changed : " << target->get() << endl;}
};int main(){	Target t1;Observer observer1(&t1,"observer1");Observer observer2(&t1,"observer2");//两个订阅观察者 t1.set(1);//一次设置,两个接收 return 0;
}
运行:

8.状态模式
允许对象在内部状态改变时改变它的行为,对象看起来好像修改了它的类。
代码:
#include <iostream>
#include <string.h>
#include <vector>
using namespace std;//抽象状态类
class StateBase{public:virtual void handle() = 0;
}; //多种状态
class State1 : public  StateBase{void handle(){cout << "state 1 out" << endl;}
};
class State2 : public  StateBase{void handle(){cout << "state 2 out" << endl;}
};//操作目标
class Target{private:StateBase* state;public:void setState(StateBase* state){this->state = state;}void apply(){state->handle();}
}; int main(){Target target;State1 state1;target.setState(&state1);//更新target的状态 target.apply();State2 state2;target.setState(&state2);//更新target的状态target.apply();//同样的行为,通过改变外部state2状态,产生不同的效果 return 0;
}
运行:

9.策略模式
定义一系列算法,并把它们一个个封装起来,并且使得它们可以互相替换。
代码:
//将不同的策略封装起来,不同情况下不同策略
#include <iostream>
#include <string.h>
#include <vector>
using namespace std;//一个策略基类
class Strategy{public:virtual void handle() = 0;//排序完,输出最大值
};
//具体策略
class Strategy1 : public Strategy{void handle() override{cout << "Strategy1 handle" << endl;}
};
class Strategy2 : public Strategy{void handle() override{cout << "Strategy2 handle" << endl;}
};//集体操作类,联系上下文场景确定策略
class  Context{private:Strategy* strategy;public:void setScene(Strategy* sgy){//配置场景 strategy = sgy;}void execute(){//确定具体策略 strategy->handle();}
};int main(){Context con;//场景1Strategy1 s1;con.setScene(&s1);con.execute();//场景2Strategy2 s2;con.setScene(&s2);con.execute(); return 0;
}
运行:

10.模板方法模式
定义一个操作中的算法骨架,而将一些步骤延迟到子类,使得子类可以不改变一个算法结构即可重定义该算法的某些特定步骤。
代码:
//典型是C++模板操作,这里用其他例子,比如建房子
#include <iostream>
#include <string.h>
#include <vector>
using namespace std;//抽象基类,定义一套框架
class  Build{public: void buildAll(){//定义一台公用框架 buildGround();buildFramework();buildDecoration(); }protected:virtual void buildGround() = 0;//打地基virtual void buildFramework() = 0;//做框架virtual void buildDecoration() = 0;//装修
};//具体实现,实现具体方法
class BuildHighHouse : public Build{protected:void buildGround() override{cout << "deep" << endl;}void buildFramework() override{cout << "wide" << endl;}void buildDecoration() override{cout << "luxurious" << endl;}
};
class BuildLowHouse : public Build{protected:void buildGround() override{cout << "shallow" << endl;}void buildFramework() override{cout << "thin" << endl;}void buildDecoration() override{cout << "simple" << endl;}
};int main(){//cout << "build high house*******" << endl; BuildHighHouse h;h.buildAll();cout << "build low house*******" << endl; BuildLowHouse l;l.buildAll();return 0;
}
运行:

11.访问者模式
封装一些作用于某种数据结构中各元素的操作,可以在不改变数据结构的前提下定义作用于这些元素的操作。主要为了实现数据结构与数据操作的分离。
代码:
//访问电脑不同元件
#include <iostream>
#include <string.h>
#include <vector>
using namespace std;class Mouse;
class Keyboard;
//抽象访问者,操作方法的集合体
class  VisitorBase{public:virtual void visit(Mouse* mouce) = 0;virtual void visit(Keyboard* keyboard) = 0;
}; //抽象访问元素
class Computer{public:virtual void accept(VisitorBase* v) = 0;
};
//具体几个访问元素
class Mouse : public Computer{public:void accept(VisitorBase* v) override{v->visit(this);}
};
class Keyboard : public Computer{public:void accept(VisitorBase* v) override{v->visit(this);}
}; //访问者具体实现
class Visitor : public VisitorBase{void visit(Mouse* mouse) override{cout << "this is mouse" << endl;}void visit(Keyboard* keyboard) override{cout << "this is keyboard" << endl;}
};int main(){Visitor v;Mouse m;m.accept(&v);//通过元素类型,定位到元素的具体操作方法;Mouse算数据结构,Visit算数据结构的操作方法 Keyboard k;k.accept(&v);return 0;
}
运行:

相关文章:

【君正T31开发记录】8.了解rtsp协议及设计模式
前边搞定了驱动,先不着急直接上手撸应用层的代码,先了解一下大致要用到的东西。 设计PC端先用vlc rtsp暂时H264编码(vlc好像不支持h265,这个后边我试试)的视频流,先需要支持上rtsp server,了解rtsp协议是必…...

C++菜鸟教程 - 从入门到精通 第三节
上节课的题 上节课的题,大家都做出来了吗? 看一下这道题: 题目描述 N!1*2*...*N; 例5!1*2*3*4*5120. 编程求1!2!3!...N!. 输入 输入一行,只有一个整数n (1<n<10) 输出 输出只有一行(这意味着末尾有一个回车符号),包括1…...

原生JS和CSS,HTML实现开屏弹窗
开屏弹窗常应用于打开游戏,或者打开网站的时候,跳出来在正中间,来显示一些信息,并可以设置今日不再显示 CSS代码如下 <style>#box {width: 100vw;height: 100vh;background-color: rgba(0, 0, 0, 0.2);position: relative…...

微软发布Win11 24H2系统11月可选更新KB5046740!
系统之家11月22日报道,微软针对Win11 24H2系统推出2024年11月最新可选更新补丁KB5046740,更新后系统版本后升至26100.2454,此次更新后修复当应用程序以PDF和XLSX格式导出图表对象时停止响应、无法使用API查找旋转信息等问题。以下小编将给大家…...

【Rabbitmq篇】高级特性----TTL,死信队列,延迟队列
目录 一.TTL 1.设置消息的TTL 2.设置队列的TTL 3.俩者区别 二.死信队列 定义: 消息成为死信的原因: 1.消息被拒绝(basic.reject 或 basic.nack) 2.消息过期(TTL) 3.队列达到最大长度 编辑 …...

【Linux】gcc/g++使用
编译 我们知道,gcc只能编译C,g既能编译C,也能编译C。 由于两者的选项是相同的,这里我们使用gcc来说明。 这就是一个我们在linux中gcc编译一段代码后会自动生成一个a.out为名的可执行文件,然后我们./a.out,…...
)
IDEA2023 SpringBoot整合MyBatis(三)
一、数据库表 CREATE TABLE students (id INT AUTO_INCREMENT PRIMARY KEY,name VARCHAR(100) NOT NULL,age INT,gender ENUM(Male, Female, Other),email VARCHAR(100) UNIQUE,phone_number VARCHAR(20),address VARCHAR(255),date_of_birth DATE,enrollment_date DATE,cours…...

Java网络编程 - cookiesession
cookie 之前学习了 Okhttp3 库可以调用API、抓取网页、下载文件。但是这些操作都是不要求登录的,如果 API、网页、文件等内容要求登录才能访问,就需要学习新的 cookie 相关的知识。 下面以豆瓣为例,使用 Java 程序读取“我的豆瓣”页面内容…...
 1)
100.【C语言】数据结构之二叉树的堆实现(顺序结构) 1
目录 1.顺序结构 2.示意图 编辑 从物理结构还原为逻辑结构的方法 3.父子节点编号的规律 4.顺序存储的前提条件 5.堆的简介 堆的定义 堆的两个重要性质 小根堆和大根堆 6.堆的插入 7.堆的实现及操作堆的函数 堆的结构体定义 堆初始化函数HeapInit 堆插入元素函…...

《Python基础》之循环结构
目录 简介 一、for循环 1、基本语法与作用 2、使用 range() 函数配合 for 循环 3、嵌套的for循环 二、while循环 1、基本语法与作用 2、while 循环嵌套 (1)、while循环与while循环嵌套 (2)、while循环与for循环嵌套 简介 …...

使用JDBC操作数据库
文章目录 使用JDBC操作数据库1. JDBC访问数据库步骤2. Statement与PreparedStatement区别3. JDBC的内容4. JDBC封装4.1 为什么进行JDBC封装4.2 实现JDBC封装4.3 什么是DAO4.4 配置数据库访问参数4.5 配置数据库连接池使用之JNDI的方式 5. 单例模式5.1 懒汉模式5.2 饿汉模式 使用…...

轻松解析 PDF 文档:深入了解 Python 的 pdfplumber 库
轻松解析 PDF 文档:深入了解 Python 的 pdfplumber 库 PDF 是一种常见的文件格式,广泛用于报告、文档、表单等领域。然而,如何高效解析 PDF 内容(尤其是文本和表格),一直是开发者面临的挑战。pdfplumber 是…...

实验五 时域采样与频域采样
时域采样理论的验证 【实例3-1】近似绘制x (n) R4n 在(0,2 π \pi π ) 上的幅频响应曲线( F T [ x ( n ) ] FT[x(n)] FT[x(n)] )。 x [1, 1, 1, 1]; N 64; xk fft(x, N); figure; subplot(2, 1, 1); stem(0:3, x, .); subplot(2, 1, 2); k 0:N-1; plot(2*k/N, abs(x…...
)
爬虫cookie反爬------加速乐(jsl)
加速乐 反爬虫技术:加速乐采用了包括OB混淆、动态加密算法和多层Cookie获取等高级反爬虫技术,确保整体校验的严密性。关键校验字段位于Cookie中的 __jsl_clearance_s,其验证过程通常涉及三次关键的请求,有效抵御恶意爬虫的侵扰。…...

设计模式——解释器模式
定义: 解释器模式是一种行为设计模式,它给定一个语言,定义它的文法的一种表示,并定义一个解释器,这个解释器使用该表示来解释语言中的句子。在这种模式中,通常会将一个复杂的表达式(如数学表达…...
函数)
sorted()函数
sorted(iterable, keyNone, reverseFalse)iterable: 需要排序的可迭代对象(如列表、元组、字符串等)。 key: 一个函数,用于从每个元素中提取排序的依据。如果未指定,默认直接比较元素本身。 reverse: 一个布尔值,Tru…...

动静态分析
静态分析 获取哈希值: 查壳: 导出函数: 获取资源信息: 通过发现dos头和pe头,来确定它是个可执行程序。 动态分析...
)
2024年信号处理与神经网络应用国际学术会议(SPNNA 2024)
重要信息 会议时间:2024年12月13-15日 会议地点:中国武汉 会议官网:www.spnna.org 会议简介 2024年信号处理与神经网络应用国际学术会议(SPNNA 2024)将于2024年12月13日至15日在中国武汉召开。本次会议旨在为全球研…...

winfrom快速自适应
在软件界面设计中,我们通常需要添加各种布局器和规则来实现界面布局,但对于不太熟练的工程师来说,这可能存在一定难度。这里要分享一种自适应布局的方法,它可以根据界面比例自动缩放内容控件,在较短时间内完成软件布局…...

VMware16安装macOS12【详细教程】
因为在应用上线IOS应用商店时,需要用到mac系统进行,于是就在VMware16pro虚拟机进行安装macOS12系统,安装的过程做了一个记录,希望对你有所帮助! 前言 首先需要下载好下面工具: VMware workstation pro 16…...
】之单例模式)
【设计模式】【创建型模式(Creational Patterns)】之单例模式
单例模式是一种常用的创建型设计模式,其目的是确保一个类只有一个实例,并提供一个全局访问点。 单例模式的原理 单例模式的核心在于控制类的实例化过程,通常通过以下方式实现: 私有化构造函数,防止外部直接实例化。…...

【1.2 Getting Started--->Installation Guide】
NVIDIA TensorRT DOCS 此 NVIDIA TensorRT 10.6.0 安装指南提供安装要求、TensorRT 包中包含的内容列表以及安装 TensorRT 的分步说明。 安装指南 摘要: 本 NVIDIA TensorRT 10.3.0 安装指南提供了安装要求、TensorRT 软件包中包含的内容列表以及安装 TensorRT 的…...

Vue 中 data 属性为函数的深度剖析:原理、区别与实践
在 Vue.js 中,data 属性通常是一个 函数 而不是一个对象,这背后有一系列设计上的原因和原理,尤其是与 Vue 的组件系统、实例化机制、以及响应式数据的管理有关。下面我将详细解答这个问题,并结合实际项目示例和代码分析,进行全面讲解。 1. Vue 中 data 为什么是一个函数而…...

【漏洞复现】H3C 用户自助服务平台 dynamiccontent.properties.xhtml 远程命令执行
免责声明: 本文旨在提供有关特定漏洞的信息,以帮助用户了解潜在风险。发布此信息旨在促进网络安全意识和技术进步,并非出于恶意。读者应理解,利用本文提到的漏洞或进行相关测试可能违反法律或服务协议。未经授权访问系统、网络或应用程序可能导致法律责任或严重后果…...

【技术支持】vscode不使用插件,两种方式重命名html标签对
1. 使用 VS Code 内置功能 VS Code 内置支持 HTML/XML 标签对的重命名功能。步骤如下: 将光标放置在标签名上(如 <div> 或</div>)。按下快捷键 F2(重命名符号)。输入新的标签名,按 Enter&…...

【Seed-Labs 2.0】The Kaminsky Attack Lab
说在前面 本实验属为Seed-Labs 的DNS LAB 中的第二个实验,是第一个实验的延伸,从攻击者和受害者同一个LAN中变成不在同一个LAN中,该系列一共有五个实验: Local DNS Attack LabThe Kaminsky Attack LabDNS Rebinding Attack LabDNS Infrastr…...
托管静态资源)
node.js中使用express.static()托管静态资源
express.static()定义 express.static(root, [options])是一个中间件函数,负责为Express应用提供静态资源服务。它允许你指定一个或多个目录作为静态资源的根目录,当客户端请求这些资源时,Express会查找并返回对应的文件。 安装express npm i…...
 函数深入解析)
SQL MAX() 函数深入解析
SQL MAX() 函数深入解析 概述 SQL(Structured Query Language)是一种广泛使用的数据库查询语言,它允许用户从数据库中检索、更新和管理数据。在SQL中,MAX() 函数是一个常用的聚合函数,用于从数据集中找出某一列的最大…...

WPF——自定义ToolTip
问题 前一天制作的图标按钮,在测试的过程中发现一个问题:为图标按钮添加的提示如下图所示,它的显示效果非常差,甚至不能看清文本内容,并且其字体与颜色也不是愚所希望的。 产生原因 此是由于tooltip有一个默认的样式…...
)
linux基本命令(1)
1. 文件和目录操作 ls — 列出目录内容 ls # 显示当前目录的文件和目录 ls -l # 显示详细的文件信息(权限、大小、修改时间等) ls -a # 显示所有文件(包括隐藏文件) ls -lh # 显示详细信息并以易读的方式显示文件大小 cd — 改…...

从0-1逐步搭建一个前端脚手架工具并发布到npm
前言 本文介绍的案例已同步到github,github地址。 vue-cli 和 create-react-app 等 cli 脚手架工具用于快速搭建应用,无需手动配置复杂的构建环境。本文介绍如何使用 rollup 搭建一个脚手架工具。 脚手架工具的工作流程简言为:提供远端仓库…...

开发者视角下的鸿蒙
鸿蒙操作系统(HarmonyOS)是华为公司自主研发的一款面向未来、面向全场景的分布式操作系统。它旨在为用户提供一个无缝的智能生活体验,支持多种终端设备,如智能手机、平板电脑、智能穿戴设备、智能家居等。鸿蒙操作系统的出现&…...

docker基础命令
目录 1、docker拉取镜像 2、查看镜像 3、运行镜像 4、查看容器 5、停止、启动、容器和删除容器 6、进入容器 7、删除镜像 8、保存镜像 9、加载镜像 10、镜像标签 11、制作镜像 12、镜像上传 1、docker拉取镜像 docker pull 用户名/镜像名:tag不加tag(版本号) 即…...

订单日记为“惠采科技”提供全方位的进销存管理支持
感谢温州惠采科技有限责任公司选择使用订单日记! 温州惠采科技有限责任公司,成立于2024年,位于浙江省温州市,是一家以从事销售电气辅材为主的企业。 在业务不断壮大的过程中,想使用一种既能提升运营效率又能节省成本…...

C++共享智能指针
C中没有垃圾回收机制,必须自己释放分配的内存,否则就会造成内存泄漏。解决这个问题最有效的方式是使用智能指针。 智能指针是存储指向动态分配(堆)对象指针的类,用于生存期的控制,能够确保在离开指针所在作用域时,自动…...
:基于 Python 的 AdaBoost 分类模型)
数学建模学习(138):基于 Python 的 AdaBoost 分类模型
1. AdaBoost算法简介 AdaBoost(Adaptive Boosting)是一种经典的集成学习算法,由Yoav Freund和Robert Schapire提出。它通过迭代训练一系列的弱分类器,并将这些弱分类器组合成一个强分类器。算法的核心思想是:对于被错误分类的样本,在下一轮训练中增加其权重;对于正确分类…...

sqlite-vec一个SQLite3高效向量搜索扩展--JDBC环境使用
最近要用SQLite3,之前放出来了SQLiteUtile工具,方便操作。今天发现AIGC方面,RAG知识库需要使用向量数据库,来存储知识信息。一般呢都是用mysql,但无奈的是mysql就是不让用。突然又发现SQLite3有向量库扩展组件…...

Spark SQL操作
Spark SQL操作 文章目录 Spark SQL操作一、DataFrame的创建与保存1.前提操作2.数据准备3.创建4.保存DataFrame 二、DataFrame的操作1.printSchema2.show3.select4.filter5.groupBy(filed)6.sort(field) 三、临时表操作1.创建临时表2.通过临时表及SQL语句进行查询 四、从RDD转换…...

【大模型】LLaMA: Open and Efficient Foundation Language Models
链接:https://arxiv.org/pdf/2302.13971 论文:LLaMA: Open and Efficient Foundation Language Models Introduction 规模和效果 7B to 65B,LLaMA-13B 超过 GPT-3 (175B)Motivation 如何最好地缩放特定训练计算预算的数据集和模型大小&…...

聚焦AI存储,联想凌拓全力奔赴
【全球存储观察 | 科技热点关注】 每一个时代,都有每一个时代的骄傲。 在信息化时代,NAS文件存储肩负着非结构化数据管理与存储的重任,NetApp以其创新实力,赢得了全球存储市场的极高声誉。 在数智化时代,…...

ansible常用模块
一.ansible常用模块 ansible [主机or组列表] -m 模块 -a "参数"1.shell:类似于在终端上直接输入命令,支持bash特性2.command(默认模块):使用的变量需要事先定义好,不支持bash特性,如管道、重定向3.script: 执行脚本,支持python,shell脚本4.file:用于在被控…...

window11编译pycdc.exe
一、代码库和参考链接 在对python打包的exe文件进行反编译时,会使用到uncompyle6工具,但是这个工具只支持python3.8及以下,针对更高的版本的python则不能反编译。 关于反编译参考几个文章: Python3.9及以上Pyinstaller 反编译教…...

C语言——break、continue、goto
目录 一、break 二、continue 1、在while循环中 2、在for循环中 三、go to 一、break 作用是终止循环,在循环内遇到break直接就跳出循环。 注: 一个break语句只能跳出一层循环。 代码演示: #include<stdio.h>void test01() {for (…...

实战OpenCV之人脸识别
基础入门 随着计算机视觉技术和深度学习的发展,人脸识别已经成为一项广泛应用的技术,涵盖了从安全监控、身份验证、智能家居到大型公共安全项目等多个领域。 人脸识别技术通常包括以下几个主要步骤。 图像采集:通过摄像头或其他图像采集设备,捕获包含人脸的图像或视频帧。 …...

记录第一次安装laravel项目
window系统 Laravel中文文档:https://laravel-docs.catchadmin.com/docs/11/getting-started/installation 1.使用composer安装全局laravel composer global require laravel/installer2.安装完成后在命令行输入laravel,如果报错:laravel不是…...
 - C 语言应用程序)
AWTK-WEB 快速入门(1) - C 语言应用程序
先安装 AWTK Designer 用 AWTK Designer 新建一个应用程序 2.1. 新建应用程序 这里假设应用程序的名称为 AwtkApplicationC,后面会用到,如果使用其它名称,后面要做相应修改。 在窗口上放置一个按钮将按钮的名称改为 “close”将按钮的文本改…...

《操作系统 - 清华大学》4 -5:非连续内存分配:页表一反向页表
文章目录 1. 大地址空间的问题2. 页寄存器( Page Registers )方案3. 基于关联内存(associative memory )的反向页表(inverted page table)4. 基于哈希(hashed)查找的反向页表5. 小结 1. 大地址空间的问题 …...

数据可视化复习1-Matplotlib简介属性和创建子图
1.Matplotlib简介 Matplotlib是一个Python的2D绘图库,它可以在各种平台上以各种硬拷贝格式和交互环境生成具有出版品质的图形。通过Matplotlib,开发者可以仅需要几行代码,便可以生成绘图、直方图、功率谱、条形图、错误图、散点图等。 以下…...
 】)
98. 验证二叉搜索树【 力扣(LeetCode) 】
文章目录 零、原题链接一、题目描述二、测试用例三、解题思路四、参考代码 零、原题链接 98. 验证二叉搜索树 一、题目描述 给你一个二叉树的根节点 root ,判断其是否是一个有效的二叉搜索树。 有效 二叉搜索树定义如下: 节点的左子树只包含 小于 当…...

github中banch和tag的应用
GitHub 中的 Branch 和 Tag 之间的关系 在 GitHub 和 Git 中,**Branch(分支)**和**Tag(标签)**都是用来管理和标记代码的概念,但它们在版本控制中扮演不同的角色和有不同的用途。 --- 名词解释 1. 分支…...