【“星睿O6”AI PC开发套件评测】+ MTCNN 开源模型部署和测试对比
经过了前几篇文章的铺垫,从搭建 tensorflow 开发环境,到测试官方 onnx 模型部署到 NPU,接着部署自己的 mnist tensorflow 模型到 NPU。这是一个从易到难的过程,本篇文章介绍开源复杂的人脸识别模型 mtcnn 到 “星睿O6” NPU 的部署和CPU对比测试。
本片计划分为三个小节:
- 环境搭建
- 对模型进行导出和转换 onnx,以及测试对比
- 对 onnx 模型进行转换到 cix,部署到 NPU 进行测试
环境搭建
这里主要是根据 mtcnn 的要求,搭建匹配的 python 和 tensorflow 等的虚拟环境,对模型进行前评估,因为这个开源模型是有三个模型串联起来的,所以前期测试找到开销最大的模型进行 NPU 部署,通过这种方式可以实现 CPU 和 NPU 性能对比的目的。
因为 mtcnn 要求Python >= 3.10 以及 TensorFlow >= 2.12,这里使用 conda 创建 python3.10 的虚拟环境:conda create --name mtcnn_tf12 python=3.10 ,然后切入到这个虚拟环境,安装 tensorflow==2.12 pip3 install tensorflow==2.12,接着在 mtcnn 仓库下安装需要的依赖,编写测试代码确认环境搭建成功,测试代码如下:
#!/home/yjoy/.conda/envs/mtcnn_tf12/bin/python3import os
import sys
import tensorflow as tf_abs_path = os.path.join(os.getcwd(), "../")
sys.path.append(_abs_path)from mtcnn import MTCNN
from mtcnn.utils.images import load_image# Create a detector instance
detector = MTCNN(device="CPU:0")# Load an image
image = load_image("resources/ivan.jpg")# Detect faces in the image
result = detector.detect_faces(image)# Display the result
print(result)
通过阅读 mtccn 的代码可以看到,主要由三个模型 PNET->RNET->ONET 组成,为了分析三个模型的时间开销,我修改了部分代码:
diff --git a/mtcnn/mtcnn.py b/mtcnn/mtcnn.py
index 3b0a6a6..aaf7e68 100644
--- a/mtcnn/mtcnn.py
+++ b/mtcnn/mtcnn.py
@@ -22,6 +22,7 @@import tensorflow as tfimport numpy as np
+from time import timefrom mtcnn.stages import StagePNet, StageRNet, StageONet@@ -156,7 +157,10 @@ class MTCNN:# Process images through each stage (PNet, RNet, ONet)for stage in self.stages:
+                    time_before=time()bboxes_batch = stage(bboxes_batch=bboxes_batch, images_normalized=images_normalized, images_oshapes=images_oshapes, **kwargs)
+                    index=self.stages.index(stage)
+                    print(f" delta{index} times:", time()-time_before)except tf.errors.InvalidArgumentError:  # No faces foundbboxes_batch = np.empty((0, 16))
运行测试代码,可以得到下面的结果:
▸ ./test00.py
2025-04-26 11:51:50.149177: I tensorflow/core/util/port.cc:110] oneDNN custom operations are on. You may see slightly different numerical results due to floating-point round-off errors from different computation orders. To turn them off, set the environment variable `TF_ENABLE_ONEDNN_OPTS=0`.
2025-04-26 11:51:50.150275: I tensorflow/tsl/cuda/cudart_stub.cc:28] Could not find cuda drivers on your machine, GPU will not be used.
2025-04-26 11:51:50.171004: I tensorflow/tsl/cuda/cudart_stub.cc:28] Could not find cuda drivers on your machine, GPU will not be used.
2025-04-26 11:51:50.171270: I tensorflow/core/platform/cpu_feature_guard.cc:182] This TensorFlow binary is optimized to use available CPU instructions in performance-critical operations.
To enable the following instructions: AVX2 AVX_VNNI FMA, in other operations, rebuild TensorFlow with the appropriate compiler flags.
2025-04-26 11:51:50.518333: W tensorflow/compiler/tf2tensorrt/utils/py_utils.cc:38] TF-TRT Warning: Could not find TensorRTdelta0 times: 0.059308767318725586delta1 times: 0.03779125213623047delta2 times: 0.011583089828491211
[{'box': [276, 92, 50, 63], 'confidence': 0.9999972581863403, 'keypoints': {'nose': [304, 131], 'mouth_right': [314, 141], 'right_eye': [315, 114], 'left_eye': [290, 116], 'mouth_left': [297, 143]}}, {'box': [9, 72, 36, 43], 'confidence': 0.8249890804290771, 'keypoints': {'nose': [28, 93], 'mouth_right': [36, 102], 'right_eye': [36, 85], 'left_eye': [20, 87], 'mouth_left': [23, 104]}}]
我们都数据进行可视化操作如下图:
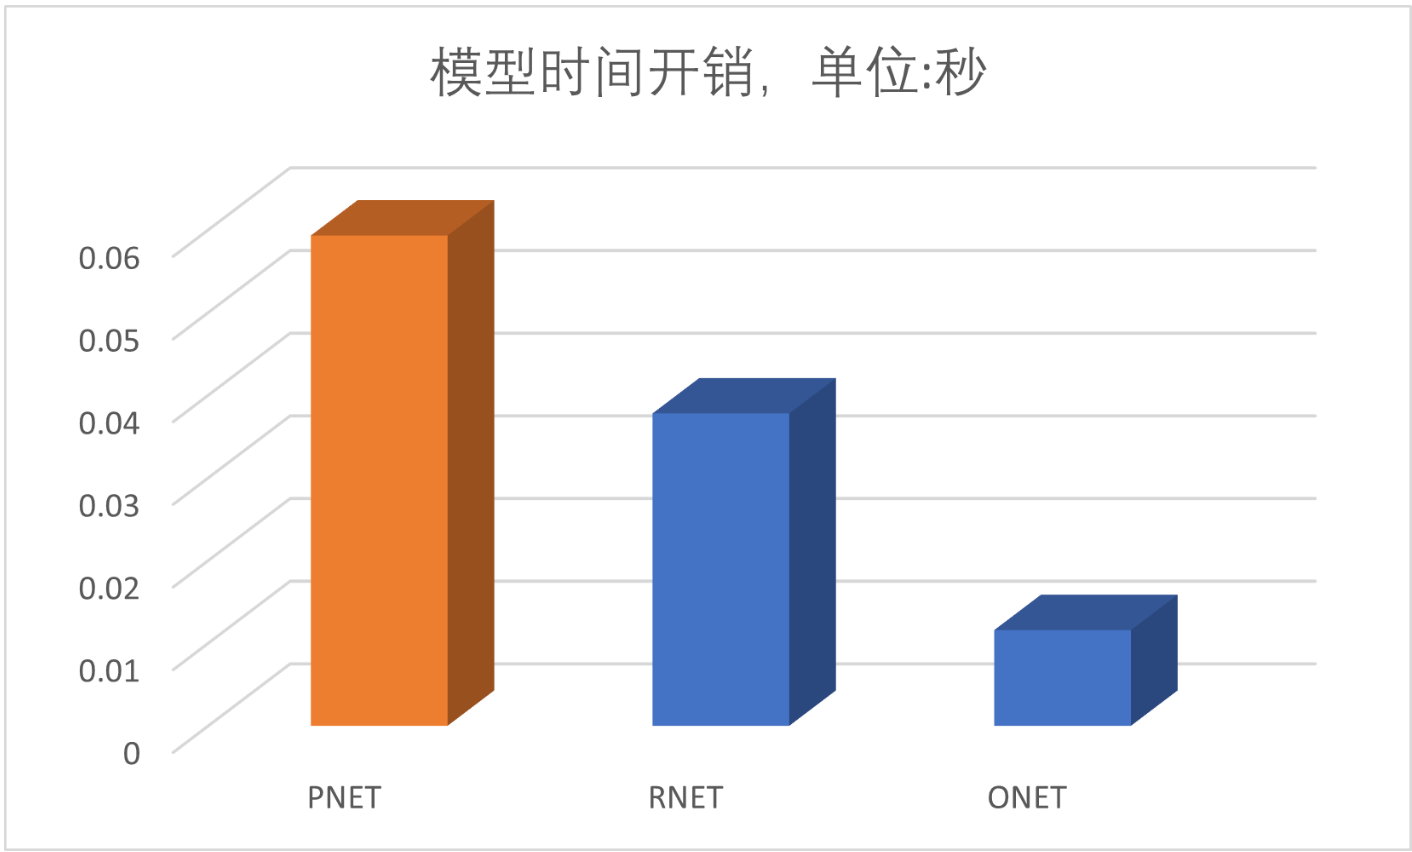
从结果可以看出,开销最大的是 PNET 模型,那么接下来我们就先对 PNET 下手了。
模型转换为 onnx 以及 CPU 部署测试
知道了要对 PNET 进行处理,我们首先对 PNET 模型进行导出,然后再进行 onnx 模型转换。这部分的 diff 如下:
diff --git a/mtcnn/stages/stage_pnet.py b/mtcnn/stages/stage_pnet.py
index 0138886..8418933 100644
--- a/mtcnn/stages/stage_pnet.py
+++ b/mtcnn/stages/stage_pnet.py
@@ -31,6 +31,7 @@ from mtcnn.utils.images import build_scale_pyramid, apply_scalesfrom mtcnn.utils.bboxes import generate_bounding_box, upscale_bboxes, smart_nms_from_bboxes, resize_to_squarefrom mtcnn.stages.base import StageBase
+from time import timeclass StagePNet(StageBase):
@@ -55,9 +56,15 @@ class StagePNet(StageBase):weights (str, optional): The file path to the weights for the PNet model. Default is "pnet.lz4"."""model = PNet()
-        model.build()  # Building the model (no need to specify input shape if default is provided)
+        model.build(input_shape=(1, 336, 336, 3))  # Building the model (no need to specify input shape if default is provided)model.set_weights(load_weights(weights))  # Load pre-trained weights+        print(model, model.summary(), "\nsummary done of pnet")
+        # 为了保存 mode, 需要使用 dummy_input 运行一下
+        dummy_input=np.random.rand(1,336,336,3)
+        model(dummy_input)
+        model.save("red_pnet/")
+        print("mode saved red_pnet dir done")super().__init__(stage_name=stage_name, stage_id=stage_id, model=model)def __call__(self, images_normalized, images_oshapes, min_face_size=20, min_size=12, scale_factor=0.709,
@@ -89,7 +96,10 @@ class StagePNet(StageBase):batch_size = images_normalized.shape[0]# 3. Get proposals bounding boxes and confidence from the model (PNet)
+        time_before=time()
+        # 模型运算耗时pnet_result = [self._model(s) for s in scales_result]
+        print("waste in pnet:", time()-time_before, "input:type and shape", type(scales_result), type(scales_result[0]), scales_result[0].shape)# 4. Generate bounding boxes per scale groupbboxes_proposals = [generate_bounding_box(result[0], result[1], threshold_pnet) for result in pnet_result]
这里输入,我根据参考图片进行了限制,明确了输入的 shape 是 (1, 336, 336, 3),导出之后模型就存储在了当前的 red_pnet 目录,如下所示:
▸ ls red_pnet/
assets fingerprint.pb keras_metadata.pb saved_model.pb variables
还是使用上一篇文章的脚本,修改下模型路径和要导出的onnx文件名,生成 mtcnn_pnet.onnx 并检查下模型的输入和输出:
▸ ./get_onnx_inputshape.py ~/gProjects/mtcnn/mtcnn_pnet.onnx
/home/yjoy/gProjects/mtcnn/mtcnn_pnet.onnx
Output Name: output_1
Output Name: output_2
Input shapes of the ONNX model:Name: red_inputShape: [1, 336, 336, 3]
接着修改原始仓库,试一试 onnxruntime 是否正常,调试到这里我发现 onnx 的输入要和 tensorflow 模型的保持一致(None, None, None, 3),否在在运行的时候会出错。所以要重新修改 onnx 模型转换脚本如下:
import tensorflow as tf
import tf2onnx# Load your TensorFlow Keras model or SavedModel
model = tf.keras.models.load_model('red_pnet') # Or tf.saved_model.load('your_saved_model')# Define the input signature
input_signature = [tf.TensorSpec(shape=(None, None, None, 3), dtype=tf.float32, name='red_input')]
#  input_signature = [tf.TensorSpec(shape=(1, 336, 336, 3), dtype=tf.float32, name='red_input')]# Convert the model to ONNX
onnx_model, _ = tf2onnx.convert.from_keras(model, input_signature=input_signature, opset=15)# Save the ONNX model
with open("mtcnn_pnet.onnx", "wb") as f:f.write(onnx_model.SerializeToString())
重新生成 mtcnn_pnet.onnx 模型文件,接着使用 onnx 模型进行推理,打印推理的时间损耗为 0.023632526397705078 秒:
▸ ./test00.py
2025-04-26 21:36:04.577597: I tensorflow/core/util/port.cc:110] oneDNN custom operations are on. You may see slightly different numerical results due to floating-point round-off errors from different computation orders. To turn them off, set the environment variable `TF_ENABLE_ONEDNN_OPTS=0`.
2025-04-26 21:36:04.578615: I tensorflow/tsl/cuda/cudart_stub.cc:28] Could not find cuda drivers on your machine, GPU will not be used.
2025-04-26 21:36:04.599424: I tensorflow/tsl/cuda/cudart_stub.cc:28] Could not find cuda drivers on your machine, GPU will not be used.
2025-04-26 21:36:04.599676: I tensorflow/core/platform/cpu_feature_guard.cc:182] This TensorFlow binary is optimized to use available CPU instructions in performance-critical operations.
To enable the following instructions: AVX2 AVX_VNNI FMA, in other operations, rebuild TensorFlow with the appropriate compiler flags.
2025-04-26 21:36:04.949215: W tensorflow/compiler/tf2tensorrt/utils/py_utils.cc:38] TF-TRT Warning: Could not find TensorRT
load onnx model
<class 'onnxruntime.capi.onnxruntime_inference_collection.InferenceSession'>
mode saved red_pnet dir done
input:type and shape <class 'list'> <class 'tensorflow.python.framework.ops.EagerTensor'> (1, 336, 336, 3)
wowo onnxruntime model
['output_1', 'output_2'] red_input
waste in pnet: 0.014083147048950195delta0 times: 0.023632526397705078delta1 times: 0.05084967613220215delta2 times: 0.014520645141601562
[{'box': [276, 92, 50, 63], 'confidence': 0.9999972581863403, 'keypoints': {'nose': [304, 131], 'mouth_right': [314, 141], 'right_eye': [315, 114], 'left_eye': [290, 116], 'mouth_left': [297, 143]}}, {'box': [9, 72, 36, 43], 'confidence': 0.8249915242195129, 'keypoints': {'nose': [28, 93], 'mouth_right': [36, 102], 'right_eye': [36, 85], 'left_eye': [20, 87], 'mouth_left': [23, 104]}}]
我将 pnet 三种推理方式包括:原始的方式推理耗时、加载tensorflow 模型进行推理、onnx 进行推理耗时进行了比对,开销如下图所示:
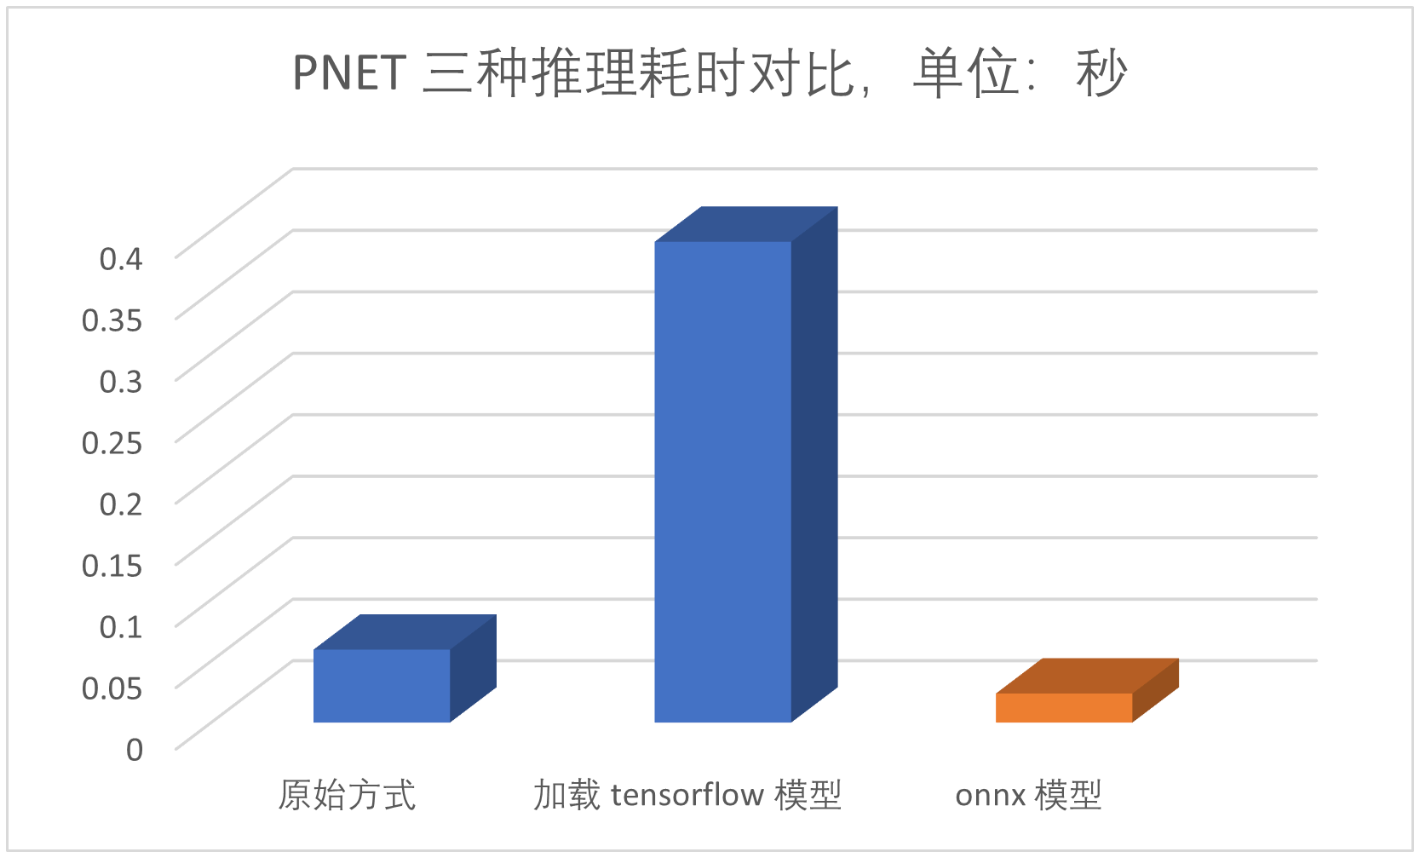
可以看出 onnx 模型推理相比原始方式耗时更低,直接加载 tensorflow 模型进行推理的方式耗时最高。到目前未知,受限于 PNET 网络的 onnx 模型输入 shape 时动态的,无法正常转换到 cix 格式。但是,我仔细查阅了官方文档,后面的 RNET 和 ONET 模型的输入都是固定 shape 的,其中 rnet 是 (24,24,3),onet 是(48, 48, 3)根据前面的分析,我们知道 RNET 的耗时处于中等,那么接下来我们就仿照 PNET 的处理方式,将 RNET 模型试着部署到 “星睿O6” NPU。
理想很丰满,现时很骨感,我想转化 RENT 模型到 onnx,这里的模型保存、模型转换,和 PNET 的操作类似,但是到模型保存和加载的时候,经过我的调试发现,RNET 网络中因为有一个 self.prelu4 = L.PReLU(name=“prelu4”) 的层,导致我加载的时候报错:````,为此,我还提了一个 issue [Bug] after I saved rnet to saved model. when I try to load, get errors. · Issue #138 · ipazc/mtcnn。
后来,我尝试修改为 self.prelu4 = L.PReLU(shared_axes=1, name="prelu4") 发现可以正常加载模型了,然后我就加载默认的权重参数,新的错误来了,因为这样修改完之后这一层的 Param 从 128 变到了 1,直接加载模型的权重值会报错的,shape 不一致,为了保持兼容,我在 mtcnn/utils/tensorflow.py 文件中新定义了一个方法加载 RNET 的权重数据,思路就是只取这一层参数的第一个数据,作为新 layer 的权重值,这部分关键代码如下:
ans_new = ans[11][0].reshape(1,)
ans[11]=ans_new
return ans
测试层修改之后的预测结果,发现和之前的结果几乎一致,说明可以向下进行。
下一步就是将 tensorflow 的 saved mode 转换为 onnx 模型,这部分代码很通用的和前面文章描述的类似,这里就不赘述了。此外就是使用 onnx 模型推理,这一步的改动比较多:
input_name = self._model.get_inputs()[0].name
output_names = [ s.name for s in self._model.get_outputs() ]
output_name = self._model.get_outputs()[0].name
nump_patchs=np.array(patches)
nump_patchs0=nump_patchs[0].reshape(1,24,24,3)
bboxes_offsets = []
scores = []
for item in nump_patchs:item=item.reshape(1,24,24,3)ans_offsets, ans_scores = self._model.run(output_names, {input_name: item})bboxes_offsets.append(ans_offsets)scores.append(ans_scores)
bboxes_offsets = np.array(bboxes_offsets)
scores = np.array(scores)
bboxes_offsets = bboxes_offsets.reshape(189, 4)
scores = scores.reshape(189, 2)
使用 onnx 模型,进行推理得到结果如下:
▸ ./test00.py
2025-04-27 20:44:31.934047: I tensorflow/core/util/port.cc:110] oneDNN custom operations are on. You may see slightly different numerical results due to floating-point round-off errors from different computation orders. To turn them off, set the environment variable `TF_ENABLE_ONEDNN_OPTS=0`.
2025-04-27 20:44:31.935124: I tensorflow/tsl/cuda/cudart_stub.cc:28] Could not find cuda drivers on your machine, GPU will not be used.
2025-04-27 20:44:31.956077: I tensorflow/tsl/cuda/cudart_stub.cc:28] Could not find cuda drivers on your machine, GPU will not be used.
2025-04-27 20:44:31.956337: I tensorflow/core/platform/cpu_feature_guard.cc:182] This TensorFlow binary is optimized to use available CPU instructions in performance-critical operations.
To enable the following instructions: AVX2 AVX_VNNI FMA, in other operations, rebuild TensorFlow with the appropriate compiler flags.
2025-04-27 20:44:32.308963: W tensorflow/compiler/tf2tensorrt/utils/py_utils.cc:38] TF-TRT Warning: Could not find TensorRT
load onnx model
<class 'onnxruntime.capi.onnxruntime_inference_collection.InferenceSession'>
mode saved red_pnet dir done
load rnet onnx model
<class 'onnxruntime.capi.onnxruntime_inference_collection.InferenceSession'>
input:type and shape <class 'list'> <class 'tensorflow.python.framework.ops.EagerTensor'> (1, 336, 336, 3)
wowo onnxruntime model
['output_1', 'output_2'] red_input
waste in pnet: 0.020001649856567383delta0 times: 0.031189441680908203
fc4 <keras.layers.core.dense.Dense object at 0x7fe53e417880>
wowo rnet use onnx format
input_name: red_input
output_name: ['output_1', 'output_2']
<class 'tensorflow.python.framework.ops.EagerTensor'> <class 'numpy.ndarray'>
(189, 24, 24, 3)
(1, 24, 24, 3)delta1 times: 0.028551578521728516
[{'box': [272, 93, 63, 63], 'confidence': 0.9978725910186768}, {'box': [477, 280, 62, 62], 'confidence': 0.9208611845970154}, {'box': [7, 71, 43, 43], 'confidence': 0.899211585521698}, {'box': [9, 72, 31, 31], 'confidence': 0.8957539796829224}, {'box': [100, 408, 43, 43], 'confidence': 0.8824490308761597}, {'box': [485, 205, 62, 62], 'confidence': 0.8461334109306335}, {'box': [305, 181, 47, 47], 'confidence': 0.7558432221412659}]
然后,在“星睿O6”上测试下,使用 CPU 测试下我们的 onnx 模型:
▸ ./test00.py
[UMD ERR] /home/alezhe02/project/Compass_Runtime_Midware_release/aipulib_build/umd/src/device/aipu/aipu.cpp:55:aipu_ll_status_t aipudrv::Aipu::init(): query capability [fail]
[ERROR][init:28][UMD].AIPU UMD API input argument(s) contain NULL pointer.
load onnx model
<class 'onnxruntime.capi.onnxruntime_inference_collection.InferenceSession'>
mode saved red_pnet dir done
load rnet onnx model
<class 'onnxruntime.capi.onnxruntime_inference_collection.InferenceSession'>
input:type and shape <class 'list'> <class 'tensorflow.python.framework.ops.EagerTensor'> (1, 336, 336, 3)
wowo onnxruntime model
['output_1', 'output_2'] red_input
waste in pnet: 0.04717898368835449delta0 times: 0.06585574150085449
fc4 <keras.src.layers.core.dense.Dense object at 0xffff2f5813d0>
wowo rnet use onnx format
input_name: red_input
output_name: ['output_1', 'output_2']
<class 'tensorflow.python.framework.ops.EagerTensor'> <class 'numpy.ndarray'>
(189, 24, 24, 3)
(1, 24, 24, 3)delta1 times: 0.09265422821044922
[{'box': [272, 93, 63, 63], 'confidence': 0.9978725910186768}, {'box': [477, 280, 62, 62], 'confidence': 0.9208603501319885}, {'box': [7, 71, 43, 43], 'confidence': 0.8992096185684204}, {'box': [9, 72, 31, 31], 'confidence': 0.8957546353340149}, {'box': [100, 408, 43, 43], 'confidence': 0.8824417591094971}, {'box': [485, 205, 62, 62], 'confidence': 0.8461276888847351}, {'box': [305, 181, 47, 47], 'confidence': 0.7558623552322388}]
这里,我们得到一个关键数据,在使用 onnx 推理耗时 0.09265422821044922 秒,最高可信度是 0.9978725910186768,检测的人脸框坐标是 [272, 93, 63, 63]。
模型转换为 cix 以及 NPU 部署测试
变换 cix 关键的是创建一个shape 是 (1,24,24,3)的数据集 npy 文件,然后编写一个 cfg 配置文件,npy 文件,我是在预测过程中直接将原始的数据保存了一个到 npy 文件,cfg 配置文件如下:
▸ /usr/bin/cat cfg/tf_mtcnn.cfg
[Common]
mode = build[Parser]
model_type = onnx
model_name = mtcnn
detection_postprocess =
model_domain = image_classification
input_model = ./mtcnn_rnet.onnx
input = red_input
input_shape = [1, 24, 24, 3]
output = output_1, output_2
output_dir = ./mtcnn_out[Optimizer]
calibration_data = datasets/rand1.npy
output_dir = ./out
dataset = numpydataset
save_statistic_info = True
cast_dtypes_for_lib = True[GBuilder]
outputs = mtcnn_rnet.cix
target = X2_1204MP3
profile = True
tiling = fps
至此,就生成了 ** mtcnn_rnet.cix**,下面编写 npu 推理部分,有了 onnx 推理的基础,这部分 NPU 推理关键代码如下:
nump_patchs=np.array(patches)
bboxes_offsets = []
scores = []
nump_patches = [ item.reshape(1,24,24,3) for item in nump_patchs]
for item in nump_patchs:#  item=item.reshape(1,24,24,3)# time_before=time()ans_offsets, ans_scores = self._model.forward(item)# print("time_waste in cix rnet:", time()-time_before)bboxes_offsets.append(ans_offsets)scores.append(ans_scores)
bboxes_offsets = np.array(bboxes_offsets)
scores = np.array(scores)
bboxes_offsets = bboxes_offsets.reshape(189, 4)
scores = scores.reshape(189, 2)
self._model.clean()
print("npu done here")
使用npu进行推理测试:
▸ ./test00.py
[UMD ERR] /home/alezhe02/project/Compass_Runtime_Midware_release/aipulib_build/umd/src/device/aipu/aipu.cpp:55:aipu_ll_status_t aipudrv::Aipu::init(): query capability [fail]
[ERROR][init:28][UMD].AIPU UMD API input argument(s) contain NULL pointer.
load onnx model
<class 'onnxruntime.capi.onnxruntime_inference_collection.InferenceSession'>
mode saved red_pnet dir done
load rnet cix model
npu: noe_init_context success
npu: noe_load_graph success
Input tensor count is 1.
Output tensor count is 2.
npu: noe_create_job success
input:type and shape <class 'list'> <class 'tensorflow.python.framework.ops.EagerTensor'> (1, 336, 336, 3)
wowo onnxruntime model
['output_1', 'output_2'] red_input
waste in pnet: 0.045818328857421875delta0 times: 0.06419897079467773
fc4 <keras.src.layers.core.dense.Dense object at 0xfffee7443150>
wowo rnet use cix format
(189, 24, 24, 3)
(1, 24, 24, 3)
npu: noe_clean_job success
npu: noe_unload_graph success
npu: noe_deinit_context success
npu done heredelta1 times: 0.11026811599731445
[{'box': [272, 92, 63, 63], 'confidence': 0.9916430115699768}, {'box': [6, 70, 43, 43], 'confidence': 0.897944450378418}, {'box': [9, 72, 31, 31], 'confidence': 0.8823280334472656}, {'box': [101, 408, 43, 43], 'confidence': 0.8589034080505371}, {'box': [486, 205, 61, 61], 'confidence': 0.7886294722557068}, {'box': [477, 279, 64, 64], 'confidence': 0.7652048468589783}]
发现使用 npu 推理耗时 0.11026811599731445 秒,最高可信度是 0.9916430115699768,检测的人脸框坐标是 [272, 93, 63, 63]。顺便地,我也测试下 saved model 的推理耗时作为参考对比:
。。。。 省略
rnet model type saved: <class 'keras.src.saving.legacy.saved_model.load.RNet'>
Model: "r_net"
_________________________________________________________________Layer (type)                Output Shape              Param #
=================================================================conv1 (Conv2D)              multiple                  784prelu1 (PReLU)              multiple                  28maxpooling1 (MaxPooling2D)  multiple                  0conv2 (Conv2D)              multiple                  12144prelu2 (PReLU)              multiple                  48maxpooling2 (MaxPooling2D)  multiple                  0conv3 (Conv2D)              multiple                  12352prelu3 (PReLU)              multiple                  64permute (Permute)           multiple                  0flatten3 (Flatten)          multiple                  0fc4 (Dense)                 multiple                  73856prelu4 (PReLU)              multiple                  1fc5-1 (Dense)               multiple                  516fc5-2 (Dense)               multiple                  258=================================================================
Total params: 100051 (390.82 KB)
Trainable params: 100051 (390.82 KB)
Non-trainable params: 0 (0.00 Byte)
_________________________________________________________________
None
input:type and shape <class 'list'> <class 'tensorflow.python.framework.ops.EagerTensor'> (1, 336, 336, 3)
wowo onnxruntime model
['output_1', 'output_2'] red_input
waste in pnet: 0.036742448806762695delta0 times: 0.05244040489196777
fc4 <keras.src.layers.core.dense.Dense object at 0xfffefc137b50>
use saveed model to rnet predict
6/6 [==============================] - 0s 8ms/stepdelta1 times: 0.23819351196289062
[{'box': [272, 93, 63, 63], 'confidence': 0.9978725910186768}, {'box': [477, 280, 62, 62], 'confidence': 0.9208602905273438}, {'box': [7, 71, 43, 43], 'confidence': 0.8992095589637756}, {'box': [9, 72, 31, 31], 'confidence': 0.8957547545433044}, {'box': [100, 408, 43, 43], 'confidence': 0.8824415802955627}, {'box': [485, 205, 62, 62], 'confidence': 0.8461276888847351}, {'box': [305, 181, 47, 47], 'confidence': 0.7558619976043701}]
关键的数据是推理耗时 0.23819351196289062秒,最高可信度是 0.9978725910186768,检测的人脸框坐标是 [272, 93, 63, 63] 可以看到初了推理耗时,其它数据和 onnx 模型得到的是一样的。
考虑到推理的识别框的结果是一致的,我从推理耗时和可信度两个角度绘制三种 RNET 模型的数据对比图如下:
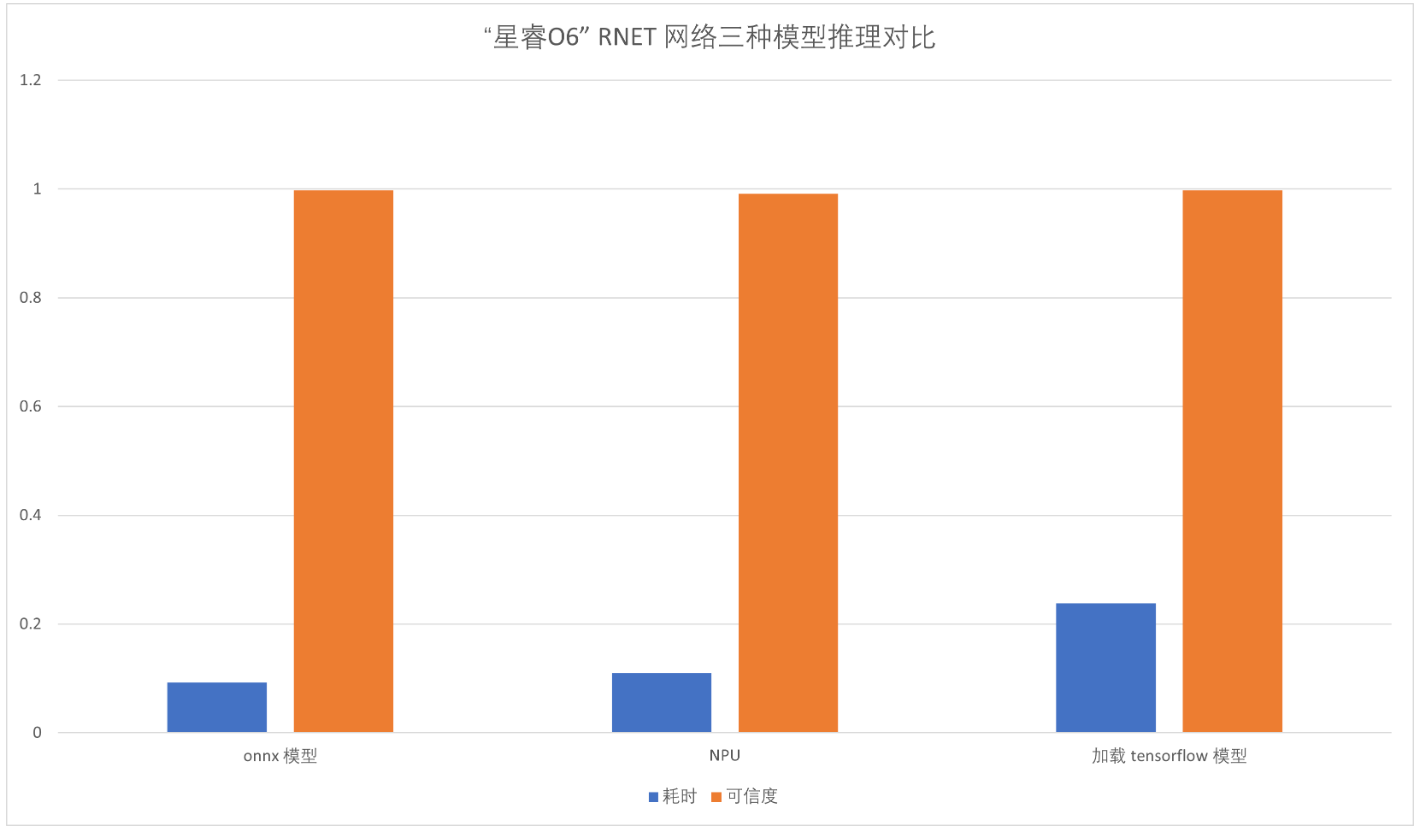
仔细固安察可以发现,NPU推理的结果的可信度指标最低,耗时比 ONNX 略高,ONNX 模型的可信度和直接加载 tensorflow 的 saved model 是一致的。
RTSP 拉流推理显示
有了上面的基础,我们就可以进一步做一些 demo 型的应用,这里我在 PC 开发机器上使用 live555 部署了一个 rtsp 推流服务。接着,在前面部分的基础上编写了 python 代码实现了在星瑞“O6”通过 mtcnn 模型实现人脸识别标框和显示的效果,这部分代码如下所示:
#!/usr/bin/python3from mtcnn.utils.images import load_image
from mtcnn.utils.plotting import plot_bbox
from mtcnn.utils.plotting import plot_landmarks
from mtcnn.utils.plotting import plot
from PIL import Image
import tensorflow as tf
import time
import cv2# Create a detector instance
detector = MTCNN(stages="face_detection_only", device="CPU:0")rtsp_url ='rtsp://192.168.99.240:8554/output.webm'
cap = cv2.VideoCapture(rtsp_url)if not cap.isOpened():print("Could not open RTSP stream.")exit(-1)face_cascade = cv2.CascadeClassifier(cv2.data.haarcascades + 'haarcascade_frontalface_default.xml')while True:ret, frame = cap.read()if not ret:print("Failed to read frame.")breaktime_before=time.time()result = detector.detect_faces(frame)time_delta = time.time() -time_beforeprint("detect waste(sec):", time_delta)if len(result) > 0:frame=plot(frame, result[0])cv2.imshow('RTSP Video Stream with Person Detection', frame)if cv2.waitKey(1) & 0xFF == ord('q'):break
这里,我截了一个视频演示的一张图片:
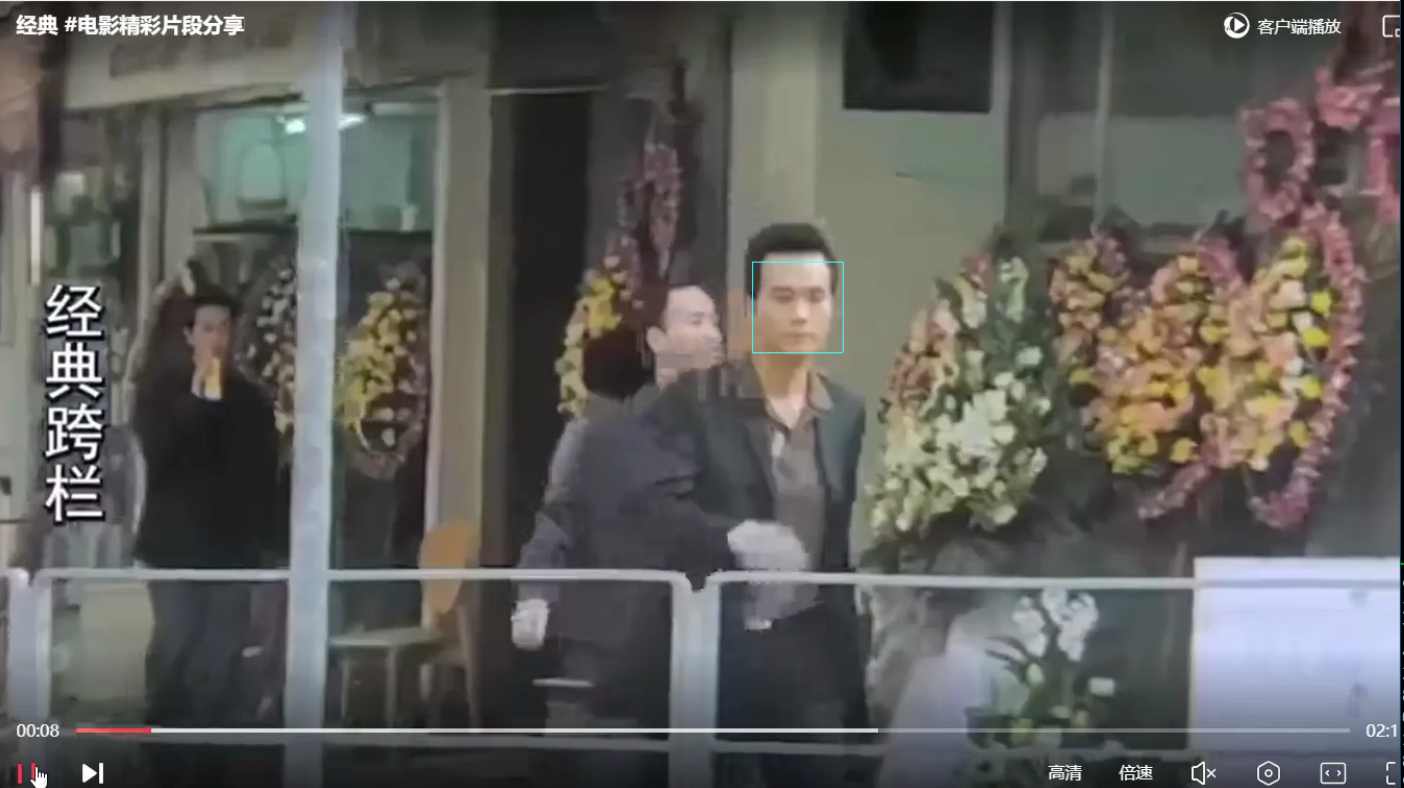
可以看到准确框出了人脸的位置,实现了mtcnn 模型在星瑞“O6” NPU 上部署和推理的过程。
相关文章:

【“星睿O6”AI PC开发套件评测】+ MTCNN 开源模型部署和测试对比
经过了前几篇文章的铺垫,从搭建 tensorflow 开发环境,到测试官方 onnx 模型部署到 NPU,接着部署自己的 mnist tensorflow 模型到 NPU。这是一个从易到难的过程,本篇文章介绍开源复杂的人脸识别模型 mtcnn 到 “星睿O6” NPU 的部署…...
 附源码x)
JAVA实战开源项目:装饰工程管理系统 (Vue+SpringBoot) 附源码x
本文项目编号 T 179 ,文末自助获取源码 \color{red}{T179,文末自助获取源码} T179,文末自助获取源码 目录 一、系统介绍二、数据库设计三、配套教程3.1 启动教程3.2 讲解视频3.3 二次开发教程 四、功能截图五、文案资料5.1 选题背景5.2 国内…...

centos 7 安装 java 运行环境
centos 7 安装 java 运行环境 java -version java version "1.8.0_131" Java(TM) SE Runtime Environment (build 1.8.0_131-b11) Java HotSpot(TM) 64-Bit Server VM (build 25.131-b11, mixed mode)java -version java version "1.8.0_144" Java(TM) …...
)
力扣题解:21.合并两个有序链表(C语言)
将两个升序链表合并为一个新的升序链表是一个经典的链表操作问题。可以通过递归或迭代的方法来解决。以下是解释和代码实现: 递归: 每次比较两个链表的头节点,将较小的节点添加到新链表中,并递归处理剩余部分。 截至条件…...

iOS App 安全性探索:源码保护、混淆方案与逆向防护日常
iOS App 安全性探索:源码保护、混淆方案与逆向防护日常 在 iOS 开发者的日常工作中,我们总是关注功能的完整性、性能的优化和UI的细节,但常常忽视了另一个越来越重要的问题:发布后的应用安全。 尤其是对于中小团队或独立开发者&…...
、项目限流详解)
SpringBoot默认并发处理(Tomcat)、项目限流详解
SpringBoot默认并发处理 在 Spring Boot 项目中,默认情况下,同一时间能处理的请求数由内嵌的 Tomcat 服务器的线程池配置决定。 默认并发处理能力 请求处理流程 请求到达:新请求首先进入 TCP 连接队列(最大 ma…...
通常指一类现代化的终端工具 工具介绍)
Xterminal(或 X Terminal)通常指一类现代化的终端工具 工具介绍
Xterminal(或 X Terminal)通常指一类现代化的终端工具,旨在为开发者、运维人员提供更高效、更智能的命令行操作体验。 📢提示:文章排版原因,资源链接地址放在文章结尾👇👇ÿ…...

如何把win10 wsl的安装目录从c盘迁移到d盘
标题:如何把win10 wsl的安装目录从c盘迁移到d盘 通过microsoft store安装的 wsl 目录默认在 C:\Users[用户名]\AppData\Local\wsl 下 wsl的docker镜像以及dify的编译环境会占用大量硬盘空间,0.15.3 、1.1.3、1.3.1 三个版本的环境占用空间超过40GB [图…...

2025医疗信息化趋势:健康管理系统如何重构智慧医院生态
当北京协和医院的门诊大厅启用智能分诊机器人时,距离其3000公里外的三甲医院正通过健康管理系统将慢性病复诊率降低42%。这场静默发生的医疗革命,正在重新定义2025年智慧医院的建设标准。 一、穿透数据孤岛的三大核心引擎 最新版《智慧医院评价指标体系…...

java volatile关键字
volatile 是 Java 中用于保证多线程环境下变量可见性和禁止指令重排序的关键字。 普通变量不加volatile修饰有可见性问题,即有线程修改该变量值,其他线程无法立即感知该变量值修改了。代码: private static int intVal 0; // 普通变量未加 …...

中阳策略模型:结构节奏中的方向感知逻辑
中阳策略模型:结构节奏中的方向感知逻辑 在交易世界中,“节奏”与“结构”的互动远比大多数人想象得复杂。中阳研究团队在大量实战数据分析中提出一个核心观点:方向感的建立,必须以结构驱动为前提,以节奏确认为依据。 …...

死锁的形成
死锁的形成 背景学习资源死锁的本质 背景 面试可能会被问到. 学习资源 一个案例: https://www.bilibili.com/video/BV1pz421Y7kM 死锁的本质 互相持有对方的资源. 存在资源竞争都没有释放. 可能出现死锁. insert into demo_user (no, name) values (6, ‘test1’) on dupl…...

每天五分钟深度学习框架pytorch:视觉工具包torchvison
本文重点 在pytorch深度学习框架中,torchvision是一个非常优秀的视觉工具包,我们可以使用它加载一些著名的数据集,然后我们可以使用它来加载网络模型,比如vgg,resnet等等,还可以使用它来预处理一些图片数据,本节课程我们将学习一下它的使用方式。 torchvision的四部分…...
)
C++之运算符重载实例(日期类实现)
日期类实现 C 日期类的实现与深度解析一、代码结构概览1.1 头文件 Date.h1.2 源文件 Date.cpp 二、关键函数实现解析2.1 获取某月天数函数 GetMonthDay2.2 构造函数 Date2.3 日期加减法运算2.4 前置与后置自增/自减操作2.5 日期比较与差值计算 三、代码优化与注意事项3.1 代码优…...

数据分析怎么做?高效的数据分析方法有哪些?
目录 一、数据分析的对象和目的 (一)数据分析的常见对象 (二)数据分析的目的 二、数据分析怎么做? (一)明确问题 (二)收集数据 (三)清洗和…...

数组和切片的区别
💝💝💝欢迎来到我的博客,很高兴能够在这里和您见面!希望您在这里可以感受到一份轻松愉快的氛围,不仅可以获得有趣的内容和知识,也可以畅所欲言、分享您的想法和见解。 非常期待和您一起在这个小…...

【Linux】自定义shell的编写
📝前言: 这篇文章我们来讲讲【Linux】简单自定义shell的编写,通过这个简单的模拟实现,进一步感受shell的工作原理。 🎬个人简介:努力学习ing 📋个人专栏:Linux 🎀CSDN主页…...

【C/C++】为什么要noexcept
为什么要noexcept 在C中,noexcept修饰符用于指示函数不会抛出异常 1. 性能优化 减少异常处理开销:编译器在生成代码时,若函数标记为noexcept,可以省略异常处理的相关机制(如栈展开代码),从而减…...

运用fmpeg写一个背英文单词的demo带翻译
-男生会因为不配而离开那个深爱的她吗?? 一, fmpeg-7.0.1 是做什么用的?? FFmpeg 7.0.1 是 FFmpeg 的一个版本,FFmpeg 是一个开源的多媒体框架,用于处理音视频数据。FFmpeg 提供了强大的工具和…...

Android 项目中配置了多个 maven 仓库,但依赖还是下载失败,除了使用代理,还有其他方法吗?
文章目录 前言解决方案gradlemaven 仓库 前言 我们在Android 开发的过程中,经常会遇到三方依赖下载不下来的问题。一般情况下我们会在项目的build.gradle文件中配置多个 maven 仓库来解决。 // Top-level build file where you can add configuration options com…...

vue3: pdf.js5.2.133 using typescript
npm install pdfjs-dist5.2.133 项目结构: <!--* creater: geovindu* since: 2025-05-09 21:56:20* LastAuthor: geovindu* lastTime: 2025-05-09 22:12:17* 文件相对于项目的路径: \jsstudy\vuepdfpreview\comonents\pdfjs.vue* message: geovindu* IDE: vscod…...

doxygen 生成 html 网页的一个简单步骤
假设项目源码目录是 src 那么在 src 上一级运行: doxygen -g生成 Doxyfile 随后配置 Doxyfile # 项目相关配置 PROJECT_NAME "你的项目名称" PROJECT_NUMBER "1.0" PROJECT_BRIEF "项目简短描述" …...

云原生环境下服务治理体系的构建与落地实践
📝个人主页🌹:慌ZHANG-CSDN博客 🌹🌹期待您的关注 🌹🌹 一、引言:服务治理正在从“框架能力”向“平台能力”演进 随着微服务架构逐步成熟,越来越多的企业开始向云原生迁移,Kubernetes、Service Mesh、Serverless 等新兴技术不断推动系统的基础设施演进。 与…...

vue 监听元素大小变化 element-resize-detector
1,安装 npm install element-resize-detector --save2、设置成全局插件 element-resize-detector.js: import ElementResizeDetectorMaker from element-resize-detectorexport default {install: function(Vue, name $erd) {Vue.prototype[name] …...

智芯Z20K144x MCU开发之时钟架构
这里写目录标题 一、zhixin时钟架构1.时钟源2.系统时钟控制器(SCC)3.外设时钟控制器(PARCC) 二、软件应用三、总结 一、zhixin时钟架构 可以将时钟架构分解为三个部分来理解: 时钟源(OSC、FIRC、LPO&#…...
)
levelDB的数据查看(非常详细)
起因:.net大作业天气预报程序(WPF)答辩时,老师问怎么维持数据持久性的,启动时加载的数据存在哪里,我明白老师想考的应该是json文件的解析(正反),半天没答上来存那个文件了(老师默认这个文件是自…...
,MMC)
OpenHarmony平台驱动开发(十),MMC
OpenHarmony平台驱动开发(十) MMC 概述 功能简介 MMC(MultiMedia Card)即多媒体卡,是一种用于固态非易失性存储的小体积大容量的快闪存储卡。 MMC后续泛指一个接口协定(一种卡式)࿰…...

【Go底层】http标准库服务端实现原理
目录 1、背景2、核心数据结构【1】Server对象【2】Handler对象【3】ServeMux对象 3、服务端代码示例4、路由注册5、路由匹配 1、背景 http协议的交互框架是C-S架构,C对应客户端模块,S对应服务端模块,接下来我们就基于Go1.23源码来熟悉http标…...

现代健康养生新主张
在充满挑战与压力的现代生活中,健康养生已成为提升生活品质的关键。无需复杂的理论与传统养生模式,通过践行以下科学方法,便能轻松拥抱健康生活。 压力管理是现代养生的核心。长期高压力状态会引发激素失衡、免疫力下降等问题。尝试每天进…...
)
Spring 必会之微服务篇(1)
目录 引入 单体架构 集群和分布式架构 微服务架构 挑战 Spring Cloud 介绍 实现方案 Spring Cloud Alibaba 引入 单体架构 当我们刚开始学开发的时候,基本都是单体架构,就是把一个项目的所有业务的实现功能都打包在一个 war 包或者 Jar 包中。…...

创始人 IP 的破局之道:从技术突围到生态重构的时代启示|创客匠人评述
在 2025 年的商业版图上,创始人 IP 正以前所未有的深度介入产业变革。当奥雅股份联合创始人李方悦在 “中国上市公司品牌价值榜” 发布会上,将 IP 赋能与城市更新大模型结合时,当马斯克在特斯拉财报电话会议上宣称 “未来属于自动驾驶和人形机…...

C++ stl中的stack和queue的相关函数用法
文章目录 stackstack的定义stack的使用 queuequeue的定义queue的使用 stack的使用 包含头文件< stack > #include <stack>queue的使用 包含头文件< queue > #include <queue>stack stack是一种容器适配器,用于具有后进先出操作的场景中&…...

Navicat BI 数据分析功能上线 | 数据洞察新方法
Navicat 17.2 版本一经发布,便以 AI 助手赋能智能交互、Snowflake 支持拓展数据连接版图、拓展对关系型、维度以及数据仓库 2.0 建模方法的支持等新特性与功能抓住了用户的目光,但其中一项低调且实用的更新 - 在 BI 数据预览中深度集成数据分析工具&…...

【网络编程】四、守护进程实现 前后台作业 会话与进程组
文章目录 Ⅰ. 守护进程的概念Ⅱ. 理解会话和作业🎏 会话和进程组的特性小总结Ⅳ. 作业的前后台转换1、fg 指令2、bg 指令 Ⅴ. 守护进程实现1、常见接口① 创建守护进程 -- daemon② 自成会话函数 -- setsid③ 获取会话ID函数 -- getsid 2、自主实现守护进程函数 Ⅰ.…...

【深度学习新浪潮】智能追焦技术全解析:从算法到设备应用
一、智能追焦技术概述 智能追焦是基于人工智能和自动化技术的对焦功能,通过深度学习算法识别并持续跟踪移动物体(如人、动物、运动器械等),实时调整焦距以保持主体清晰,显著提升动态场景拍摄成功率。其核心优势包括: 精准性:AI 算法优化复杂运动轨迹追踪(如不规则移动…...

【PostgreSQL数据分析实战:从数据清洗到可视化全流程】电商数据分析案例-9.3 商品销售预测模型
👉 点击关注不迷路 👉 点击关注不迷路 👉 点击关注不迷路 文章大纲 9.3 商品销售预测模型9.3.1 数据清洗与特征工程9.3.1.1 数据清洗流程1. 缺失值处理2. 异常值检测3. 数据一致性校验 9.3.1.2 特征工程实现1. 时间特征提取2. 用户行为特征3.…...

Docker容器启动失败?无法启动?
Docker容器无法启动的疑难杂症解析与解决方案 一、问题现象 Docker容器无法启动是开发者在容器化部署中最常见的故障之一。尽管Docker提供了丰富的调试工具,但问题的根源往往隐藏在复杂的配置、环境依赖或资源限制中。本文将从环境变量配置错误这一细节问题入手&am…...

【PostgreSQL数据分析实战:从数据清洗到可视化全流程】电商数据分析案例-9.4 可视化报告输出
👉 点击关注不迷路 👉 点击关注不迷路 👉 点击关注不迷路 文章大纲 电商数据分析实战:基于PostgreSQL的可视化报告生成全流程9.4 可视化报告输出9.4.1 可视化报告设计框架9.4.1.1 报告目标与受众9.4.1.2 数据准备与指标体系 9.4.2…...

字符串---Spring字符串基本处理
一、String类的特性 不可变性 String对象一旦创建,内容不可更改,任何修改操作都会生成新对象。字符串常量池 字符串字面量(如"abc")直接存储在常量池中,重复字面量共享同一内存地址。创建方式 虽然都是字符…...
)
车载以太网转USB接口工具选型指南(2025版)
一、车载以太网转USB接口工具的核心需求 在新能源汽车研发中,车载以太网与USB接口的转换工具需满足以下核心需求: 物理层兼容性:支持100BASE-T1/1000BASE-T1车载以太网标准,适应车内EMC环境。协议解析能力:支持SOME/…...

Docker基础入门:容器化技术详解
Docker基础入门:容器化技术详解 1. Docker简介 Docker是一个开源的容器化平台,它允许开发者将应用及其依赖打包到一个可移植的容器中,从而确保应用在不同环境中的一致运行。Docker于2013年发布,迅速成为软件开发领域的革命性工具…...

SQL注入的绕过方式
1.注释与空白符绕过 利用#,--,/**/替代被过滤的注释符 利用%09(Tab),%0A(换行) ,/**/代替空格:如union%0Aselect%0A1,2,3 2.编码绕过: URL编码,双重编码,十六进制编码,Unicode编…...

Java 23种设计模式 - 结构型模式7种
Java 23种设计模式 - 结构型模式7种 1 适配器模式 适配器模式把一个类的接口变换成客户端所期待的另一种接口,从而使原本因接口不匹配而无法在一起工作的两个类能够在一起工作。 优点 将目标类和适配者类解耦增加了类的透明性和复用性,将具体的实现封…...

Linux快速入门
Linux概述 Linux系统版本 Linux系统分为内核版和发行版 内核版 由Linux核心团队开发、维护 免费、开源 负责控制硬件 发行版 基于Linux内核版进行扩展 由各个Linux厂商开发、维护 有收费版本和免费版本 Linux系统发行版: Ubuntu:以桌面应用为主,免费 …...

了解Hadoop
Hadoop了解 Hadoop 是 Apache 基金会开发的一个开源分布式计算平台,主要用于存储和处理大规模数据集。 它能让用户在不了解分布式系统底层细节的情况下,轻松进行分布式程序的开发,将应用程序自动部署到由大量普通机器组成的集群上进行高效运…...

FPGA:如何提高RTL编码能力?
要提升RTL(寄存器传输级)编码能力,需从硬件设计思维建立、典型电路建模、编码规范掌握、工具链应用和工程实践五个维度系统性训练。以下是具体提升路径: 一、建立硬件设计思维:理解RTL与软件的本质区别 RTL代码最终会…...

高频微服务面试题总结
微服务基础概念 什么是微服务架构? 将单一应用拆分为一组小型服务每个服务运行独立进程,轻量级通信独立开发、部署和扩展特点:松耦合、独立技术栈、独立数据库微服务与单体架构对比 维度单体架构微服务架构开发效率初期快初期慢部署整体部署独立部署扩展性整体扩展细粒度扩展…...

【RAG】Milvus、Pinecone、PgVector向量数据库索引参数优化
Milvus 、PgVector 索引参数优化 IVF类索引关键参数(基于聚类算法) nlist (倒排列表数量): 决定将向量空间划分为多少个聚类中心值越大搜索越精确但耗时越长推荐值: 通常设置为数据量的4√n到n/1000之间例如: 1百万数据量可设nlist1000到4000 nprobe (…...
 【待续】)
基金基础知识-指数基金 | 投资理财(4) 【待续】
基金通常是由股票、债券等多种资产组合而成的投资工具,核心是分散化,将资金投向一篮子资产(动态),避免单一资产的风险。 按投资标的分类: 基金类型 相当于 特点 适合人群 货币基金 活期钱包&…...

【K8S系列】Kubernetes常用 命令
以下为的 Kubernetes 超全常用命令文档,涵盖集群管理、资源操作、调试排错等核心场景,结合示例与解析, 高效运维 Kubernetes 环境。 一、集群与节点管理 1. 集群信息查看 查看集群基本信息kubectl cluster-info # 显示API Server、DNS等核…...