Kotlin协程解析
目录
一、协程的使用
二、协程的执行原理
2.1、挂起函数的反编译代码及执行分析
2.2、协程执行流程分析
2.2.1、createCoroutineUnintercepted方法
2.2.2、intercepted方法
2.2.3、resumeCancellableWith方法
2.3、Dispatcher----分发器的实现
2.3.1、Main 分发器的实现
2.3.2、Default、IO分发器的实现
三、Delay挂起函数的实现
3.1、Delay函数的定义
3.2、主线程的Delay函数实现
3.3、子线程的Delay函数实现
四、总结
参考
本文的介绍内容如下:1、协程和线程的区别;2、协程是如何执行的;3、协程是如何挂起的;4、协程挂起后是如何恢复的。
协程可以看作是一个通过“状态机”执行的代码块,还是在线程上执行,并没有新的机器指令的支持。
一、协程的使用
下面给出一个简介的demo。在挂起函数test1中,先挂起30ms,然后执行挂起函数test2。
class TestSuspend {private val TAG = "TestSuspend"suspend fun test1(): Int {delay(30)Log.i(TAG, "test1")test2()return 1}suspend fun test2() {Log.i(TAG, "test2")}@OptIn(DelicateCoroutinesApi::class)fun startTest() {GlobalScope.launch {test1()test2()}}
}
二、协程的执行原理
2.1、挂起函数的反编译代码及执行分析
以挂起函数test1为例,为了更好的分析协程是如何执行的,需要查看上述demo的反编译代码,如下:
public final class TestSuspend {@NotNullprivate final String TAG = "TestSuspend";public static final int $stable;// 如果是第二次以后的执行,传入的参数就是内部创建的那个协程对象$continuation@Nullablepublic final Object test1(@NotNull Continuation $completion) {Continuation $continuation;label27: {if ($completion instanceof <undefinedtype>) {$continuation = (<undefinedtype>)$completion;if (($continuation.label & Integer.MIN_VALUE) != 0) {$continuation.label -= Integer.MIN_VALUE;break label27;}}// 注1:创建一个协程对象,此协程对象的作用是在存储当前协程的状态及返回$continuation = new ContinuationImpl($completion) {Object L$0;// $FF: synthetic fieldObject result;int label;// 注3 调用协程的resume方法去恢复协程执行时,会调用到这里@Nullablepublic final Object invokeSuspend(@NotNull Object $result) {this.result = $result;this.label |= Integer.MIN_VALUE;return TestSuspend.this.test1((Continuation)this);}};}Object $result = $continuation.result;// var4是协程挂起状态常量Object var4 = IntrinsicsKt.getCOROUTINE_SUSPENDED();// 通过switch的方式,实现状态机switch ($continuation.label) {case 0:ResultKt.throwOnFailure($result);$continuation.L$0 = this;$continuation.label = 1;// 注2:delay方法会返回一个协程挂起状态常量,与var4相同。这时直接返回的方式,挂起当前协程if (DelayKt.delay(30L, $continuation) == var4) {return var4;}break;case 1:this = (TestSuspend)$continuation.L$0;ResultKt.throwOnFailure($result);break;case 2:ResultKt.throwOnFailure($result);return Boxing.boxInt(1);default:throw new IllegalStateException("call to 'resume' before 'invoke' with coroutine");}Log.i(this.TAG, "test1");$continuation.L$0 = null;$continuation.label = 2;// 执行挂起函数test2,因为test2的返回值是Unit.INSTANCE,所以会返回1,当前协程就执行结束了if (this.test2($continuation) == var4) {return var4;} else {return Boxing.boxInt(1);}}@Nullablepublic final Object test2(@NotNull Continuation $completion) {Log.i(this.TAG, "test2");return Unit.INSTANCE;}public final void startTest() {// 在default线程执行BuildersKt.launch$default((CoroutineScope)GlobalScope.INSTANCE, (CoroutineContext)null, (CoroutineStart)null, new Function2((Continuation)null) {int label;public final Object invokeSuspend(Object $result) {Object var2 = IntrinsicsKt.getCOROUTINE_SUSPENDED();switch (this.label) {case 0:ResultKt.throwOnFailure($result);TestSuspend var10000 = TestSuspend.this;Continuation var10001 = (Continuation)this;this.label = 1;// 调用test1方法,因为test1内部会调用delay,所以这里第一次调用时会挂起if (var10000.test1(var10001) == var2) {return var2;}break;case 1:ResultKt.throwOnFailure($result);break;case 2:ResultKt.throwOnFailure($result);return Unit.INSTANCE;default:throw new IllegalStateException("call to 'resume' before 'invoke' with coroutine");}TestSuspend var3 = TestSuspend.this;Continuation var4 = (Continuation)this;this.label = 2;if (var3.test2(var4) == var2) {return var2;} else {return Unit.INSTANCE;}}public final Continuation create(Object value, Continuation $completion) {return (Continuation)(new <anonymous constructor>($completion));}// 调用invokeSuspend开始执行协程public final Object invoke(CoroutineScope p1, Continuation p2) {return ((<undefinedtype>)this.create(p1, p2)).invokeSuspend(Unit.INSTANCE);}// $FF: synthetic method// $FF: bridge methodpublic Object invoke(Object p1, Object p2) {return this.invoke((CoroutineScope)p1, (Continuation)p2);}}, 3, (Object)null);}
}
kotlin中协程的执行方式与状态机相同,在如果发生了挂起,就更新、记录内部的状态(代码中的label)。然后挂起协程,等待下一次的执行恢复回调。当再次执行时,根据内部状态,跳转到对应的逻辑处执行,直至协程执行结束。
根据上面的字节码,可以看出:
首先,挂起函数test1会在内部创建一个协程对象(注1),这个协程对象会保存协程的状态(即label)、下次恢复执行协程时需要的参数(此demo中未给出)、当前协程自身(即L$0)。
然后,协程基于switch实现状态机,作为协程实现挂起和恢复的基础。在注2处,test1方法调用了另一个挂起函数delay,此函数会返回一个COROUTINE_SUSPENDED对象,告诉当前协程需要挂起,当前方法就会通过return方式,实现协程挂起等待。在delay结束后,会调用协程的resume方法,继而调用到invokeSuspend方法,在此方法中重新调用test1方法去继续执行协程。delay函数的实现方式与线程有关,针对主线程,通过postDelay的方式实现,在延迟结束后,回去执行协程的resume方法。针对非主线程,会通过pack方式实现,调用此方法当线程阻塞一段时间。
最后,在延迟结束后,会调用协程的resume方法,恢复协程的执行。在之前调用delay时,将状态label改成了1,这时会直接跳转到label=1的地方进行执行。因为label=1的地方没有挂起函数,会继续往下执行,调用挂起函数test2,因为test2方法没有返回COROUTINE_SUSPENDED,所以返回test1方法的返回值,执行结束。
以上介绍了挂起函数test1的执行流程和协程挂起的实现方式----通过return实现挂起。下面分析test1是如何被调用。
2.2、协程执行流程分析
在demo中,通过GlobalScope.launch方式启动了一个协程,在协程内部执行了挂起函数test1和test2。此launch方法实现如下:
public fun CoroutineScope.launch(context: CoroutineContext = EmptyCoroutineContext,start: CoroutineStart = CoroutineStart.DEFAULT,block: suspend CoroutineScope.() -> Unit
): Job {val newContext = newCoroutineContext(context)val coroutine = if (start.isLazy)LazyStandaloneCoroutine(newContext, block) elseStandaloneCoroutine(newContext, active = true)coroutine.start(start, coroutine, block)return coroutine
}
可以看到此方法首先会调用newCoroutineContext方法创建一个协程上下文,如下:
public actual fun CoroutineScope.newCoroutineContext(context: CoroutineContext): CoroutineContext {val combined = foldCopies(coroutineContext, context, true)val debug = if (DEBUG) combined + CoroutineId(COROUTINE_ID.incrementAndGet()) else combinedreturn if (combined !== Dispatchers.Default && combined[ContinuationInterceptor] == null)debug + Dispatchers.Default else debug
}
在此方法中会将Dispatchers.Default添加到上下文中,即协程会执行在默认分发器Default上。
然后,会创建一个StandaloneCoroutine对象,调用此对象的start方法启动协程,并将我们自定义的挂起函数作为block参数传入,此方法如下:
public fun <R> start(start: CoroutineStart, receiver: R, block: suspend R.() -> T)
{start(block, receiver, this)
}public enum class CoroutineStart {DEFAULT,LAZY,ATOMIC,UNDISPATCHED;public operator fun <R, T> invoke(block: suspend R.() -> T, receiver: R, completion: Continuation<T>): Unit =when (this) {// 注4DEFAULT -> block.startCoroutineCancellable(receiver, completion)ATOMIC -> block.startCoroutine(receiver, completion)UNDISPATCHED -> block.startCoroutineUndispatched(receiver, completion)LAZY -> Unit // will start lazily}
}
start方法会去调用CoroutineStart的invoke方法,因为传入的DEFAULT类型的CoroutineStart,所以会调用到注4处,如下:
internal fun <R, T> (suspend (R) -> T).startCoroutineCancellable(receiver: R, completion: Continuation<T>,
) = runSafely(completion) {createCoroutineUnintercepted(receiver, completion).intercepted().resumeCancellableWith(Result.success(Unit))
}
此方法首先,会调用createCoroutineUnintercepted方法创建一个协程对象,此协程对象内部会调用我们自定义的挂起函数。然后,通过intercepted方法对创建的协程对象进行包装,以控制协程对象的执行;最后,调用resumeCancellableWith方法将协程抛到分发器(dispatcher)中去执行。
接下来,依次对上面3个步骤进行分析:
2.2.1、createCoroutineUnintercepted方法
public actual fun <R, T> (suspend R.() -> T).createCoroutineUnintercepted(receiver: R,completion: Continuation<T>
): Continuation<Unit> {val probeCompletion = probeCoroutineCreated(completion)return if (this is BaseContinuationImpl)create(receiver, probeCompletion)else {createCoroutineFromSuspendFunction(probeCompletion) {(this as Function2<R, Continuation<T>, Any?>).invoke(receiver, it)}}
}
通过查看反编译代码,发现我们传入的是Function2类型的对象,所以会执行else中的代码,如下:
private inline fun <T> createCoroutineFromSuspendFunction(completion: Continuation<T>,crossinline block: (Continuation<T>) -> Any?
): Continuation<Unit> {val context = completion.context// label == 0 when coroutine is not started yet (initially) or label == 1 when it wasreturn if (context === EmptyCoroutineContext)object : RestrictedContinuationImpl(completion as Continuation<Any?>) {......}elseobject : ContinuationImpl(completion as Continuation<Any?>, context) {private var label = 0override fun invokeSuspend(result: Result<Any?>): Any? =when (label) {0 -> {label = 1result.getOrThrow() // Rethrow exception if trying to start with exception (will be caught by BaseContinuationImpl.resumeWith// block是我们自定义的挂起函数block(this) // run the block, may return or suspend}1 -> {label = 2result.getOrThrow() // this is the result if the block had suspended}// 上面将label设置为1,此处直接抛Error。表示此协程只能在此执行一次;多次执行此处会报错else -> error("This coroutine had already completed")}}
}
此方法最后会创建一个匿名ContinuationImpl对象,将我们传入的自定义挂起函数封装到一个协程对象中。
2.2.2、intercepted方法
public actual fun <T> Continuation<T>.intercepted(): Continuation<T> =(this as? ContinuationImpl)?.intercepted() ?: thisinternal abstract class ContinuationImpl(completion: Continuation<Any?>?,private val _context: CoroutineContext?
) : BaseContinuationImpl(completion) {// 注5public fun intercepted(): Continuation<Any?> =intercepted?: (context[ContinuationInterceptor]?.interceptContinuation(this) ?: this).also { intercepted = it }}public abstract class CoroutineDispatcher :AbstractCoroutineContextElement(ContinuationInterceptor), ContinuationInterceptor {// 返回一个包裹原协程的协程对象,用于拦截原协程的resume调用public final override fun <T> interceptContinuation(continuation: Continuation<T>): Continuation<T> =DispatchedContinuation(this, continuation)}
此方法会查找协程的上下文context,从中读取实现了ContinuationInterceptor接口的对象。从上面看到,CoroutineDispatcher实现了ContinuationInterceptor接口,所以注5处返回的是抽象类CoroutineDispatcher的一个子类对象,而这子类对象就是协程中的分发器Dispatcher。比较常见的分发器对应的类如下表格:
| 协程中的分发器 | 对应类(CoroutineDispatcher的子类) |
| Dispatchers.Default | DefaultScheduler |
| Dispatchers.Main | MainCoroutineDispatcher |
| Dispatchers.IO | DefaultIoScheduler |
在注5处得到CoroutineDispatcher对象后,会调用interceptContinuation方法创建一个DispatchedContinuation对象,此对象会在协程resume之前,把协程分发到对应的Dispatcher中去恢复执行。具体实现方式在下一小节介绍。
2.2.3、resumeCancellableWith方法
internal class DispatchedContinuation<in T>(@JvmField internal val dispatcher: CoroutineDispatcher,@JvmField val continuation: Continuation<T>
) : DispatchedTask<T>(MODE_UNINITIALIZED), CoroutineStackFrame, Continuation<T> by continuation {override fun resumeWith(result: Result<T>) {val state = result.toState()if (dispatcher.safeIsDispatchNeeded(context)) {_state = stateresumeMode = MODE_ATOMICdispatcher.safeDispatch(context, this)} else {executeUnconfined(state, MODE_ATOMIC) {withCoroutineContext(context, countOrElement) {continuation.resumeWith(result)}}}}// We inline it to save an entry on the stack in cases where it shows (unconfined dispatcher)// It is used only in Continuation<T>.resumeCancellableWith@Suppress("NOTHING_TO_INLINE")internal inline fun resumeCancellableWith(result: Result<T>) {val state = result.toState()// 先检查是否可以在dispatcher上执行当前协程。if (dispatcher.safeIsDispatchNeeded(context)) {_state = stateresumeMode = MODE_CANCELLABLE1)、检查通过,放到dispatcher执行dispatcher.safeDispatch(context, this)} else {2)、检查不通过,直接在当前线程执行executeUnconfined(state, MODE_CANCELLABLE) {if (!resumeCancelled(state)) {resumeUndispatchedWith(result)}}}}}
在协程执行前,会调用safeIsDispatchNeeded方法,检查协程是否可以在dispatcher上执行。此方法默认值会true,所以一般情况会分发到dispatcher上执行。dispatcher的类型是CoroutineDispatcher,来源于context[ContinuationInterceptor],大多数情况下,是Dispatchers.Default、Dispatchers.Main、Dispatchers.IO这3个对象中的一个。
在调用dispatcher的safeDispatch方法时,它的第二个参数是一个Runnable对象(亦是当前对象this),表示安排这个Runnable对象在分发器上执行。这个Runnable接口是由父类DispatchedTask实现的,如下:
internal abstract class DispatchedTask<in T> internal constructor(@JvmField var resumeMode: Int
) : SchedulerTask() {// 在分发器上执行此run方法final override fun run() {assert { resumeMode != MODE_UNINITIALIZED } // should have been set before dispatchingtry {val delegate = delegate as DispatchedContinuation<T>// 获取当前的协程对象val continuation = delegate.continuationwithContinuationContext(continuation, delegate.countOrElement) {val context = continuation.contextval state = takeState() // NOTE: Must take state in any case, even if cancelledval exception = getExceptionalResult(state)/** Check whether continuation was originally resumed with an exception.* If so, it dominates cancellation, otherwise the original exception* will be silently lost.*/val job = if (exception == null && resumeMode.isCancellableMode) context[Job] else nullif (job != null && !job.isActive) {val cause = job.getCancellationException()cancelCompletedResult(state, cause)// 恢复协程执行continuation.resumeWithStackTrace(cause)} else {// 让挂起过的协程,恢复执行if (exception != null) {continuation.resumeWithException(exception)} else {continuation.resume(getSuccessfulResult(state))}}}} catch (e: DispatchException) {handleCoroutineException(delegate.context, e.cause)} catch (e: Throwable) {handleFatalException(e)}}
}
综合上面代码可以看出,在调用safeDispatch方法之后,会把协程安排到对应的分发器上恢复执行,即执行一个含有协程对象的Runnable对象,然后在执行Runnable对象时,调用协程对象的resumeWithException方法,此方法最终会调用invokeSuspend方法,而是invokeSuspend方法是在编译时生成的(见注3处),其内部会调用我们自定义的挂起函数。ps: 在2.2.1节中也有一个invokeSuspend方法,但是这个invokeSuspend方法只会在协程启动时执行,而非协程resume恢复时执行,且在协程整个生命周期只会执行1次,多了就会报错。从resumeWithException方法调用invokeSuspend方法的具体流程如下:
public inline fun <T> Continuation<T>.resume(value: T): Unit =resumeWith(Result.success(value))public inline fun <T> Continuation<T>.resumeWithException(exception: Throwable): Unit =resumeWith(Result.failure(exception))internal abstract class BaseContinuationImpl(// completion是外层的协程对象,见2.1节反编译代码,// 在startTest方法调用test1方法时,会给test1传入一个外部协程对象。public val completion: Continuation<Any?>?
) : Continuation<Any?>, CoroutineStackFrame, Serializable {public final override fun resumeWith(result: Result<Any?>) {// This loop unrolls recursion in current.resumeWith(param) to make saner and shorter stack traces on resumevar current = thisvar param = result// 从内层到外层遍历协程,然后resume协程while (true) {probeCoroutineResumed(current)// 在便利协程对象,通过with函数,来更新协程对象,// 从而可以调用外层协程对象的invokeSuspendwith(current) {val completion = completion!! // fail fast when trying to resume continuation without completionval outcome: Result<Any?> =try {// invokeSuspend的实现详见 注3 ,其内部会调用我们自定义的挂起方法val outcome = invokeSuspend(param)// 如果遇到挂起函数,则return 挂起if (outcome === COROUTINE_SUSPENDED) returnResult.success(outcome)} catch (exception: Throwable) {Result.failure(exception)}releaseIntercepted() // this state machine instance is terminating// 检查是否还有外层协程,如果有,则重置current和param,继续恢复外层协程if (completion is BaseContinuationImpl) {// unrolling recursion via loopcurrent = completionparam = outcome} else {// top-level completion reached -- invoke and returncompletion.resumeWith(outcome)return}}}}// 1)、编译时实现,如 注3;// 2)、协程首次启动时实现(不会在resume时执行,只在首次启动执行)如 2.2.1protected abstract fun invokeSuspend(result: Result<Any?>): Any?
}
上面给出了协程在resume时会执行的操作。首先、发生挂起协程会执行resume方法,在此方法内部调用invokeSuspend方法,继续执行之前的协程逻辑。然后、在执行完内部协程逻辑后(假设不再发生挂起),会获取外层的协程,继续去执行外层协程的逻辑,直到全部协程执行结束,或有协程再次发生挂起。
从以上可以看出:
1)、针对“挂起”操作,当存在挂起函数嵌套调用时(相当于有多个协程体互相嵌套),内部的挂起函数发生挂起后,外部的挂起函数也会暂停执行。因为当内部的挂起函数挂起后,即返回“挂起标识常量”后,此常量会被一层一层的传递到最外层挂起函数,每一层挂起函数检测到此常量后,都会return,终止当前的执行。
2)、针对“恢复”操作,当挂起函数被恢复时,会从内到外依次遍历外层的协程体对象(每一个协程体对象代表一个外层嵌套的挂起函数),然后调用协程体对象的invokeSuspend方法,以继续执行外层挂起函数。
2.3、Dispatcher----分发器的实现
在前面几节,介绍了协程如何挂起和协程的恢复操作。这个恢复操作是在一个Runnable对象(即DispatchedTask)中去发起的。那么,接下来将介绍,这个Runnable对象是如何被调用的。Kotlin的分发器虽然分为Default、Main、IO,但可以依据他们执行所在的线程分成2类:主线程(Main)、子线程(Default、Main)。
2.3.1、Main 分发器的实现
在kotlin中,Main分发器的定义如下:
public actual object Dispatchers {public actual val Main: MainCoroutineDispatcher get() = MainDispatcherLoader.dispatcher
}internal object MainDispatcherLoader {private val FAST_SERVICE_LOADER_ENABLED = systemProp(FAST_SERVICE_LOADER_PROPERTY_NAME, true)@JvmFieldval dispatcher: MainCoroutineDispatcher = loadMainDispatcher()private fun loadMainDispatcher(): MainCoroutineDispatcher {return try {// FAST_SERVICE_LOADER_ENABLED的定义在上面,默认值是trueval factories = if (FAST_SERVICE_LOADER_ENABLED) {// 返回AndroidDispatcherFactoryFastServiceLoader.loadMainDispatcherFactory()} else {// We are explicitly using the// `ServiceLoader.load(MyClass::class.java, MyClass::class.java.classLoader).iterator()`// form of the ServiceLoader call to enable R8 optimization when compiled on Android.ServiceLoader.load(MainDispatcherFactory::class.java,MainDispatcherFactory::class.java.classLoader).iterator().asSequence().toList()}@Suppress("ConstantConditionIf")factories.maxByOrNull { it.loadPriority }?.tryCreateDispatcher(factories)?: createMissingDispatcher()} catch (e: Throwable) {// Service loader can throw an exception as wellcreateMissingDispatcher(e)}}
}
从上面代码可以看出,Main分发器的类型是MainCoroutineDispatcher,是由FastServiceLoader.loadMainDispatcherFactory()方法,返回的AndroidDispatcherFactory对象,通过调用tryCreateDispatcher方法创建。具体代码如下:
public fun MainDispatcherFactory.tryCreateDispatcher(factories: List<MainDispatcherFactory>): MainCoroutineDispatcher =try {createDispatcher(factories)} catch (cause: Throwable) {createMissingDispatcher(cause, hintOnError())}internal class AndroidDispatcherFactory : MainDispatcherFactory {override fun createDispatcher(allFactories: List<MainDispatcherFactory>): MainCoroutineDispatcher {// 创建Main Dispatcher,并把主线程的Looper作为参数传入。val mainLooper = Looper.getMainLooper() ?: throw IllegalStateException("The main looper is not available")return HandlerContext(mainLooper.asHandler(async = true))}override fun hintOnError(): String = "For tests Dispatchers.setMain from kotlinx-coroutines-test module can be used"override val loadPriority: Intget() = Int.MAX_VALUE / 2
}
从上面代码看出,最终Main分发器的实现类是HandlerContext,其代码如下:
internal class HandlerContext private constructor(private val handler: Handler,private val name: String?,private val invokeImmediately: Boolean
) : HandlerDispatcher(), Delay {constructor(handler: Handler,name: String? = null) : this(handler, name, false)override fun isDispatchNeeded(context: CoroutineContext): Boolean {return !invokeImmediately || Looper.myLooper() != handler.looper}override fun dispatch(context: CoroutineContext, block: Runnable) {// 执行DispatchedTaskif (!handler.post(block)) {cancelOnRejection(context, block)}}
}
在上面的dispatch方法,会把DispatchedTask抛到handler中去执行,而这个handler又是在主线程执行的,基于此Main分发器就实现了把协程体抛到主线程执行。
2.3.2、Default、IO分发器的实现
Default和IO分发器都是在子线程执行的,且IO分发器也是基于Default分发器下的类实现的,只是参数不同,所以在此只分析Default的分发器的实现。
在kotlin中,Default分发器的定义如下:
public actual object Dispatchers {@JvmStaticpublic actual val Default: CoroutineDispatcher = DefaultScheduler
}internal object DefaultScheduler : SchedulerCoroutineDispatcher(CORE_POOL_SIZE, MAX_POOL_SIZE,IDLE_WORKER_KEEP_ALIVE_NS, DEFAULT_SCHEDULER_NAME
) {......override fun toString(): String = "Dispatchers.Default"
}internal open class SchedulerCoroutineDispatcher(private val corePoolSize: Int = CORE_POOL_SIZE,private val maxPoolSize: Int = MAX_POOL_SIZE,private val idleWorkerKeepAliveNs: Long = IDLE_WORKER_KEEP_ALIVE_NS,private val schedulerName: String = "CoroutineScheduler",
) : ExecutorCoroutineDispatcher() {private var coroutineScheduler = createScheduler()private fun createScheduler() =CoroutineScheduler(corePoolSize, maxPoolSize, idleWorkerKeepAliveNs, schedulerName)override fun dispatch(context: CoroutineContext, block: Runnable): Unit = coroutineScheduler.dispatch(block)
}
从上面的代码可知,Default分发器最终会由SchedulerCoroutineDispatcher对象来实现,其内部会创建一个CoroutineScheduler对象,用于执行Runnable对象,通过调用dispatch方法去实现,其代码如下:
fun dispatch(block: Runnable, taskContext: TaskContext = NonBlockingContext, fair: Boolean = false) {trackTask() // 将Runnable对象封装成一个task(TaskImpl类型)val task = createTask(block, taskContext)// 因为构造task的taskContext是NonBlockingContext,所以这里是falseval isBlockingTask = task.isBlocking// Invariant: we increment counter **before** publishing the task// so executing thread can safely decrement the number of blocking tasksval stateSnapshot = if (isBlockingTask) incrementBlockingTasks() else 0// try to submit the task to the local queue and act depending on the result// 获取一个当前正在执行的worker,这个worker继承了Thread,是一个正在执行的线程val currentWorker = currentWorker()// 把Runnable对象添加到worker的待执行队列中。// 若未添加成功,会把task原封返回val notAdded = currentWorker.submitToLocalQueue(task, fair)if (notAdded != null) {// 注6 把task添加到一个全局待执行队列if (!addToGlobalQueue(notAdded)) {// Global queue is closed in the last step of close/shutdown -- no more tasks should be acceptedthrow RejectedExecutionException("$schedulerName was terminated")}}// Checking 'task' instead of 'notAdded' is completely okayif (isBlockingTask) {// Use state snapshot to better estimate the number of running threadssignalBlockingWork(stateSnapshot)} else {// 执行了 注6 处的代码才会到这里// (若没有则先创建)启动一个Worker去拉取全局待执行队列中的task 去执行signalCpuWork()}}dispatch方法执行Runnable的流程为:
首先,将Runnable封装成一个Task对象,给这个Runnable对象扩展一些执行的参数,要不要阻塞之类的。
然后,尝试获取一个Worker,Woker继承了Thread,并在内部维护了一个task队列。会在内部启动一个循环去读取task队列,并执行task(即Runnable)。当所有task都执行完毕时,会阻塞自己(通过LockSupport.parkNanos方法)或直接结束自己。当有task添加进来时,会通过LockSupport.unpark方法,唤醒一个正在阻塞的Worker。Worker的代码如下:
internal inner class Worker private constructor() : Thread() {val localQueue: WorkQueue = WorkQueue()override fun run() = runWorker()private fun runWorker() {var rescanned = falsewhile (!isTerminated && state != WorkerState.TERMINATED) {// 从本地队列(localQueue)或全局队列中读取一个taskval task = findTask(mayHaveLocalTasks)// Task found. Execute and repeatif (task != null) {rescanned = falseminDelayUntilStealableTaskNs = 0L// 执行此task后,继续读取执行下个taskexecuteTask(task)continue} else {mayHaveLocalTasks = false}......// 没有可用task了,阻塞当前worker,即阻塞当前线程tryPark()}tryReleaseCpu(WorkerState.TERMINATED)}
}
最后,如果找不到正在执行的Worker,则先会调用addToGlobalQueue方法,将task添加到全局队列中。然后,调用signalCpuWork方法尝试唤醒一个worker或创建一个worker(如果当前一个worker都没有)。代码如下
// 添加task到全局队列中
private fun addToGlobalQueue(task: Task): Boolean {return if (task.isBlocking) {globalBlockingQueue.addLast(task)} else {globalCpuQueue.addLast(task)}}fun signalCpuWork() {// 先尝试唤醒一个阻塞的Worker(通过LockSupport.unpark方法)if (tryUnpark()) return// 如果没有worker可用,则创建一个新的workerif (tryCreateWorker()) returntryUnpark()}// 创建并启动一个Worker
private fun createNewWorker(): Int {val worker: Workerreturn synchronized(workers) {// Make sure we're not trying to resurrect terminated schedulerif (isTerminated) return -1val state = controlState.valueval created = createdWorkers(state)val blocking = blockingTasks(state)val cpuWorkers = (created - blocking).coerceAtLeast(0)// Double check for overprovisionif (cpuWorkers >= corePoolSize) return 0if (created >= maxPoolSize) return 0// start & register new worker, commit index only after successful creationval newIndex = createdWorkers + 1require(newIndex > 0 && workers[newIndex] == null)worker = Worker(newIndex)workers.setSynchronized(newIndex, worker)require(newIndex == incrementCreatedWorkers())cpuWorkers + 1}.also { worker.start() } // 启动Worker}
综上所述,Default分发器首先,会将Runnable对象封装成task,并添加到task队列中。然后启动Thread去循环读取task队列中的task,并执行。
三、Delay挂起函数的实现
之前部分分析了1)、协程如何挂起----通过返回挂起标识常量,return方法执行;2)协程恢复的流程----从内层协程到外层协程依次恢复执行;3)、协程是如何执行的----实现了Runnable接口,放到Thread中去执行。但是还缺少一点,那就是从协程挂起如何转为协程恢复执行,即在何时、如何resume协程。下面将对Delay方法进行分析来查看协程是如何恢复的。
因为协程可以在不同的分发器上执行(既可在主线程执行,也可以在子线程执行),所以delay方法的实现也与线程有关。
3.1、Delay函数的定义
在kotlin中,delay函数定义如下:
public interface Delay {......public fun scheduleResumeAfterDelay(timeMillis: Long, continuation: CancellableContinuation<Unit>)public fun invokeOnTimeout(timeMillis: Long, block: Runnable, context: CoroutineContext): DisposableHandle =DefaultDelay.invokeOnTimeout(timeMillis, block, context)
}public suspend fun delay(timeMillis: Long) {if (timeMillis <= 0) return // don't delayreturn suspendCancellableCoroutine sc@ { cont: CancellableContinuation<Unit> ->// if timeMillis == Long.MAX_VALUE then just wait forever like awaitCancellation, don't schedule.if (timeMillis < Long.MAX_VALUE) {// 注7 先获取协程上下文中的delay对象,然后调用delay对象的scheduleResumeAfterDelay方法cont.context.delay.scheduleResumeAfterDelay(timeMillis, cont)}}
}
3.2、主线程的Delay函数实现
在主线程,Delay函数的实现简单明了,如下所示:
internal class HandlerContext private constructor(private val handler: Handler,private val name: String?,private val invokeImmediately: Boolean
) : HandlerDispatcher(), Delay {override fun scheduleResumeAfterDelay(timeMillis: Long, continuation: CancellableContinuation<Unit>) {// 生成一个Runnable对象,调用协程的resume方法,恢复协程val block = Runnable {with(continuation) { resumeUndispatched(Unit) }}// 将上述Runnable对象延迟执行,实现delay的效果if (handler.postDelayed(block, timeMillis.coerceAtMost(MAX_DELAY))) {continuation.invokeOnCancellation { handler.removeCallbacks(block) }} else {cancelOnRejection(continuation.context, block)}}override fun invokeOnTimeout(timeMillis: Long, block: Runnable, context: CoroutineContext): DisposableHandle {if (handler.postDelayed(block, timeMillis.coerceAtMost(MAX_DELAY))) {return DisposableHandle { handler.removeCallbacks(block) }}cancelOnRejection(context, block)return NonDisposableHandle}
}
可以看到,在主线程中,HandlerContext不仅作为Main分发器使用,还实现了Delay接口。所以在注7处返回的就是HandlerContext对象。在调用delay方法,直接往主线程抛一个恢复协程执行的Runnable对象,并让它延迟执行。
3.3、子线程的Delay函数实现
以Default分发器为例,因为DefaultScheduler并没有实现delay接口,所以在Default分发器中使用delay方法时,在注7处返回的Delay对象为DefaultExecutor,如下所示:
internal val CoroutineContext.delay: Delay get() = get(ContinuationInterceptor) as? Delay ?: DefaultDelayinternal actual val DefaultDelay: Delay = initializeDefaultDelay()private val defaultMainDelayOptIn = systemProp("kotlinx.coroutines.main.delay", false)
private fun initializeDefaultDelay(): Delay {// 默认值为false,返回DefaultExecutor// Opt-out flagif (!defaultMainDelayOptIn) return DefaultExecutorval main = Dispatchers.Main/** When we already are working with UI and Main threads, it makes* no sense to create a separate thread with timer that cannot be controller* by the UI runtime.*/return if (main.isMissing() || main !is Delay) DefaultExecutor else main
}
在Default分发器中,会使用DefaultExecutor作为Delay接口的实现类,其代码如下:
internal actual object DefaultExecutor : EventLoopImplBase(), Runnable {private var _thread: Thread? = null// 创建一个新的Thread对象,以执行run方法,因为run方法中有循环,可能会发生阻塞override val thread: Threadget() = _thread ?: createThreadSync()private val _delayed = atomic<DelayedTaskQueue?>(null)override fun scheduleResumeAfterDelay(timeMillis: Long, continuation: CancellableContinuation<Unit>) {val timeNanos = delayToNanos(timeMillis)if (timeNanos < MAX_DELAY_NS) {val now = nanoTime()// 封装成DelayedResumeTask对象,// 此task对象有协程需要恢复执行的时间,即now + timeNanosDelayedResumeTask(now + timeNanos, continuation).also { task ->// 把task添加到_delayed队列中schedule(now, task)continuation.disposeOnCancellation(task)}}}override fun run() {ThreadLocalEventLoop.setEventLoop(this)registerTimeLoopThread()try {var shutdownNanos = Long.MAX_VALUEif (!notifyStartup()) returnwhile (true) {Thread.interrupted() // just reset interruption flag// 读取下个task,检查此task需要何时执行,如需立刻执行则执行并返回0// 如不需立刻执行,则会返回下个task的执行时间点与现在时刻的差值parkNanos,// 并在之后让线程阻塞parkNanos时长。var parkNanos = processNextEvent()if (parkNanos == Long.MAX_VALUE) {// nothing to do, initialize shutdown timeoutval now = nanoTime()if (shutdownNanos == Long.MAX_VALUE) shutdownNanos = now + KEEP_ALIVE_NANOSval tillShutdown = shutdownNanos - nowif (tillShutdown <= 0) return // shut thread downparkNanos = parkNanos.coerceAtMost(tillShutdown)} elseshutdownNanos = Long.MAX_VALUEif (parkNanos > 0) {// check if shutdown was requested and bail out in this caseif (isShutdownRequested) return// 当前没有task需要立刻执行,需要让当前线程阻塞parkNanos时长parkNanos(this, parkNanos)}}} finally {_thread = null // this thread is deadacknowledgeShutdownIfNeeded()unregisterTimeLoopThread()// recheck if queues are empty after _thread reference was set to null (!!!)if (!isEmpty) thread // recreate thread if it is needed}}override fun processNextEvent(): Long {// unconfined events take priorityif (processUnconfinedEvent()) return 0// queue all delayed tasks that are due to be executedenqueueDelayedTasks()// then process one event from queue// 读取一个需要立刻执行的taskval task = dequeue()if (task != null) {// 执行此taskplatformAutoreleasePool { task.run() }return 0}return nextTime}private fun createThreadSync(): Thread {return _thread ?: Thread(this, THREAD_NAME).apply {_thread = thiscontextClassLoader = this@DefaultExecutor.javaClass.classLoaderisDaemon = truestart()}}
}
上面代码表明,在Default分发器(子线程)执行delay操作,会先把恢复协程操作封装一个task;然后,把这个task加入到task队列中;接着,在一个新的线程中重复读取task队列,若task的时间点到了,则立刻执行,即立刻调用协程的resume方法。若task的时间点未到,则计算这个时间点与现在的时长,当线程阻塞这个时长,然后在去重复检查task。
四、总结
1)、协程的挂起是通过return 挂起函数执行实现;2)、在协程恢复时,会从内层协程到外层协程依次恢复执行。3)、协程代码依旧是执行在线程上;4)、delay挂起函数在恢复协程时,是把协程resume操作封装到了Runnable对象,然后延迟执行此Runnable对象实现的。
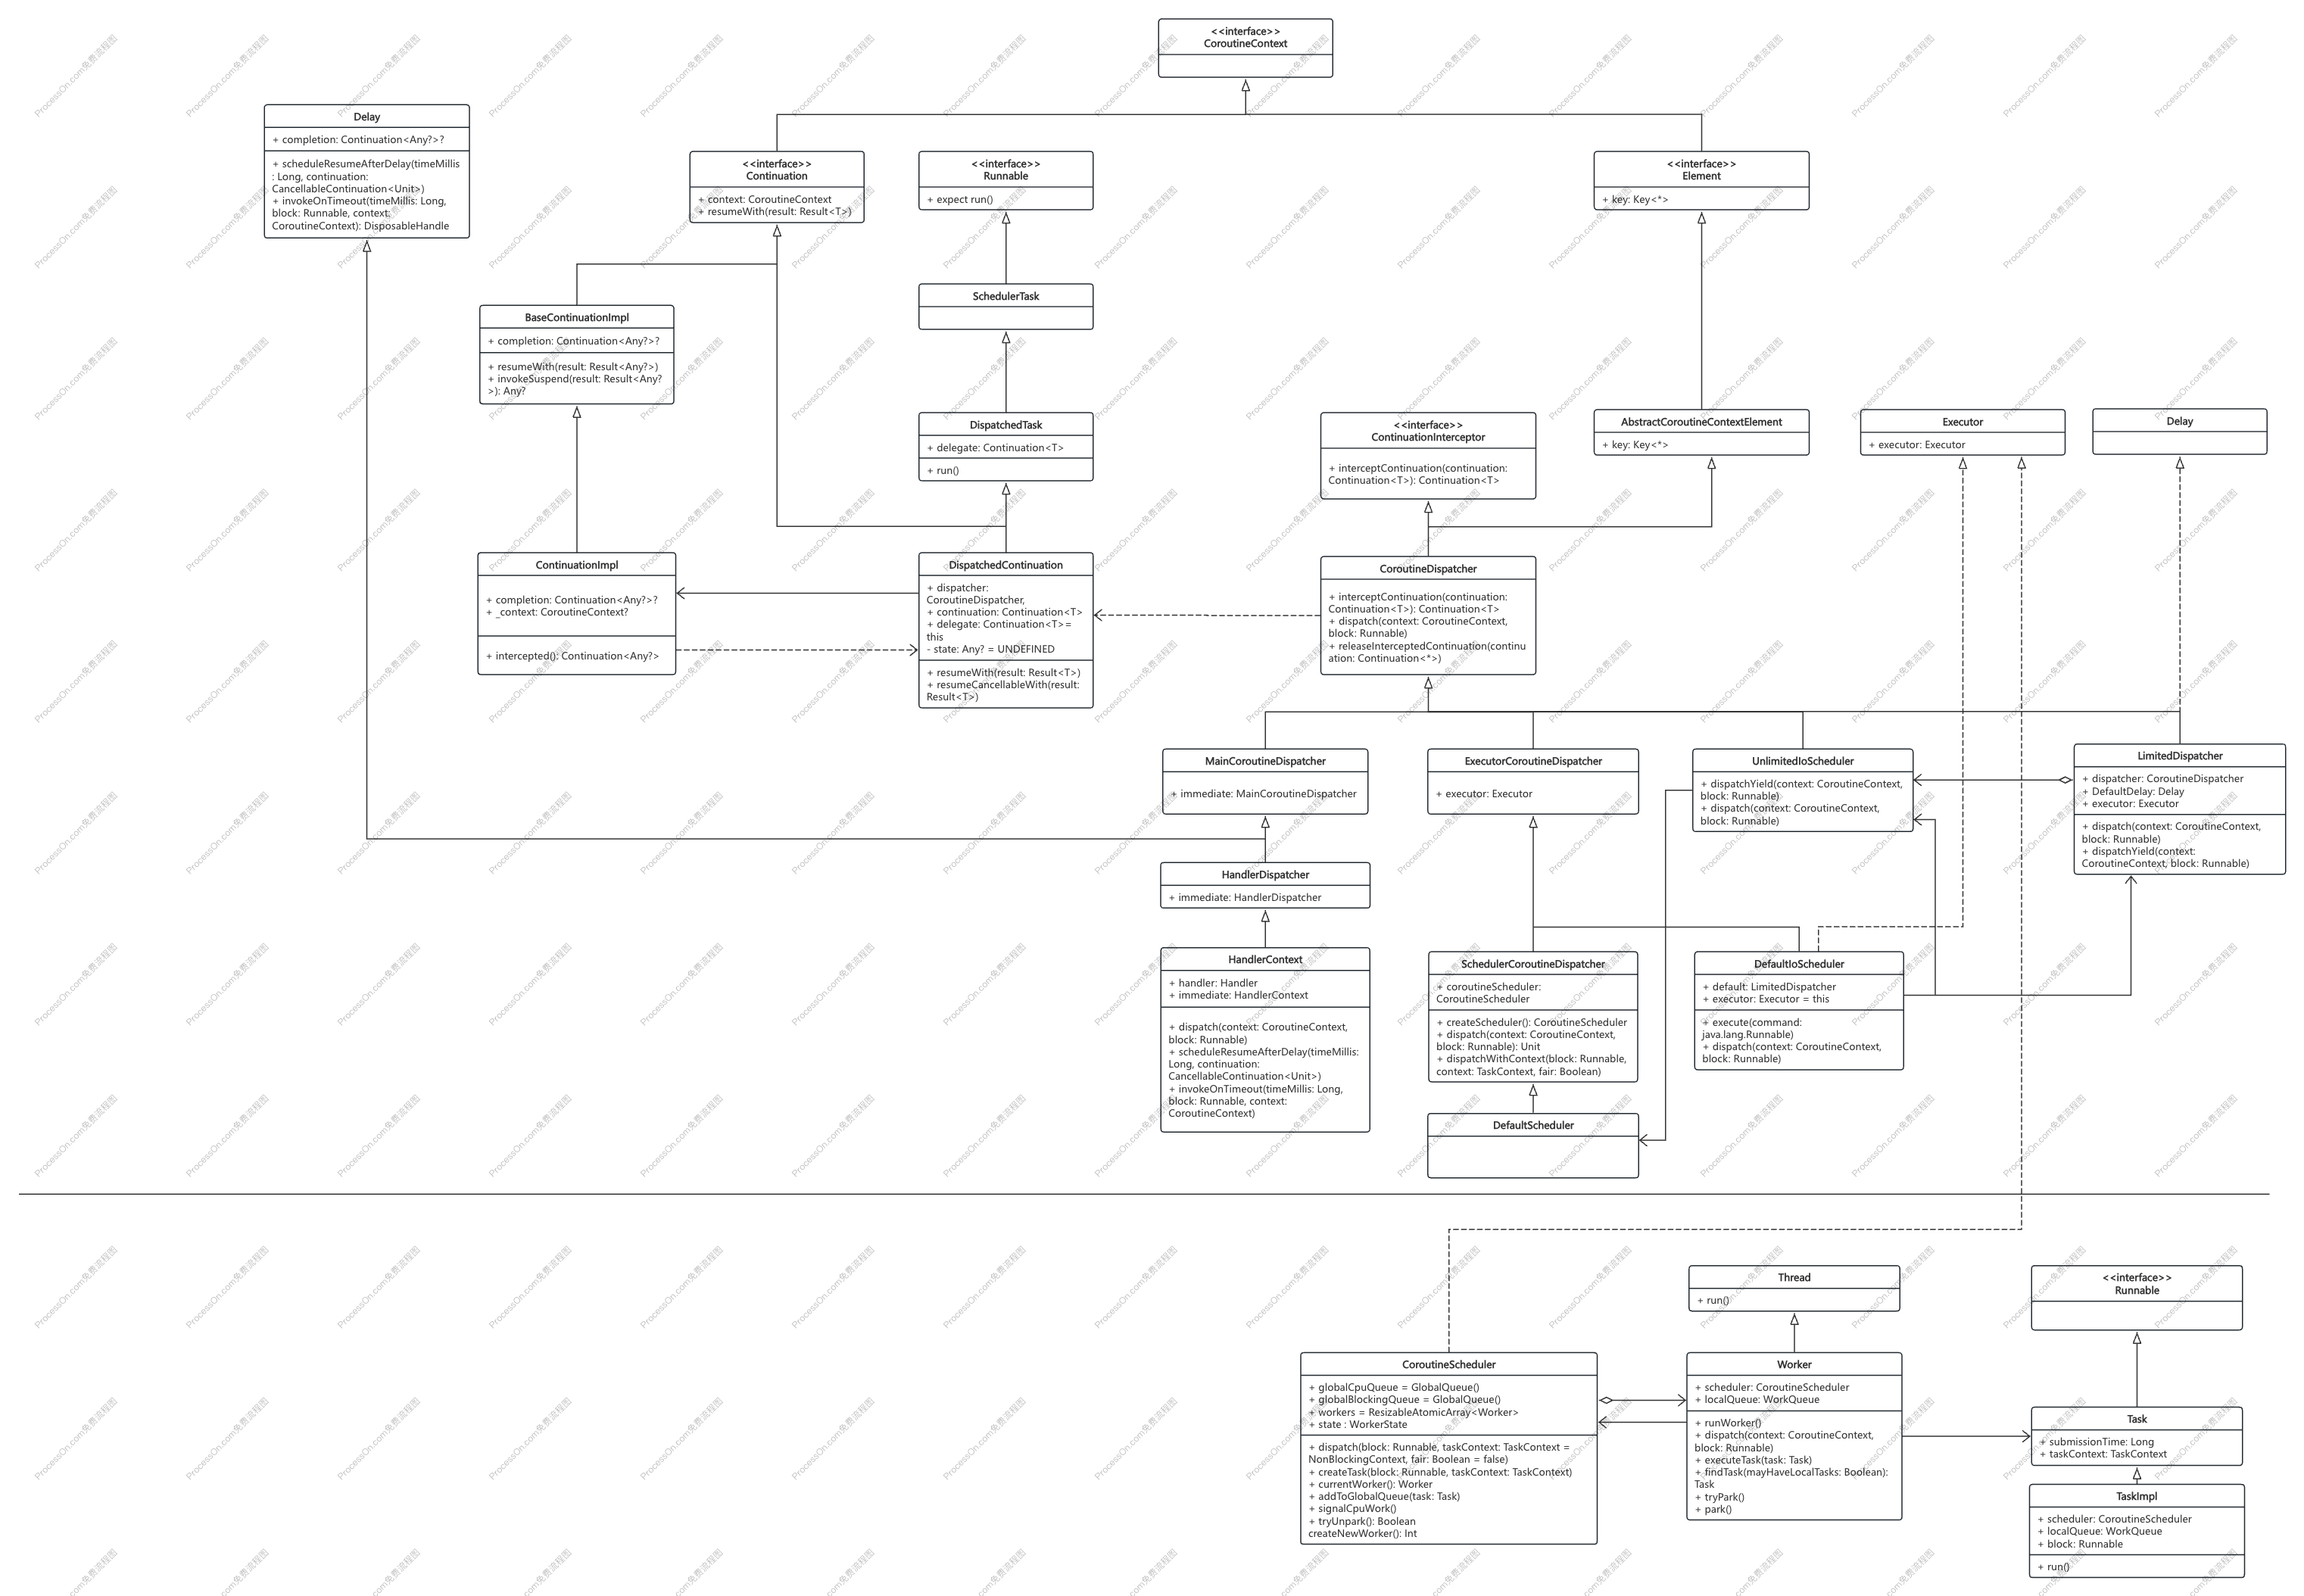
协程UML图
参考
1、协程源码github: https://github.com/Kotlin/kotlinx.coroutines.git
2、kotlin源码 github: GitHub - JetBrains/kotlin: The Kotlin Programming Language.
3、delay方法解析:Kotlin delay方法解析_kotlin none of the following candidates is applica-CSDN博客
相关文章:

Kotlin协程解析
目录 一、协程的使用 二、协程的执行原理 2.1、挂起函数的反编译代码及执行分析 2.2、协程执行流程分析 2.2.1、createCoroutineUnintercepted方法 2.2.2、intercepted方法 2.2.3、resumeCancellableWith方法 2.3、Dispatcher----分发器的实现 2.3.1、Main 分发器的实…...

Nginx核心功能 02
目录 Nginx代理技术核心概念 (一)正向代理(Forward Proxy) 1. 基本定义 2. 技术原理 3. 应用场景 (二)反向代理(Reverse Proxy) 1. 基本定义 2. 技术原理 3. 应用场景 一、…...

聊聊对Mysql的理解
目录 1、Sql介绍 1.1、SQL的分类 1.2、数据库的三大范式 1.3、数据表的约束 1.4、约束的添加与删除 2、核心特性 3、主要组件 4、数据结构原理 5、索引失效 6、常用问题 7、优势与局限 前言 MySQL是一个开源的关系型数据库管理系统(RDBMS),由瑞典MySQL A…...

「Mac畅玩AIGC与多模态17」开发篇13 - 条件判断与分支跳转工作流示例
一、概述 本篇在多节点串联的基础上,进一步引入条件判断与分支跳转机制,实现根据用户输入内容动态走不同执行路径。开发人员将学习如何配置判断节点、定义分支规则,以及如何在工作流中引导执行方向,完成基础的逻辑控制。 二、环境准备 macOS 系统Dify 平台已部署并可访问…...

pycharm terminal 窗口打不开了
参考添加链接描述powershell.exe改为cmd.exe发现有一个小正方形,最大化可以看见了。...

JAVA:使用 MapStruct 实现高效对象映射的技术指南
1、简述 在 Java 开发中,对象之间的转换是一个常见的需求,尤其是在 DTO(数据传输对象)和实体类之间的转换过程中。手动编写转换代码既耗时又容易出错,而 MapStruct 是一个优秀的对象映射框架,可以通过注解生成高效的对象转换代码,从而大大提升开发效率。 本文将介绍 M…...

Linux线程深度解析:从基础到实践
Linux线程深度解析:从基础到实践 一、线程基础概念 1. 进程与线程定义 进程:一个正在运行的程序,是操作系统资源分配的最小单位(拥有独立的地址空间、文件描述符等资源),状态包括就绪、运行、阻塞。线程…...
)
【ROS2】launch启动文件如何集成到ROS2(Python版本)
一、简单实操 1.创建/打开一个功能包 mkdir -p my_ws/src cd my_ws/src ros2 pkg create my_pkg_example --build-type ament_python 2.创建Launch文件的存放目录 将所有启动文件都存储在launch包内的目录中。 目录结构如下所示: src/my_pkg_example/launch/…...

用 PyTorch 轻松实现 MNIST 手写数字识别
用 PyTorch 轻松实现 MNIST 手写数字识别 引言 在深度学习领域,MNIST 数据集就像是 “Hello World” 级别的经典入门项目。它包含大量手写数字图像及对应标签,非常适合新手学习如何搭建和训练神经网络模型。本文将基于 PyTorch 框架,详细拆…...

碰撞检测学习笔记
目录 SUMO 模拟碰撞 LimSim pygame模拟碰撞检测 SUMO 模拟碰撞 LimSim 多模态大语言模型(M)LLM的出现为人工智能开辟了新的途径,特别是提供增强的理解和推理能力,为自动驾驶开辟了新途径。本文介绍LimSim,LimSim的…...

Sway初体验
Sway(缩写自 SirCmpwn’s Wayland compositor[1])是一款专为 Wayland 设计的合成器,旨在与 i3 完全兼容。根据官网所述: Sway 是 Wayland 的合成器,也是 x11 的 i3 窗口管理器的替代品。它可以根据您现有的 i3 配置工作…...

《工业社会的诞生》章节
工业革命的技术前奏 早期工业技术双引擎: 【火药武器】:重塑战争形态与经济地理 新式青铜炮助力殖民扩张,开辟全球贸易网络 高桅帆船(西班牙大帆船)实现洲际航行 战争规模化倒逼中央集权,催生国家-商人…...

消息队列MQ
参考资料:https://cloud.tencent.com/developer/article/2335397 https://www.cnblogs.com/hahaha111122222/p/18457859 消息队列是大型分布式系统不可缺少的中间件,也是高并发系统的基石中间件 消息队列 消息队列 Message Queue 消息队列是利用高效可…...

LangChain4J-XiaozhiAI 项目分析报告
LangChain4J-XiaozhiAI 项目分析报告 GitHub 链接 1. 项目概述 本项目名为 “硅谷小智(医疗版)”,是一个基于 Java 技术栈和 LangChain4J 框架构建的 AI 聊天助手应用。其核心目标是利用大型语言模型(LLM)的能力&am…...

学习spring boot-拦截器Interceptor,过滤器Filter
目录 拦截器Interceptor 过滤器Filter 关于过滤器的前置知识可以参考: 过滤器在springboot项目的应用 一,使用WebfilterServletComponentScan 注解 1 创建过滤器类实现Filter接口 2 在启动类中添加 ServletComponentScan 注解 二,创建…...

【程序+论文】大规模新能源并网下的火电机组深度调峰经济调度
目录 1 主要内容 讲解重点 2 讲解视频及代码 1 主要内容 该视频为《大规模新能源并网下的火电机组深度调峰经济调度》代码讲解内容,该程序有完全对照的论文,以改进IEEE30节点作为研究对象,系统包括5个火电机组和2个新能源机组,…...

【win11 】win11 键盘测试
我的键盘是支持mac和win的,fn tab 就能切换,有可能是用错了模式,导致 我alt a 就会弹出 win11的 wifi 等菜单控制 键盘测试网站 https://keyboard.bmcx.com/ 识别到我按下的是alt...

再识动静态库
动静态库 1 手动制作静态库2 手动调用静态库方式一:(安装到系统)方式二:(和源文件一起)方式三:(使用带路径的库) 3 动态库制作与使用方式一:拷贝到系统方式二…...

前端 uni-app 初步使用指南
在数字化浪潮下,实现应用多端适配成为开发者的刚需。uni-app 凭借 “一次编写,多端运行” 的特性,极大提升了开发效率,成为前端开发的热门选择。如果你是首次接触 uni-app,这篇文章将带你开启 uni-app 的使用之旅&…...

尼卡音乐 1.1.1 | 免费畅听全网音乐,支持无损下载,无广告无需注册登录
尼卡音乐是一款可以免费畅听全网音乐的应用程序,支持免费下载无损高品质音源,并且没有任何广告,无需注册登录。用户可以轻松搜索全网无损音质音源,并可将其他音乐APP的歌单导入,让音乐陪你开心一整天。该应用彻底拒绝臃…...

33.降速提高EMC能力
降速提高EMC能力 1. 电磁兼容问题的错误累积效应2. 降速减少累积效应的机理分析 1. 电磁兼容问题的错误累积效应 2. 降速减少累积效应的机理分析 降速之后,信号的波形更完整,容错空间更大;另外边沿变缓,对外干扰也会减小。...

【赵渝强老师】TiDB的MVCC机制
TiDB是一款开源的国产分布式关系型数据库。TiKV是TiDB的行存引擎,它支持多版本并发控制(Multi-Version Concurrency Control,MVCC)。假设有这样一种场景:某客户端A在写一个Key,另一个客户端B同时在对这个Key进行读操作。如果没有数据的多版本…...
)
数电填空题整理(适用期末考试)
在下列门电路中,OC门能实现“线与”逻辑功能; 三态门能用于总线结构的数 据传输;传输门 能实现模拟信号的双向传输。 并联比较型A/D转换器的转换速度最快, 双积分型A/D转换器的稳定性和抗干扰能力最好 TTL与非门多余的输入端应该…...

node核心学习
目录 1-1node概述 1-2全局对象 1-3Node的模块化细节 1-4Node中的ES模块化 1-5基本内置模块 OS模块: path模块: url模块: util模块: 1-6文件IO I/O:input output fs模块的方法 代码示例: 练习…...

基于 PyQt 的YOLO目标检测可视化界面+ nuitka 打包
在人工智能和计算机视觉领域,YOLO(You Only Look Once)是一种广泛使用的实时目标检测算法。为了直观地展示YOLO算法的检测效果,我们使用Pyqt框架进行检测结果的可视化,同时为了使其能够脱离Python环境,我们…...

234树和红黑树
首先,把目光聚集在234树中 以下是234的三种节点(可以有更多这里使用以下的三个): 右侧是节点转换成红黑树节点的样子。 接下来会用以下序列进行1234树的搭建和红黑树的搭建: 首先是234树 2-3-4树(234树&…...

GenCLS++:通过联合优化SFT和RL,提升生成式大模型的分类效果
摘要:作为机器学习中的一个基础任务,文本分类在许多领域都发挥着至关重要的作用。随着大型语言模型(LLMs)的快速扩展,特别是通过强化学习(RL)的推动,对于更强大的分类器的需求也在不…...

maven坐标导入jar包时剔除不需要的内容
maven坐标导入jar包时剔除不需要的内容 问题描述解决方案 问题描述 maven坐标导入jar包时剔除不需要的内容 解决方案 Spring Boot 默认使用 Logback,需在 pom.xml 中排除其依赖: <dependency><groupId>org.springframework.boot</gro…...

Oracle OCP认证考试考点详解083系列06
题记: 本系列主要讲解Oracle OCP认证考试考点(题目),适用于19C/21C,跟着学OCP考试必过。 26. 第26题: 题目 解析及答案: 关于块介质恢复,以下哪三项是正确的? A) 需恢复一个或多个…...

llfc项目分布式服务笔记
一、系统整体架构流程图(简明版) 复制代码 +---------------+ +------------------+ +----------------+ | 客户端 (Client) |--------->| GateServer |----------| StatusServer |<--+ +---------------+ +--------------…...

“链式前向星”等三种存图方式分别输出“无向无权图”的“DFS序列”
【DFS序列】 DFS序列(深度优先搜索序列),是树或图结构在深度优先遍历过程中生成的节点访问顺序记录。 下面三段代码,分别采用链式前向星、邻接表、邻接矩阵存图,输出图的“DFS序列”。 【DFS:链式前向星】…...

Lesson 16 A polite request
Lesson 16 A polite request 词汇 park n. 公园,停车场,庄园 v. 停车,泊车 例句:让我来停车。 Let me park. 相关:spot n. 车位 区别:garden n. 花园 [小,私家的] 例句:我们…...

【IP101】边缘检测技术全解析:从Sobel到Canny的进阶之路
🌟 边缘检测的艺术 🎨 在图像处理的世界里,边缘检测就像是给图像画眉毛 —— 没有它,你的图像就像一只没有轮廓的熊猫🐼。让我们一起来探索这个神奇的"美妆"技术! 📚 目录 基础概念 …...
)
Nx 智能分发机制(Nx Agents + Nx Cloud)
Nx 智能分发机制(Nx Agents Nx Cloud) 阶段关键做的事作用1. 收集信息- Project Graph:解析整个 workspace 依赖关系(谁依赖谁)- 历史统计:每次 CI 结束后将每个任务的实际用时与缓存命中情况上传…...

《“昊龙一号”:开启中国航天货运新时代》
中国航天新力量:昊龙一号登场 在 2024 年 10 月 29 日上午,神舟十九号载人飞行任务新闻发布会如一颗重磅炸弹,在航天领域激起千层浪。发布会上,一系列关乎中国载人航天工程未来走向的重要信息被披露,其中,“昊龙一号” 货运航天飞机入围空间站低成本货物运输系统总体方案…...

C++ 多态:原理、实现与应用
目录 引言 一、多态的概念 二、多态的定义及实现 (一)构成条件 (二)虚函数的深入理解 (三)虚函数的重写(覆盖) 三、抽象类 (一)概念 (二&…...
)
多模态大语言模型arxiv论文略读(五十八)
How Does the Textual Information Affect the Retrieval of Multimodal In-Context Learning? ➡️ 论文标题:How Does the Textual Information Affect the Retrieval of Multimodal In-Context Learning? ➡️ 论文作者:Yang Luo, Zangwei Zheng, …...

TS 枚举类型
枚举 参数为枚举成员中的一个 数字枚举 字符串枚举 枚举特点 、 缺点:转为JS代码时会编译成JS代码,增大开销...

Python容器与循环:数据处理的双剑合璧
Python作为一门简洁强大的编程语言,其容器类型和循环结构的完美结合为数据处理提供了极大的便利。本文将带领初学者深入理解Python中的四大容器(列表、元组、字典、集合)以及它们与循环结构的配合使用,助你掌握数据处理的核心技能…...

ST-LINKV2仿真器下载
ST-LINKV2仿真器 — 正点原子资料下载中心 1.0.0 文档...

RAGFlow 接入企业微信应用实现原理剖析与最佳实践
背景 近期有医美行业客户咨询我们智能客服产品,期望将自己企业的产品、服务以及报价信息以企微应用的方式给到客户进行体验互动,提升企业运营效率。关于企业微信对接,我们分享下最佳实践,抛砖引玉。效果图如下: 这里也…...

大模型实践:图文解锁Ollama在个人笔记本上部署llm
使用在线模型服务时,我们常常需要支付API调用费用,这对于个人开发者或小型组织来说可能是一笔不小的开支。那么,有没有方法可以在本地免费使用这些强大的模型呢?答案是肯定的——Ollama就是这样一个工具。 当然如果是比较大的组织…...
)
如何提高情商?(优化版)
引言 提高情商(EQ)是一个需要长期练习和自我反思的过程,核心在于理解自己、管理情绪、共情他人并有效沟通。以下是一些具体且可操作的方法,结合理论和实际场景,帮助你逐步提升: 一、核心方法:…...

学习黑客Linux权限
在 Linux 的王国里,“权限”就是装备与技能加成:决定谁能拔剑(读 r)、挥剑(写 w)、进入房间(执行 x)。本文用“闯关升级”视角,把常见 rwx、八进制数字、SUID/SGID/Stick…...
)
信息系统监理师第二版教材模拟题第二组(含解析)
信息系统监理师模拟题第二组(30题) 监理理论与法规 根据《信息系统工程监理暂行规定》,监理单位应当独立于( ) A. 建设单位和承建单位 B. 政府监管部门 C. 行业组织 D. 最终用户答案:A 解析:监理单位应当保持独立性,不得与建设单位和承建单位有隶属关系或其他利害关系…...

C与指针——输入输出
错误定位 当一个库函数出错时,errno会被重置 perror(const char* s);\\输出s: errno 对应的错误信息 \\如果单独想要错误信息可以 char* e strerror(errno);\\系统错误码转换为对应的错误信息字符串输出缓冲区 一般输出缓冲区满的时候才刷新,也就是…...
级别如何防止幻读)
RR(Repeatable Read)级别如何防止幻读
在 MySQL 数据库事务隔离级别中,RR(可重复读) 通过 MVCC(多版本并发控制) 和 锁机制 的组合策略来避免幻读问题。 一、MVCC机制:快照读与版本控制 快照读(Snapshot Read) 每个事务启…...
)
Python之学习笔记(六)
文章目录 1. 字典(Dictionary)2. 集合(Set)3. 字典 vs 集合4. 应用场景5. 注意事项 Python中的字典( dict)和集合( set)是两种高效且常用的数据结构,适用于不同的场景。…...

Easy云盘总结篇-文件上传02
说在前面:此项目是跟着B站一位大佬写的,不分享源码,支持项目付费 文件预览 主要分视频和其他文件预览,但实现逻辑相同,只是请求路径有区别。 这段逻辑: 拿视频预览举例: 视频开始时ÿ…...

window-docker的容器使用宿主机音频设备
文章目录 前言操作配置 前言 你有没有遇到过这种情况? 你兴冲冲地在Windows上用Docker搭了个语音识别项目,准备让容器高歌一曲,或者至少"Hey Docker"一下。结果——静音。 Docker Desktop一脸无辜:“亲,默…...