AimRT从入门到精通 - 03Channel发布者和订阅者
刚接触AimRT的小伙伴可能会疑惑,这个Channel和RPC(后面讲的)到底是什么呢?
但是当我们接触了之后,就会发现,其本质类似ROS的Topic通信!(其本质基于发布订阅模型)
接下来这里我们回顾一下ROS的Topic;
一、ROS中的Topic通信
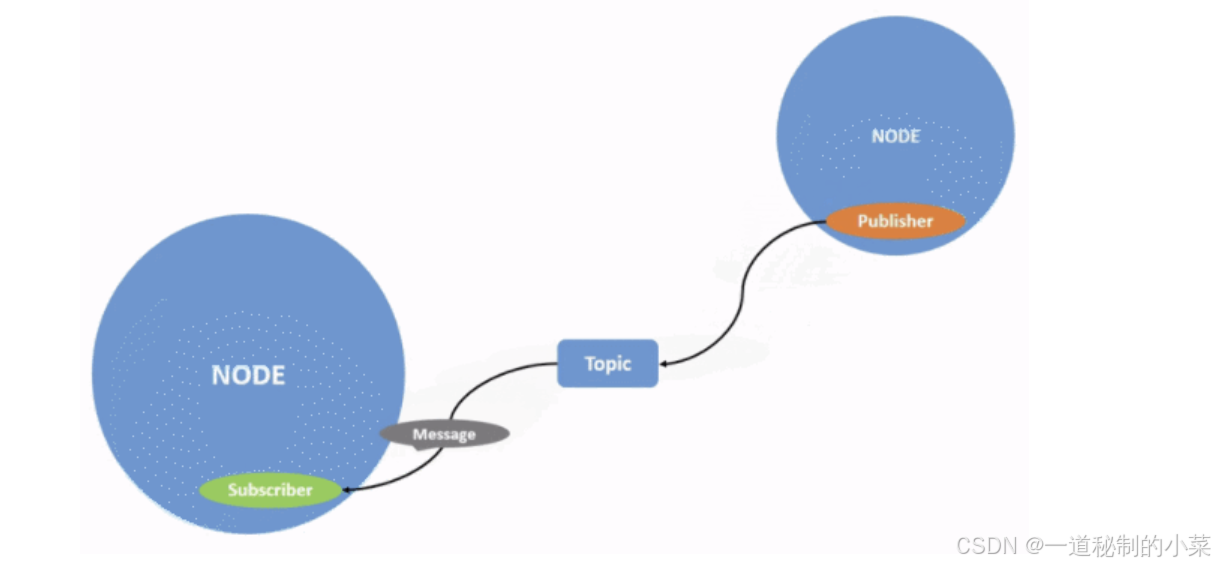
话题通信是一种以发布订阅的方式实现不同节点之间数据传输的通信模型。数据发布对象称为发布方,数据订阅对象称之为订阅方,发布方和订阅方通过话题相关联,发布方将消息发布在话题上,订阅方则从该话题订阅消息,消息的流向是单向的。
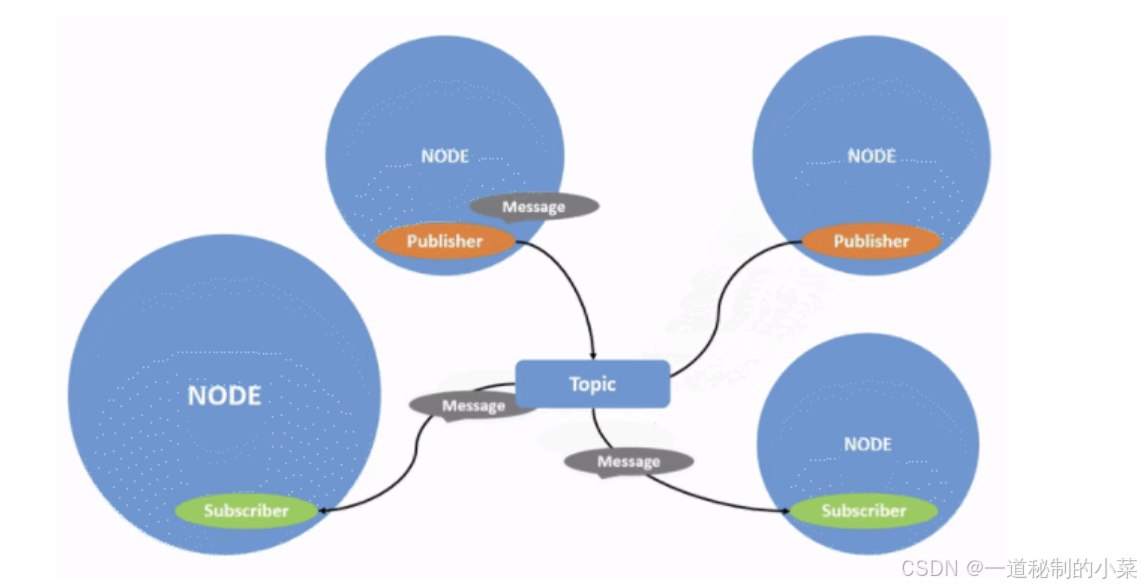
话题通信的发布方与订阅方是一种多对多的关系,也即,同一话题下可以存在多个发布方,也可以存在多个订阅方,这意味着数据会出现交叉传输的情况,当然如果没有订阅方,数据传输也会出现丢失的情况。
ROS中的话题通信用的地方非常多,对一些传统的传感器,例如雷达、相机、GPS等信息的采集,在ROS中通常可以通过节点发布采集到的数据;
二、Channel通信
目前AimRT也开发了一套基于发布-订阅的消息传递机制,其功能和ROS中的Topic等价,有关具体的AimRT的channel大家可以参考下面的链接:
AimRT 中的基本概念 — AimRT v0.10.0 documentation
在 AimRT 中,Channel 由接口层和后端两部分组成,两者相互解耦。
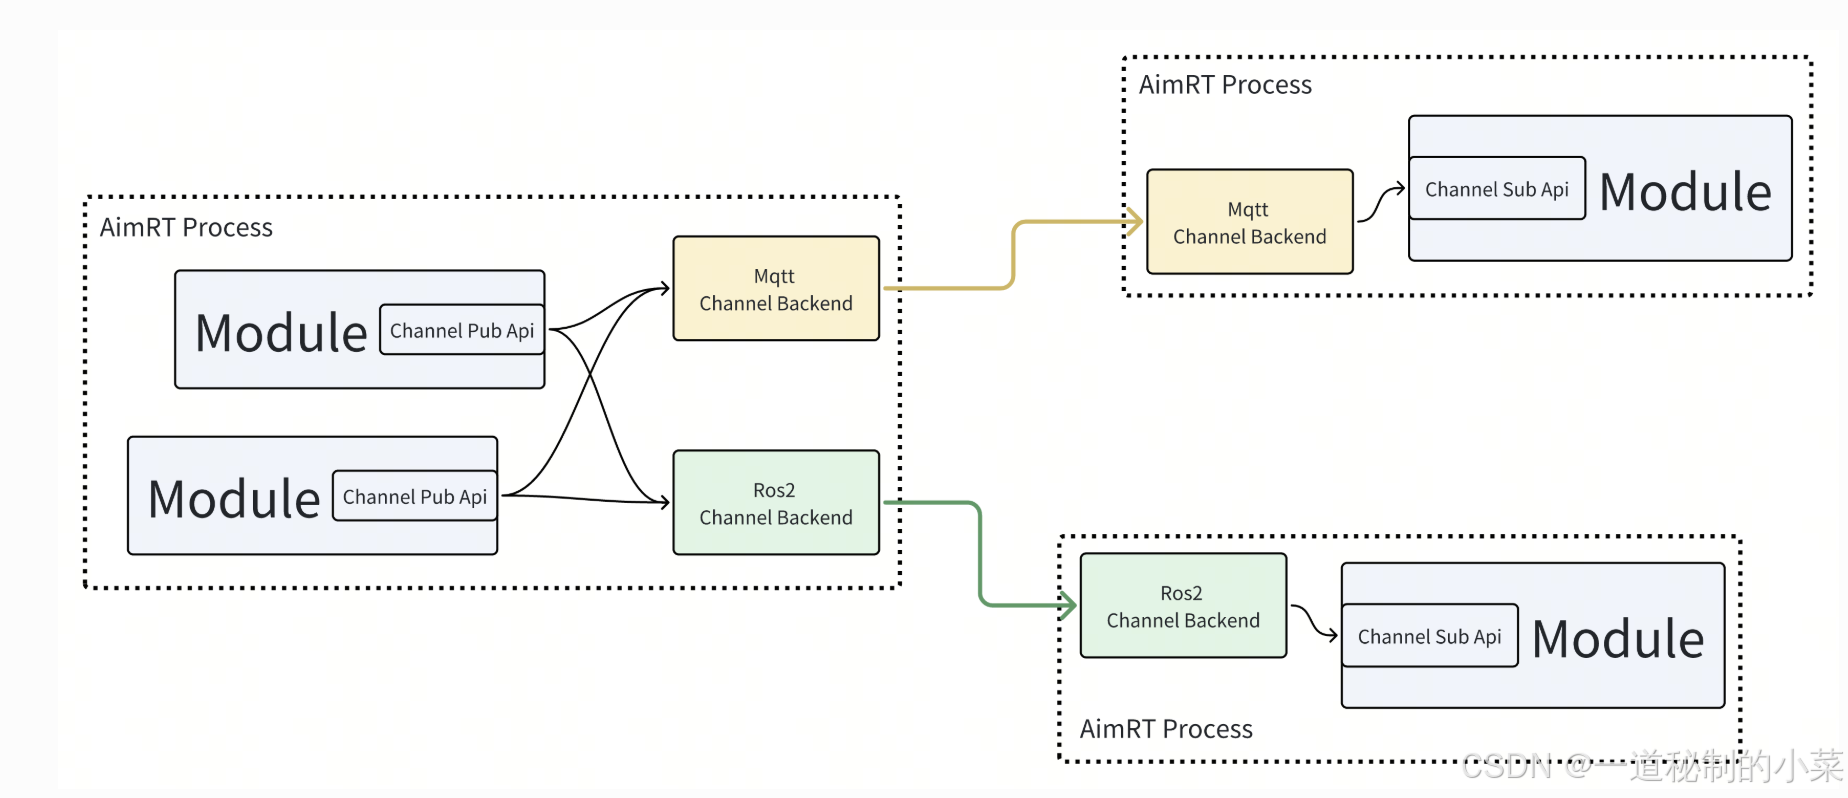
接口层:我认为这里大家可以类比网络的应用层和网络层等,这里的接口层主要是进行:用户书写代码,确定Channel的名字,确定发布者和接收者的Protocol;
后端:这里是实际上Channel的传输,在我们写的程序当中,我们可以通过配置文件设置后端使用得到协议;AimRT 官方提供了一些 Channel 后端,例如 mqtt、ros2 等,使用者也可以自行开发新的 Channel 后端。
protocol
Protocol表示的是两个module之间通信的接口层的协议,目前支持以下两种:
- Protobuf
- ROS2 msg/srv
除此之外,AimRT 的 Channel 通讯方式(后端)支持底层多种协议实现(http、mqtt、tcp、ROS2等),因此在 Channel 通讯时, AimRT 可以无缝兼容 ROS2;
接下来我们分别以基于Protobuf和基于ROS2 msg/srv两种消息接口的形式进行发布者和订阅者的相关操作;
三、基于Protobuf消息的发布者与订阅者
编写.proto文件
关于Protobuf的相关基本语法,大家可以参考我之前发的博客;
Protubuf入门 --- 01基本语法与编译使用-CSDN博客
下面给出一个简单的示例消息:
syntax = "proto3";package aimrt.protocols.example;message ExampleEventMsg {string msg = 1;int32 num = 2;
}
然后我们可以将其编译为对应的.cc文件和.h文件:
protoc --cpp_out=. event.proto此时会生成对应的event.pb.h头文件;
接下来我们编写发布者module模块代码;
.proto文件的编译(话题通信的框架下)
对于正常情况下.proto文件的编译,大家可以参考我的之前写的博客;
这里AimRT对于protobuf的编译提供了下面的编译指令,即我们可以在CMakeLists.txt进行相关文件的配置:
add_protobuf_gencode_target_for_proto_path:为某个路径下的.proto文件生成 C++ 代码,参数如下:
-
TARGET_NAME:生成的 CMake Target 名称;
-
PROTO_PATH:协议存放目录;
-
GENCODE_PATH:生成的桩代码存放路径;
-
DEP_PROTO_TARGETS:依赖的 Proto CMake Target;
-
OPTIONS:传递给 protoc 的其他参数;
例如下面的例子:
add_protobuf_gencode_target_for_proto_path(TARGET_NAME example_pb_gencodePROTO_PATH ${CMAKE_CURRENT_SOURCE_DIR}GENCODE_PATH ${CMAKE_CURRENT_BINARY_DIR})然后当我们调用这个编译的.proto生成的.h的文件的时候,此时还需要在CMakeLists.txt里面添加以下指令:
target_link_libraries(my_lib PUBLIC example_pb_gencode)此时即可正常使用!
publisher_module.h
#pragma once#include <atomic>
#include <future>#include "aimrt_module_cpp_interface/module_base.h"namespace aimrt::examples::cpp::pb_chn::normal_publisher_module {class NormalPublisherModule : public aimrt::ModuleBase {public:NormalPublisherModule() = default;~NormalPublisherModule() override = default;ModuleInfo Info() const override {return ModuleInfo{.name = "NormalPublisherModule"};}bool Initialize(aimrt::CoreRef core) override;bool Start() override;void Shutdown() override;private:auto GetLogger() { return core_.GetLogger(); }void MainLoop();private:aimrt::CoreRef core_;aimrt::executor::ExecutorRef executor_;std::atomic_bool run_flag_ = false;std::promise<void> stop_sig_;std::string topic_name_ = "test_topic";double channel_frq_ = 0.5;aimrt::channel::PublisherRef publisher_;
};}
接下来我们依次对上面的代码模块进行分析:
- 主要的模块(初始化、开始和结束)与我们之前进行的模块一样;
- 除此之外,还有一个executor,这里是用于发送者将任务投递到执行器,然后执行器可以发送对应的任务;
- run_flag:用来标识模块是否在运行;
- stop_sig_n:当发送任务循环结束时,此时会给发送对应的信号给关闭模块,shutdown收到后此时就对模块进行关闭;
- 除此之外,这里还定义了话题名、发布者和发布的频率;
publisher_module.cc
#include "normal_publisher_module/normal_publisher_module.h"
#include "aimrt_module_protobuf_interface/channel/protobuf_channel.h"
#include "aimrt_module_protobuf_interface/util/protobuf_tools.h"#include "yaml-cpp/yaml.h"#include "event.pb.h"namespace aimrt::examples::cpp::pb_chn::normal_publisher_module {bool NormalPublisherModule::Initialize(aimrt::CoreRef core) {core_ = core;try {// Read cfgauto file_path = core_.GetConfigurator().GetConfigFilePath();if (!file_path.empty()) {YAML::Node cfg_node = YAML::LoadFile(std::string(file_path));topic_name_ = cfg_node["topic_name"].as<std::string>();channel_frq_ = cfg_node["channel_frq"].as<double>();}// Get executor handleexecutor_ = core_.GetExecutorManager().GetExecutor("work_thread_pool");AIMRT_CHECK_ERROR_THROW(executor_ && executor_.SupportTimerSchedule(),"Get executor 'work_thread_pool' failed.");// Register publish typepublisher_ = core_.GetChannelHandle().GetPublisher(topic_name_);AIMRT_CHECK_ERROR_THROW(publisher_, "Get publisher for topic '{}' failed.", topic_name_);bool ret = aimrt::channel::RegisterPublishType<aimrt::protocols::example::ExampleEventMsg>(publisher_);AIMRT_CHECK_ERROR_THROW(ret, "Register publish type failed.");} catch (const std::exception& e) {AIMRT_ERROR("Init failed, {}", e.what());return false;}AIMRT_INFO("Init succeeded.");return true;
}bool NormalPublisherModule::Start() {try {run_flag_ = true;executor_.Execute(std::bind(&NormalPublisherModule::MainLoop, this));} catch (const std::exception& e) {AIMRT_ERROR("Start failed, {}", e.what());return false;}AIMRT_INFO("Start succeeded.");return true;
}void NormalPublisherModule::Shutdown() {try {if (run_flag_) {run_flag_ = false;stop_sig_.get_future().wait();}} catch (const std::exception& e) {AIMRT_ERROR("Shutdown failed, {}", e.what());return;}AIMRT_INFO("Shutdown succeeded.");
}// Main loop
void NormalPublisherModule::MainLoop() {try {AIMRT_INFO("Start MainLoop.");aimrt::channel::PublisherProxy<aimrt::protocols::example::ExampleEventMsg> publisher_proxy(publisher_);uint32_t count = 0;while (run_flag_) {std::this_thread::sleep_for(std::chrono::milliseconds(static_cast<uint32_t>(1000 / channel_frq_)));count++;AIMRT_INFO("Loop count : {} -------------------------", count);// publish eventaimrt::protocols::example::ExampleEventMsg msg;msg.set_msg("count: " + std::to_string(count));msg.set_num(count);AIMRT_INFO("Publish new pb event, data: {}", aimrt::Pb2CompactJson(msg));publisher_proxy.Publish(msg);}AIMRT_INFO("Exit MainLoop.");} catch (const std::exception& e) {AIMRT_ERROR("Exit MainLoop with exception, {}", e.what());}stop_sig_.set_value();
}}
接下来我们对上面的模块进行挨个分析:
#include "normal_publisher_module/normal_publisher_module.h"
#include "aimrt_module_protobuf_interface/channel/protobuf_channel.h"
#include "aimrt_module_protobuf_interface/util/protobuf_tools.h"#include "yaml-cpp/yaml.h"#include "event.pb.h"
当我们使用protobuf作为channel的接口层的通信协议时,此时就需要包含:
#include "aimrt_module_protobuf_interface/channel/protobuf_channel.h"而当我们需要将二进制的protobuf文件转化为其他可读类型的数据时,此时就需要包含下面这个头文件:
#include "aimrt_module_protobuf_interface/util/protobuf_tools.h"当我们调用我们编写.proto文件的C++代码,这里调用:
#include "event.pb.h"接下来我们再看初始化模块:
bool NormalPublisherModule::Initialize(aimrt::CoreRef core) {core_ = core;try {// Read cfgauto file_path = core_.GetConfigurator().GetConfigFilePath();if (!file_path.empty()) {YAML::Node cfg_node = YAML::LoadFile(std::string(file_path));topic_name_ = cfg_node["topic_name"].as<std::string>();channel_frq_ = cfg_node["channel_frq"].as<double>();}// Get executor handleexecutor_ = core_.GetExecutorManager().GetExecutor("work_thread_pool");AIMRT_CHECK_ERROR_THROW(executor_ && executor_.SupportTimerSchedule(),"Get executor 'work_thread_pool' failed.");// Register publish typepublisher_ = core_.GetChannelHandle().GetPublisher(topic_name_);AIMRT_CHECK_ERROR_THROW(publisher_, "Get publisher for topic '{}' failed.", topic_name_);bool ret = aimrt::channel::RegisterPublishType<aimrt::protocols::example::ExampleEventMsg>(publisher_);AIMRT_CHECK_ERROR_THROW(ret, "Register publish type failed.");} catch (const std::exception& e) {AIMRT_ERROR("Init failed, {}", e.what());return false;}这里分别读取配置文件,然后获取到执行器句柄;接下来还有注册发布者模块;
接下来我们重点讲解一下发布者注册模块:详细可以参考下面的链接:
Channel — AimRT v0.10.0 documentation
namespace aimrt::channel {class ChannelHandleRef {public:PublisherRef GetPublisher(std::string_view topic) const;SubscriberRef GetSubscriber(std::string_view topic) const;void MergeSubscribeContextToPublishContext(const ContextRef subscribe_ctx_ref, ContextRef publish_ctx_ref) const;
};} // namespace aimrt::channel- 这里我们还是通过核心句柄获取到Channel管理模块的句柄,然后通过管理模块句柄可以创建对应的发布者或订阅者;
- 通过AimRT的官方文档,这里我们可以知道:获取发布者/订阅者可以发生在初始化/开始阶段,上面我们实现的是在初始化阶段;
接下来是开始模块:
bool NormalPublisherModule::Start() {try {run_flag_ = true;executor_.Execute(std::bind(&NormalPublisherModule::MainLoop, this));} catch (const std::exception& e) {AIMRT_ERROR("Start failed, {}", e.what());return false;}AIMRT_INFO("Start succeeded.");return true;
}
问题:这里我们执行器中的MainLoop函数不与this指针进行绑定可以吗?
不可以!对于非静态的成员函数,必须通过实例化的对象来进行调用!所以这里必须对MainLoop进行绑定!
接下来我们我们看Start代码的整体结构:
- 这里的MainLoop函数里面存放了关于发布消息的任务,然后将任务放到执行器中,让执行器执行;
- run_flag表示模块的运行状态;
接下来我们跳过shutdown模块,先看MainLoop模块:
void NormalPublisherModule::MainLoop() {try {AIMRT_INFO("Start MainLoop.");aimrt::channel::PublisherProxy<aimrt::protocols::example::ExampleEventMsg> publisher_proxy(publisher_);uint32_t count = 0;while (run_flag_) {std::this_thread::sleep_for(std::chrono::milliseconds(static_cast<uint32_t>(1000 / channel_frq_)));count++;AIMRT_INFO("Loop count : {} -------------------------", count);// publish eventaimrt::protocols::example::ExampleEventMsg msg;msg.set_msg("count: " + std::to_string(count));msg.set_num(count);AIMRT_INFO("Publish new pb event, data: {}", aimrt::Pb2CompactJson(msg));publisher_proxy.Publish(msg);}AIMRT_INFO("Exit MainLoop.");} catch (const std::exception& e) {AIMRT_ERROR("Exit MainLoop with exception, {}", e.what());}问题:当我们获取到发布者句柄,那么此时我们该如何发布消息呢?
在AimRT中,为了发布消息,提供了两种风格的接口来进行发布:
-
函数风格接口:
namespace aimrt::channel {template <typename MsgType>
bool RegisterPublishType(PublisherRef publisher);template <typename MsgType>
void Publish(PublisherRef publisher, aimrt::channel::ContextRef ctx_ref, const MsgType& msg);template <typename MsgType>
void Publish(PublisherRef publisher, const MsgType& msg);}
这里需要注意的是:函数模板实例化的时候传入的是消息的类型;
- Proxy类风格接口:
namespace aimrt::channel {template <typename MsgType>
class PublisherProxy {public:explicit PublisherProxy(PublisherRef publisher);// Contextstd::shared_ptr<Context> NewContextSharedPtr(ContextRef ctx_ref = ContextRef()) const;void SetDefaultContextSharedPtr(const std::shared_ptr<Context>& ctx_ptr);std::shared_ptr<Context> GetDefaultContextSharedPtr() const;// Register typestatic bool RegisterPublishType(PublisherRef publisher);bool RegisterPublishType() const;// Publishvoid Publish(ContextRef ctx_ref, const MsgType& msg) const;void Publish(const MsgType& msg) const;
};}
两种接口方法都提供了注册Publish的方法和发送消息的方法,这里需要注意的是:
对于 RegisterPublishType 这种方法:
- 只能在Initialize阶段注册;
- 不允许在一个PublisherRef中重复注册同一种类型;
- 如果注册失败,会返回 false;
对于 Publish 这种方法:
- 只能在Start阶段之后发布数据;
- 有两种Publish接口,其中一种多一个 Context 参数,用于向后端、下游传递一些额外信息;
- 在调用Publish接口时,开发者应保证传入的 Context 和 Msg 在Publish接口返回之前都不会发生变化,否则行为是未定义的;
因此此时我们再看上面的MainLoop函数就能看懂了:
这里发布信息采用的是Proxy类风格的接口,先初始化了一个类对象;
aimrt::channel::PublisherProxy<aimrt::protocols::example::ExampleEventMsg> publisher_proxy(publisher_);接下来设置发布消息的频率:
std::this_thread::sleep_for(std::chrono::milliseconds(static_cast<uint32_t>(1000 / channel_frq_)));接下来根据我们在event.proto设置的文件,设置对应的值:
aimrt::protocols::example::ExampleEventMsg msg;msg.set_msg("count: " + std::to_string(count));msg.set_num(count);接下来由于proto发布的消息是二进制,我们无法读懂,这里我们给其转化为json可视化,然后将对应的msg发送出去即可;
AIMRT_INFO("Publish new pb event, data: {}", aimrt::Pb2CompactJson(msg));publisher_proxy.Publish(msg);接下来当MainLoop循环结束后,此时我们发送对应的信号:
stop_sig_.set_value();接下来我们看shutdown模块:
void NormalPublisherModule::Shutdown() {try {if (run_flag_) {run_flag_ = false;stop_sig_.get_future().wait();}} catch (const std::exception& e) {AIMRT_ERROR("Shutdown failed, {}", e.what());return;}AIMRT_INFO("Shutdown succeeded.");
}
当信号发送后,此时shutdown会收到对应的信号,然后成功关闭!
接下来我们看subscriber相关的module代码:
subscriber_module.h
订阅者的相关代码结构与发布者相比更简单一点,下面是对应示例的头文件代码:
#pragma once#include "aimrt_module_cpp_interface/module_base.h"#include "event.pb.h"namespace aimrt::examples::cpp::pb_chn::normal_subscriber_module {class NormalSubscriberModule : public aimrt::ModuleBase {public:NormalSubscriberModule() = default;~NormalSubscriberModule() override = default;ModuleInfo Info() const override {return ModuleInfo{.name = "NormalSubscriberModule"};}bool Initialize(aimrt::CoreRef core) override;bool Start() override;void Shutdown() override;private:auto GetLogger() { return core_.GetLogger(); }void EventHandle(aimrt::channel::ContextRef ctx,const std::shared_ptr<const aimrt::protocols::example::ExampleEventMsg>& data);private:aimrt::CoreRef core_;std::string topic_name_ = "test_topic";aimrt::channel::SubscriberRef subscriber_;
};}这里相比于其他的模块,框架大致都一样,但是有几个是是订阅者特有的:
-
void EventHandle:这个函数作为回调函数,用于处理订阅后的信息;
-
分别定义订阅者相关的成员变量;
subscriber_module.cc
接下来我们分析整个订阅者实现的框架:
#include "normal_subscriber_module/normal_subscriber_module.h"
#include "aimrt_module_protobuf_interface/channel/protobuf_channel.h"
#include "aimrt_module_protobuf_interface/util/protobuf_tools.h"#include "yaml-cpp/yaml.h"namespace aimrt::examples::cpp::pb_chn::normal_subscriber_module {bool NormalSubscriberModule::Initialize(aimrt::CoreRef core) {core_ = core;try {// Read cfgauto file_path = core_.GetConfigurator().GetConfigFilePath();if (!file_path.empty()) {YAML::Node cfg_node = YAML::LoadFile(std::string(file_path));topic_name_ = cfg_node["topic_name"].as<std::string>();}// Subscribesubscriber_ = core_.GetChannelHandle().GetSubscriber(topic_name_);AIMRT_CHECK_ERROR_THROW(subscriber_, "Get subscriber for topic '{}' failed.", topic_name_);bool ret = aimrt::channel::Subscribe<aimrt::protocols::example::ExampleEventMsg>(subscriber_,std::bind(&NormalSubscriberModule::EventHandle, this, std::placeholders::_1, std::placeholders::_2));AIMRT_CHECK_ERROR_THROW(ret, "Subscribe failed.");} catch (const std::exception& e) {AIMRT_ERROR("Init failed, {}", e.what());return false;}AIMRT_INFO("Init succeeded.");return true;
}bool NormalSubscriberModule::Start() { return true; }void NormalSubscriberModule::Shutdown() {}void NormalSubscriberModule::EventHandle(aimrt::channel::ContextRef ctx,const std::shared_ptr<const aimrt::protocols::example::ExampleEventMsg>& data) {AIMRT_INFO("Receive new pb event, ctx: {}, data: {}", ctx.ToString(), aimrt::Pb2CompactJson(*data));
}}
要看懂上面的代码,这里我们要引入一个新的模块:context;
Context
- 当我们在使用Publish的时候,可以通过Context向后端传入一些特定的消息(对于发布者);
- 当我们使用Subscribe的时候,可以通过ContextRef后端传入一些特定的消息(对于订阅者);
namespace aimrt::channel {class Context {public:bool CheckUsed() const;void SetUsed();void Reset();aimrt_channel_context_type_t GetType() const;std::string_view GetMetaValue(std::string_view key) const;void SetMetaValue(std::string_view key, std::string_view val);std::vector<std::string_view> GetMetaKeys() const;std::string ToString() const;
};class ContextRef {public:ContextRef(const Context& ctx);ContextRef(const Context* ctx_ptr);ContextRef(const std::shared_ptr<Context>& ctx_ptr);explicit ContextRef(const aimrt_channel_context_base_t* base_ptr);bool CheckUsed() const;void SetUsed();void Reset();aimrt_channel_context_type_t GetType() const;std::string_view GetMetaValue(std::string_view key) const;void SetMetaValue(std::string_view key, std::string_view val);std::vector<std::string_view> GetMetaKeys() const;std::string ToString() const;
};}
上面是AimRT提供的关于一些Context和ContextRef提供的一些相关的接口,这里我们需要注意以下几点:
- Channel ctx 分为 Publish 端和 Subscribe 端两种类型,在构造时确定,无法修改,分别用于 Publish 和 Subscribe 场景;
- 可以使用SetMetaValue、GetMetaValue方法来设置、获取 ctx 中的 Key-Val 值,使用GetMetaKeys来获取当前所有的 Key 值;
在 Publish 端,Context主要是用于在调用Publish方法时传入一些特殊的信息给 AimRT 框架和 Channel 后端,其使用时需要注意以下几点:
- 开发者可以直接构造一个Context类型实例,并自行负责其生命周期;
- 只能给Publish方法传入 Publish 类型的 ctx;
- 每个 Context 只能用于一次 Publish 过程,在传递给Publish方法后,状态即会被置为Used,如果未经Reset就用于下一次 Publish,消息将不会被正确发布;
在 Subscribe 端,开发者可以选择在回调处理函数中接收ContextRef类型的参数,其使用时需要注意以下几点:
- 传递给回调处理函数的 ctx 生命周期由 AimRT 框架管理,与 Msg 的生命周期一致;
- 传递给回调处理函数的 ctx 是 Subscribe 类型的,并且是Used状态;
所以这里我们先看信息处理的回调函数:void NormalSubscriberModule::EventHandle
void NormalSubscriberModule::EventHandle(aimrt::channel::ContextRef ctx,const std::shared_ptr<const aimrt::protocols::example::ExampleEventMsg>& data) {AIMRT_INFO("Receive new pb event, ctx: {}, data: {}", ctx.ToString(), aimrt::Pb2CompactJson(*data));}
- 此时回调函数有两个参数:ctx负责的是传入后端的配置,data是传入的对应的消息;
接下来我们再看初始化模块:
bool NormalSubscriberModule::Initialize(aimrt::CoreRef core) {core_ = core;try {// Read cfgauto file_path = core_.GetConfigurator().GetConfigFilePath();if (!file_path.empty()) {YAML::Node cfg_node = YAML::LoadFile(std::string(file_path));topic_name_ = cfg_node["topic_name"].as<std::string>();}// Subscribesubscriber_ = core_.GetChannelHandle().GetSubscriber(topic_name_);AIMRT_CHECK_ERROR_THROW(subscriber_, "Get subscriber for topic '{}' failed.", topic_name_);bool ret = aimrt::channel::Subscribe<aimrt::protocols::example::ExampleEventMsg>(subscriber_,std::bind(&NormalSubscriberModule::EventHandle, this, std::placeholders::_1, std::placeholders::_2));AIMRT_CHECK_ERROR_THROW(ret, "Subscribe failed.");} catch (const std::exception& e) {AIMRT_ERROR("Init failed, {}", e.what());return false;}AIMRT_INFO("Init succeeded.");return true;
}
首先依然是获取配置文件,然后获取到订阅者的句柄;
问题:当我们获取到订阅者的句柄的时候,怎么订阅对应的消息?
与发布接口一样,AimRT 提供了函数风格和Proxy风格两种风格类型的接口来订阅一个消息,同时还提供了智能指针形式和协程形式两种回调函数:
-
函数风格接口:
template <MsgType>
bool Subscribe(SubscriberRef subscriber,std::function<void(ContextRef, const std::shared_ptr<const MsgType>&)>&& callback);// Callback accept a pointer as a parameter
template <MsgType>
bool Subscribe(SubscriberRef subscriber,std::function<void(const std::shared_ptr<const MsgType>&)>&& callback);// Coroutine callback, accept a CTX and a const reference to message as parameters
template <MsgType>
bool SubscribeCo(SubscriberRef subscriber,std::function<co::Task<void>(ContextRef, const MsgType&)>&& callback);// Coroutine callback, accept a const reference to message as a parameter
template <MsgType>
bool SubscribeCo(SubscriberRef subscriber,std::function<co::Task<void>(const MsgType&)>&& callback);
上面两种是基于智能指针形式的回调函数、下面两种是基于协程接口的回调函数;
- Proxy 类风格接口
namespace aimrt::channel {template <typename MsgType>
class SubscriberProxy {public:explicit SubscriberProxy(SubscriberRef subscriber);// Callback accept a CTX and a smart pointer as parametersbool Subscribe(std::function<void(ContextRef, const std::shared_ptr<const MsgType>&)>&& callback) const;// Callback accept a pointer as a parameterbool Subscribe(std::function<void(const std::shared_ptr<const MsgType>&)>&& callback) const;// Coroutine callback, accept a CTX and a const reference to message as parametersbool SubscribeCo(std::function<co::Task<void>(ContextRef, const MsgType&)>&& callback) const;// Coroutine callback, accept a const reference to message as a parameterbool SubscribeCo(std::function<co::Task<void>(const MsgType&)>&& callback) const;
};}
其实这两种接口的功能大致是一样的,但是使用这些接口的时候,我们需要注意以下:
- 只能在Initialize阶段调用订阅接口;
- 不允许在一个SubscriberRef中重复订阅同一种类型;
- 如果订阅失败,会返回 false;
Context 和 Msg 的生命周期:
- 对于接收智能指针形式 Msg 的回调,Context 和 Msg 的生命周期将持续到 Msg 的智能指针引用计数归零析构时;
- 对于协程形式的回调,Context 和 Msg 的生命周期将持续到协程退出为止;
所以在上面初始化的时候,当我们获取到订阅者的句柄的时候,此时就可以通过接口函数类型,对消息进行订阅!
参数分别为订阅者的句柄和回调函数!
CMake链接相关库
当我们使用protobuf作为channel的接口层的通信协议的时候,我们编译对应的cmake需要链接以下的库:
target_link_libraries(${PROJECT_NAME} PUBLICaimrt::runtime::coreaimrt::interface::aimrt_module_cpp_interfaceyaml-cpp::yaml-cppaimrt::interface::aimrt_module_protobuf_interface # protobuf接口消息所需包含的接口aimrt::protocols::example_pb_gencode # protobuf生成的消息的target
)
其中:
- aimrt::interface::aimrt_module_protobuf_interface:是AimRT中channel的接口库;
- aimrt::protocols::example_pb_gencode: 是protobuf消息类型的库;
这里订阅者和发布者两者链接的库是一样的!
四、 基于ROS2 msg消息的发布者与订阅者
ROS2消息接口的使用和上面的Protobuf几乎一样,因此下面我们不会详细讲解每一步,会挑出一些不同点进行讲解:
编写.msg文件
这里我们编译了两个msg文件:
RosTestMsg:
int64       num
byte[]      data
RosTestData test_msg2
上面的msg分别包含两个内置类型和一个自定义类型:
- 这里每个int64占8个字节;
- byte[]是一个数组,该数组中每个元素占1个字节;
- 除此之外,还包含了一个自定义类型;(可以看出ROS2的msg是支持自定义类型的);
自定义的数据类型的格式如下所示:
RosTestData:
int32   num
float32 num2
char    data
该自定义类型分别包含三个内置类型;
接下来,可以通过ROS2提供的CMake编译指令,将上面的消息编译成对应的C++代码:
rosidl_generate_interfaces(${CUR_PACKAGE_NAME}"msg/RosTestMsg.msg""msg/RosTestData.msg"
)
publisher_module.h
namespace aimrt::examples::cpp::ros2_chn::normal_publisher_module {class NormalPublisherModule : public aimrt::ModuleBase {public:NormalPublisherModule() = default;~NormalPublisherModule() override = default;ModuleInfo Info() const override {return ModuleInfo{.name = "NormalPublisherModule"};}bool Initialize(aimrt::CoreRef core) override;bool Start() override;void Shutdown() override;private:auto GetLogger() { return core_.GetLogger(); }void MainLoop();private:aimrt::CoreRef core_;aimrt::executor::ExecutorRef executor_;std::atomic_bool run_flag_ = false;std::promise<void> stop_sig_;std::string topic_name_ = "test_topic";double channel_frq_;aimrt::channel::PublisherRef publisher_;
};}
这些接口文件与使用Protobuf通信的接口是一样的,所以这里我们不再对其进行解释;
publisher_module.cc
#include "normal_publisher_module/normal_publisher_module.h"
#include "aimrt_module_ros2_interface/channel/ros2_channel.h"#include "yaml-cpp/yaml.h"#include "example_ros2/msg/ros_test_msg.hpp"namespace aimrt::examples::cpp::ros2_chn::normal_publisher_module {bool NormalPublisherModule::Initialize(aimrt::CoreRef core) {core_ = core;try {// Read cfgauto file_path = core_.GetConfigurator().GetConfigFilePath();if (!file_path.empty()) {YAML::Node cfg_node = YAML::LoadFile(std::string(file_path));topic_name_ = cfg_node["topic_name"].as<std::string>();channel_frq_ = cfg_node["channel_frq"].as<double>();}// Get executor handleexecutor_ = core_.GetExecutorManager().GetExecutor("work_thread_pool");AIMRT_CHECK_ERROR_THROW(executor_ && executor_.SupportTimerSchedule(),"Get executor 'work_thread_pool' failed.");// Register publish typepublisher_ = core_.GetChannelHandle().GetPublisher(topic_name_);AIMRT_CHECK_ERROR_THROW(publisher_, "Get publisher for topic '{}' failed.", topic_name_);bool ret = aimrt::channel::RegisterPublishType<example_ros2::msg::RosTestMsg>(publisher_);AIMRT_CHECK_ERROR_THROW(ret, "Register publishType failed.");} catch (const std::exception& e) {AIMRT_ERROR("Init failed, {}", e.what());return false;}AIMRT_INFO("Init succeeded.");return true;
}bool NormalPublisherModule::Start() {try {run_flag_ = true;executor_.Execute(std::bind(&NormalPublisherModule::MainLoop, this));} catch (const std::exception& e) {AIMRT_ERROR("Start failed, {}", e.what());return false;}AIMRT_INFO("Start succeeded.");return true;
}void NormalPublisherModule::Shutdown() {try {if (run_flag_) {run_flag_ = false;stop_sig_.get_future().wait();}} catch (const std::exception& e) {AIMRT_ERROR("Shutdown failed, {}", e.what());return;}AIMRT_INFO("Shutdown succeeded.");
}// Main loop
void NormalPublisherModule::MainLoop() {try {AIMRT_INFO("Start MainLoop.");aimrt::channel::PublisherProxy<example_ros2::msg::RosTestMsg> publisher_proxy(publisher_);uint32_t count = 0;while (run_flag_) {std::this_thread::sleep_for(std::chrono::milliseconds(static_cast<uint32_t>(1000 / channel_frq_)));count++;AIMRT_INFO("loop count : {} -------------------------", count);// publish ros eventexample_ros2::msg::RosTestMsg msg;msg.data = {1, 2, 3, 4};msg.num = count + 1000;AIMRT_INFO("Publish new ros event, data:\n{}", example_ros2::msg::to_yaml(msg));publisher_proxy.Publish(msg);}AIMRT_INFO("Exit MainLoop.");} catch (const std::exception& e) {AIMRT_ERROR("Exit MainLoop with exception, {}", e.what());}stop_sig_.set_value();
}}
主函数的代码逻辑跟上面的使用protobuf使用的通信逻辑框架是一样的,只是这里采用的是ROS2的msg消息;
// publish ros eventexample_ros2::msg::RosTestMsg msg;msg.data = {1, 2, 3, 4};msg.num = count + 1000;所以这里初始化ROS2信息,然后设置对应的信息,其他的代码逻辑都和上面的一致;
订阅者的代码逻辑框架和上面的也基本一致,所以这里我们不再过多介绍;
五、使用protobuf和ROS2msg进行channel通信的区别
1. 编译时开启的选项不同
在编译时Protobuf Channel时需要开启如下两个 AimRT 的 cmake 选项:
- -DAIMRT_BUILD_EXAMPLES=ON(aimrt 预定义msg)
- -DAIMRT_BUILD_WITH_PROTOBUF=ON
但是在使用ROS2 Channel时,需要开启如下两个 AimRT 的 cmake 选项:
- -DAIMRT_BUILD_ROS2_PLUGIN=ON
- -DAIMRT_BUILD_WITH_ROS2=ON
2. CMakeList 链接的库不同
- 使用 Protobuf Channel 需要链接:aimrt::interface::aimrt_module_protobuf_interface
target_link_libraries(${PROJECT_NAME}aimrt::runtime::coreaimrt::interface::aimrt_module_cpp_interfaceyaml-cpp::yaml-cppaimrt::interface::aimrt_module_protobuf_interface # protobuf接口消息所需包含的接口aimrt::protocols::example_pb_gencode # 消息类型的pb类型库
)- 使用 ROS2 Channel 需要链接:aimrt::interface::aimrt_module_ros2_interface
# 查找ROS Msg包
find_package(std_msgs REQUIRED)#链接
target_link_libraries(${PROJECT_NAME}aimrt::runtime::coreaimrt::interface::aimrt_module_cpp_interfaceyaml-cpp::yaml-cppaimrt::interface::aimrt_module_ros2_interface # 发布ROS2消息所需包含的接口std_msgs::std_msgs__rosidl_generator_cpp #消息类型的ROS库 这里我们使用std::msgstd_msgs::std_msgs__rosidl_typesupport_cppstd_msgs::std_msgs__rosidl_typesupport_fastrtps_cppstd_msgs::std_msgs__rosidl_typesupport_introspection_cpp
)
需要注意的是,这里我们使用ROS2 的std_msgs作为通讯协议。由于 ROS2 封装了一套自己的CMake语法,因此如果想要使用 target_link_libraries 链接ROS2的消息类型时,需要链接如下四个 ROS2 CMake 库:
[消息包名]::[消息包名]__rosidl_generator_cpp #消息类型的ROS库[消息包名]::[消息包名]__rosidl_typesupport_cpp[消息包名]::[消息包名]__rosidl_typesupport_fastrtps_cpp[消息包名]::[消息包名]__rosidl_typesupport_introspection_cpp3. 导入接口头文件不同
Protobuf 消息类型的发布者与订阅者需要导入:
#include "aimrt_module_protobuf_interface/channel/protobuf_channelROS2 消息类型的发布者与订阅者需要导入:
#include "aimrt_module_ros2_interface/channel/ros2_channel.h"4 注册的消息类型不同
- 使用Protobuf Channel时,在注册与回调函数要写对应的Protobuf消息类型:
aimrt::protocols::example::ExampleEventMsg- 使用ROS2 Channel时,在注册与回调函数要写对应的ROS2消息类型:
std_msgs::msg::String通过上面的讲解,我们目前对channel就有了一个清晰的认识;
相关文章:

AimRT从入门到精通 - 03Channel发布者和订阅者
刚接触AimRT的小伙伴可能会疑惑,这个Channel和RPC(后面讲的)到底是什么呢? 但是当我们接触了之后,就会发现,其本质类似ROS的Topic通信!(其本质基于发布订阅模型) 接下来…...

MySQL初阶:数据库基础,数据库和表操作,数据库中的数据类型
1.数据库基础 数据库是一个客户端——服务器结构的程序。 服务器是真正的主体,负责保存和管理数据,数据都存储在硬盘上 数据库处理的主要内容是数据的存储,查找,修改,排序,统计等。 关系型数据库&#…...

AI 驱动的智能交通系统:从拥堵到流畅的未来出行
最近研学过程中发现了一个巨牛的人工智能学习网站,通俗易懂,风趣幽默,忍不住分享一下给大家。点击链接跳转到网站人工智能及编程语言学习教程。读者们可以通过里面的文章详细了解一下人工智能及其编程等教程和学习方法。下面开始对正文内容的…...

Python清空Word段落样式的方法
在 Python 中,你可以使用 python-docx 库来操作 Word 文档,包括清空段落样式。以下是几种清空段落样式的方法: 方法一:直接设置段落样式为"Normal" from docx import Documentdoc Document(your_document.docx) # 打…...

[javaEE]网络编程
目录 socket对tcp ServerSocket ServerSocket 构造方法: ServerSocket 方法: socket 实现回显服务器和客户端 由于我们之前已经写多了socket对udq的实现,所以我们这节,主要将重心放在Tcp之上 socket对tcp ServerS…...

组件通信-mitt
mitt:与消息订阅与发布(pubsub)功能类似,可以实现任意组件间通信。 第一步:安装mitt npm i mitt 第二步:新建文件:src\utils\emitter.ts // 引入mitt import mitt from "mitt"; //调…...

微软发布了最新的开源推理模型套件“Phi-4-Reasoning
每周跟踪AI热点新闻动向和震撼发展 想要探索生成式人工智能的前沿进展吗?订阅我们的简报,深入解析最新的技术突破、实际应用案例和未来的趋势。与全球数同行一同,从行业内部的深度分析和实用指南中受益。不要错过这个机会,成为AI领…...

Socat 用法详解:网络安全中的瑞士军刀
Socat 用法详解:网络安全中的强大工具 引言 socat(SOcket CAT)是一款功能强大的命令行工具,被誉为“网络瑞士军刀”,广泛应用于数据传输、端口转发和网络调试等场景。它支持多种协议和数据通道(如文件、管…...
:SaaS商业模式的指标动态与实践案例)
精益数据分析(36/126):SaaS商业模式的指标动态与实践案例
精益数据分析(36/126):SaaS商业模式的指标动态与实践案例 在创业与数据分析的学习道路上,我们不断探索各种商业模式的核心要点。今天,依旧怀揣着和大家共同进步的想法,深入研读《精益数据分析》中SaaS商业…...

2.LED灯的控制和按键检测
目录 STM32F103的GPIO口 GPIO口的作用 GPIO口的工作模式 input输入检测 -- 向内检测 output控制输出 -- 向外输出 寄存器 寄存器地址的确定 配置GPIO口的工作模式 时钟的开启和关闭 软件编程驱动 LED 灯 硬件 软件 软件编程驱动 KEY 按键 硬件 软件 按键消抖 代码 STM32F…...
:注册中心架构模式)
架构师面试(三十八):注册中心架构模式
题目 在微服务系统中,当服务达到一定数量时,通常需要引入【注册中心】组件,以方便服务发现。 大家有没有思考过,注册中心存在的最根本的原因是什么呢?注册中心在企业中的最佳实践是怎样的?注册中心的服务…...

Go-web开发之帖子功能
帖子功能 route.go r.Use(middleware.JWTAuthMiddleware()){r.POST("/post", controller.CreatePostHandler)r.GET("/post/:id", controller.GetPostDetailHandler)}post.go 定义帖子结构 type Post struct {Id int64 json:"id" …...

MYSQL-设计表
一.范式 数据库的范式是⼀组规则。在设计关系数据库时,遵从不同的规范要求,设计出合理的关系型数 据库,这些不同的规范要求被称为不同的范式。 关系数据库有六种范式:第⼀范式(1NF)、第⼆范式(…...

动态思维——AI与思维模型【91】
一、定义 动态思维思维模型是一种强调在思考问题和分析情况时,充分考虑到事物的变化性、发展性和相互关联性,不局限于静态的、孤立的视角,而是以发展变化的眼光看待事物,能够根据不同时间、环境和条件的变化,灵活调整…...
)
文献阅读篇#7:5月一区好文阅读,BFA-YOLO,用于建筑信息建模!(下)
期刊简介:《Advanced Engineering Informatics》创刊于2002年,由Elsevier Ltd出版商出版,出版周期Quarterly。该刊已被SCIE数据库收录,在中科院最新升级版分区表中,该刊分区信息为大类学科工程技术1区,2023…...

【Linux网络编程】http协议的状态码,常见请求方法以及cookie-session
本文专栏:Linux网络编程 目录 一,状态码 重定向状态码 1,永久重定向(301 Moved Permanently) 2,临时重定向(302 Found) 二,常见请求方法 1,HTTP常见Hea…...
第六章:ARM 编程技巧与优化策略)
ARM 指令集(ubuntu环境学习)第六章:ARM 编程技巧与优化策略
在本章中,我们将介绍一些在 ARM 架构上编写高效代码的技巧和常见优化策略,帮助您在嵌入式系统中获得更低延迟、更高吞吐和更低功耗。 6.1 寄存器利用与最小化内存访问 多用寄存器 ARM 通用寄存器(r0–r12)数量充足,尽量将临时变量保留在寄存器中,减少对内存的读写。 避免…...

柔性超声耦合剂的选择与设计-可穿戴式柔性超声耦合剂面临的难题
柔性PZT压电薄膜:破解可穿戴式超声耦合剂难题的关键材料! 随着可穿戴技术的快速发展,超声设备正朝着轻量化、柔性化和高集成度方向演进。在医学诊断、健康监测和智能穿戴领域,可穿戴式超声设备因其无创、实时、动态成像等优势受到…...
)
XCTF-pwn(二)
guess_num 看一下文件信息 利用gets函数将seed[0]给覆盖掉 距离0x20 我们需要输入十次随机数产生的值 写一个c程序先预判当seed是a的时候产生的随机数分别是多少 payload from pwn import* from ctypes import* context.log_leveldebugrremote("61.147.171.105", 6…...

AI外挂RAG:大模型时代的检索增强生成技术
目录 引言 一、RAG是什么? 二、RAG为什么会出现? 三、RAG的工作原理 四、RAG的技术优势 五、RAG的应用场景 六、RAG对AI行业的影响 七、RAG面临的挑战 引言 在人工智能领域,大型语言模型(LLM)如ChatGPT、DeepSe…...

SpringTask
Spring Task是Spring框架提供的任务调度工具,可以按照约定的时间自动执行某个代码逻辑 应用场景:信用卡每月还款提醒、火车票售票系统处理未支付订单 fixedDelay:上一次任务执行完成后多长时间(ms)执行下一次任务 fixe…...

Sphinx 文档图片点击放大
文章目录 问题描述解决方案步骤 1:创建 JavaScript 文件步骤 2:编写 JavaScript 代码步骤 3:更新 Sphinx 配置 高级定制为所有图片添加点击功能添加缩放控制 总结 在使用 Sphinx 生成技术文档时,我们经常需要在文档中嵌入截图和示…...

菜鸟之路Day29一一MySQL之DDL
菜鸟之路Day29一一MySQL之DDL 作者:blue 时间:2025.5.2 文章目录 菜鸟之路Day29一一MySQL之DDL0.概述1.DDL之数据库操作1.1查询1.2创建1.3使用1.4删除 2.DDL之表操作2.1创建表2.2数据类型2.3查询表2.4修改表结构2.5删除表 0.概述 文章内容学习自黑马程…...
:监控系统架构模式)
架构师面试(三十七):监控系统架构模式
题目 监控是在产品生命周期的运维环节,能对产品的关键指标数据进行【实时跟踪】并对异常数据进行【实时报警】。 一句话描述,监控系统可以帮我们【主动预防和发现】业务系统中的问题。 我们常说,监控系统是 “粮草”,业务系统是…...

【Redis】Hash哈希
文章目录 注意个问题hset命令(核心)hget命令(核心)hexists命令hdel命令hkeys和hvals命令hgetall和hmget命令hlen命令hsetnx命令hincrby命令哈希命令小结哈希编码方式使用场景1.关系型数据表保存用户的信息Redis三种缓存方式对比1.…...
【SpringBoot】Spring中事务的实现:声明式事务@Transactional、编程式事务
1. 准备工作 1.1 在MySQL数据库中创建相应的表 用户注册的例子进行演示事务操作,索引需要一个用户信息表 (1)创建数据库 -- 创建数据库 DROP DATABASE IF EXISTS trans_test; CREATE DATABASE trans_test DEFAULT CHARACTER SET utf8mb4;…...
——AXI 接口MIG 使用(2))
从零开始讲DDR(9)——AXI 接口MIG 使用(2)
一、前言 在之前的文章中,我们介绍了官方DDR MIG AXI接口的例程的整体框架,在本文中,我们将着重介绍例程中关于数据产生,及驱动到AXI接口的相关逻辑实现。 二、data_gen 在例程中,有ddr4_v2_2_8_data_gen这样一个文件…...

组件通信-props
props 是使用频率最高的一种通信方式,父>子 子>父 父传子:属性值 是非函数子传父:属性值 是函数 父组件 <script setup lang"ts"> import { ref } from vue import Child from ./Child.vue const car ref(奥迪) c…...

纯原生Java实现:获取整个项目中指定接口所有的实现类
不使用第三方,不使用属性文件,不指定包名,获取整个系统中某一个接口所有的实现类,纯Java实现 /*** 类查找器,用于扫描类路径中的所有类,并找出指定类的实现类。* 该类通过递归扫描类路径下的所有 .class 文件…...

反射机制补充
不同对象实例的地址不同 在 Java 里,每当使用 new 关键字创建一个对象时,JVM 会在堆内存中为该对象分配一块新的内存空间,每个对象实例都有自己独立的内存地址。所以不同的对象实例,其内存地址是不同的。 以下是一个简单示例&am…...

计算机视觉的未来发展趋势
计算机视觉的未来发展趋势主要集中在以下几个方面: 1. 自监督学习与少样本学习 自监督学习:通过从无标签的数据中提取有用特征,克服对大量标注数据的依赖。2025年,基于大规模图像数据的自监督预训练模型将更加成熟,能…...

轻量级网页版视频播放器
用deepseek开发的轻量级,网页版视频播放器 可以选择本地文件 可以播放、暂停、全屏、有进度条和时间进度 代码如下: 新建.txt文本文档,把代码复制粘贴进去,把.txt文档后缀名改为.html,用浏览器打开即可使用 <!DO…...

18. LangChain分布式任务调度:大规模应用的性能优化
引言:从单机到万级并发的进化 2025年某全球客服系统通过LangChain分布式改造,成功应对黑五期间每秒12,000次的咨询请求。本文将基于LangChain的分布式架构,详解如何实现AI任务的自动扩缩容与智能调度。 一、分布式系统核心指标 1.1 性能基准…...

C/C++工程师使用 DeepSeek
一、使用 DeepSeek 生成 C/C 代码 在 C/C 开发中,很多时候需要编写一些常见功能的代码,如排序算法、文件读写操作、数据结构的实现等。借助 DeepSeek,工程师只需用自然语言清晰描述需求,它就能依据大量的代码数据和深度学习算法&a…...
实现)
数据结构-线性结构(链表、栈、队列)实现
公共头文件common.h #define TRUE 1 #define FALSE 0// 定义节点数据类型 #define DATA_TYPE int单链表C语言实现 SingleList.h #pragma once#include "common.h"typedef struct Node {DATA_TYPE data;struct Node *next; } Node;Node *initList();void headInser…...
:简单务实的概率性选手)
第 7 篇:跳表 (Skip List):简单务实的概率性选手
前面几篇我们都在探讨各种基于“树”结构的有序表实现,它们通过精巧的平衡策略(高度、颜色、大小)和核心的“旋转”操作来保证 O(log N) 的性能。今天,我们要介绍一位画风完全不同的选手——跳表 (Skip List)。它不依赖树形结构&a…...

sys目录介绍
文章目录 1. 前言2. 目录层次3. 目录介绍3.1 devices 目录3.2 block 目录3.3 bus 目录3.4 class 目录3.5 dev 目录3.6 firmware目录3.7 fs 目录3.8 kernel目录3.9 module 目录3.10 power 目录 sys目录介绍 1. 前言 linux 下一切皆文件,文件的类型也很多,…...

基于DQN的自动驾驶小车绕圈任务
1.任务介绍 任务来源: DQN: Deep Q Learning |自动驾驶入门(?) |算法与实现 任务原始代码: self-driving car 最终效果: 以下所有内容,都是对上面DQN代码的改进&#…...

源码安装SRS4
Ubuntu20安装好SRS后,(源码安装) 注意:在trunk目录SRS ./objs/srs -c conf/srs.conf 以上为启动srs命令,-c 为指定配置文件, 查看SRS进程 ps aux | grep srs 查看端口: netstat -ano | gre…...

OrbitControls
OrbitControls 3D虚拟工厂在线体验 描述 Orbit controls(轨道控制器)可以使得相机围绕目标进行轨道运动。 Constructor OrbitControls( object : Camera, domElement : HTMLDOMElement ) 参数类型描述objectCamera(必须)将要…...

【数据库】四种连表查询:内连接,外连接,左连接,右连接
在数据库操作中,连表查询是处理多表关联的核心技术。以下是四种主要连接方式的详细介绍、快速掌握方法及实际应用指南: 目录 **一、四种连表查询详解****1. 内连接(INNER JOIN)****2. 左连接(LEFT JOIN / LEFT OUTER J…...

Redis怎么避免热点数据问题
使用 RedisTemplate 避免热点数据问题的解决方案、场景及示例: 1. 数据分片(Sharding) 场景:高频读写的计数器(如文章阅读量统计) 原理:将数据分散到多个子键,降低单个 Key 的压…...

完整的 VS Code + CMake + Qt + GCC 项目构建方案:EXE 程序与多个 DLL 库
完整的 VS Code CMake Qt GCC 项目构建方案:EXE 程序与多个 DLL 库 在本文中,我们将介绍如何构建一个包含 EXE 程序和多个 DLL 库的项目,适用于 VS Code CMake Qt GCC 开发环境。这个方案为一个模块化的项目结构,使得代码清…...
:智能流失预警 - 融合文本反馈)
Python 数据智能实战 (7):智能流失预警 - 融合文本反馈
写在前面 —— 不再错过关键预警!结合用户行为与 LLM 文本洞察,构建更精准的流失预测模型 在之前的探索中,我们学习了如何利用大语言模型 (LLM) 对用户评论进行深度挖掘,提取情感、发现主题,并将非结构化的文本信息转化为有价值的特征 (如 Embeddings)。 现在,我们要将…...

Flutter - 概览
Hello world ⌘ shift p 选择 Empty Application 模板 // 导入Material风格的组件包 // 位置在flutter安装目录/packages/flutter/lib/material.dart import package:flutter/material.dart;void main() {// runApp函数接收MainApp组件并将这个Widget作为根节点runApp(cons…...
及Excel表格列名操作详细分享)
Python-pandas-操作Excel文件(读取数据/写入数据)及Excel表格列名操作详细分享
Python-pandas-操作Excel文件(读取数据/写入数据) 提示:帮帮志会陆续更新非常多的IT技术知识,希望分享的内容对您有用。本章分享的是pandas的使用语法。前后每一小节的内容是存在的有:学习and理解的关联性。【帮帮志系列文章】:每…...

手写 Vue 源码 === Vue3 设计思想
1.声明式框架 Vue3 是声明式的框架,用起来简单。 命令式和声明式区别 早在 JQ 的时代编写的代码都是命令式的,命令式框架重要特点就是关注过程声明式框架更加关注结果。命令式的代码封装到了 Vuejs 中,过程靠 vuejs 来实现声明式代码更加简单,不需要关注实现,按照要求填代…...

Android WebView加载h5打开麦克风与摄像头的权限问题
目录 快速处理 app向系统申请录音与相机权限h5向app申请录音和相机权限 详细解答 app权限与h5权限录音与麦克风默许的风险最佳实践 Android webview h5 麦克风权限,摄像头(相机)权限实现与填坑。 快速处理 app向系统申请录音与相机权限 …...

三种计算最小公倍数的方法分析
三种计算最小公倍数的方法分析与比较 一.引言 最小公倍数(Least Common Multiple, LCM)是数学中的一个基本概念,指能够被两个或多个整数整除的最小的正整数。在编程中,我们有多种方法可以计算两个数的最小公倍数。本文将分析三种…...

PDF转换工具xpdf-tools-4.05
XPDF是一个开源的PDF查看、提取和转换工具套件,使用C编写,支持多种操作系统,包括Linux、Unix、OS/2、Windows和Mac OS X1。XPDF不仅是一个PDF查看器,还包含多个实用工具,如文本提取器、图像转换器和HTML转换器等&a…...