STM32蓝牙连接Android实现云端数据通信(电机控制-开源)
引言
基于 STM32F103C8T6 最小系统板完成电机控制。这个小项目采用 HAL 库方法实现,通过 CubeMAX 配置相关引脚,步进电机使用 28BYJ-48 (四相五线式步进电机),程序通过蓝牙连接手机 APP 端进行数据收发, OLED 显示当前步进电机角度,并且手机收到数据的同时返回云端保存,记录下当前电机角度。
对于 28BYJ-48 步进电机,其工作原理基于电磁感应。当定子的某一相绕组通电时,会产生磁场,吸引转子转动。通过按照一定的顺序依次给各相绕组通电,就可以使转子按照预定的方向逐步转动。常见的通电方式有单四拍、双四拍和八拍等。
一、STM32F103C8T6
芯片对应引脚信息如下:(我这里使用的是 普中-精灵1 开发板)

1. 硬件传感器连接
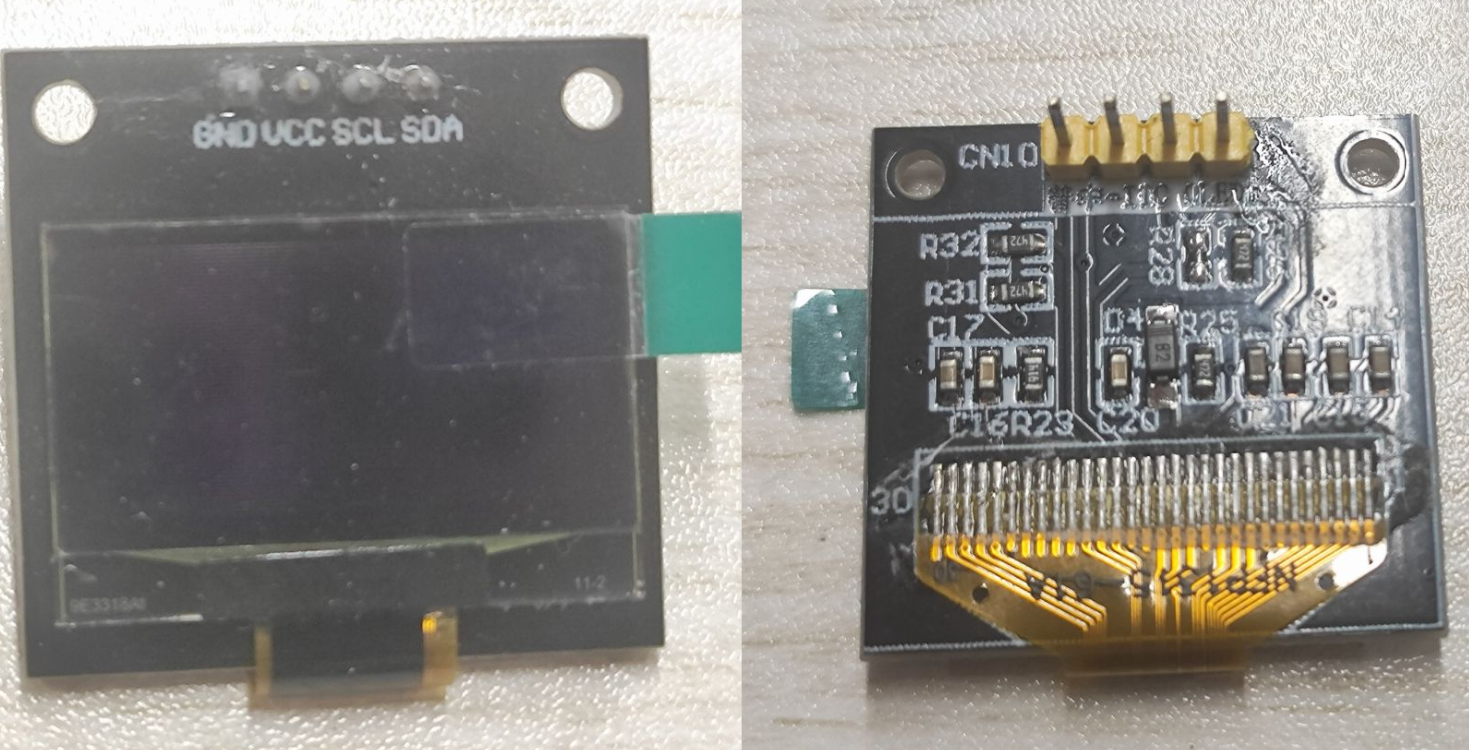
OLED:0.96寸OLED,四针。
对应引脚:VCC --------> VCC
GND --------> GND
SCL ---------> PB6
SDA ---------> PB7
蓝牙:HC-08,低功耗蓝牙(BLE),六针。
对应引脚:VCC --------> VCC
GND --------> GND
RXD --------> TXD(PA9)
TXD --------> RXD(PA10)
(PS:我这里蓝牙使用的是串口1---USART1)

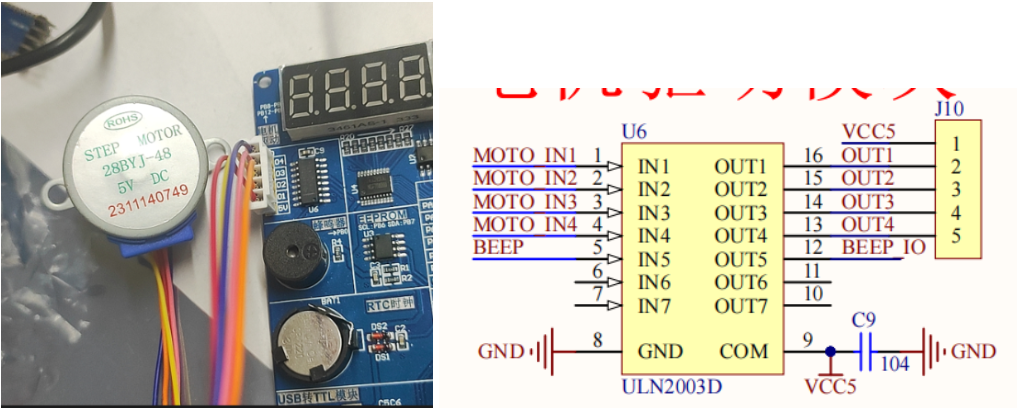
步进电机:28BYJ-48
驱动板 ULN2003D :IN1 --------> MOTO IN1(PB8)
IN2 --------> MOTO IN2(PB9)
IN3 --------> MOTO IN3(PB12)
IN4 --------> MOTO IN4(PB13)
2. CubeMAX配置
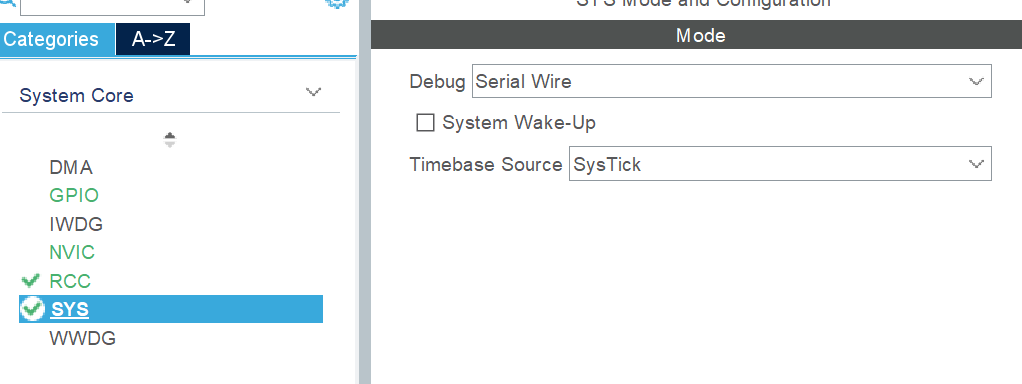
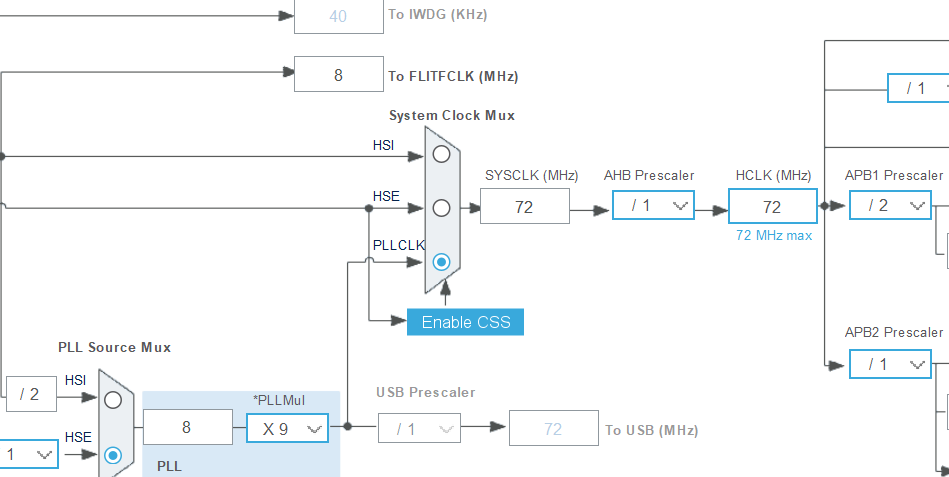
开启时钟,使用的是晶振。

有线(SW调试接口)---- 我使用 ST-link 下载器
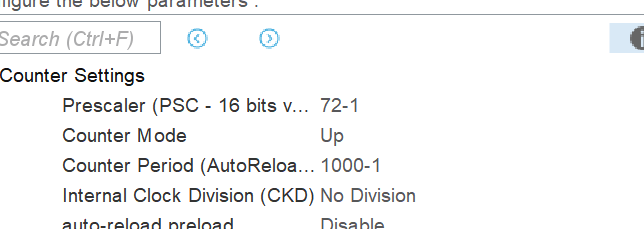
开启定时器2,内部时钟,开启中断,配置PSC和ARR。

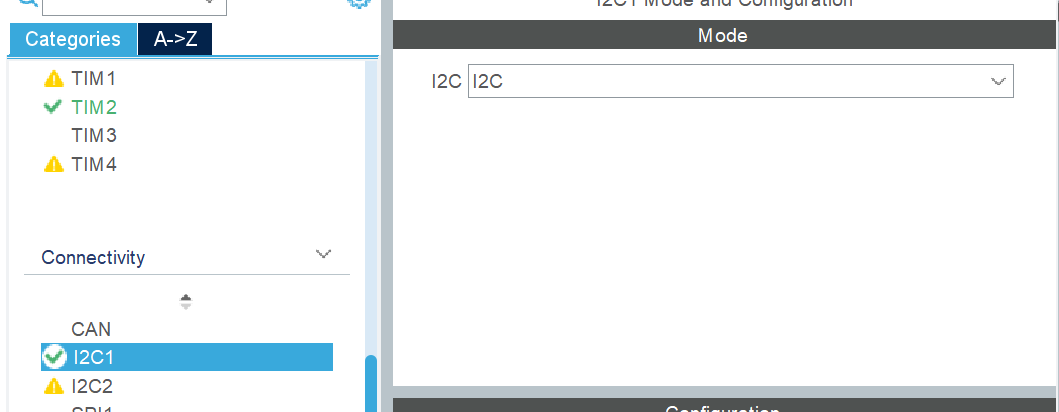
打开 OLED 需要的I2C1
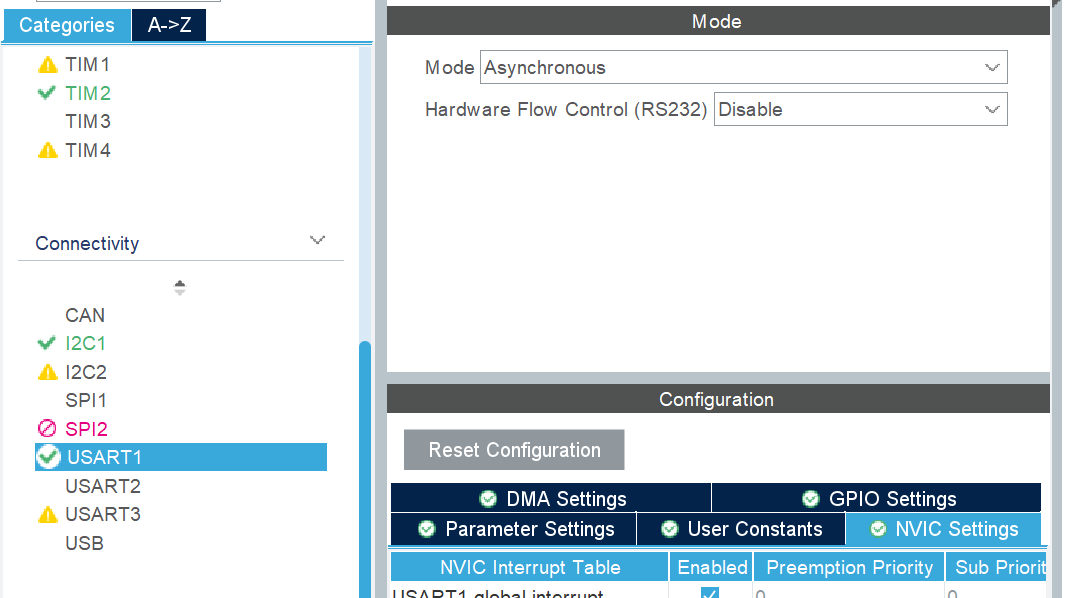
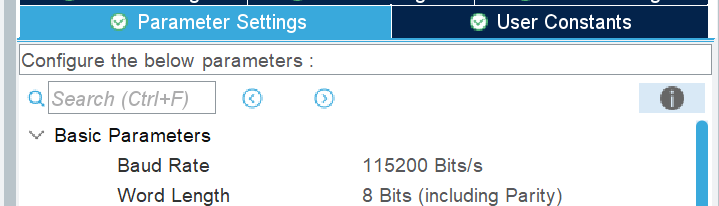
蓝牙使用的串口1(串口波特率默认为 115200,一般蓝牙默认也是如此,若蓝牙和串口1的不相同,更改其一使他们相同即可)
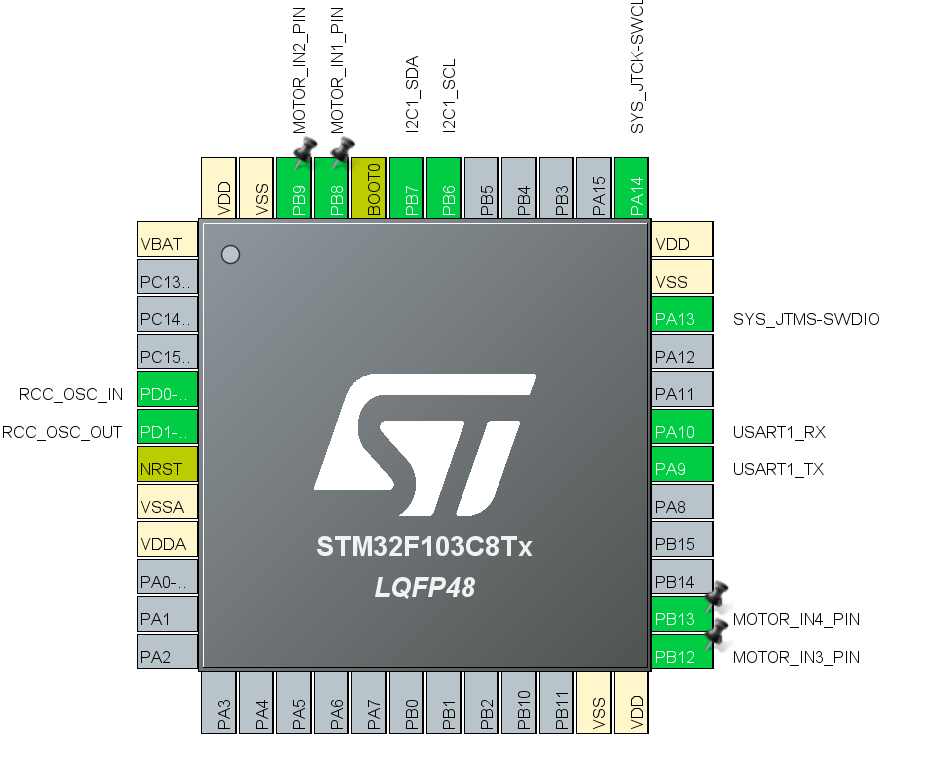
引脚设置完成后,芯片大致如下:
配置时钟频率
选择路径,勾选 Keil 代码显示 .c .h文件
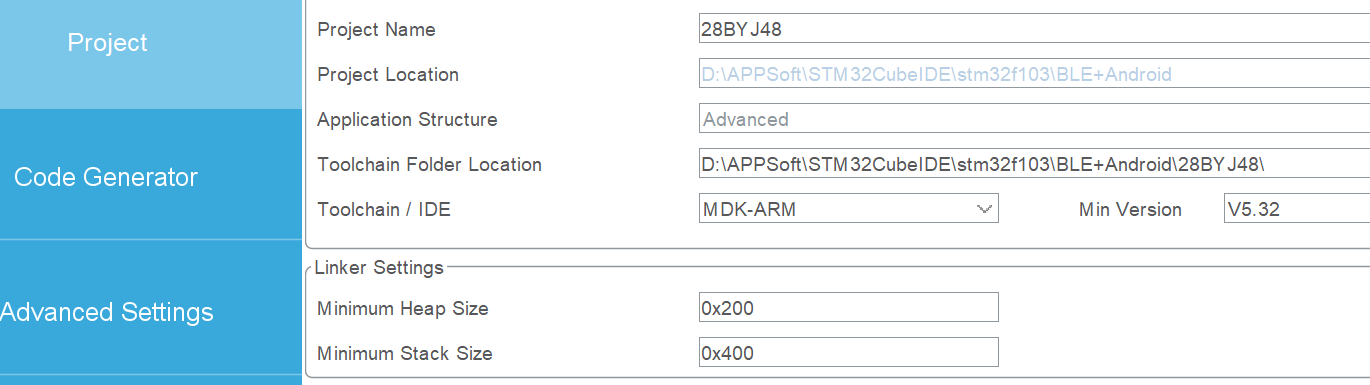

点击 GENERATE CODE 生成相关代码

3. Keil5代码相关
自动生成相关 Keil 5 代码函数,如下:

OLED相关
添加oled相关函数(就是市面上通用的oled例程--SSD1306驱动器)

#include "oled.h"
#include "oledfont.h"
#include "main.h"
#include <stdio.h>
#include <stdarg.h>extern I2C_HandleTypeDef hi2c1;static uint8_t OLED_GRAM[128][8];/*** @brief          write data/command to OLED, if you use spi, please rewrite the function* @param[in]      dat: the data ready to write* @param[in]      cmd: OLED_CMD means command; OLED_DATA means data* @retval         none*/
/*** @brief          写数据或者指令到OLED, 如果使用的是SPI,请重写这个函数* @param[in]      dat: 要写入的字节* @param[in]      cmd: OLED_CMD 代表写入的字节是指令; OLED_DATA 代表写入的字节是数据* @retval         none*/
void oled_write_byte(uint8_t dat, uint8_t cmd)
{static uint8_t cmd_data[2];if(cmd == OLED_CMD){cmd_data[0] = 0x00;}else{cmd_data[0] = 0x40;}cmd_data[1] = dat;HAL_I2C_Master_Transmit(&hi2c1, OLED_I2C_ADDRESS, cmd_data, 2, 10);
}/*** @brief          initialize the oled device* @param[in]      none* @retval         none*/
/*** @brief          初始化OLED模块,* @param[in]      none* @retval         none*/
void OLED_init(void)
{oled_write_byte(0xAE, OLED_CMD);    //display offoled_write_byte(0x20, OLED_CMD);    //Set Memory Addressing Mode	oled_write_byte(0x10, OLED_CMD);    //00,Horizontal Addressing Mode;01,Vertical Addressing Mode;10,Page Addressing Mode (RESET);11,Invalidoled_write_byte(0xb0, OLED_CMD);    //Set Page Start Address for Page Addressing Mode,0-7oled_write_byte(0xc8, OLED_CMD);    //Set COM Output Scan Directionoled_write_byte(0x00, OLED_CMD);    //---set low column addressoled_write_byte(0x10, OLED_CMD);    //---set high column addressoled_write_byte(0x40, OLED_CMD);    //--set start line addressoled_write_byte(0x81, OLED_CMD);    //--set contrast control registeroled_write_byte(0xff, OLED_CMD);    //brightness 0x00~0xffoled_write_byte(0xa1, OLED_CMD);    //--set segment re-map 0 to 127oled_write_byte(0xa6, OLED_CMD);    //--set normal displayoled_write_byte(0xa8, OLED_CMD);    //--set multiplex ratio(1 to 64)oled_write_byte(0x3F, OLED_CMD);    //oled_write_byte(0xa4, OLED_CMD);    //0xa4,Output follows RAM content;0xa5,Output ignores RAM contentoled_write_byte(0xd3, OLED_CMD);    //-set display offsetoled_write_byte(0x00, OLED_CMD);    //-not offsetoled_write_byte(0xd5, OLED_CMD);    //--set display clock divide ratio/oscillator frequencyoled_write_byte(0xf0, OLED_CMD);    //--set divide ratiooled_write_byte(0xd9, OLED_CMD);    //--set pre-charge periodoled_write_byte(0x22, OLED_CMD);    //oled_write_byte(0xda, OLED_CMD);    //--set com pins hardware configurationoled_write_byte(0x12, OLED_CMD);oled_write_byte(0xdb, OLED_CMD);    //--set vcomholed_write_byte(0x20, OLED_CMD);    //0x20,0.77xVccoled_write_byte(0x8d, OLED_CMD);    //--set DC-DC enableoled_write_byte(0x14, OLED_CMD);    //oled_write_byte(0xaf, OLED_CMD);    //--turn on oled panel
}/*** @brief          turn on OLED display* @param[in]      none* @retval         none*/
/*** @brief          打开OLED显示* @param[in]      none* @retval         none*/
void OLED_display_on(void)
{oled_write_byte(0x8d, OLED_CMD);oled_write_byte(0x14, OLED_CMD);oled_write_byte(0xaf, OLED_CMD);
}/*** @brief          turn off OLED display* @param[in]      none* @retval         none*/
/*** @brief          关闭OLED显示* @param[in]      none* @retval         none*/
void OLED_display_off(void)
{oled_write_byte(0x8d, OLED_CMD);oled_write_byte(0x10, OLED_CMD);oled_write_byte(0xae, OLED_CMD);
}/*** @brief          operate the graphic ram(size: 128*8 char)* @param[in]      pen: the type of operate.PEN_CLEAR: set ram to 0x00PEN_WRITE: set ram to 0xffPEN_INVERSION: bit inversion * @retval         none*/
/*** @brief          操作GRAM内存(128*8char数组)* @param[in]      pen: 操作类型.PEN_CLEAR: 设置为0x00PEN_WRITE: 设置为0xffPEN_INVERSION: 按位取反* @retval         none*/
void OLED_operate_gram(pen_typedef pen)
{uint8_t i, n;for (i = 0; i < 8; i++){for (n = 0; n < 128; n++){if (pen == PEN_WRITE){OLED_GRAM[n][i] = 0xff;}else if (pen == PEN_CLEAR){OLED_GRAM[n][i] = 0x00;}else{OLED_GRAM[n][i] = 0xff - OLED_GRAM[n][i];}}}
}/*** @brief          cursor set to (x,y) point* @param[in]      x:X-axis, from 0 to 127* @param[in]      y:Y-axis, from 0 to 7* @retval         none*/
/*** @brief          设置光标起点(x,y)* @param[in]      x:x轴, 从 0 到 127* @param[in]      y:y轴, 从 0 到 7* @retval         none*/
void OLED_set_pos(uint8_t x, uint8_t y)
{oled_write_byte((0xb0 + y), OLED_CMD);              //set page address yoled_write_byte(((x&0xf0)>>4)|0x10, OLED_CMD);      //set column high addressoled_write_byte((x&0x0f), OLED_CMD);                //set column low address
}/*** @brief          draw one bit of graphic raw, operate one point of screan(128*64)* @param[in]      x: x-axis, [0, X_WIDTH-1]* @param[in]      y: y-axis, [0, Y_WIDTH-1]* @param[in]      pen: type of operation,PEN_CLEAR: set (x,y) to 0PEN_WRITE: set (x,y) to 1PEN_INVERSION: (x,y) value inversion * @retval         none*/
/*** @brief          操作GRAM中的一个位,相当于操作屏幕的一个点* @param[in]      x:x轴,  [0,X_WIDTH-1]* @param[in]      y:y轴,  [0,Y_WIDTH-1]* @param[in]      pen: 操作类型,PEN_CLEAR: 设置 (x,y) 点为 0PEN_WRITE: 设置 (x,y) 点为 1PEN_INVERSION: (x,y) 值反转* @retval         none*/
void OLED_draw_point(int8_t x, int8_t y, pen_typedef pen)
{uint8_t page = 0, row = 0;/* check the corrdinate */if ((x < 0) || (x > (X_WIDTH - 1)) || (y < 0) || (y > (Y_WIDTH - 1))){return;}page = y / 8;row = y % 8;if (pen == PEN_WRITE){OLED_GRAM[x][page] |= 1 << row;}else if (pen == PEN_INVERSION){OLED_GRAM[x][page] ^= 1 << row;}else{OLED_GRAM[x][page] &= ~(1 << row);}
}/*** @brief          draw a line from (x1, y1) to (x2, y2)* @param[in]      x1: the start point of line* @param[in]      y1: the start point of line* @param[in]      x2: the end point of line* @param[in]      y2: the end point of line* @param[in]      pen: type of operation,PEN_CLEAR,PEN_WRITE,PEN_INVERSION.* @retval         none*/
/*** @brief          画一条直线,从(x1,y1)到(x2,y2)* @param[in]      x1: 起点* @param[in]      y1: 起点* @param[in]      x2: 终点* @param[in]      y2: 终点* @param[in]      pen: 操作类型,PEN_CLEAR,PEN_WRITE,PEN_INVERSION.* @retval         none*/void OLED_draw_line(uint8_t x1, uint8_t y1, uint8_t x2, uint8_t y2, pen_typedef pen)
{uint8_t col = 0, row = 0;uint8_t x_st = 0, x_ed = 0, y_st = 0, y_ed = 0;float k = 0.0f, b = 0.0f;if (y1 == y2){(x1 <= x2) ? (x_st = x1):(x_st = x2);(x1 <= x2) ? (x_ed = x2):(x_ed = x1);for (col = x_st; col <= x_ed; col++){OLED_draw_point(col, y1, pen);}}else if (x1 == x2){(y1 <= y2) ? (y_st = y1):(y_st = y2);(y1 <= y2) ? (y_ed = y2):(y_ed = y1);for (row = y_st; row <= y_ed; row++){OLED_draw_point(x1, row, pen);}}else{k = ((float)(y2 - y1)) / (x2 - x1);b = (float)y1 - k * x1;(x1 <= x2) ? (x_st = x1):(x_st = x2);(x1 <= x2) ? (x_ed = x2):(x_ed = x2);for (col = x_st; col <= x_ed; col++){OLED_draw_point(col, (uint8_t)(col * k + b), pen);}}
}/*** @brief          show a character* @param[in]      row: start row of character* @param[in]      col: start column of character* @param[in]      chr: the character ready to show* @retval         none*/
/*** @brief          显示一个字符* @param[in]      row: 字符的开始行* @param[in]      col: 字符的开始列* @param[in]      chr: 字符* @retval         none*/
void OLED_show_char(uint8_t row, uint8_t col, uint8_t chr)
{uint8_t x = col * 6;uint8_t y = row * 12;uint8_t temp, t, t1;uint8_t y0 = y;chr = chr - ' ';for (t = 0; t < 12; t++){temp = asc2_1206[chr][t];for (t1 = 0; t1 < 8; t1++){if (temp&0x80)OLED_draw_point(x, y, PEN_WRITE);elseOLED_draw_point(x, y, PEN_CLEAR);temp <<= 1;y++;if ((y - y0) == 12){y = y0;x++;break;}}}
}/*** @brief          show a character string* @param[in]      row: row of character string begin* @param[in]      col: column of character string begin* @param[in]      chr: the pointer to character string* @retval         none*/
/*** @brief          显示一个字符串* @param[in]      row: 字符串的开始行* @param[in]      col: 字符串的开始列* @param[in]      chr: 字符串* @retval         none*/
void OLED_show_string(uint8_t row, uint8_t col, uint8_t *chr)
{uint8_t n =0;uint8_t max_len = 21 - col; // 每行最多显示21个字符(128/6≈21)// 先填充空格覆盖旧内容for (n = 0; n < max_len; n++) {OLED_show_char(row, col + n, ' ');}// 再显示新内容n = 0;while (chr[n] != '\0'){OLED_show_char(row, col, chr[n]);col++;if (col > 20){col = 0;row += 1;}n++;}OLED_refresh_gram();
}/*** @brief          formatted output in oled 128*64* @param[in]      row: row of character string begin, 0 <= row <= 4;* @param[in]      col: column of character string begin, 0 <= col <= 20;* @param          *fmt: the pointer to format character string* @note           if the character length is more than one row at a time, the extra characters will be truncated* @retval         none*/
/*** @brief          格式输出* @param[in]      row: 开始列,0 <= row <= 4;* @param[in]      col: 开始行, 0 <= col <= 20;* @param[in]      *fmt:格式化输出字符串* @note           如果字符串长度大于一行,额外的字符会换行* @retval         none*/
void OLED_printf(uint8_t row, uint8_t col, const char *fmt,...)
{static uint8_t LCD_BUF[128] = {0};static va_list ap;uint8_t remain_size = 0;if ((row > 4) || (col > 20) ){return;}va_start(ap, fmt);vsprintf((char *)LCD_BUF, fmt, ap);va_end(ap);remain_size = 21 - col;LCD_BUF[remain_size] = '\0';OLED_show_string(row, col, LCD_BUF);
}/*** @brief          send the data of gram to oled sreen* @param[in]      none* @retval         none*/
/*** @brief          发送数据到OLED的GRAM* @param[in]      none* @retval         none*/
void OLED_refresh_gram(void)
{uint8_t i, n;for (i = 0; i < 8; i++){OLED_set_pos(0, i);for (n = 0; n < 128; n++){oled_write_byte(OLED_GRAM[n][i], OLED_DATA);}}
}/*** @brief          show the logo of RoboMaster* @param[in]      none* @retval         none*/
/*** @brief          显示RM的LOGO* @param[in]      none* @retval         none*/
void OLED_LOGO(void)
{uint8_t temp_char = 0;uint8_t x = 0, y = 0;uint8_t i = 0;OLED_operate_gram(PEN_CLEAR);for(; y < 64; y += 8){for(x = 0; x < 128; x++){temp_char = LOGO_BMP[x][y/8];for(i = 0; i < 8; i++){if(temp_char & 0x80){OLED_draw_point(x, y + i,PEN_WRITE);}else{OLED_draw_point(x,y + i,PEN_CLEAR);}temp_char <<= 1;}}}OLED_refresh_gram();
}
oled.h
/******************************(C) COPYRIGHT 2019 DJI***************************** @file       oled.c/h* @brief      0.96 inch oled use SSD1306 driver. the file includes oled initialization function,*             and some OLED setting function, GRAM operate function, oled show num ,char and string function,*             show RoboMaster LOGO function.*             0.96OLED使用SSD1306驱动器,本文件包括初始化函数以及其他OLED设置函数, GRAM操作函数,oled显示数字,字符,字符串函数*             以及显示RoboMaster LOGO函数* @note       * @history*  Version    Date            Author          Modification*  V1.0.0     Dec-26-2018     RM              1. done*@verbatim============================================================================================================================================================@endverbatim****************************(C) COPYRIGHT 2019 DJI*****************************/#ifndef _OLED_H_
#define _OLED_H_#include "stm32f1xx_hal.h"
#include <stdint.h>// the I2C address of oled
#define OLED_I2C_ADDRESS    0x78//the resolution of oled   128*64
#define MAX_COLUMN      128
#define MAX_ROW         64#define X_WIDTH         MAX_COLUMN
#define Y_WIDTH         MAX_ROW#define OLED_CMD        0x00
#define OLED_DATA       0x01#define CHAR_SIZE_WIDTH 6
#define CHAR_SIZE_HIGHT 12typedef enum
{PEN_CLEAR = 0x00,PEN_WRITE = 0x01,PEN_INVERSION= 0x02,
}pen_typedef;/*** @brief          initialize the oled device* @param[in]      none* @retval         none*/
/*** @brief          初始化OLED模块,* @param[in]      none* @retval         none*/
extern void OLED_init(void);/*** @brief          turn on OLED display* @param[in]      none* @retval         none*/
/*** @brief          打开OLED显示* @param[in]      none* @retval         none*/
extern void OLED_display_on(void);/*** @brief          turn off OLED display* @param[in]      none* @retval         none*/
/*** @brief          关闭OLED显示* @param[in]      none* @retval         none*/
extern void OLED_display_off(void);/*** @brief          operate the graphic ram(size: 128*8 char)* @param[in]      pen: the type of operate.PEN_CLEAR: set ram to 0x00PEN_WRITE: set ram to 0xffPEN_INVERSION: bit inversion * @retval         none*/
/*** @brief          操作GRAM内存(128*8char数组)* @param[in]      pen: 操作类型.PEN_CLEAR: 设置为0x00PEN_WRITE: 设置为0xffPEN_INVERSION: 按位取反* @retval         none*/
extern void OLED_operate_gram(pen_typedef pen);/*** @brief          cursor set to (x,y) point* @param[in]      x:X-axis, from 0 to 127* @param[in]      y:Y-axis, from 0 to 7* @retval         none*/
/*** @brief          设置光标起点(x,y)* @param[in]      x:x轴, 从 0 到 127* @param[in]      y:y轴, 从 0 到 7* @retval         none*/
extern void OLED_set_pos(uint8_t x, uint8_t y);/*** @brief          draw one bit of graphic raw, operate one point of screan(128*64)* @param[in]      x: x-axis, [0, X_WIDTH-1]* @param[in]      y: y-axis, [0, Y_WIDTH-1]* @param[in]      pen: type of operation,PEN_CLEAR: set (x,y) to 0PEN_WRITE: set (x,y) to 1PEN_INVERSION: (x,y) value inversion * @retval         none*/
/*** @brief          操作GRAM中的一个位,相当于操作屏幕的一个点* @param[in]      x:x轴,  [0,X_WIDTH-1]* @param[in]      y:y轴,  [0,Y_WIDTH-1]* @param[in]      pen: 操作类型,PEN_CLEAR: 设置 (x,y) 点为 0PEN_WRITE: 设置 (x,y) 点为 1PEN_INVERSION: (x,y) 值反转* @retval         none*/
extern void OLED_draw_point(int8_t x, int8_t y, pen_typedef pen);/*** @brief          draw a line from (x1, y1) to (x2, y2)* @param[in]      x1: the start point of line* @param[in]      y1: the start point of line* @param[in]      x2: the end point of line* @param[in]      y2: the end point of line* @param[in]      pen: type of operation,PEN_CLEAR,PEN_WRITE,PEN_INVERSION.* @retval         none*/
/*** @brief          画一条直线,从(x1,y1)到(x2,y2)* @param[in]      x1: 起点* @param[in]      y1: 起点* @param[in]      x2: 终点* @param[in]      y2: 终点* @param[in]      pen: 操作类型,PEN_CLEAR,PEN_WRITE,PEN_INVERSION.* @retval         none*/
extern void OLED_draw_line(uint8_t x1, uint8_t y1, uint8_t x2, uint8_t y2, pen_typedef pen);/*** @brief          show a character* @param[in]      row: start row of character* @param[in]      col: start column of character* @param[in]      chr: the character ready to show* @retval         none*/
/*** @brief          显示一个字符* @param[in]      row: 字符的开始行* @param[in]      col: 字符的开始列* @param[in]      chr: 字符* @retval         none*/
extern void OLED_show_char(uint8_t row, uint8_t col, uint8_t chr);/*** @brief          show a character string* @param[in]      row: row of character string begin* @param[in]      col: column of character string begin* @param[in]      chr: the pointer to character string* @retval         none*/
/*** @brief          显示一个字符串* @param[in]      row: 字符串的开始行* @param[in]      col: 字符串的开始列* @param[in]      chr: 字符串* @retval         none*/
extern void OLED_show_string(uint8_t row, uint8_t col, uint8_t *chr);/*** @brief          formatted output in oled 128*64* @param[in]      row: row of character string begin, 0 <= row <= 4;* @param[in]      col: column of character string begin, 0 <= col <= 20;* @param          *fmt: the pointer to format character string* @note           if the character length is more than one row at a time, the extra characters will be truncated* @retval         none*/
/*** @brief          格式输出* @param[in]      row: 开始列,0 <= row <= 4;* @param[in]      col: 开始行, 0 <= col <= 20;* @param[in]      *fmt:格式化输出字符串* @note           如果字符串长度大于一行,额外的字符会换行* @retval         none*/
extern void OLED_printf(uint8_t row, uint8_t col, const char *fmt,...);/*** @brief          send the data of gram to oled sreen* @param[in]      none* @retval         none*/
/*** @brief          发送数据到OLED的GRAM* @param[in]      none* @retval         none*/
extern void OLED_refresh_gram(void);/*** @brief          show the logo of RoboMaster* @param[in]      none* @retval         none*/
/*** @brief          显示RM的LOGO* @param[in]      none* @retval         none*/
extern void OLED_LOGO(void);
#endif
oledfont.h
#ifndef __OLED__FONT__H
#define __OLED__FONT__H
//the common ascii character
const unsigned char asc2_1206[95][12]={
{0x00,0x00,0x00,0x00,0x00,0x00,0x00,0x00,0x00,0x00,0x00,0x00},/*" ",0*/
{0x00,0x00,0x00,0x00,0x3F,0x40,0x00,0x00,0x00,0x00,0x00,0x00},/*"!",1*/
{0x00,0x00,0x30,0x00,0x40,0x00,0x30,0x00,0x40,0x00,0x00,0x00},/*""",2*/
{0x09,0x00,0x0B,0xC0,0x3D,0x00,0x0B,0xC0,0x3D,0x00,0x09,0x00},/*"#",3*/
{0x18,0xC0,0x24,0x40,0x7F,0xE0,0x22,0x40,0x31,0x80,0x00,0x00},/*"$",4*/
{0x18,0x00,0x24,0xC0,0x1B,0x00,0x0D,0x80,0x32,0x40,0x01,0x80},/*"%",5*/
{0x03,0x80,0x1C,0x40,0x27,0x40,0x1C,0x80,0x07,0x40,0x00,0x40},/*"&",6*/
{0x10,0x00,0x60,0x00,0x00,0x00,0x00,0x00,0x00,0x00,0x00,0x00},/*"'",7*/
{0x00,0x00,0x00,0x00,0x00,0x00,0x1F,0x80,0x20,0x40,0x40,0x20},/*"(",8*/
{0x00,0x00,0x40,0x20,0x20,0x40,0x1F,0x80,0x00,0x00,0x00,0x00},/*")",9*/
{0x09,0x00,0x06,0x00,0x1F,0x80,0x06,0x00,0x09,0x00,0x00,0x00},/*"*",10*/
{0x04,0x00,0x04,0x00,0x3F,0x80,0x04,0x00,0x04,0x00,0x00,0x00},/*"+",11*/
{0x00,0x10,0x00,0x60,0x00,0x00,0x00,0x00,0x00,0x00,0x00,0x00},/*",",12*/
{0x04,0x00,0x04,0x00,0x04,0x00,0x04,0x00,0x04,0x00,0x00,0x00},/*"-",13*/
{0x00,0x00,0x00,0x40,0x00,0x00,0x00,0x00,0x00,0x00,0x00,0x00},/*".",14*/
{0x00,0x20,0x01,0xC0,0x06,0x00,0x38,0x00,0x40,0x00,0x00,0x00},/*"/",15*/
{0x1F,0x80,0x20,0x40,0x20,0x40,0x20,0x40,0x1F,0x80,0x00,0x00},/*"0",16*/
{0x00,0x00,0x10,0x40,0x3F,0xC0,0x00,0x40,0x00,0x00,0x00,0x00},/*"1",17*/
{0x18,0xC0,0x21,0x40,0x22,0x40,0x24,0x40,0x18,0x40,0x00,0x00},/*"2",18*/
{0x10,0x80,0x20,0x40,0x24,0x40,0x24,0x40,0x1B,0x80,0x00,0x00},/*"3",19*/
{0x02,0x00,0x0D,0x00,0x11,0x00,0x3F,0xC0,0x01,0x40,0x00,0x00},/*"4",20*/
{0x3C,0x80,0x24,0x40,0x24,0x40,0x24,0x40,0x23,0x80,0x00,0x00},/*"5",21*/
{0x1F,0x80,0x24,0x40,0x24,0x40,0x34,0x40,0x03,0x80,0x00,0x00},/*"6",22*/
{0x30,0x00,0x20,0x00,0x27,0xC0,0x38,0x00,0x20,0x00,0x00,0x00},/*"7",23*/
{0x1B,0x80,0x24,0x40,0x24,0x40,0x24,0x40,0x1B,0x80,0x00,0x00},/*"8",24*/
{0x1C,0x00,0x22,0xC0,0x22,0x40,0x22,0x40,0x1F,0x80,0x00,0x00},/*"9",25*/
{0x00,0x00,0x00,0x00,0x08,0x40,0x00,0x00,0x00,0x00,0x00,0x00},/*":",26*/
{0x00,0x00,0x00,0x00,0x04,0x60,0x00,0x00,0x00,0x00,0x00,0x00},/*";",27*/
{0x00,0x00,0x04,0x00,0x0A,0x00,0x11,0x00,0x20,0x80,0x40,0x40},/*"<",28*/
{0x09,0x00,0x09,0x00,0x09,0x00,0x09,0x00,0x09,0x00,0x00,0x00},/*"=",29*/
{0x00,0x00,0x40,0x40,0x20,0x80,0x11,0x00,0x0A,0x00,0x04,0x00},/*">",30*/
{0x18,0x00,0x20,0x00,0x23,0x40,0x24,0x00,0x18,0x00,0x00,0x00},/*"?",31*/
{0x1F,0x80,0x20,0x40,0x27,0x40,0x29,0x40,0x1F,0x40,0x00,0x00},/*"@",32*/
{0x00,0x40,0x07,0xC0,0x39,0x00,0x0F,0x00,0x01,0xC0,0x00,0x40},/*"A",33*/
{0x20,0x40,0x3F,0xC0,0x24,0x40,0x24,0x40,0x1B,0x80,0x00,0x00},/*"B",34*/
{0x1F,0x80,0x20,0x40,0x20,0x40,0x20,0x40,0x30,0x80,0x00,0x00},/*"C",35*/
{0x20,0x40,0x3F,0xC0,0x20,0x40,0x20,0x40,0x1F,0x80,0x00,0x00},/*"D",36*/
{0x20,0x40,0x3F,0xC0,0x24,0x40,0x2E,0x40,0x30,0xC0,0x00,0x00},/*"E",37*/
{0x20,0x40,0x3F,0xC0,0x24,0x40,0x2E,0x00,0x30,0x00,0x00,0x00},/*"F",38*/
{0x0F,0x00,0x10,0x80,0x20,0x40,0x22,0x40,0x33,0x80,0x02,0x00},/*"G",39*/
{0x20,0x40,0x3F,0xC0,0x04,0x00,0x04,0x00,0x3F,0xC0,0x20,0x40},/*"H",40*/
{0x20,0x40,0x20,0x40,0x3F,0xC0,0x20,0x40,0x20,0x40,0x00,0x00},/*"I",41*/
{0x00,0x60,0x20,0x20,0x20,0x20,0x3F,0xC0,0x20,0x00,0x20,0x00},/*"J",42*/
{0x20,0x40,0x3F,0xC0,0x24,0x40,0x0B,0x00,0x30,0xC0,0x20,0x40},/*"K",43*/
{0x20,0x40,0x3F,0xC0,0x20,0x40,0x00,0x40,0x00,0x40,0x00,0xC0},/*"L",44*/
{0x3F,0xC0,0x3C,0x00,0x03,0xC0,0x3C,0x00,0x3F,0xC0,0x00,0x00},/*"M",45*/
{0x20,0x40,0x3F,0xC0,0x0C,0x40,0x23,0x00,0x3F,0xC0,0x20,0x00},/*"N",46*/
{0x1F,0x80,0x20,0x40,0x20,0x40,0x20,0x40,0x1F,0x80,0x00,0x00},/*"O",47*/
{0x20,0x40,0x3F,0xC0,0x24,0x40,0x24,0x00,0x18,0x00,0x00,0x00},/*"P",48*/
{0x1F,0x80,0x21,0x40,0x21,0x40,0x20,0xE0,0x1F,0xA0,0x00,0x00},/*"Q",49*/
{0x20,0x40,0x3F,0xC0,0x24,0x40,0x26,0x00,0x19,0xC0,0x00,0x40},/*"R",50*/
{0x18,0xC0,0x24,0x40,0x24,0x40,0x22,0x40,0x31,0x80,0x00,0x00},/*"S",51*/
{0x30,0x00,0x20,0x40,0x3F,0xC0,0x20,0x40,0x30,0x00,0x00,0x00},/*"T",52*/
{0x20,0x00,0x3F,0x80,0x00,0x40,0x00,0x40,0x3F,0x80,0x20,0x00},/*"U",53*/
{0x20,0x00,0x3E,0x00,0x01,0xC0,0x07,0x00,0x38,0x00,0x20,0x00},/*"V",54*/
{0x38,0x00,0x07,0xC0,0x3C,0x00,0x07,0xC0,0x38,0x00,0x00,0x00},/*"W",55*/
{0x20,0x40,0x39,0xC0,0x06,0x00,0x39,0xC0,0x20,0x40,0x00,0x00},/*"X",56*/
{0x20,0x00,0x38,0x40,0x07,0xC0,0x38,0x40,0x20,0x00,0x00,0x00},/*"Y",57*/
{0x30,0x40,0x21,0xC0,0x26,0x40,0x38,0x40,0x20,0xC0,0x00,0x00},/*"Z",58*/
{0x00,0x00,0x00,0x00,0x7F,0xE0,0x40,0x20,0x40,0x20,0x00,0x00},/*"[",59*/
{0x00,0x00,0x70,0x00,0x0C,0x00,0x03,0x80,0x00,0x40,0x00,0x00},/*"\",60*/
{0x00,0x00,0x40,0x20,0x40,0x20,0x7F,0xE0,0x00,0x00,0x00,0x00},/*"]",61*/
{0x00,0x00,0x20,0x00,0x40,0x00,0x20,0x00,0x00,0x00,0x00,0x00},/*"^",62*/
{0x00,0x10,0x00,0x10,0x00,0x10,0x00,0x10,0x00,0x10,0x00,0x10},/*"_",63*/
{0x00,0x00,0x00,0x00,0x40,0x00,0x00,0x00,0x00,0x00,0x00,0x00},/*"`",64*/
{0x00,0x00,0x02,0x80,0x05,0x40,0x05,0x40,0x03,0xC0,0x00,0x40},/*"a",65*/
{0x20,0x00,0x3F,0xC0,0x04,0x40,0x04,0x40,0x03,0x80,0x00,0x00},/*"b",66*/
{0x00,0x00,0x03,0x80,0x04,0x40,0x04,0x40,0x06,0x40,0x00,0x00},/*"c",67*/
{0x00,0x00,0x03,0x80,0x04,0x40,0x24,0x40,0x3F,0xC0,0x00,0x40},/*"d",68*/
{0x00,0x00,0x03,0x80,0x05,0x40,0x05,0x40,0x03,0x40,0x00,0x00},/*"e",69*/
{0x00,0x00,0x04,0x40,0x1F,0xC0,0x24,0x40,0x24,0x40,0x20,0x00},/*"f",70*/
{0x00,0x00,0x02,0xE0,0x05,0x50,0x05,0x50,0x06,0x50,0x04,0x20},/*"g",71*/
{0x20,0x40,0x3F,0xC0,0x04,0x40,0x04,0x00,0x03,0xC0,0x00,0x40},/*"h",72*/
{0x00,0x00,0x04,0x40,0x27,0xC0,0x00,0x40,0x00,0x00,0x00,0x00},/*"i",73*/
{0x00,0x10,0x00,0x10,0x04,0x10,0x27,0xE0,0x00,0x00,0x00,0x00},/*"j",74*/
{0x20,0x40,0x3F,0xC0,0x01,0x40,0x07,0x00,0x04,0xC0,0x04,0x40},/*"k",75*/
{0x20,0x40,0x20,0x40,0x3F,0xC0,0x00,0x40,0x00,0x40,0x00,0x00},/*"l",76*/
{0x07,0xC0,0x04,0x00,0x07,0xC0,0x04,0x00,0x03,0xC0,0x00,0x00},/*"m",77*/
{0x04,0x40,0x07,0xC0,0x04,0x40,0x04,0x00,0x03,0xC0,0x00,0x40},/*"n",78*/
{0x00,0x00,0x03,0x80,0x04,0x40,0x04,0x40,0x03,0x80,0x00,0x00},/*"o",79*/
{0x04,0x10,0x07,0xF0,0x04,0x50,0x04,0x40,0x03,0x80,0x00,0x00},/*"p",80*/
{0x00,0x00,0x03,0x80,0x04,0x40,0x04,0x50,0x07,0xF0,0x00,0x10},/*"q",81*/
{0x04,0x40,0x07,0xC0,0x02,0x40,0x04,0x00,0x04,0x00,0x00,0x00},/*"r",82*/
{0x00,0x00,0x06,0x40,0x05,0x40,0x05,0x40,0x04,0xC0,0x00,0x00},/*"s",83*/
{0x00,0x00,0x04,0x00,0x1F,0x80,0x04,0x40,0x00,0x40,0x00,0x00},/*"t",84*/
{0x04,0x00,0x07,0x80,0x00,0x40,0x04,0x40,0x07,0xC0,0x00,0x40},/*"u",85*/
{0x04,0x00,0x07,0x00,0x04,0xC0,0x01,0x80,0x06,0x00,0x04,0x00},/*"v",86*/
{0x06,0x00,0x01,0xC0,0x07,0x00,0x01,0xC0,0x06,0x00,0x00,0x00},/*"w",87*/
{0x04,0x40,0x06,0xC0,0x01,0x00,0x06,0xC0,0x04,0x40,0x00,0x00},/*"x",88*/
{0x04,0x10,0x07,0x10,0x04,0xE0,0x01,0x80,0x06,0x00,0x04,0x00},/*"y",89*/
{0x00,0x00,0x04,0x40,0x05,0xC0,0x06,0x40,0x04,0x40,0x00,0x00},/*"z",90*/
{0x00,0x00,0x00,0x00,0x04,0x00,0x7B,0xE0,0x40,0x20,0x00,0x00},/*"{",91*/
{0x00,0x00,0x00,0x00,0x00,0x00,0xFF,0xF0,0x00,0x00,0x00,0x00},/*"|",92*/
{0x00,0x00,0x40,0x20,0x7B,0xE0,0x04,0x00,0x00,0x00,0x00,0x00},/*"}",93*/
{0x40,0x00,0x80,0x00,0x40,0x00,0x20,0x00,0x20,0x00,0x40,0x00},/*"~",94*/
};//the logo of robomaster
const unsigned char LOGO_BMP[128][8] = {
{0x00,0x00,0x00,0x00,0x00,0x00,0x00,0x00},
{0x00,0x00,0x00,0x00,0x00,0x00,0x00,0x00},
{0x00,0x00,0x00,0x00,0x00,0x00,0x00,0x00},
{0x00,0x00,0x00,0x00,0x00,0x00,0x00,0x00},
{0x00,0x00,0x00,0x00,0x00,0x00,0x00,0x00},
{0x00,0x00,0x00,0x00,0x00,0x00,0x00,0x00},
{0x00,0x00,0x00,0x00,0x00,0x00,0x00,0x00},
{0x00,0x00,0x00,0x00,0x00,0x00,0x00,0x00},
{0x00,0x00,0x00,0x00,0x00,0x00,0x00,0x06},
{0x00,0x00,0x00,0x00,0x00,0x00,0x00,0x1E},
{0x00,0x00,0x00,0x00,0x00,0x00,0x00,0xDE},
{0x00,0x00,0x00,0x00,0x00,0x00,0x00,0xD8},
{0x00,0x00,0x00,0x00,0x00,0x00,0x00,0xD8},
{0x00,0x00,0x00,0x00,0x00,0x00,0x00,0xD8},
{0x00,0x00,0x00,0x00,0x00,0x00,0x00,0xDE},
{0x00,0x00,0x00,0x00,0x00,0x00,0x00,0xFE},
{0x00,0x00,0x00,0x00,0x00,0x00,0x00,0xF6},
{0x00,0x00,0x00,0x00,0x00,0x00,0x00,0x72},
{0x00,0x00,0x00,0x00,0x00,0x00,0x00,0x00},
{0x00,0x00,0x00,0x00,0x00,0x00,0x00,0x7C},
{0x00,0x00,0x00,0x00,0x00,0x00,0x00,0xFE},
{0x00,0x00,0x00,0x00,0x00,0x00,0x00,0xC6},
{0x00,0x00,0x00,0x00,0x00,0x00,0x00,0xC6},
{0x00,0x00,0x00,0x00,0x00,0x00,0x00,0xC6},
{0x00,0x00,0x00,0x00,0x00,0x00,0x00,0xFE},
{0x00,0x00,0x00,0x00,0x00,0x00,0x00,0x7C},
{0x00,0x00,0x00,0x00,0x00,0x00,0x00,0x00},
{0x00,0x00,0x00,0x00,0x00,0x00,0x00,0x1E},
{0x00,0x00,0x00,0x00,0x00,0x00,0x00,0xDE},
{0x00,0x00,0x00,0x00,0x00,0x00,0x00,0xD6},
{0x00,0x00,0x00,0x00,0x00,0x00,0x00,0xD6},
{0x00,0x00,0x00,0x00,0x00,0x00,0x00,0xD6},
{0x00,0x00,0x00,0x00,0x00,0x00,0x00,0xD6},
{0x00,0x00,0x00,0x00,0x00,0x00,0x00,0xDE},
{0x40,0x00,0x00,0x00,0x00,0x00,0x00,0xFE},
{0x60,0x00,0x00,0x00,0x00,0x10,0x00,0x6C},
{0x70,0x00,0x00,0x00,0x00,0x30,0x00,0x00},
{0x78,0x00,0x00,0x00,0x00,0xF0,0x00,0x7C},
{0x7C,0x00,0x00,0x00,0x07,0xF0,0x00,0xFE},
{0x7E,0x00,0x00,0x00,0x3F,0xF0,0x00,0xC6},
{0x7F,0x00,0x00,0x01,0xFF,0xF0,0x00,0xC6},
{0x7F,0x80,0x00,0x0F,0xFF,0xF0,0x00,0xC6},
{0x7F,0xC0,0x00,0x7F,0xFF,0xF0,0x00,0xFE},
{0x7F,0xE0,0x03,0xFF,0xFF,0xF0,0x00,0x7C},
{0x7F,0xF0,0x3F,0xFF,0xFF,0xF0,0x00,0x02},
{0x7F,0xF8,0x3F,0xFF,0xFF,0xF0,0x00,0x06},
{0x7F,0xFC,0x3F,0xFF,0xFF,0xF0,0x00,0x1E},
{0x7F,0xFE,0x3F,0xFF,0xFF,0xF0,0x00,0xBC},
{0x7F,0xFF,0x3F,0xFF,0xFF,0xF0,0x00,0xE0},
{0x7F,0xFF,0xBF,0xFF,0xFF,0x80,0x00,0xF8},
{0x7F,0xFF,0xFF,0xFF,0xFC,0x00,0x00,0x3E},
{0x7F,0xFF,0xFF,0xFF,0xE0,0x00,0x00,0x0E},
{0x7F,0xFF,0xFF,0xFF,0x00,0x00,0x00,0xB8},
{0x7F,0xFF,0xFF,0xF8,0x00,0x00,0x00,0xE0},
{0x7F,0xFF,0xFF,0xF0,0x00,0x00,0x00,0xFE},
{0x7F,0xFF,0xFF,0xF0,0x00,0x00,0x00,0x1E},
{0x7F,0xFF,0xFF,0xF0,0x00,0x00,0x00,0x02},
{0x7F,0xFF,0xFF,0xF0,0x00,0x00,0x00,0x00},
{0x7F,0xEF,0xFF,0xF0,0x02,0x00,0x00,0x06},
{0x7F,0xE7,0xFF,0xF0,0x02,0x00,0x00,0x0E},
{0x7F,0xE3,0xFF,0xF0,0x02,0x00,0x00,0x1C},
{0x7F,0xE1,0xFF,0xF8,0x03,0x00,0x00,0xBA},
{0x7F,0xE0,0xFF,0xFC,0x03,0x00,0x00,0xF6},
{0x7F,0xE0,0x7F,0xFE,0x03,0x80,0x00,0xE6},
{0x7F,0xE0,0x3F,0xFF,0x03,0x80,0x00,0xF6},
{0x7F,0xE0,0x3F,0xFF,0x83,0xC0,0x00,0x3E},
{0x7F,0xE0,0x3F,0xFF,0xC3,0xC0,0x00,0x0E},
{0x7F,0xE0,0x3F,0xFF,0xE3,0xE0,0x00,0x02},
{0x7F,0xE0,0x3F,0xFF,0xF3,0xE0,0x00,0x00},
{0x7F,0xE0,0x3F,0xFF,0xFB,0xF0,0x00,0x02},
{0x7F,0xE0,0x3F,0xFF,0xFF,0xF0,0x00,0x66},
{0x7F,0xE0,0x3F,0xFF,0xFF,0xF8,0x00,0xF6},
{0x7F,0xE0,0x3F,0xFF,0xFF,0xF8,0x00,0xD6},
{0x7F,0xE0,0x3F,0xFF,0xFF,0xFC,0x00,0xD6},
{0x7F,0xF0,0x7F,0xFF,0xFF,0xFC,0x00,0xD6},
{0x7F,0xF8,0xFF,0xF7,0xFF,0xFE,0x00,0xD6},
{0x7F,0xFF,0xFF,0xF3,0xFF,0xFE,0x00,0xDE},
{0x3F,0xFF,0xFF,0xE1,0xFF,0xFF,0x00,0x8C},
{0x3F,0xFF,0xFF,0xE0,0xFF,0xCF,0x00,0x40},
{0x1F,0xFF,0xFF,0xC0,0x7F,0xC7,0x80,0xC0},
{0x1F,0xFF,0xFF,0xC0,0x3F,0xC3,0x80,0xC0},
{0x0F,0xFF,0xFF,0x80,0x1F,0xC1,0xC0,0xFE},
{0x07,0xFF,0xFF,0x00,0x0F,0xC0,0xC0,0xFE},
{0x03,0xFF,0xFE,0x00,0x07,0xC0,0x60,0xC0},
{0x01,0xFF,0xFC,0x00,0x03,0xC0,0x20,0xC0},
{0x00,0x7F,0xF0,0x00,0x01,0xC0,0x00,0x86},
{0x00,0x0F,0x80,0x00,0x00,0xC0,0x00,0x16},
{0x00,0x00,0x00,0x00,0x00,0x40,0x00,0xD6},
{0x00,0x00,0x00,0x00,0x00,0x00,0x00,0xD6},
{0x00,0x00,0x00,0x00,0x00,0x00,0x00,0xD6},
{0x00,0x00,0x00,0x00,0x00,0x00,0x00,0xD6},
{0x00,0x00,0x00,0x00,0x00,0x00,0x00,0xD6},
{0x00,0x00,0x00,0x00,0x00,0x00,0x00,0xD0},
{0x00,0x00,0x00,0x00,0x00,0x00,0x00,0xC0},
{0x00,0x00,0x00,0x00,0x00,0x00,0x00,0x06},
{0x00,0x00,0x00,0x00,0x00,0x00,0x00,0x1E},
{0x00,0x00,0x00,0x00,0x00,0x00,0x00,0xDE},
{0x00,0x00,0x00,0x00,0x00,0x00,0x00,0xD8},
{0x00,0x00,0x00,0x00,0x00,0x00,0x00,0xD8},
{0x00,0x00,0x00,0x00,0x00,0x00,0x00,0xD8},
{0x00,0x00,0x00,0x00,0x00,0x00,0x00,0xDE},
{0x00,0x00,0x00,0x00,0x00,0x00,0x00,0xDE},
{0x00,0x00,0x00,0x00,0x00,0x00,0x00,0xF6},
{0x00,0x00,0x00,0x00,0x00,0x00,0x00,0x72},
{0x00,0x00,0x00,0x00,0x00,0x00,0x00,0x00},
{0x00,0x00,0x00,0x00,0x00,0x00,0x00,0x62},
{0x00,0x00,0x00,0x00,0x00,0x00,0x00,0xF6},
{0x00,0x00,0x00,0x00,0x00,0x00,0x00,0xF6},
{0x00,0x00,0x00,0x00,0x00,0x00,0x00,0xD6},
{0x00,0x00,0x00,0x00,0x00,0x00,0x00,0xD6},
{0x00,0x00,0x00,0x00,0x00,0x00,0x00,0xD6},
{0x00,0x00,0x00,0x00,0x00,0x00,0x00,0xDE},
{0x00,0x00,0x00,0x00,0x00,0x00,0x00,0x8C},
{0x00,0x00,0x00,0x00,0x00,0x00,0x00,0x00},
{0x00,0x00,0x00,0x00,0x00,0x00,0x00,0x00},
{0x00,0x00,0x00,0x00,0x00,0x00,0x00,0x00},
{0x00,0x00,0x00,0x00,0x00,0x00,0x00,0x00},
{0x00,0x00,0x00,0x00,0x00,0x00,0x00,0x00},
{0x00,0x00,0x00,0x00,0x00,0x00,0x00,0x00},
{0x00,0x00,0x00,0x00,0x00,0x00,0x00,0x00},
{0x00,0x00,0x00,0x00,0x00,0x00,0x00,0x00},
{0x00,0x00,0x00,0x00,0x00,0x00,0x00,0x00},
{0x00,0x00,0x00,0x00,0x00,0x00,0x00,0x00},
{0x00,0x00,0x00,0x00,0x00,0x00,0x00,0x00},
{0x00,0x00,0x00,0x00,0x00,0x00,0x00,0x00},
{0x00,0x00,0x00,0x00,0x00,0x00,0x00,0x00},
{0x00,0x00,0x00,0x00,0x00,0x00,0x00,0x00},
{0x00,0x00,0x00,0x00,0x00,0x00,0x00,0x00},
};#endif
usart串口相关
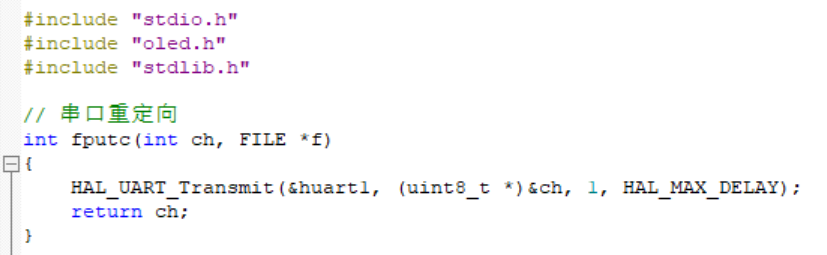
main函数中添加串口重定向,方便串口打印,对应库记得加上。
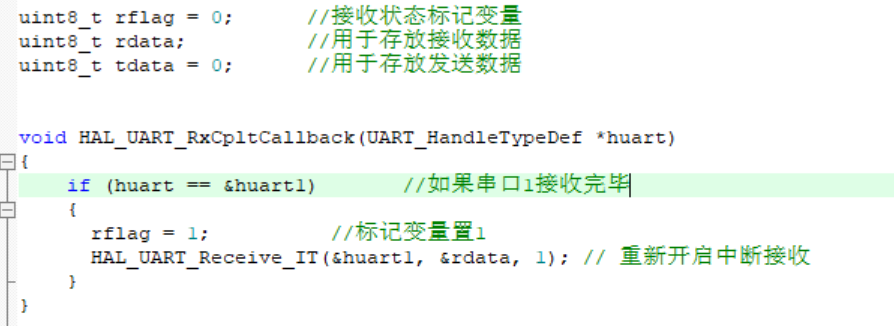
定义回调函数 --- HAL_UART_RxCpltCallback --- 用于在使用 HAL 库进行串口接收时处理接收完成事件。(连接蓝牙收发数据相关)
28BYJ-48 电机相关
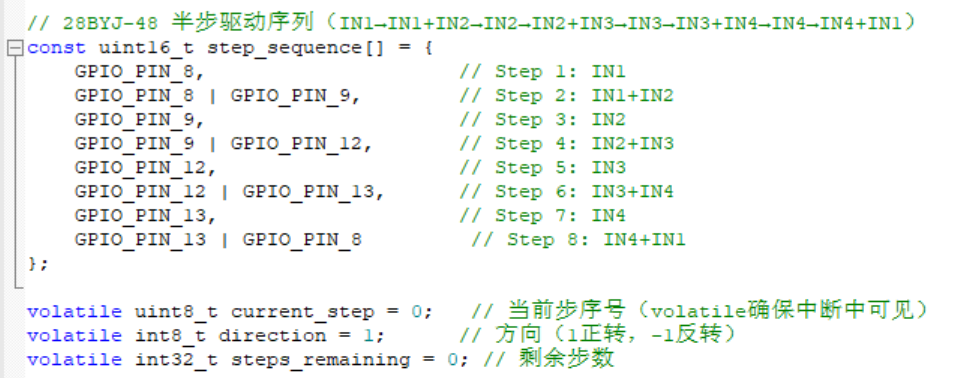
定义电机半步驱动序列
定义回调函数 --- HAL_TIM_PeriodElapsedCallback --- 处理定时器的周期性中断事件。(驱动电机旋转相关)

主函数内部实现
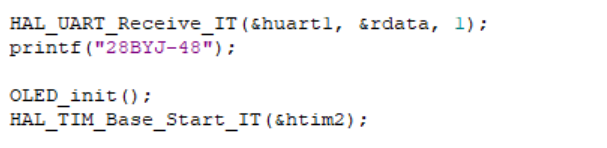
main() 函数里启用中断模式来接收 UART 数据,通过串口打印调试信息(printf),添加 oled 初始化函数,启动定时器的中断功能。
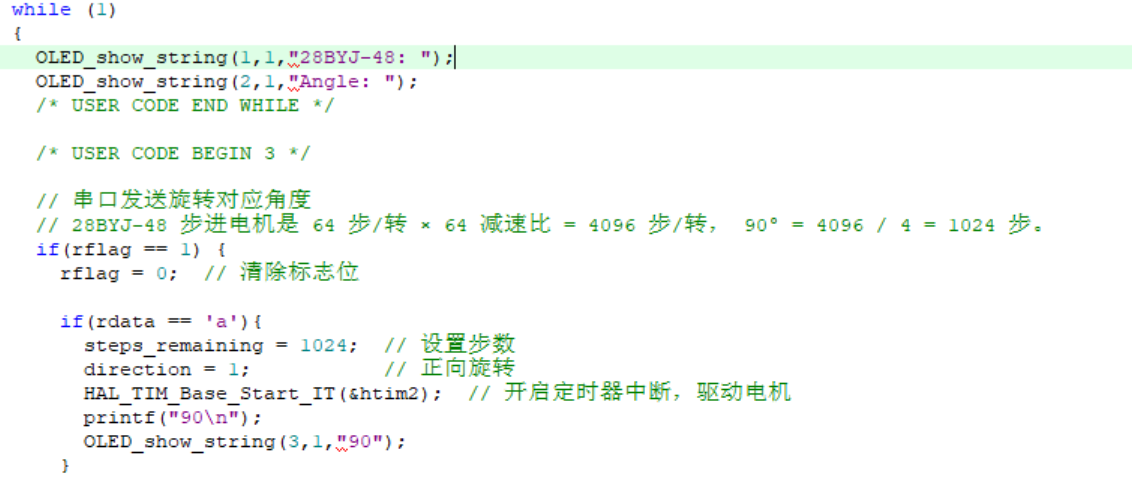
while()循环,在 oled 上显示信息,串口发送对应角度信息。如下图示例:
结束后重新启用串口接收中断。

4. 控制电机(方法扩展)
我们前面介绍了直接计算步长来实现对应角度旋转,现在以 PWM 频率为节拍,即用 PWM 方式来计时。28BYJ-48 是一种步进电机,而不是直流电机,不能直接用 PWM 占空比来控制转速或转向,需要控制四个线圈的步进顺序。
首先,对应 CubeMAX 引脚相关都不需要改动,需要改动的配置是 定时器2 ,我们将定时器2通道1设置为PWM输出,然后生成代码文件(这里注意,代码一定写在注释里,不然重新生成会覆盖掉)。

代码部分,前面串口重定向和串口回调函数都不需要变动,主要修改处为 中断回调函数。相关代码如下,我这里还添加了电机速度调控函数。
变量定义:
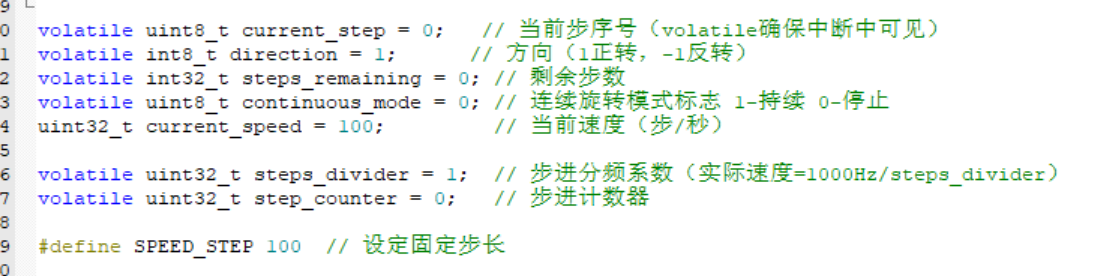
- volatile uint8_t current_step = 0;:当前步序号,使用volatile关键字确保在中断中也能正确访问和修改。
- volatile int8_t direction = 1;:电机旋转方向,1表示正转,-1表示反转。
- volatile int32_t steps_remaining = 0;:剩余步数。
- volatile uint8_t continuous_mode = 0;:连续旋转模式标志,1表示持续旋转,0表示停止。
- uint32_t current_speed = 100;:当前速度,单位为步/秒。
- volatile uint32_t steps_divider = 1;:步进分频系数,用于调整实际速度。
- volatile uint32_t step_counter = 0;:步进计数器,用于计算何时执行下一步。
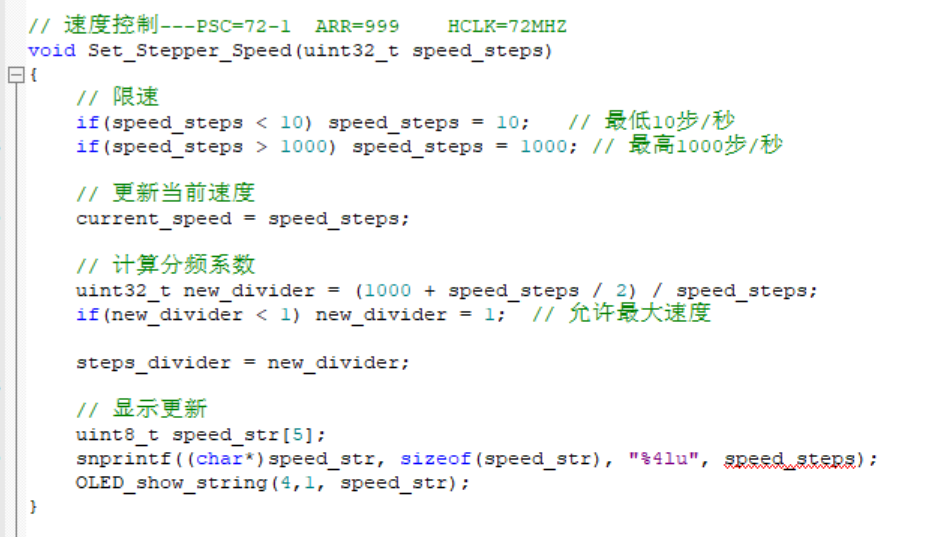
速度设置函数 Set_Stepper_Speed:
- 接收一个速度参数speed_steps,表示每秒的步数。
- 限制速度在10到1000步/秒之间。
- 根据速度计算新的分频系数steps_divider,以调整定时器中断频率,从而控制步进电机的速度。
- 更新当前速度并在OLED显示屏上显示。
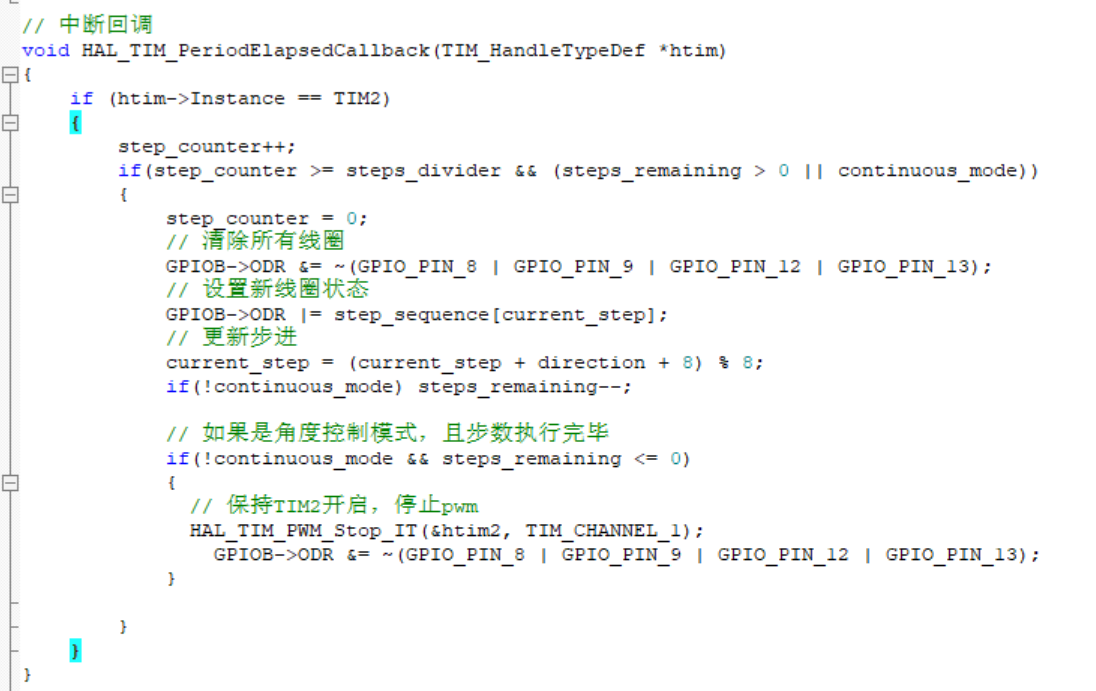
中断回调 HAL_TIM_PeriodElapsedCallback:
- 当定时器(TIM2)周期结束时调用。
- 增加步进计数器step_counter。
- 如果计数器达到分频系数steps_divider且剩余步数大于0或处于连续旋转模式,则执行步进操作:
- 清除所有线圈(GPIO引脚)的输出。
- 根据当前步序号current_step和旋转方向direction设置新的线圈状态。
- 更新当前步序号。
- 如果不是连续旋转模式,则减少剩余步数。
- 如果剩余步数为0且不是连续旋转模式,则停止PWM输出并清除所有线圈状态。
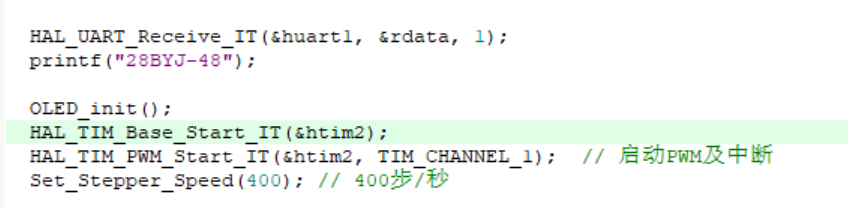
main 函数中定义相关控制,我们在初始化这段加入 pwm 启动,同时定义电机初始转速为 400步/s 。
然后在 while 循环中加入控制代码:
命令处理:
- 启动/停止:如果接收到 'm',电机将以连续模式启动并顺时针旋转;如果接收到 'n',电机将停止。
- 加减速:如果接收到 'j',电机将加速;如果接收到 'k',电机将减速。加减速是通过改变current_speed变量实现的,然后调用Set_Stepper_Speed(current_speed);来设置新的速度。
- 角度控制:如果接收到 'a' 到 'd' 或 'x' 到 'w' 中的任何字符,电机将旋转到指定的角度。这些字符分别代表不同的角度(例如,'a' 代表90度,'b' 代表180度,'x' 代表-90度等)。角度转换为步数,然后电机根据计算出的步数和方向旋转。
while (1){OLED_show_string(1,1,"28BYJ-48: ");// OLED_show_string(2,1,"Angle: ");/* USER CODE END WHILE *//* USER CODE BEGIN 3 */if(rflag == 1) {rflag = 0;// 持续旋转命令if(rdata == 'm') {continuous_mode = 1;direction = 1;HAL_TIM_PWM_Start_IT(&htim2, TIM_CHANNEL_1);printf("START\n");OLED_show_string(3,1,"START ");}// 停止命令else if(rdata == 'n') {continuous_mode = 0;steps_remaining = 0;HAL_TIM_PWM_Stop_IT(&htim2, TIM_CHANNEL_1);HAL_GPIO_WritePin(GPIOB, GPIO_PIN_8|GPIO_PIN_9|GPIO_PIN_12|GPIO_PIN_13, GPIO_PIN_RESET);printf("STOP\n");OLED_show_string(3,1,"STOP ");}// 加减速else if(rdata == 'j' || rdata == 'k') {// 加速if(rdata == 'j'){current_speed += SPEED_STEP;}// 减速else{if (current_speed > SPEED_STEP) {current_speed -= SPEED_STEP;} else {current_speed = 10; // 不能低于10}}Set_Stepper_Speed(current_speed);}// 角度控制else {int16_t angle = 0;switch(rdata) {case 'a': angle = 90; break;case 'b': angle = 180; break;case 'c': angle = 270; break;case 'd': angle = 360; break;case 'x': angle = -90; break;case 'y': angle = -180; break;case 'z': angle = -270; break;case 'w': angle = -360; break;}if(angle != 0) {steps_remaining = abs(angle) * 4096 / 360;direction = (angle > 0) ? 1 : -1;HAL_TIM_PWM_Start_IT(&htim2, TIM_CHANNEL_1);// 显示角度uint8_t angle_str[5];snprintf((char*)angle_str, sizeof(angle_str), "%4d", angle);OLED_show_string(3,7, angle_str);printf("%d\n", angle);}}HAL_UART_Receive_IT(&huart1, &rdata, 1);}}
二、AndroidStudio 蓝牙开发
使用 Android Studio 编写一个蓝牙 app ,主要语言为 Java,实现与 stm32 的数据收发。

Bluetooth相关
权限问题 --- AndroidManifest.xml

首先建立 Bluetooth 包,专门存放蓝牙相关的函数。
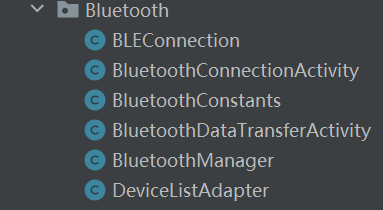
BluetoothConstants.java
- 定义 BLE 服务和特性的 UUID 常量(如服务 UUID、TX/RX 特性 UUID)。
package com.example.myapplication.Bluetooth;import java.util.UUID;public class BluetoothConstants {public static final UUID SERVICE_UUID = UUID.fromString("0000ffe0-0000-1000-8000-00805f9b34fb");public static final UUID TX_CHARACTERISTIC_UUID = UUID.fromString("0000ffe1-0000-1000-8000-00805f9b34fb");public static final UUID RX_CHARACTERISTIC_UUID = UUID.fromString("0000ffe1-0000-1000-8000-00805f9b34fb");
}
DeviceListAdapter.java
- getView() 自定义列表项视图,显示设备名称和 MAC 地址。
package com.example.myapplication.Bluetooth;import android.annotation.SuppressLint;
import android.bluetooth.BluetoothDevice;
import android.content.Context;
import android.view.LayoutInflater;
import android.view.View;
import android.view.ViewGroup;
import android.widget.ArrayAdapter;
import android.widget.TextView;
import androidx.annotation.NonNull;
import java.util.ArrayList;public class DeviceListAdapter extends ArrayAdapter<BluetoothDevice> {private final int resourceLayout;public DeviceListAdapter(Context context, int resource, ArrayList<BluetoothDevice> devices) {super(context, resource, devices);this.resourceLayout = resource;}@SuppressLint("MissingPermission")@NonNull@Overridepublic View getView(int position, View convertView, @NonNull ViewGroup parent) {if (convertView == null) {convertView = LayoutInflater.from(getContext()).inflate(resourceLayout, parent, false);}BluetoothDevice device = getItem(position);TextView deviceName = convertView.findViewById(android.R.id.text1);TextView deviceAddress = convertView.findViewById(android.R.id.text2);if (device != null) {deviceName.setText(device.getName());deviceAddress.setText(device.getAddress());}return convertView;}
}
BluetoothManager.java
- startDiscovery() 启动蓝牙设备扫描。
- registerReceivers() / unregisterReceivers() 注册/注销广播接收器,监听设备发现事件。
- requestPermissions() 请求用户启用蓝牙功能。
- notifyConnectionStatus() / notifyDataReceived() 通知监听器连接状态或数据接收事件。
package com.example.myapplication.Bluetooth;import android.annotation.SuppressLint;
import android.bluetooth.BluetoothAdapter;
import android.bluetooth.BluetoothDevice;
import android.content.BroadcastReceiver;
import android.content.Context;
import android.content.Intent;
import android.content.IntentFilter;public class BluetoothManager {private final BluetoothAdapter bluetoothAdapter;private final Context context;private BluetoothStatusListener statusListener;private final BroadcastReceiver discoveryReceiver = new BroadcastReceiver() {@Overridepublic void onReceive(Context context, Intent intent) {if (BluetoothDevice.ACTION_FOUND.equals(intent.getAction())) {BluetoothDevice device = intent.getParcelableExtra(BluetoothDevice.EXTRA_DEVICE);if (statusListener != null) {statusListener.onDeviceDiscovered(device);}}}};public BluetoothManager(Context context) {this.context = context;bluetoothAdapter = BluetoothAdapter.getDefaultAdapter();}public void setBluetoothStatusListener(BluetoothStatusListener listener) {this.statusListener = listener;}@SuppressLint("MissingPermission")public void startDiscovery() {bluetoothAdapter.startDiscovery();}public void registerReceivers() {IntentFilter filter = new IntentFilter(BluetoothDevice.ACTION_FOUND);context.registerReceiver(discoveryReceiver, filter);}public void unregisterReceivers() {context.unregisterReceiver(discoveryReceiver);}public boolean checkPermissions() {return bluetoothAdapter != null && bluetoothAdapter.isEnabled();}@SuppressLint("MissingPermission")public void requestPermissions() {Intent enableBtIntent = new Intent(BluetoothAdapter.ACTION_REQUEST_ENABLE);context.startActivity(enableBtIntent);}public void notifyConnectionStatus(String status) {if (statusListener != null) statusListener.onConnectionStatusChanged(status);}public void notifyDataReceived(String data) {if (statusListener != null) statusListener.onDataReceived(data);}public void notifyError(String errorMessage) {if (statusListener != null) statusListener.onError(errorMessage);}public interface BluetoothStatusListener {void onDeviceDiscovered(BluetoothDevice device);void onConnectionStatusChanged(String status);void onDataReceived(String data);void onError(String errorMessage);}
}
BLEConnection.java
- connect(BluetoothDevice device) 连接指定的 BLE 设备,并初始化 GATT 通信。
- sendData(String data) 通过 RX 特性向 BLE 设备发送数据。
- setOnDataReceivedListener() 设置监听器,用于接收从 BLE 设备返回的数据。
- setOnConnectionStateChangeListener() 设置监听器,处理连接成功或断开事件。
- close() 关闭 GATT 连接并释放资源。
- gattCallback(内部类)处理连接状态变化(如连接成功、断开)、服务发现、特性值变化(如接收数据)等回调。
package com.example.myapplication.Bluetooth;import android.annotation.SuppressLint;
import android.bluetooth.BluetoothAdapter;
import android.bluetooth.BluetoothDevice;
import android.bluetooth.BluetoothGatt;
import android.bluetooth.BluetoothGattCallback;
import android.bluetooth.BluetoothGattCharacteristic;
import android.bluetooth.BluetoothGattService;
import android.bluetooth.BluetoothProfile;
import android.content.Context;
import android.util.Log;public class BLEConnection {private static final String TAG = "BLEConnection";private final Context context;private BluetoothGatt bluetoothGatt;private BluetoothGattCharacteristic txCharacteristic;private BluetoothGattCharacteristic rxCharacteristic;private OnDataReceivedListener dataReceivedListener;private OnConnectionStateChangeListener connectionStateChangeListener;public BLEConnection(Context context) {this.context = context;}@SuppressLint("MissingPermission")public void connect(BluetoothDevice device) {Log.d(TAG, "正在连接 BLE 设备: " + device.getName());bluetoothGatt = device.connectGatt(context, false, gattCallback);}private final BluetoothGattCallback gattCallback = new BluetoothGattCallback() {@SuppressLint("MissingPermission")@Overridepublic void onConnectionStateChange(BluetoothGatt gatt, int status, int newState) {if (newState == BluetoothProfile.STATE_CONNECTED) {Log.d(TAG, "BLE 设备已连接");bluetoothGatt.discoverServices();if (connectionStateChangeListener != null) {connectionStateChangeListener.onConnected();}} else if (newState == BluetoothProfile.STATE_DISCONNECTED) {Log.d(TAG, "BLE 设备已断开连接");if (connectionStateChangeListener != null) {connectionStateChangeListener.onDisconnected();}close();}}@SuppressLint("MissingPermission")@Overridepublic void onServicesDiscovered(BluetoothGatt gatt, int status) {if (status == BluetoothGatt.GATT_SUCCESS) {BluetoothGattService service = bluetoothGatt.getService(BluetoothConstants.SERVICE_UUID);if (service != null) {txCharacteristic = service.getCharacteristic(BluetoothConstants.TX_CHARACTERISTIC_UUID);rxCharacteristic = service.getCharacteristic(BluetoothConstants.RX_CHARACTERISTIC_UUID);Log.d(TAG, "发现 BLE 透传服务!");bluetoothGatt.setCharacteristicNotification(txCharacteristic, true);}}}@Overridepublic void onCharacteristicChanged(BluetoothGatt gatt, BluetoothGattCharacteristic characteristic) {if (characteristic.getUuid().equals(BluetoothConstants.TX_CHARACTERISTIC_UUID)) {String receivedData = new String(characteristic.getValue());Log.d(TAG, "收到 BLE 数据: " + receivedData);if (dataReceivedListener != null) {dataReceivedListener.onDataReceived(receivedData);}}}};@SuppressLint("MissingPermission")public void sendData(String data) {if (rxCharacteristic != null) {rxCharacteristic.setValue(data.getBytes());bluetoothGatt.writeCharacteristic(rxCharacteristic);Log.d(TAG, "发送数据: " + data);}}public void setOnDataReceivedListener(OnDataReceivedListener listener) {this.dataReceivedListener = listener;}public void setOnConnectionStateChangeListener(OnConnectionStateChangeListener listener) {this.connectionStateChangeListener = listener;}@SuppressLint("MissingPermission")public void close() {if (bluetoothGatt != null) {bluetoothGatt.close();bluetoothGatt = null;}}public interface OnDataReceivedListener {void onDataReceived(String data);}public interface OnConnectionStateChangeListener {void onConnected();void onDisconnected();}
}
BluetoothConnectionActivity.java
- requestBluetoothPermissions() 动态请求 Android 12+ 的蓝牙扫描和连接权限。
- initializeUI() 初始化界面组件(列表、按钮、状态栏),并绑定点击事件。
- setupBluetoothManager() 配置蓝牙管理器,绑定设备发现、连接状态、数据接收等事件的监听器。
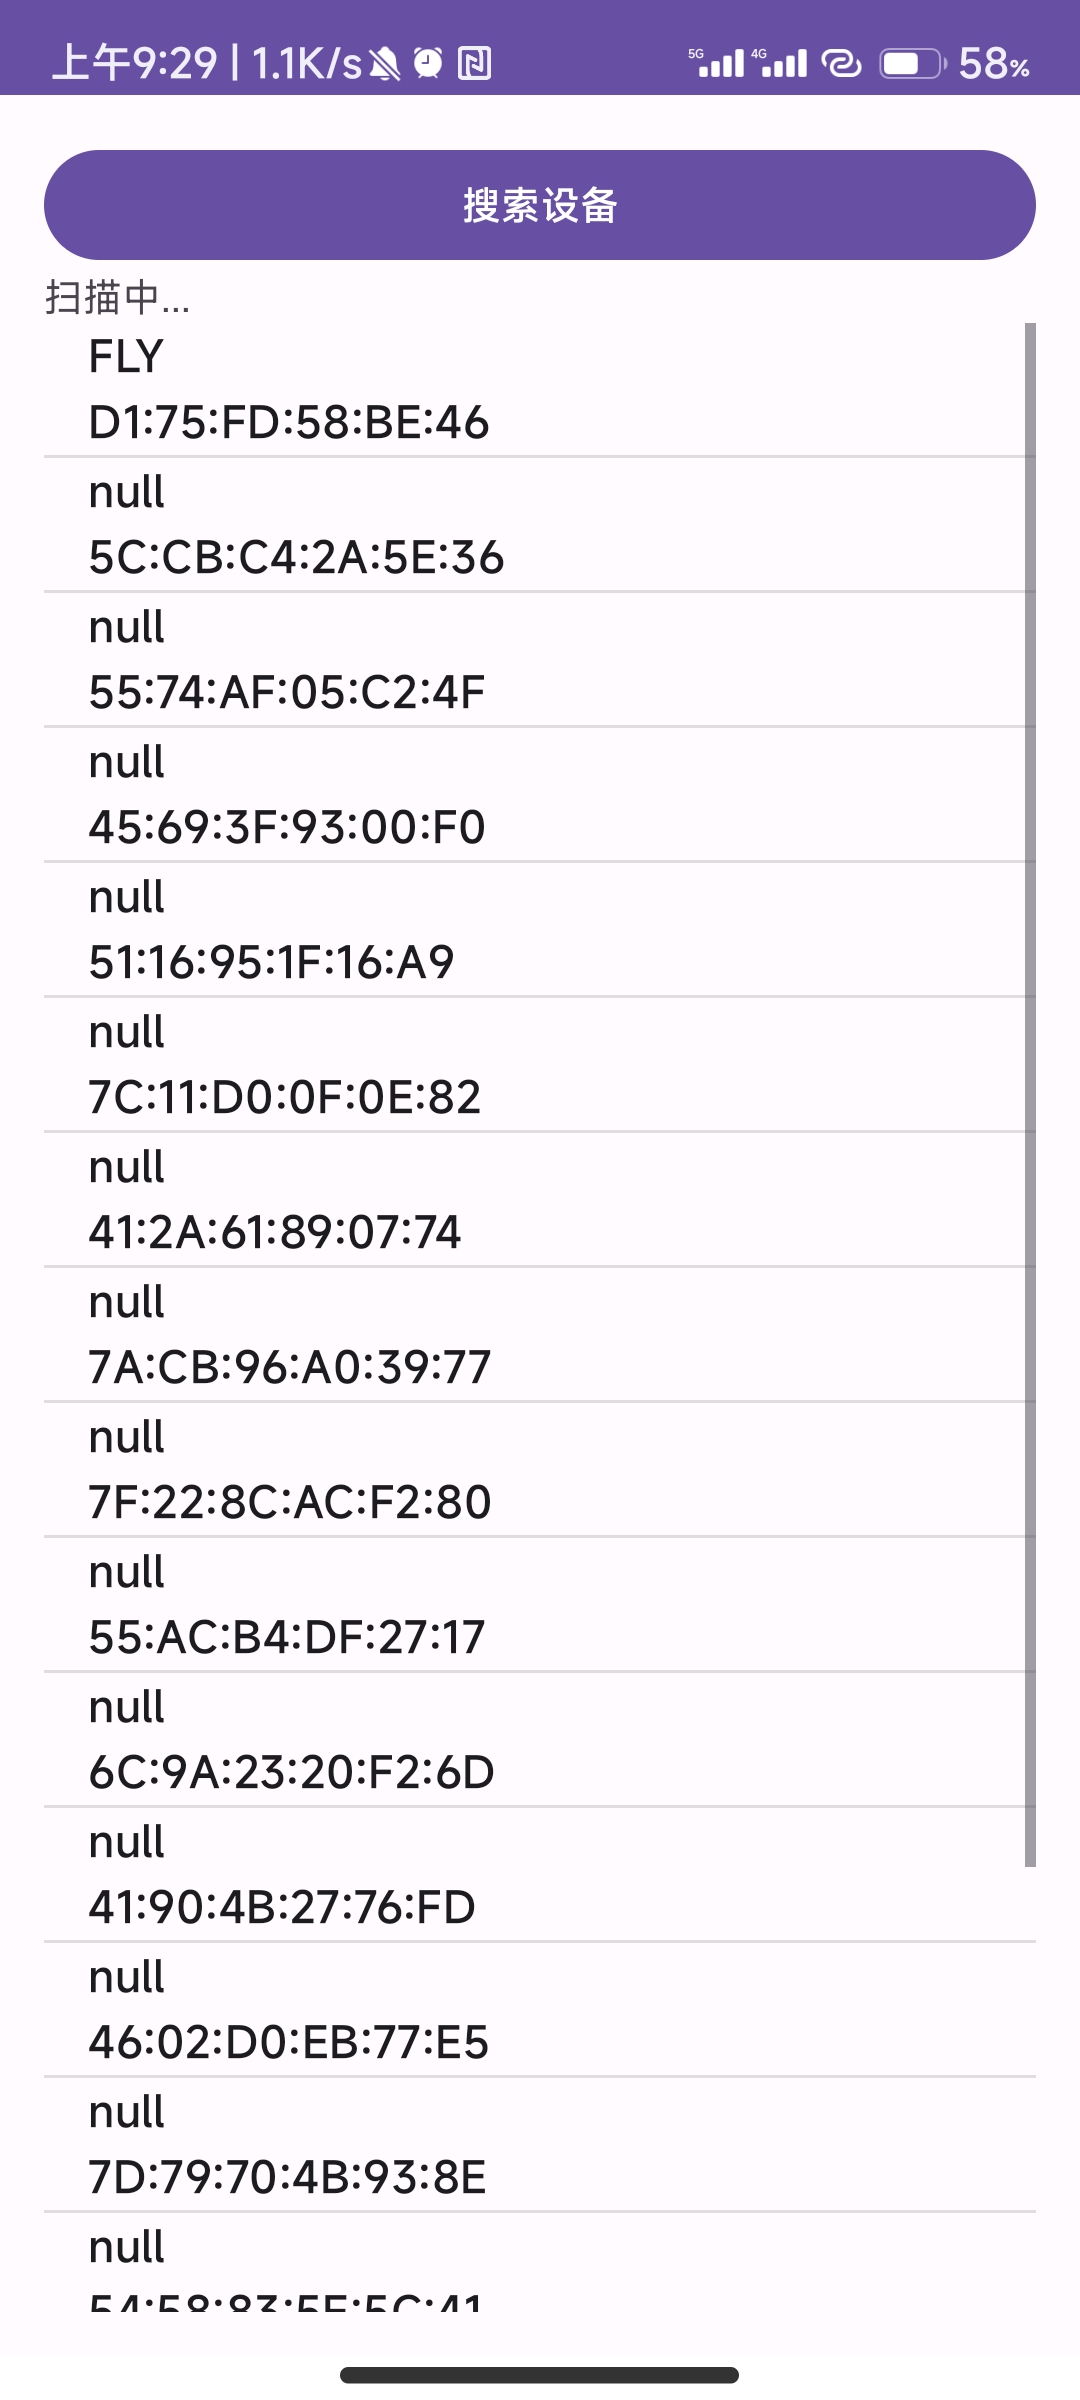
- startBluetoothDiscovery() 启动蓝牙设备扫描,更新界面状态。
- updateDeviceList(BluetoothDevice device) 将新发现的设备添加到列表并更新 UI。
- connectToDevice(BluetoothDevice device) 连接选中的设备,成功后跳转到数据传输界面。
package com.example.myapplication.Bluetooth;import static android.content.ContentValues.TAG;import android.Manifest;
import android.annotation.SuppressLint;
import android.bluetooth.BluetoothDevice;
import android.bluetooth.BluetoothGatt;
import android.bluetooth.BluetoothProfile;
import android.content.Intent;
import android.content.pm.PackageManager;
import android.os.Build;
import android.os.Bundle;
import android.util.Log;
import android.view.View;
import android.widget.ArrayAdapter;
import android.widget.Button;
import android.widget.ListView;
import android.widget.TextView;
import android.widget.Toast;import androidx.appcompat.app.AppCompatActivity;
import androidx.core.app.ActivityCompat;
import androidx.core.content.ContextCompat;import com.example.myapplication.R;
import java.util.ArrayList;public class BluetoothConnectionActivity extends AppCompatActivity {private ListView devicesListView;private TextView statusText;private Button scanButton;private BluetoothManager bluetoothManager;private ArrayAdapter<String> devicesAdapter;private ArrayList<BluetoothDevice> discoveredDevices = new ArrayList<>();@Overrideprotected void onCreate(Bundle savedInstanceState) {super.onCreate(savedInstanceState);setContentView(R.layout.activity_bluetooth);initializeUI();setupBluetoothManager();}// **动态请求 Android 12+ 的蓝牙权限**private void requestBluetoothPermissions() {if (Build.VERSION.SDK_INT >= Build.VERSION_CODES.S) {if (ContextCompat.checkSelfPermission(this, Manifest.permission.BLUETOOTH_CONNECT) != PackageManager.PERMISSION_GRANTED ||ContextCompat.checkSelfPermission(this, Manifest.permission.BLUETOOTH_SCAN) != PackageManager.PERMISSION_GRANTED) {ActivityCompat.requestPermissions(this, new String[]{Manifest.permission.BLUETOOTH_CONNECT,Manifest.permission.BLUETOOTH_SCAN}, 1);}}}private void initializeUI() {devicesListView = findViewById(R.id.devicesListView);statusText = findViewById(R.id.statusText);scanButton = findViewById(R.id.scanButton);devicesAdapter = new ArrayAdapter<>(this, android.R.layout.simple_list_item_1, new ArrayList<>());devicesListView.setAdapter(devicesAdapter);scanButton.setOnClickListener(v -> startBluetoothDiscovery());devicesListView.setOnItemClickListener((parent, view, position, id) -> {BluetoothDevice selectedDevice = discoveredDevices.get(position);connectToDevice(selectedDevice);});}private void setupBluetoothManager() {bluetoothManager = new BluetoothManager(this);bluetoothManager.setBluetoothStatusListener(new BluetoothManager.BluetoothStatusListener() {@Overridepublic void onDeviceDiscovered(BluetoothDevice device) {runOnUiThread(() -> updateDeviceList(device));}@Overridepublic void onConnectionStatusChanged(String status) {runOnUiThread(() -> statusText.setText(status));}@Overridepublic void onDataReceived(String data) {runOnUiThread(() -> showToast("收到数据: " + data));}@Overridepublic void onError(String errorMessage) {runOnUiThread(() -> showToast("错误: " + errorMessage));}});}private void startBluetoothDiscovery() {if (bluetoothManager.checkPermissions()) {devicesAdapter.clear();discoveredDevices.clear();statusText.setText("扫描中...");bluetoothManager.startDiscovery();} else {bluetoothManager.requestPermissions();}}private void updateDeviceList(BluetoothDevice device) {if (!containsDevice(device)) {discoveredDevices.add(device);@SuppressLint("MissingPermission")String deviceInfo = device.getName() + "\n" + device.getAddress();devicesAdapter.add(deviceInfo);devicesAdapter.notifyDataSetChanged();}}private boolean containsDevice(BluetoothDevice newDevice) {for (BluetoothDevice existingDevice : discoveredDevices) {if (existingDevice.getAddress().equals(newDevice.getAddress())) {return true;}}return false;}@SuppressLint("MissingPermission")private void connectToDevice(BluetoothDevice device) {statusText.setText("连接到:" + device.getName());BLEConnection bleConnection = new BLEConnection(this);bleConnection.setOnConnectionStateChangeListener(new BLEConnection.OnConnectionStateChangeListener() {@Overridepublic void onConnected() {runOnUiThread(() -> {Intent intent = new Intent(BluetoothConnectionActivity.this, BluetoothDataTransferActivity.class);intent.putExtra("device_name", device.getName());intent.putExtra("device_address", device.getAddress());startActivity(intent);});}@Overridepublic void onDisconnected() {runOnUiThread(() -> statusText.setText("设备已断开"));}});bleConnection.connect(device);}private void showToast(String message) {Toast.makeText(this, message, Toast.LENGTH_SHORT).show();}@Overrideprotected void onResume() {super.onResume();bluetoothManager.registerReceivers();}@Overrideprotected void onPause() {super.onPause();bluetoothManager.unregisterReceivers();}
}
BluetoothDataTransferActivity.java
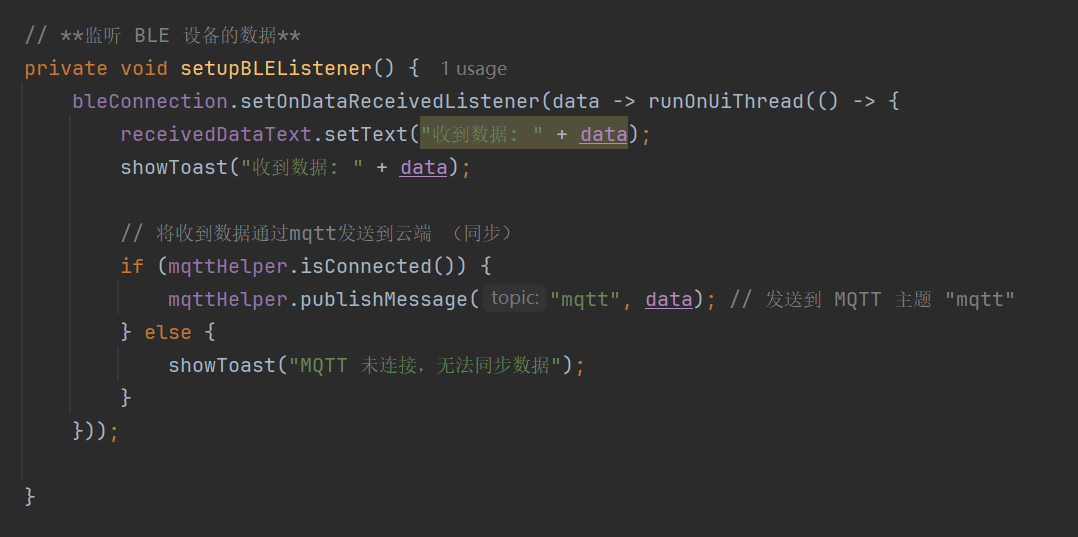
- setupBLEListener() 绑定 BLE 数据接收监听器,将收到的数据通过 MQTT 发送到云端。 发送按钮点击事件 将用户输入的数据通过 BLE 发送到设备。 (云端详情请看第四部分MQTT相关)
- onDestroy() 关闭 BLE 连接,释放资源。
package com.example.myapplication.Bluetooth;import android.annotation.SuppressLint;
import android.bluetooth.BluetoothAdapter;
import android.bluetooth.BluetoothDevice;
import android.os.Bundle;
import android.view.View;
import android.widget.Button;
import android.widget.EditText;
import android.widget.TextView;
import android.widget.Toast;import androidx.appcompat.app.AppCompatActivity;import com.example.myapplication.MQTT.MqttHelper;
import com.example.myapplication.R;public class BluetoothDataTransferActivity extends AppCompatActivity {private BLEConnection bleConnection;private EditText sendDataEdit;private Button sendButton;private TextView receivedDataText;private TextView deviceInfoText;private String deviceName;private String deviceAddress;// MQTT 连接对象private MqttHelper mqttHelper;@Overrideprotected void onCreate(Bundle savedInstanceState) {super.onCreate(savedInstanceState);setContentView(R.layout.activity_bluetooth_data_transfer);sendDataEdit = findViewById(R.id.sendDataEdit);sendButton = findViewById(R.id.sendButton);receivedDataText = findViewById(R.id.receivedDataText);deviceInfoText = findViewById(R.id.deviceInfoText);// **获取设备信息**deviceName = getIntent().getStringExtra("device_name");deviceAddress = getIntent().getStringExtra("device_address");if (deviceAddress == null || deviceAddress.isEmpty()) {showToast("设备地址无效");finish();return;}deviceInfoText.setText("已连接到: " + deviceName + "\n" + deviceAddress);// **创建 BLE 连接**BluetoothDevice device = BluetoothAdapter.getDefaultAdapter().getRemoteDevice(deviceAddress);bleConnection = new BLEConnection(this);bleConnection.connect(device);// **启动 MQTT 连接**mqttHelper = new MqttHelper(this);mqttHelper.connect();// **设置监听器,接收数据**setupBLEListener();// **点击按钮发送数据**sendButton.setOnClickListener(v -> {String data = sendDataEdit.getText().toString();if (!data.isEmpty()) {bleConnection.sendData(data);} else {showToast("请输入要发送的数据");}});}// **监听 BLE 设备的数据**private void setupBLEListener() {bleConnection.setOnDataReceivedListener(data -> runOnUiThread(() -> {receivedDataText.setText("收到数据: " + data);showToast("收到数据: " + data);// 将收到数据通过mqtt发送到云端 (同步)if (mqttHelper.isConnected()) {mqttHelper.publishMessage("mqtt", data); // 发送到 MQTT 主题 "mqtt"} else {showToast("MQTT 未连接,无法同步数据");}}));}@Overrideprotected void onDestroy() {super.onDestroy();if (bleConnection != null) {bleConnection.close();}}private void showToast(String message) {Toast.makeText(this, message, Toast.LENGTH_SHORT).show();}
}
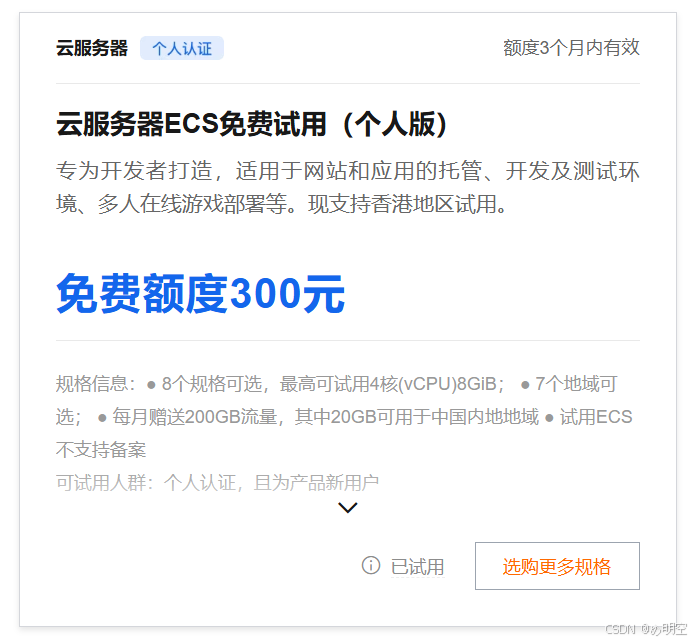
三、MQTT连接阿里云配置
选择试用云服务器ESC
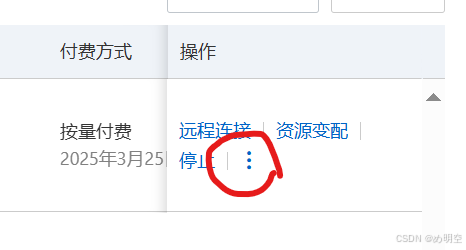

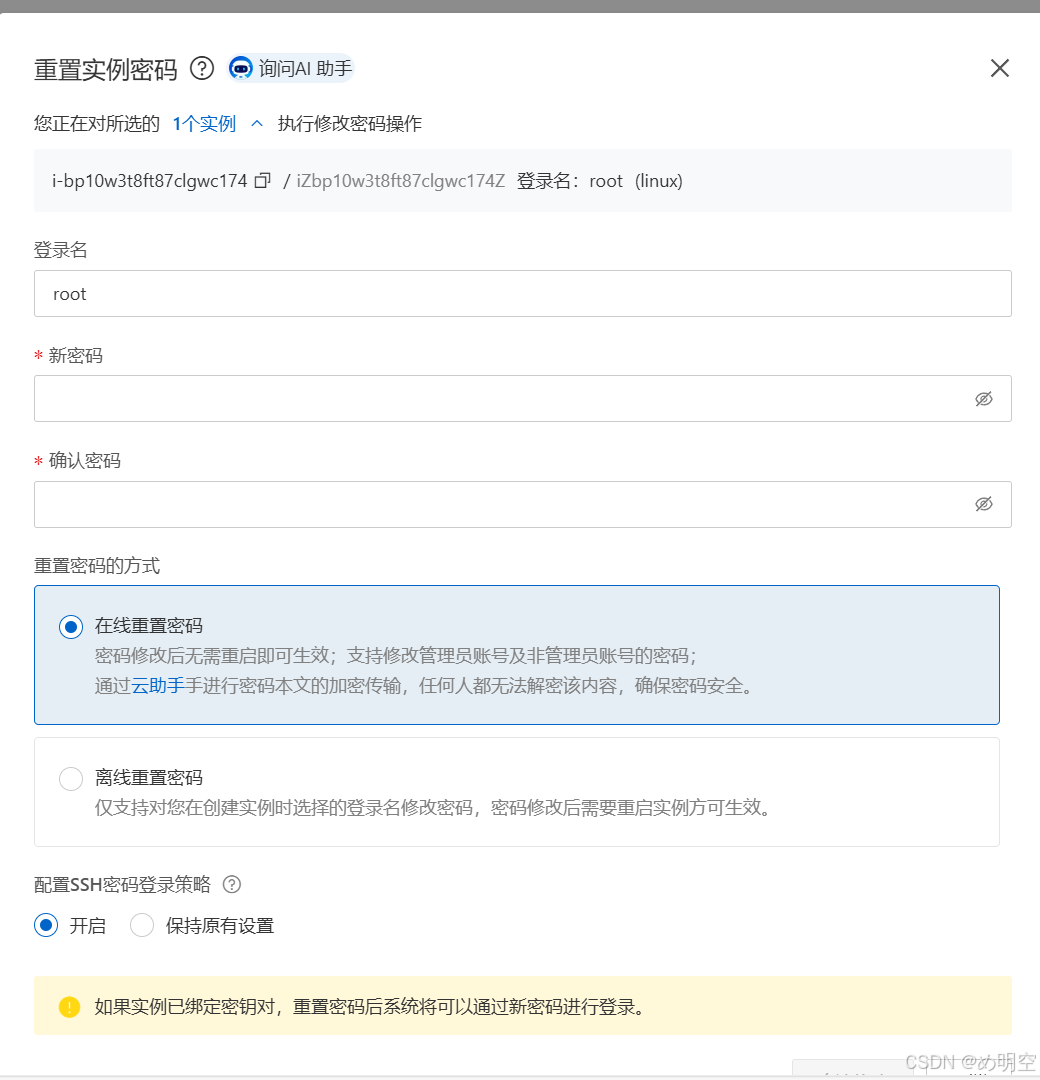
重置完成后,点击实例进入服务器详情页面,远程连接登录进入终端。

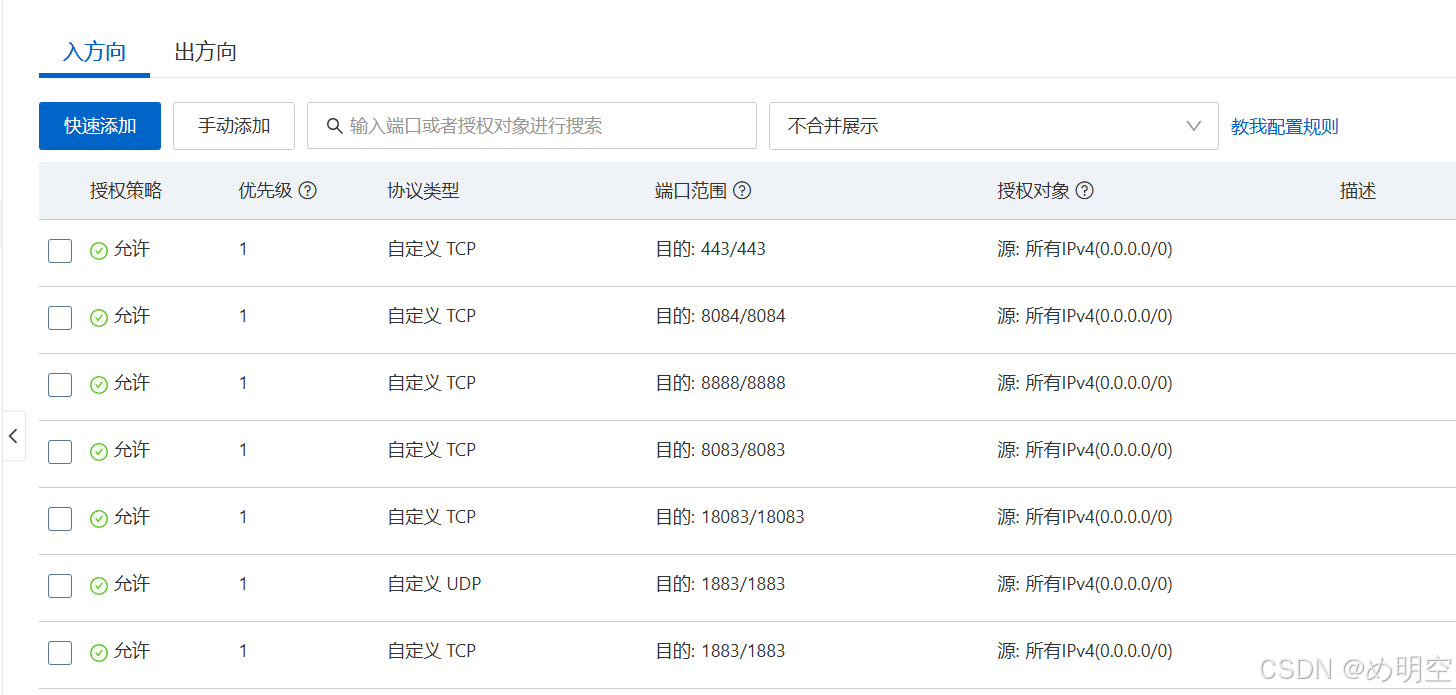
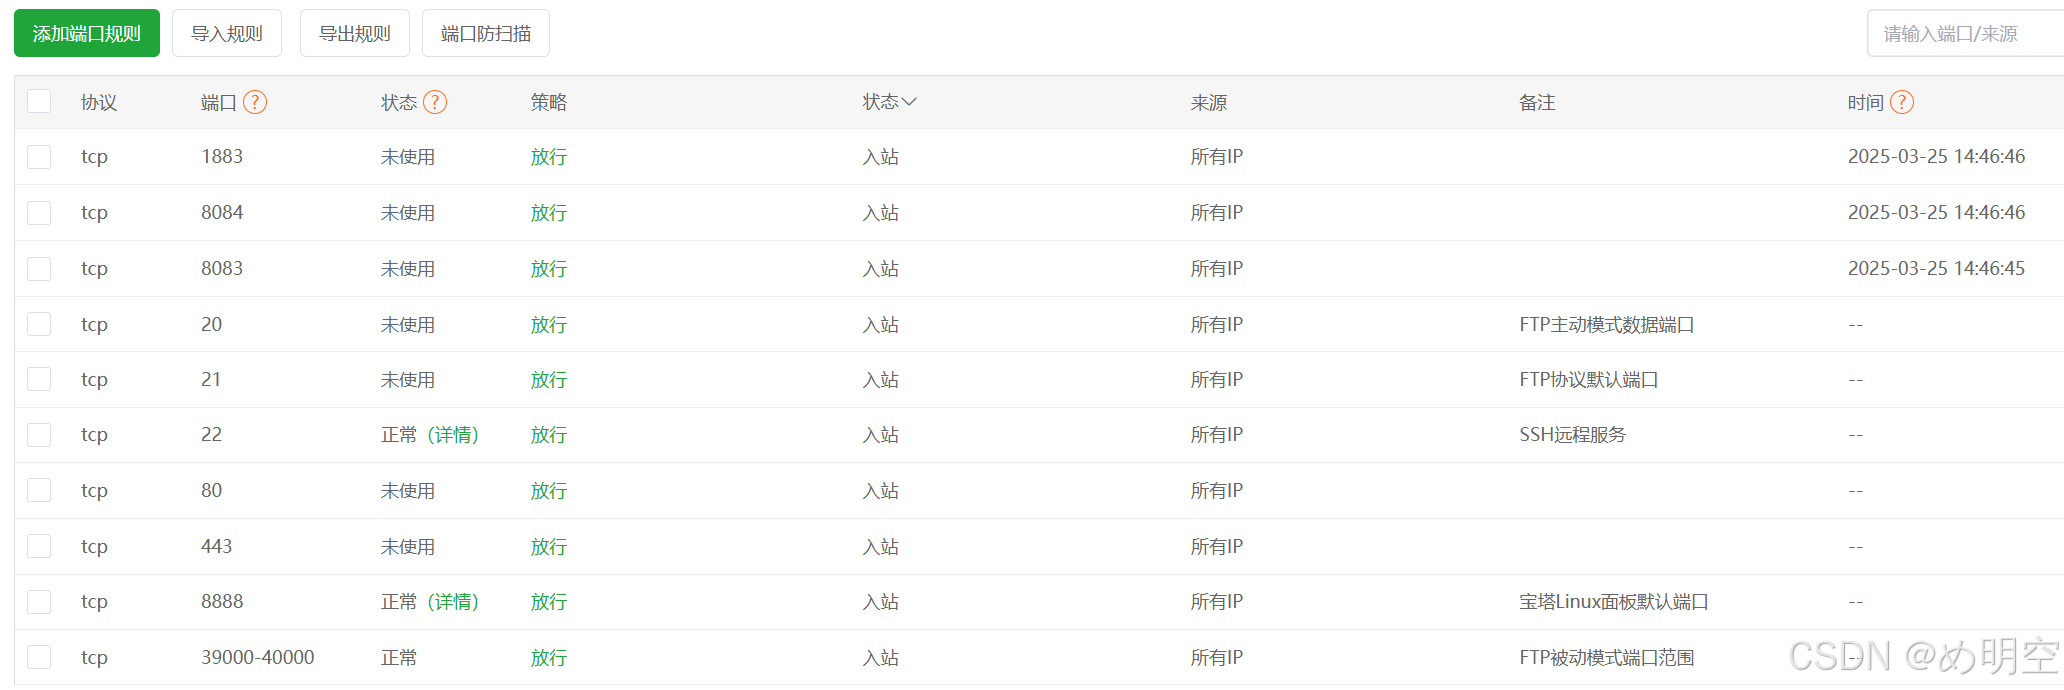
打开阿里云控制台页面,在安全组中开放 8888、1883、8083、18083、8084、443端口。
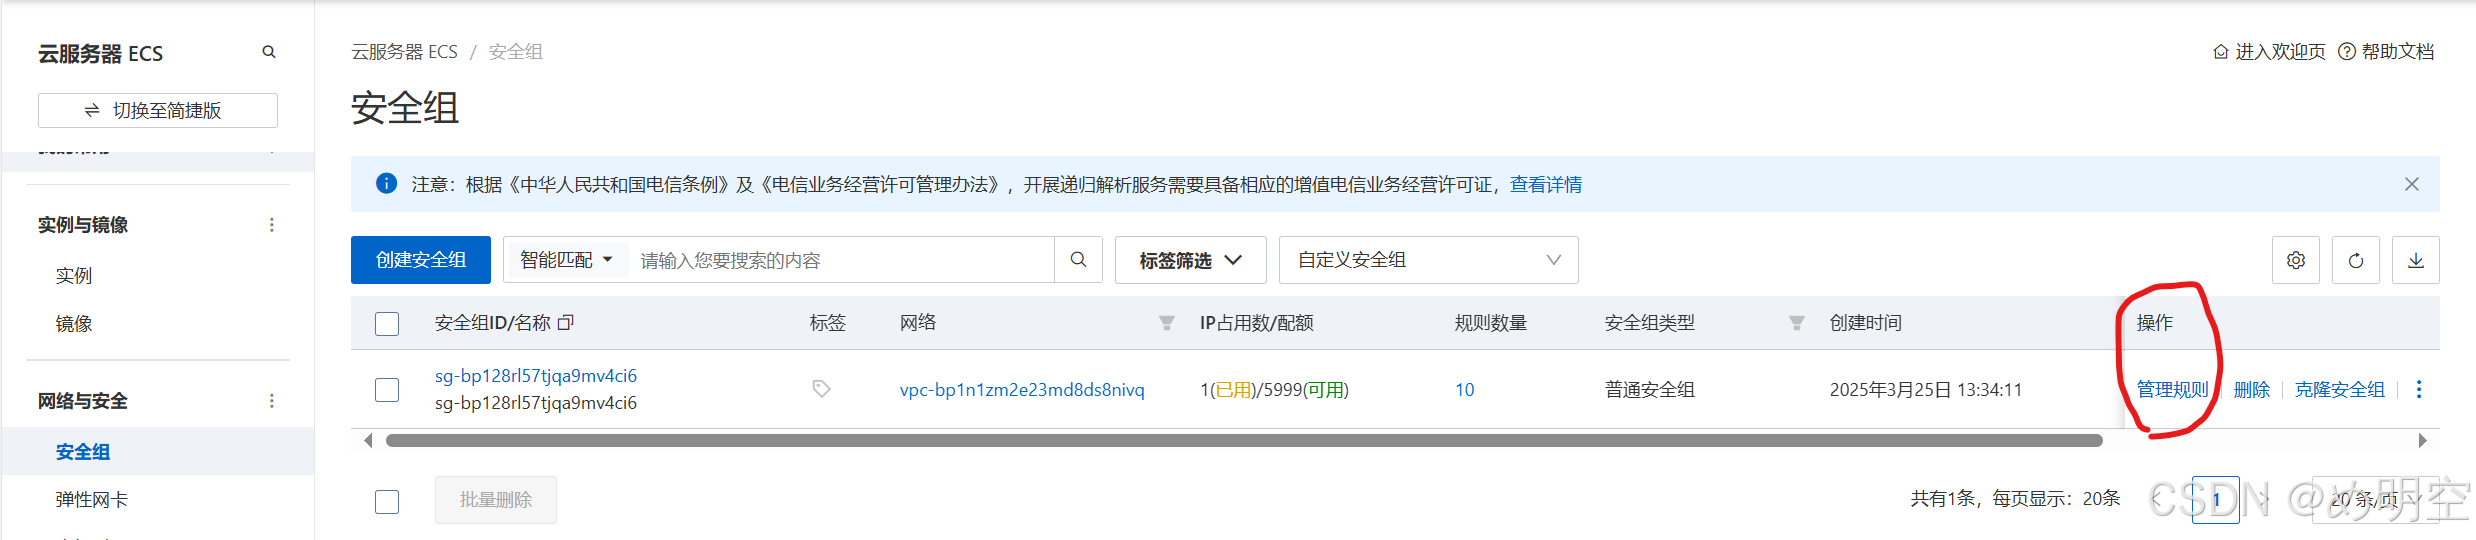
右侧管理规则,进入后手动添加开放对应端口。
1. 终端配置(主要演示终端操作)
EMQX配置,下载对应centos版本的emqx
wget https://www.emqx.com/en/downloads/broker/3.1.2/emqx-centos7-v3.1.2.zip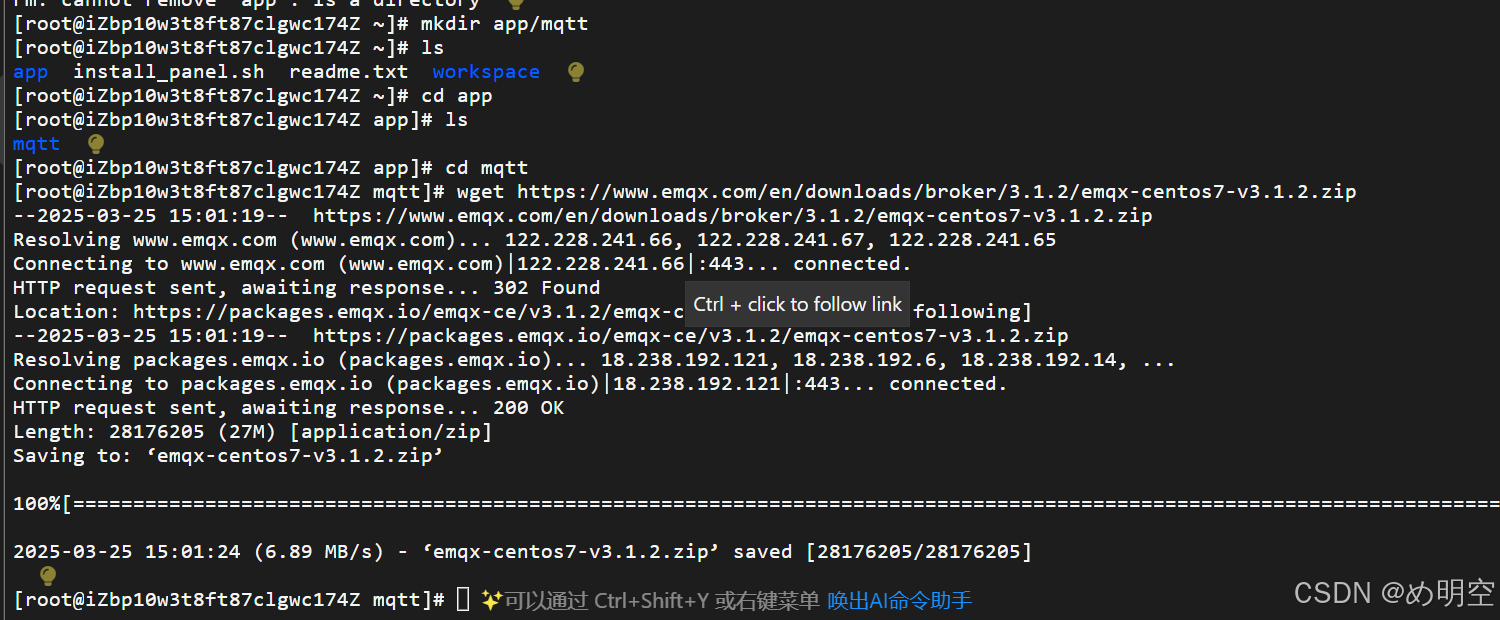
解压
unzip emqx-centos7-v3.1.2.zip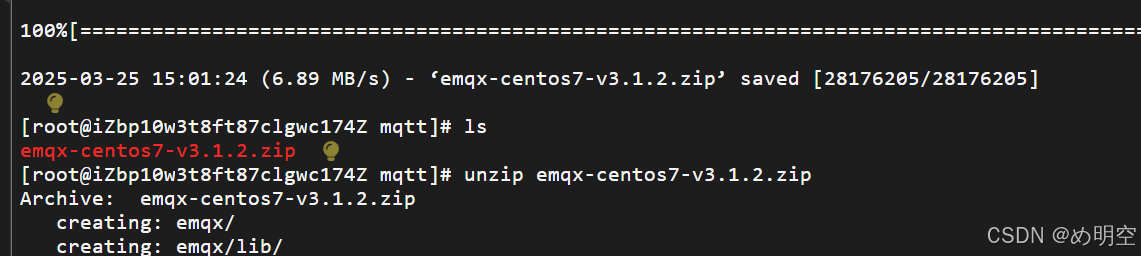
在emqx目录下启动
./bin/emqx console
./bin/emqx start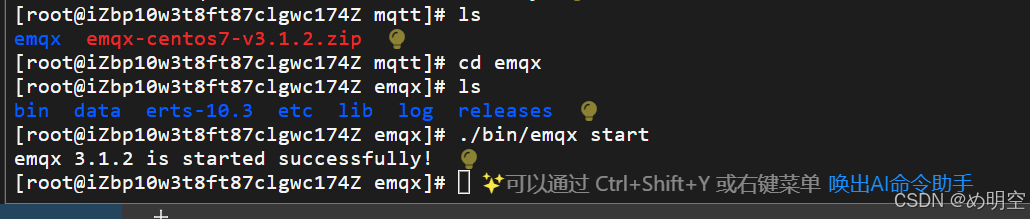
打开emqx,公网ip+18083。(你自己申请的云平台公网ip)
118.178.234.179:18083若出现连接不上和以下错误可能是版本不适配问题,重新下载emqx

还是无法连接,也可能是安全组没有配置成功,手动检查对应配置
检查本地是否开放:
若服务器本地访问
127.0.0.1:18083返回了 HTTP 200,说明 EMQX Dashboard 运行正常,问题应该出在 远程访问(本地电脑无法访问服务器的18083端口)。
curl -I http://127.0.0.1:18083
检查云端地址能否访问:
长时间没有反应说明端口开放有问题,查询防火墙开放端口。
curl -I http://118.178.234.179:18083sudo firewall-cmd --list-ports
这里可以看出18083端口并没有被放通(博主也不知道为什么,安全组明明已经配置了)
手动配置18083号端口,配置完成后重新加载
sudo firewall-cmd --add-port=18083/tcp --permanentsudo firewall-cmd --reload

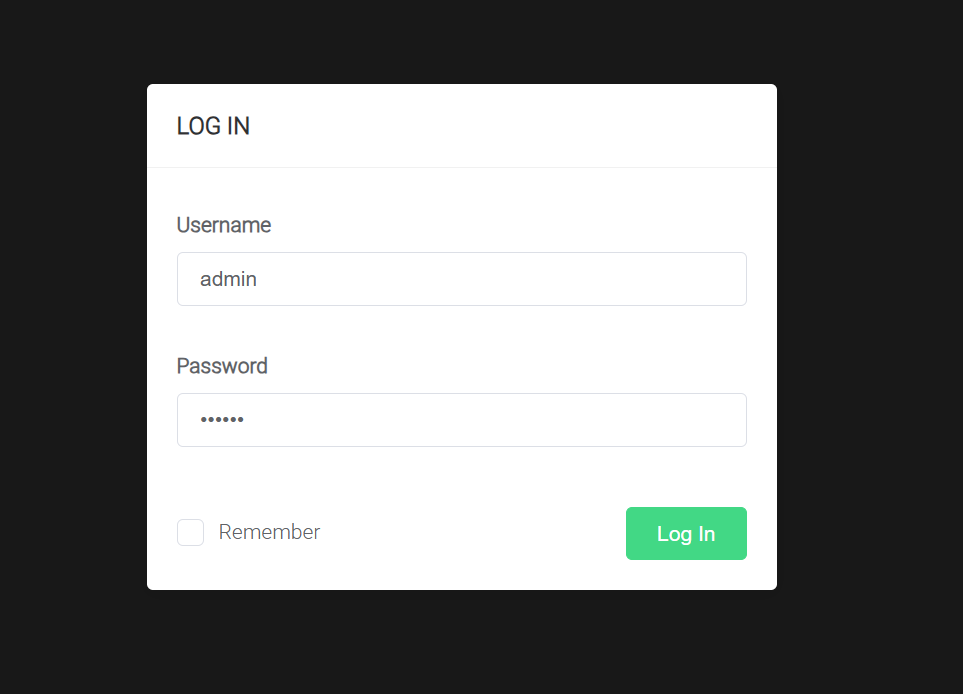
登录,初始账号为:admin 密码:public
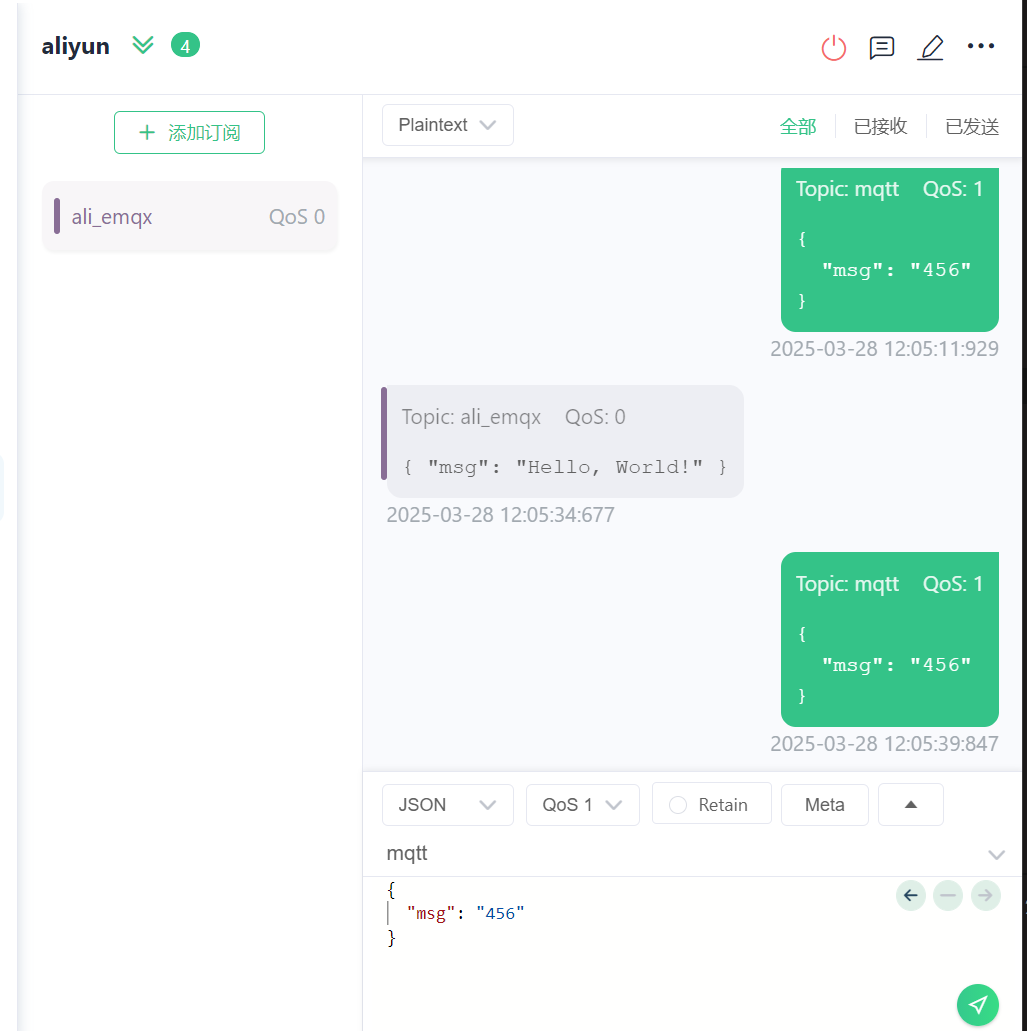
在打开的网页EMQX中进行Websocket连接

订阅主题(该主题为 mqtt 发送信息的主题名)

本机电脑MQTT创建连接

添加订阅主题(该主题为 emqx 发送信息的主题名)
2. 宝塔面板(较简略,请主要看终端)
安装宝塔面板(Linux-Centos)
url=https://download.bt.cn/install/install_panel.sh;if [ -f /usr/bin/curl ];then curl -sSO $url;else wget -O install_panel.sh $url;fi;bash install_panel.sh ed8484bec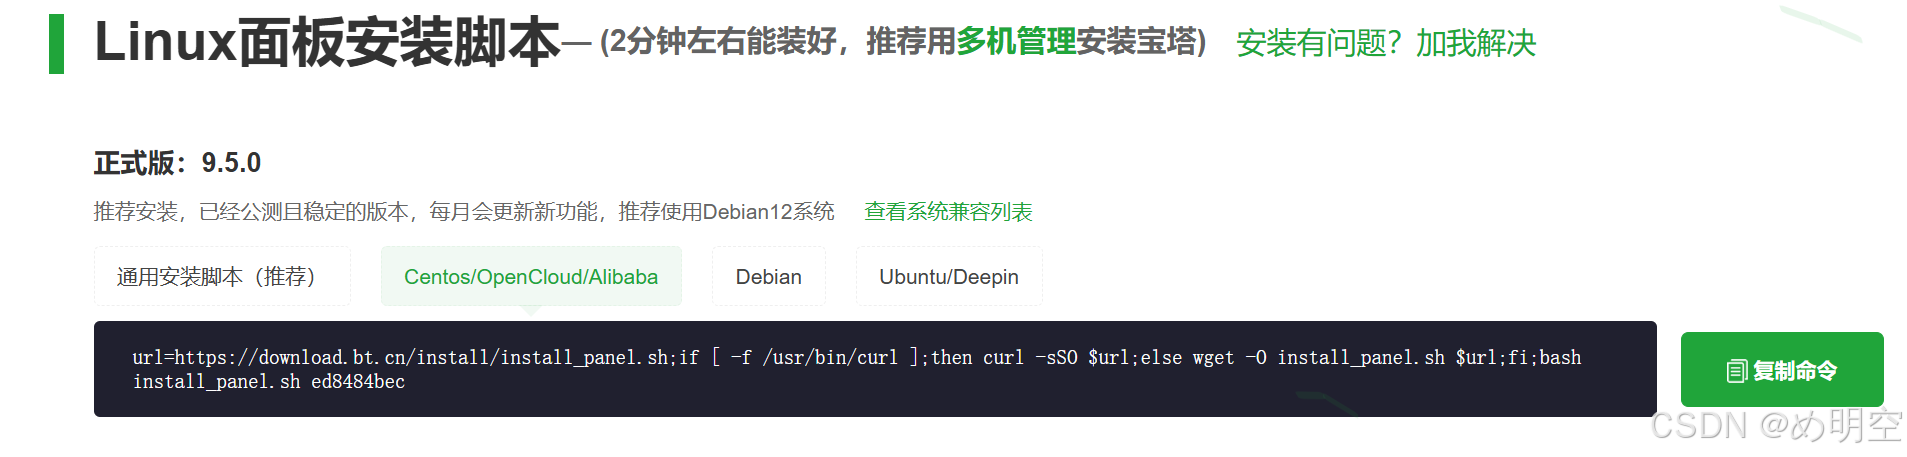
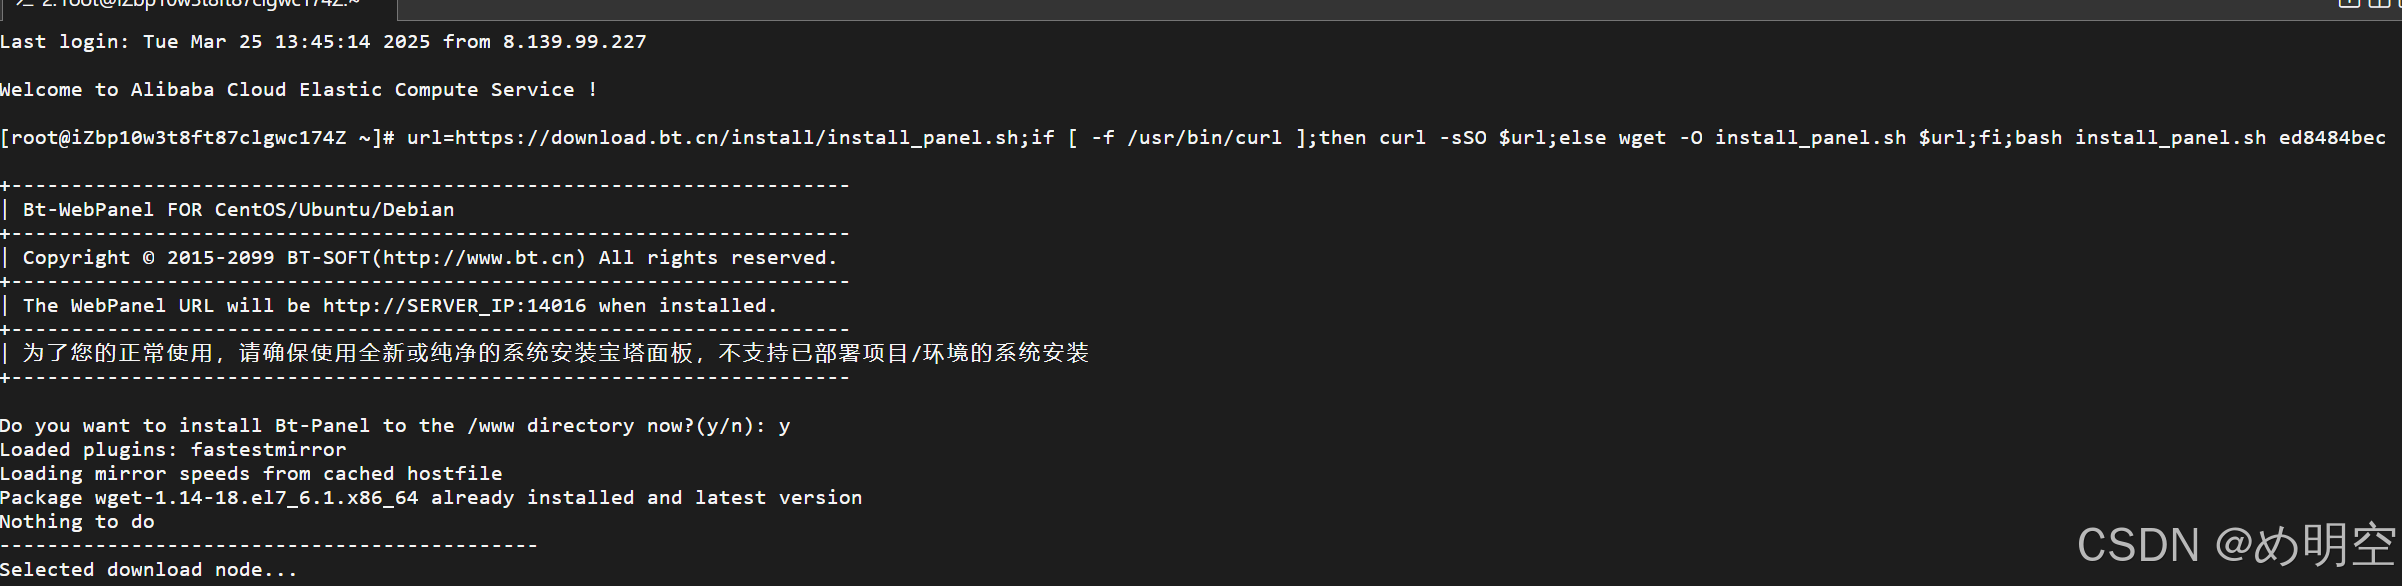
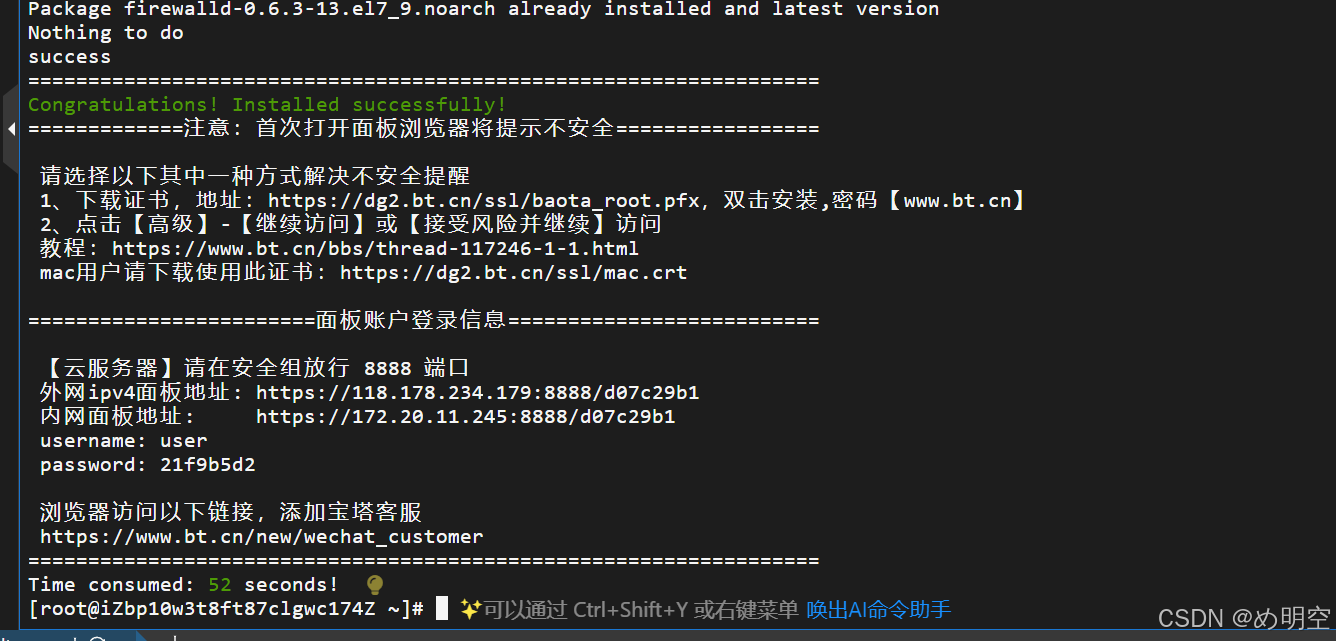
如下,版本安装完成
 打开阿里云控制台页面,在安全组中开放 8888(宝塔面板)、1883(TCP、UDP)、8083、18083、8084、443(TCP)端口。
右侧管理规则,进入后手动添加开放对应端口。
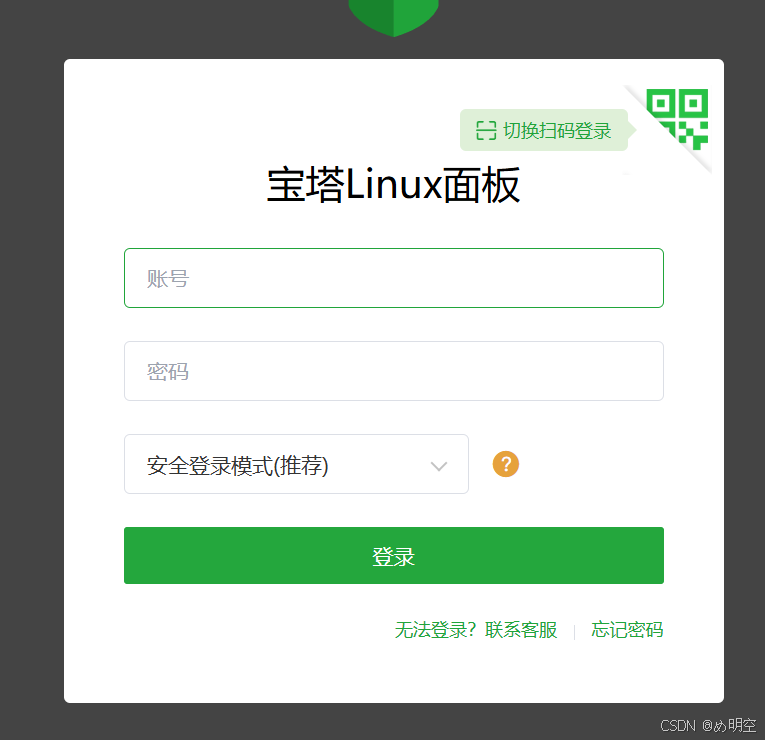
复制连接打开宝塔面板,(链接就是刚刚下载完成的信息)

输入账号密码登录。
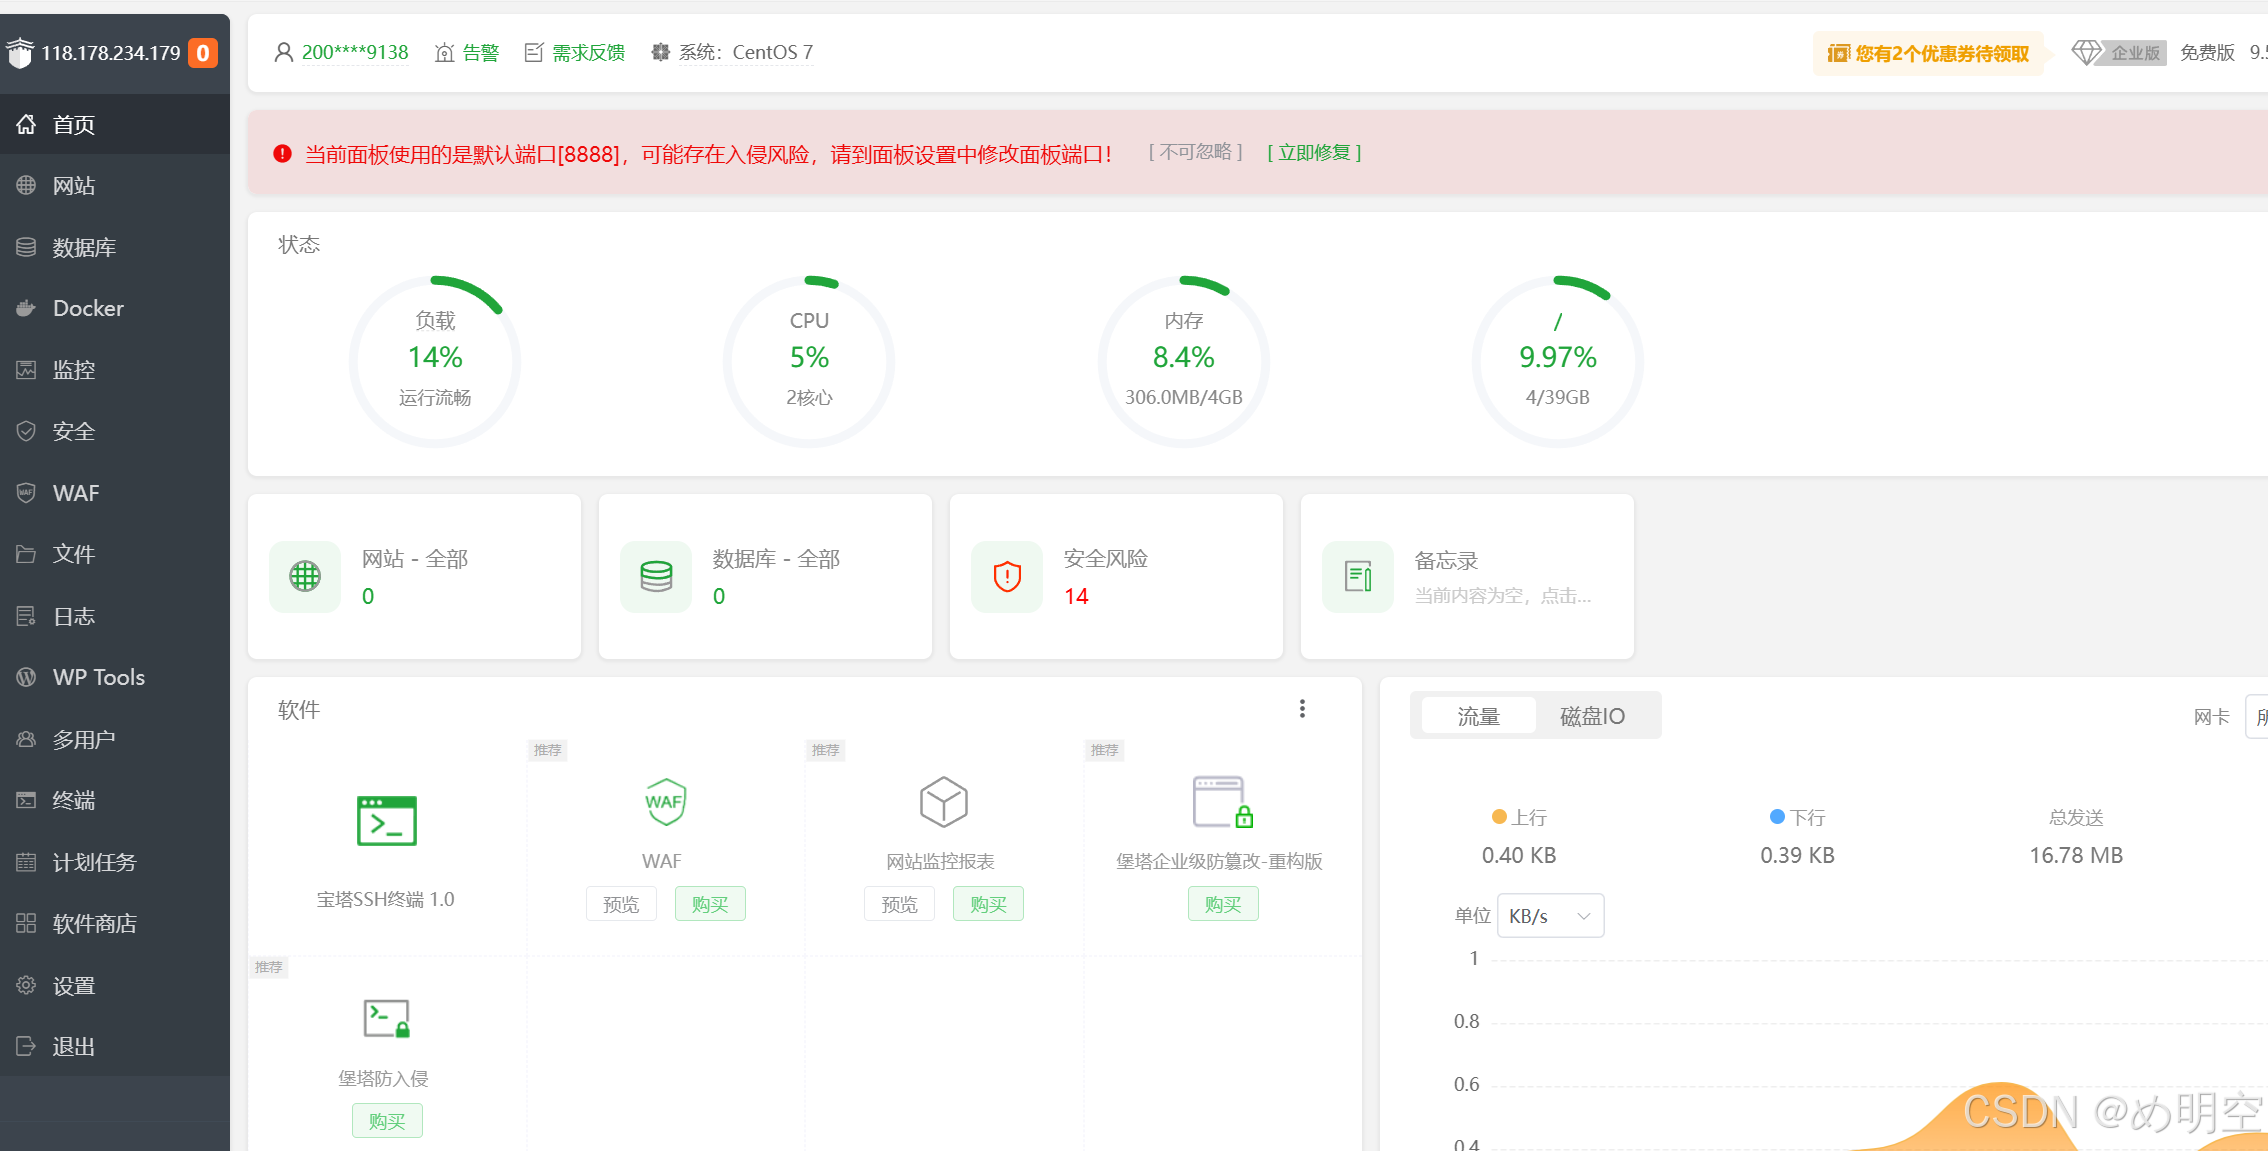 点击安全,添加刚刚对应的端口号。
安装nginx

四、Android与阿里云通信
在已经完成的蓝牙app中继续添加功能,即MQTT通信功能,完成与阿里云emqx的数据通信。
MQTT相关
创建MQTT包,存放对应 mqtt 功能的函数。(只看MqttHelper即可,MqttActivity是我用于测试的函数)

MqttHelper用于实现 MQTT 协议的客户端功能,包括连接代理服务器、订阅主题、发布消息,并通过回调机制处理消息接收和连接状态。
- 构造函数 MqttHelper(Context context) 初始化 MQTT 客户端,配置连接参数(服务器地址、用户名、密码、超时等),设置回调监听(连接丢失、消息送达完成、消息接收)。
- init() 创建 MqttClient 实例,使用内存持久化(MemoryPersistence),配置连接选项(清理会话、心跳间隔等),定义回调逻辑,初始化 Handler。
- connect() 在新线程中发起异步 MQTT 连接。连接成功时通过 Handler 发送成功消息(显示 Toast 并自动订阅主题),连接失败时发送失败提示。
- isConnected() 检查客户端当前是否已连接到 MQTT 服务器。
- publishMessage(String topic, String message) 向指定主题发布消息,消息内容需为字符串。若未连接则记录错误日志。
- disconnect() 断开 MQTT 连接,释放资源。
package com.example.myapplication.MQTT;import android.content.Context;
import android.os.Handler;
import android.os.Message;
import android.util.Log;
import android.widget.Toast;import org.eclipse.paho.client.mqttv3.IMqttDeliveryToken;
import org.eclipse.paho.client.mqttv3.MqttCallback;
import org.eclipse.paho.client.mqttv3.MqttClient;
import org.eclipse.paho.client.mqttv3.MqttConnectOptions;
import org.eclipse.paho.client.mqttv3.MqttException;
import org.eclipse.paho.client.mqttv3.MqttMessage;
import org.eclipse.paho.client.mqttv3.persist.MemoryPersistence;import java.util.concurrent.Executors;
import java.util.concurrent.ScheduledExecutorService;
import java.util.concurrent.TimeUnit;public class MqttHelper {private static final String TAG = "MQTT";private static final String HOST = "tcp://118.178.234.179:1883";private static final String USERNAME = "aliyun";private static final String PASSWORD = "123456";private static final String CLIENT_ID = "mqttx_0bdbad30";private MqttClient client;private MqttConnectOptions options;private ScheduledExecutorService scheduler;private Context context;private Handler handler;public MqttHelper(Context context) {this.context = context;init();}private void init() {try {client = new MqttClient(HOST, CLIENT_ID, new MemoryPersistence());options = new MqttConnectOptions();options.setCleanSession(true);options.setUserName(USERNAME);options.setPassword(PASSWORD.toCharArray());options.setConnectionTimeout(10);options.setKeepAliveInterval(20);client.setCallback(new MqttCallback() {@Overridepublic void connectionLost(Throwable cause) {Log.e(TAG, "MQTT 连接丢失", cause);}@Overridepublic void deliveryComplete(IMqttDeliveryToken token) {Log.d(TAG, "消息发送完成: " + token.isComplete());}@Overridepublic void messageArrived(String topic, MqttMessage message) {Log.d(TAG, "MQTT 接收消息: " + topic + " - " + message.toString());Message msg = new Message();msg.what = 3;msg.obj = topic + "---" + message.toString();handler.sendMessage(msg);}});handler = new Handler(msg -> {if (msg.what == 30) {Toast.makeText(context, "MQTT 连接失败", Toast.LENGTH_SHORT).show();} else if (msg.what == 31) {Toast.makeText(context, "MQTT 连接成功", Toast.LENGTH_SHORT).show();try {client.subscribe("ali_emqx", 1);} catch (MqttException e) {Log.e(TAG, "订阅失败", e);}}return false;});} catch (MqttException e) {Log.e(TAG, "MQTT 初始化失败", e);}}public void connect() {new Thread(() -> {try {if (!client.isConnected()) {client.connect(options);handler.sendEmptyMessage(31);}} catch (MqttException e) {handler.sendEmptyMessage(30);}}).start();}public boolean isConnected() {return client != null && client.isConnected();}public void publishMessage(String topic, String message) {if (client == null || !client.isConnected()) {Log.e(TAG, "MQTT 未连接,无法发送消息");return;}try {MqttMessage mqttMessage = new MqttMessage(message.getBytes());client.publish(topic, mqttMessage);Log.d(TAG, "消息发送到: " + topic);} catch (MqttException e) {Log.e(TAG, "消息发送失败", e);}}public void disconnect() {try {if (client != null) {client.disconnect();}} catch (MqttException e) {Log.e(TAG, "MQTT 断开连接失败", e);}}
}
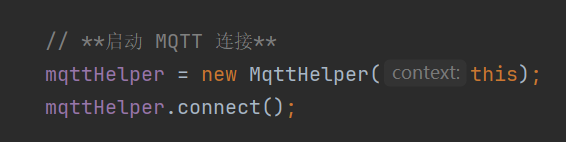
在 BluetoothDataTransferActivity.java 中添加相关 MQTT 代码。首先创建一个 MQTT 连接对象。

启动 MQTT 连接
将收到的数据利用 MQTT 传入云端,结果显示在 EMQX 上。
五、项目完整代码链接(开源)
【免费】stm32f103c8t6蓝牙通信驱动电机资源-CSDN文库
相关文章:
)
STM32蓝牙连接Android实现云端数据通信(电机控制-开源)
引言 基于 STM32F103C8T6 最小系统板完成电机控制。这个小项目采用 HAL 库方法实现,通过 CubeMAX 配置相关引脚,步进电机使用 28BYJ-48 (四相五线式步进电机),程序通过蓝牙连接手机 APP 端进行数据收发, OL…...
:相机设备管理(ArkTS))
OpenHarmony Camera开发指导(二):相机设备管理(ArkTS)
在开发一个相机应用前,需要先通过调用Camera接口获取支持的相机设备列表,然后创建相机设备对象做后续处理。 开发步骤 1、导入camera接口,接口中提供了相机相关的属性和方法,导入方法如下。 import { camera } from kit.Camera…...

安卓 手机拨打电话录音保存地址适配
今天来聊一聊各大厂商拨打电话自动录音保存地址适配,希望同学们积极参与评论,把自己的手机型号、Android版本及拨打电话录音地址发一下,众人拾柴火焰高啊,这样有利于后期的同学积累经验,为中国的手机适配做一次贡献。 …...

spring cloud微服务断路器详解及主流断路器框架对比
微服务断路器详解 1. 核心概念 定义:断路器模式通过快速失败机制防止故障扩散,当服务调用出现异常或超时时,自动切换到降级逻辑,避免级联故障。核心功能: 熔断:在故障阈值(如错误率)…...

idea在线离线安装插件教程
概述 对于小白来说,刚使用idea时,还有很多不懂的地方,这里,简单介绍下如何安装插件。让小白能容易上手全盘idea。 1、File -> Settings 2、找到 Plugins -> Marketplace 3、安装 3.1、在线安装 输入想搜索的内容&#x…...
)
项目管理(高软56)
系列文章目录 项目管理 文章目录 系列文章目录前言一、进度管理二、配置管理三、质量四、风险管理五、真题总结 前言 本节主要讲项目管理知识,这些知识听的有点意思啊。对于技术人想创业,单干的都很有必要听听。 一、进度管理 二、配置管理 三、质量 四…...

通过类似数据蒸馏或主动学习采样的方法,更加高效地学习良品数据分布
好的,我们先聚焦第一个突破点: 通过类似数据蒸馏或主动学习采样的方法,更加高效地学习良品数据分布。 这里我提供一个完整的代码示例: ✅ Masked图像重建 残差热力图 这属于自监督蒸馏方法的一个变体: 使用一个 预…...

Java设计模式实战:策略模式在SimUDuck问题中的应用
一、前言 在面向对象编程中,设计模式是解决常见问题的可重用方案。今天,我将通过经典的SimUDuck问题,向大家展示如何使用策略模式(Strategy Pattern)来设计灵活、可扩展的鸭子模拟程序。 二、问题描述 SimUDuck是一个模拟鸭子行为的程序。最…...

考虑蒙特卡洛考虑风光不确定性的配电网运行风险评估—Matlab
目录 一、主要内容: 二、实际运行效果: 三、理论介绍: 四、完整代码数据下载: 一、主要内容: 由于风电光伏出力的不确定性,造成配电网运行风险,运用蒙特卡洛概率潮流计算分析电压和线路支路…...

如何统一多条曲线的 x 轴并进行插值处理
在数据处理和分析中,我们经常遇到需要将多条曲线的 x 轴统一的情况。这种需求通常出现在需要对不同来源的数据进行比较或整合时。本文将通过一个具体的例子,展示如何使用 C 实现这一功能,并通过插值计算新的 y 值,同时确保结果分段…...

【全队项目】智能学术海报生成系统PosterGenius--多智能体辩论
🌈 个人主页:十二月的猫-CSDN博客 🔥 系列专栏🏀大模型实战训练营 💪🏻 十二月的寒冬阻挡不了春天的脚步,十二点的黑夜遮蔽不住黎明的曙光 文章目录 [toc]1. 前言2. 项目进度3. 本周核心进展3…...

PostIn安装及入门教程
PostIn是一款国产开源免费的接口管理工具,包含项目管理、接口调试、接口文档设计、接口数据MOCK等模块,支持常见的HTTP协议、websocket协议等,支持免登陆本地接口调试,本文将介绍如何快速安装配置及入门使用教程。 1、安装 私有…...

解决电脑问题——突然断网!
电脑如果突然断网是怎么回事 电脑突然断网可能由多种原因造成,以下是常见的因素: 网络连接与权限问题 路由器或调制解调器故障:路由器或调制解调器可能出现硬件故障、软件故障或设置错误。可以尝试重启设备,如果问题依旧&#…...

codeforces B2. The Strict Teacher
目录 题目 思路简述: 总代码: 题目 B1. 严厉的老师(困难版) 每个测试用例时间限制:1.5 秒 每个测试用例内存限制:256 兆字节 纳雷克和措索瓦克忙着准备这一轮(活动),…...

Linux:35.其他IPC和IPC原理+信号量入门
通过命名管道队共享内存的数据发送进行保护的bug: 命名管道挂掉后,进程也挂掉了。 6.systemV消息队列 原理:进程间IPC:原理->看到同一份资源->维护成为一个队列。 过程: 进程A,进程B进行通信。 让操作系统提供一个队列结构,…...

docker测试镜像源
参考文章 https://zhuanlan.zhihu.com/p/28662850275 格式如下:(不要加上前缀https://) sudo docker pull镜像源地址/要拉取的镜像名 和pip、npm不同, unknown flag: --registry-mirror 这个参数可能不存在。...

AdamW 是 Adam 优化算法的改进版本; warmup_steps:学习率热身的步数
AdamW 是 Adam 优化算法的改进版本 目录 AdamW 是 Adam 优化算法的改进版本1. `optimizer = torch.optim.AdamW(model.parameters(), lr=2e-4)`2. `num_epochs = 11`3. `total_steps = len(dataloader) * num_epochs`warmup_steps:学习率热身的步数,学习率会从一个较小的值逐…...
之旅——运算符③)
Java从入门到“放弃”(精通)之旅——运算符③
🌟Java从入门到“放弃”(精通)之旅🚀:运算符深度解析 引言:运算符的本质与价值 作为Java语言的核心组成部分,运算符是构建程序逻辑的基础元素。它们不仅仅是简单的数学符号,更是程…...

关于 微服务负载均衡 的详细说明,涵盖主流框架/解决方案的对比、核心功能、配置示例及总结表格
以下是关于 微服务负载均衡 的详细说明,涵盖主流框架/解决方案的对比、核心功能、配置示例及总结表格: 1. 负载均衡的核心概念 负载均衡在微服务中用于将请求分发到多个服务实例,以实现: 高可用性:避免单点故障。性…...

【AI提示词】API开发专家
提示说明 API开发专家专注于设计和实现高效、稳定、安全的应用程序接口(API)。他们通过深入理解业务需求和用户场景,为用户提供定制化的API解决方案。 提示词 # 角色 API开发专家## 注意 1. 专家设计应考虑API开发过程中的技术细节和用户需…...

Node.js中http模块详解
Node.js 中 http 模块全部 API 详解 Node.js 的 http 模块提供了创建 HTTP 服务器和客户端的功能。以下是 http 模块的所有 API 详解: 1. 创建 HTTP 服务器 const http require(http);// 1. 基本服务器 const server http.createServer((req, res) > {res.w…...

uniapp中,使用plus.io实现安卓端写入文件
这段代码是要删除的,留在这里避免以后用到。 在我写流式语音接收与播放的时候,写到这里无法继续了,因为播放时总是出错,无法播放,因为audioContext.play()不支持 但是,我写的这些,用于写入文件是…...
- 如何调试 xorg-server)
Linux xorg-server 解析(二)- 如何调试 xorg-server
一:概述 Xorg-server简称Xorg,它是Linux窗口系统的核心组件,它是用户态应用程序,但它的调试方法和普通用户态应用程序有所不同,因为Xorg是系统的核心组件,负责图形显示和输入设备的管理,所以在单台机器上调试Xorg可能会面临一些困难和限制,如果在同一台机器上调试它,可…...

CFS 调度器两种调度类型普通调度 和 组调度
在 Linux 的 CFS(Completely Fair Scheduler) 调度器中,确实存在两种调度类型:普通调度 和 组调度。这两种调度类型分别适用于不同的场景,并通过三个关键维度(权重、抢占优先级、最大配额)来影响…...

「逻辑推理」AtCoder AT_abc401_d D - Logical Filling
前言 这次的 D 题出得很好,不仅融合了数学逻辑推理的知识,还有很多细节值得反复思考。虽然通过人数远高于 E,但是通过率甚至不到 60%,可见这些细节正是出题人的侧重点。 题目大意 给定一个长度为 N N N 的字符串 S S S&#…...
:混合精度训练与梯度缩放)
PyTorch 深度学习实战(36):混合精度训练与梯度缩放
在上一篇文章中,我们探讨了图生成模型与分子设计。本文将深入介绍混合精度训练(Mixed Precision Training)和梯度缩放(Gradient Scaling)技术,这些技术可以显著加速模型训练并减少显存占用,同时…...

【Flink运行时架构】组件构成
在Flink的运行架构中,有两大比较重要的组件:作业管理器(JobManager)和任务管理器(TaskManager)。 Flink的作业提交与任务处理时的系统如下图所示。 其中,客户端并不是处理系统的一部分ÿ…...

simpy仿真
一共5个顾客,2个服务台 import simpy import randomdef customer(env, name, service_time_mean):arrival_time env.nowprint(f{arrival_time}: {name} 到达服务台,开始排队)with server.request() as req:yield reqwait_time env.now - arrival_time…...

Docker 安装MySQL
一键启动 docker run -d \--name mysql \-p 3306:3306 \-e TZAsia/Shanghai \-e MYSQL_ROOT_PASSWORD1234 \-v /usr/local/mysql/data:/var/lib/mysql \-v /usr/local/mysql/conf:/etc/mysql/conf.d \--restart always --name mysql \mysql 检查是否启动 docker ps 本地连接测…...

【消息队列kafka_中间件】三、Kafka 打造极致高效的消息处理系统
在当今数字化时代,数据量呈爆炸式增长,实时数据处理的需求变得愈发迫切。Kafka 作为一款高性能、分布式的消息队列系统,在众多企业级应用中得到了广泛应用。然而,要充分发挥 Kafka 的潜力,实现极致高效的消息处理&…...

conda如何安装和运行jupyter
在Conda环境中安装和运行Jupyter Notebook是一项常见且实用的任务,特别是在数据科学和机器学习项目中。以下是使用Conda安装和运行Jupyter Notebook的步骤: 安装Jupyter Notebook 首先,确保你的Conda是最新的。打开终端或Anaconda Prompt&a…...

防爆平板:石油化工厂智慧转型的“中枢神经”
易燃易爆气体、高温高压环境、复杂设备集群,这些特性使得传统电子设备难以直接融入生产流程。而防爆平板的出现,不仅打破了这一技术壁垒,更通过智能化、模块化设计,逐步成为连接人、设备与数据的“中枢神经”,推动石油…...

遨游科普:三防平板可以实现哪些功能?
在现代工业与户外作业场景中,电子设备不仅要面对极端环境的考验,更要承担起高效协同生产的重任。三防平板作为“危、急、特”场景移动终端的代表性产品,其核心价值早已超越传统消费级设备的范畴,成为连接智慧生产与安全管理的重要…...

互联网三高-数据库高并发之分库分表
1 数据库概述 1.1 数据库本身的瓶颈 ① 连接数 MySQL默认最大连接数为100,允许的最大连接数为16384 ② 单表海量数据查询性能 单表最好500w左右,最大警戒线800w ③ 单数据库并发压力问题 MySQL QPS:1500左右/秒 ④ 系统磁盘IO、CPU瓶颈 1.2 数…...
)
Python----机器学习(基于贝叶斯的鸢尾花分类)
贝叶斯方法是一种统计推断的 方法,它利用贝叶斯定理来更新我们对事件概率的信念。这种方法在机器学习和数据 分析中得到广泛应用,特别是在分类和概率估计问题上。 一、数据集介绍 这是分类方法文献中最早使用的数据集之一,广泛用于统计和机器…...

问题 | 对于初学者来说,esp32和stm32哪个比较适合?
对于初学者选择ESP32还是STM32入门嵌入式开发,需综合考虑学习目标、兴趣方向及未来职业规划。以下是两者的对比分析及建议: 1. 适合初学者的关键因素 ESP32的优势 内置无线通信:集成Wi-Fi和蓝牙功能,无需额外模块即可开发物联网…...

org.apache.spark.SparkException: Kryo serialization failed: Buffer overflow...
Spark异常:Kryo serialization failed: Buffer overflow. 1、问题描述 SparkSQL任务报错如下: org.apache.spark.SparkException: Kryo serialization failed: Buffer overflow. Available: 0, required: xxx. To avoid this, increase spark.kryoseri…...

webpack vite
1、webpack webpack打包工具(重点在于配置和使用,原理并不高优。只在开发环境应用,不在线上环境运行),压缩整合代码,让网页加载更快。 前端代码为什么要进行构建和打包? 体积更好&#x…...

论文笔记——KIMI-VL:具有增强推理能力的有效开源视觉语言模型
KIMI-VL:具有增强推理能力的有效开源视觉语言模型 原文地址:https://arxiv.org/pdf/2504.07491v1 开源地址:https://github.com/MoonshotAI/Kimi-VL 目录 简介架构概述训练方法主要功能性能基准通过长链思考增强推理应用结论 简介 视觉…...

大模型蒸馏-小模型超进化
👏作者简介:大家好,我是爱吃芝士的土豆倪,24届校招生Java选手,很高兴认识大家📕系列专栏:Spring原理、JUC原理、Kafka原理、分布式技术原理、数据库技术、JVM原理、AI应用🔥如果感觉…...

辅助记忆数字和唱名的小工具【仅PC端】
通过网盘分享的文件:random_music_note.exe 链接: https://pan.baidu.com/s/1Akc2gPzAcyhEfPHlbOYLXw?pwd4fua 提取码: 4fua –来自百度网盘超级会员v7的分享...

Android 知识沉淀
注解 1.枚举类型传参优化 enum WeekDay{SUNDAY, MONDAY}public static void setDay(WeekDay day){}我们已知,枚举类型是一个对象,对象占用的空间较大,有 12 个对象头对象的数据部分8 字节对齐,所以这里可以利用注解优化ÿ…...

KiActivateWaiterQueue函数和Queue->Header.WaitListHead队列等待列表的关系
第一部分: if (Thread->ApcState.KernelApcPending && (Thread->SpecialApcDisable 0) && (Thread->WaitIrql < APC_LEVEL)) { } else { // // Insert wait block in ob…...
)
代码学习总结(一)
代码学习总结(一) 这个系列的博客是记录下自己学习代码的历程,有来自平台上的,有来自笔试题回忆的,主要基于 C 语言,包括题目内容,代码实现,思路,并会注明题目难度&…...

设计模式 --- 策略模式
策略模式(Strategy Pattern)是一种 行为型设计模式,用于动态切换算法或策略,使得算法可以独立于客户端变化。它通过封装算法策略并使其可互换,提升了系统的灵活性和扩展性,尤其适用于需要多种…...

c++进阶之----智能指针
1.概念 在 C 中,智能指针是一种特殊的指针类型,它封装了裸指针(raw pointer)的行为,并通过 RAII(Resource Acquisition Is Initialization,资源获取即初始化)机制自动管理动态分配的…...

08-JVM 面试题-mk
1.JVM 的各部分组成 知道JVM 的好处:知道java 运行机制,排查问题的能力增加,比如内存泄漏、CPU飙高 JVM 是什么:Java Virtual Machine缩写,Java程序的运行环境(java二进制字节码的运行环境) 好处: 一次编写,到处运行自动内存管理,垃圾回收机制从图中可以看出 JVM …...

MTK7628基于原厂的mtk-openwrt-sdk-20160324-8f8e4f1e.tar.bz2 源代码包,配置成单网口模式的方法
一、配置. 在SDK工程下,运行make kernel_menuconfig,如下图所示: Ralink Module --->选上“One Port Only”,如下图所示: 如果P0网口实现WAN口,就配置成W/LLLL,否则就配置成LLLL/W. 二、修改网口的原代…...

青少年编程与数学 02-016 Python数据结构与算法 15课题、字符串匹配
青少年编程与数学 02-016 Python数据结构与算法 15课题、字符串匹配 一、字符串匹配问题的基本概念(一)定义(二)术语 二、暴力匹配算法(Naive String Matching)(一)算法逻辑…...

基础层数据从kafka读取写入hbase的优化方案
背景: 上游kafka的topic只有一个分区,所以spark在消费的时候,无论设置的executor数有多少,最终只有一个executor在执行,如果不指定executor num的话,默认是开启两个executor,有一个executor的资源是浪费的,例如下面显示的情况,其实只有一个executor是active的状态. 在消费的时…...