自动化测试之Pytest框架(万字详解)
Pytest测试框架
- 一、前言
- 二、安装
- 2.1 命令行安装
- 2.2 验证安装
- 三、pytest设计测试用例注意点
- 3.1 命名规范
- 3.2 断言清晰
- 3.3 fixture
- 3.4 参数化设置
- 3.5 测试隔离
- 3.6 异常处理
- 3.7 跳过或者预期失败
- 3.8 mocking
- 3.9 标记测试
- 四、以案例初入pytest
- 4.1 第一个pytest测试
- 4.2 多个测试分组一个类里面
- 4.3 将多个测试用例分组
- 4.4 pytest运行中命令行运行可选参数
- 五、配置文件pytest.ini
- 六、conftest文件
- 6.1 conftest的关键点
- 6.2 conftest案例
- 七、mark属性标记
- 7.1 内置/自定义标记
- 7.2 @pytest.mark.parametrize:参数化测试函数
- 八、Fixture装饰器
- 8.1 基本概念
- 8.2 Fixture方法解析
- 8.3 Fixture的创建和使用
- 8.4 调用Fixture的方式
- 九 、pytest跳过测试用例方法
- 9.1 skip -- 跳过测试用例
- 9.2 skipif -- 有条件跳过测试用例
- 十、失败重跑
- 10.1 使用 --last-failed 选项
- 10.2 使用 --failed-first 选项
- 10.3 使用 pytest-rerunfailures 插件
- 十一、pytest执行顺序
- 十二、hooks(钩子函数)
- 12.1 钩子函数的四个阶段
- 12.1.1 配置阶段 (Configuration)
- 12.2 收集阶段 (Collection)
- 12.3 运行阶段 (Running)
- 12.4 总结阶段 (Summary)
- 12.2 钩子函数关键点
- 十三、Allure测试报告
- 13.1 前言
- 13.2 安装 Allure
- 13.3 配置 pytest 以使用 Allure
- 13.4 Allure装饰器函数
- 13.5 执行自动化用例 生成allure报告所需文件
- 13.6 查看测试报告的两种方式
- 13.6.1 直接打开默认浏览器展示报告
- 13.6.2 从结果生成报告
- 十四、pytest中管理日志
- 14.1 日志级别
- 14.2 使用logging模块
- 14.3 将日志保存到文件
- 14.4 控制日志捕获的行为
- 14.5 示例
一、前言
pytest 是一个功能强大且易于使用的Python测试框架,它允许开发者编写简单或复杂的函数式测试。pytest 的设计理念是让测试过程尽可能的简单和直观,同时提供丰富的插件生态系统来扩展其功能。
-
介绍:
- 易用性:pytest 不需要额外的导入语句来标记测试函数(如unittest中的test_前缀),你可以直接使用标准的断言语句(assert)来进行测试,这使得测试代码更加简洁、可读
- 自动发现测试:pytest 能够自动找到并运行测试。默认情况下,它会查找文件名以test_开头或结尾的模块,以及任何以Test开头的类(无需继承自特定的父类)。在这些模块或类中,它会执行所有以test_开头的方法或函数
- 参数化测试:pytest 支持参数化测试,这意味着你可以用不同的输入数据多次运行同一个测试函数,而不需要为每个数据点编写单独的测试函数
- 详细的报告和输出:当测试失败时,pytest 提供了清晰的错误信息和追踪,帮助你快速定位问题所在
- 丰富的插件生态:pytest 拥有一个活跃的社区和大量的第三方插件,可以用来增强测试的功能,例如集成覆盖率报告、与CI/CD工具对接、支持异步测试等
- 兼容其他测试框架:pytest 可以运行unittest和nose风格的测试,所以如果你有旧的测试代码,通常可以直接使用pytest来运行它们,而不需要重写
- 内置的fixture机制:pytest 引入了fixture的概念,这是一个非常强大的特性,用于设置前置条件(比如创建数据库连接、初始化对象等),并且可以在多个测试之间共享
- 命令行选项:pytest 提供了许多有用的命令行选项,让你能够灵活地控制测试行为,比如选择运行特定的测试、跳过某些测试、根据关键字筛选测试等等
二、安装
2.1 命令行安装
pip install pytest
2.2 验证安装
pytest --version
三、pytest设计测试用例注意点
3.1 命名规范
- 文件名:文件名要以test_开头或结尾 例如:test_login.py
- 函数名:函数名要以test_开头,这样子有助与python自动取搜索他
- 如果使用类来组织测试,类名应以 Test 开头,并且不应继承自任何特定的基类(除非是为了使用某些特性)
3.2 断言清晰
- 使用 Python 内置的 assert 语句来进行断言。pytest 会提供详细的失败信息,因此尽量让断言语句尽可能直接明了
3.3 fixture
- fixture是pytest中非常重要的概念,用于设置测试环境,我们要合理的使用fixture,减少代码的重复使用,提高测试效率
3.4 参数化设置
- 利用 @pytest.mark.parametrize 装饰器可以为同一个测试函数提供多组输入数据,从而避免编写多个类似的测试函数
3.5 测试隔离
- 使用setup和teardowm来准备测试环境
3.6 异常处理
- 如果你的测试预期某个操作会抛出异常,可以使用 pytest.raises 上下文管理器来检查是否确实发生了预期的异常
3.7 跳过或者预期失败
- 对于暂时无法通过的测试,可以使用 @pytest.mark.skip 或 @pytest.mark.xfail 标记,以便在不影响整体测试结果的情况下继续开发
3.8 mocking
- 当测试需要依赖外部系统(如数据库、网络服务等)时,考虑使用 unittest.mock 或者第三方库如 pytest-mock 来模拟这些依赖,确保测试的快速性和稳定性
3.9 标记测试
- 使用 @pytest.mark 可以为测试添加标签,比如 slow, network, database 等,然后可以根据这些标签选择性地运行测试
四、以案例初入pytest
4.1 第一个pytest测试
创建一个名为test_demo的文件名,其中有一个函数 一个测试
def func(x):return x + 1def test_answer():assert func(3) == 5 # 断言
在命令行输入pytest运行,以下是输出结果
$ pytest
=========================== test session starts ============================
platform linux -- Python 3.x.y, pytest-8.x.y, pluggy-1.x.y
rootdir: /home/sweet/project
collected 1 itemtest_sample.py F                                                     [100%]================================= FAILURES =================================
_______________________________ test_answer ________________________________def test_answer():
>       assert func(3) == 5
E       assert 4 == 5
E        +  where 4 = func(3)test_sample.py:6: AssertionError
========================= short test summary info ==========================
FAILED test_sample.py::test_answer - assert 4 == 5
============================ 1 failed in 0.12s =============================
4.2 多个测试分组一个类里面
创建一个名为test_demo的文件名,创建一个类 其中有两个函数
class TestClass:def test_one(self):x = "this"assert "h" in xdef test_two(self):x = "hello"assert hasattr(x, "check") # 断言x是否具有名为check的属性或方法
在命令行输入pytest运行,以下是输出结果
$ pytest -q test_class.py
.F                                                                   [100%]
================================= FAILURES =================================
____________________________ TestClass.test_two ____________________________self = <test_class.TestClass object at 0xdeadbeef0001>def test_two(self):x = "hello"
>       assert hasattr(x, "check")
E       AssertionError: assert False
E        +  where False = hasattr('hello', 'check')test_class.py:8: AssertionError
========================= short test summary info ==========================
FAILED test_class.py::TestClass::test_two - AssertionError: assert False
1 failed, 1 passed in 0.12s
其中第一条是成功 第二条是失败 失败原因就是在x不具有check的属性 观察失败原因主要看断言中的中间值
4.3 将多个测试用例分组
好处:
测试组织
仅在特定类中共享用于测试的装置
在班级层面上应用标记,并让它们隐式地应用于所有测试
class TestClassDemoInstance:value = 0def test_one(self):self.value = 1assert self.value == 1def test_two(self):assert self.value == 1
$ pytest -k TestClassDemoInstance -q
.F                                                                   [100%]
================================= FAILURES =================================
______________________ TestClassDemoInstance.test_two ______________________self = <test_class_demo.TestClassDemoInstance object at 0xdeadbeef0002>def test_two(self):
>       assert self.value == 1
E       assert 0 == 1
E        +  where 0 = <test_class_demo.TestClassDemoInstance object at 0xdeadbeef0002>.valuetest_class_demo.py:9: AssertionError
========================= short test summary info ==========================
FAILED test_class_demo.py::TestClassDemoInstance::test_two - assert 0 == 1
1 failed, 1 passed in 0.12s
4.4 pytest运行中命令行运行可选参数
| 参数 | 功能 |
|---|---|
| -v | 增加输出的详细程度 |
| -q | 减少输出信息 |
| -k EXPRESSION | 根据表达式选择运行哪些测试,例如 -k ‘not slow’ 可以跳过标记为 slow 的测试 |
| -x | 遇到第一个失败就退出 |
| –html=REPORT.html | 生成HTML格式的测试报告,需要安装 pytest-html 插件 |
| –maxfail=NUM | 在达到指定数量的失败后停止测试 |
| -m MARKEXPR | 只运行带有指定标记的测试,例如 -m slow |
| -n NUM 或 --numprocesses=NUM | 使用多个进程并行运行测试,需要安装 pytest-xdist 插件 |
| -s | 不捕获标准输出和错误输出,允许直接看到 print 调用的结果 |
| –ignore=path | 忽略指定路径下的测试文件 |
五、配置文件pytest.ini
pytest.ini 文件是 pytest 的配置文件之一,用于定义项目的全局设置和选项。通过这个文件,你可以定制化测试行为,指定插件、命令行选项以及其他配置项,而无需每次都手动在命令行中输入这些参数
[pytest]
# 基本配置选项
addopts = -ra -q --tb=short
testpaths = tests/
markers =slow: marks tests as slow (deselect with '-m "not slow"')serial: marks tests that should run in serial
python_files = test_*.py *_test.py
python_classes = Test* *Tests
python_functions = test_*# 插件配置
plugins = myplugin, otherplugin# 环境变量
env =ENV_VAR=value1OTHER_ENV_VAR=value2# 代码覆盖率配置(需要安装 pytest-cov)
addopts += --cov=myproject --cov-report=term-missing# 并行测试配置(需要安装 pytest-xdist)
addopts += -n auto# 设置默认的编码为 utf-8
console_output_encoding = utf-8
file_system_encoding = utf-8# 设置收集器忽略某些路径
norecursedirs = .git .tox dist build# 自定义日志格式(需要安装 pytest-log-clerk 或类似插件)
log_cli = True
log_cli_level = INFO
log_cli_format = %(asctime)s [%(levelname)8s] %(message)s (%(filename)s:%(lineno)s)
log_cli_date_format = %Y-%m-%d %H:%M:%S
关键配置项解释
- addopts:添加默认的命令行选项。这可以包含任何有效的 pytest 命令行参数。例如,-ra 表示显示所有错误摘要,–tb=short 设置回溯输出风格
- testpaths:指定要搜索测试的目录,默认情况下 pytest 会递归搜索当前目录及其子目录中的所有匹配文件
- markers:定义自定义标记的帮助信息,使得其他开发者更容易理解标记的意义
- python_files:指定哪些文件名模式被视为测试文件
- python_classes:指定哪些类名模式被视为测试类
- python_functions:指定哪些函数名模式被视为测试函数
- plugins:加载额外的插件。通常不需要显式声明,因为大多数插件会自动注册
- norecursedirs:排除不希望递归搜索的目录
- log_cli 和相关日志配置:控制命令行日志输出的行为(需要适当的插件支持)
- coverage 和并行测试配置:可以通过 addopts 添加与 pytest-cov 或 pytest-xdist 相关的选项
六、conftest文件
conftest.py 文件是 Pytest 框架中的一个特殊文件,用于包含 fixture(固定装置)和其他配置代码。Pytest 会自动加载名为 conftest.py 的文件中定义的 fixtures 和插件,而不需要在测试模块中显式导入它们。这个文件通常用来存放那些被多个测试文件共享的配置和设置
6.1 conftest的关键点
- 位置:conftest.py 文件应当放置在你的测试文件所在的目录或其父目录中。Pytest 会递归地查找这些文件
- 作用域:定义在 conftest.py 中的 fixture 可以被该文件所在目录及其子目录下的所有测试文件使用
- 内容:可以包含 fixtures、hooks(钩子函数)和其他配置选项。它不应该包含实际的测试代码
- 命名:文件名必须严格为 conftest.py,否则 Pytest 将不会识别它
- 初始化代码:如果需要执行一些一次性的初始化代码(比如设置日志记录、数据库连接等),可以在 conftest.py 中定义
6.2 conftest案例
例如,在 conftest.py 中定义一个 fixture,用来作为登录模块用例的前置操作
import pytest
from seleium import webdirver@pytest.fixture(scope='class')
def login():driver = webdriver.Chrome()driver.get('http://127.0.0.1')driver.maximzie_window()driver.implicitly_wait(10)yield driverdriver quit()
七、mark属性标记
通过使用pytest.mark帮助程序,您可以轻松地在测试函数上设置元数据
7.1 内置/自定义标记
-
usefixtures - 在测试函数或类上使用fixture
-
filterwarnings-过滤测试函数的某些警告
-
skip-总是跳过测试函数
-
skipif - 如果满足某个条件,则跳过测试函数
-
xfail - 如果满足某个条件,则产生“预期失败”结果
-
参数化-对同一个测试函数执行多次调用
自定义标记
自定义标记就如上述pytest.ini文件,自定义标记
[pytest]
markers =slow: marks tests as slow (deselect with '-m "not slow"')serial
7.2 @pytest.mark.parametrize:参数化测试函数
pytest.mark.parametrize 是 pytest 框架提供的一个装饰器,用于参数化测试函数。它允许你定义多个参数集,然后针对每个参数集运行测试函数,这样可以有效地减少代码重复,并且使得测试更加灵活和易于维护
使用 @pytest.mark.parametrize 装饰器时,你需要提供两个参数:
- 第一个参数是一个字符串,其中包含逗号分隔的参数名列表
- 第二个参数是一个元组列表(或者可迭代的对象),每个元组代表一组测试数据,这些数据会依次传递给测试函数的相应参数
示例
import pytestdef add(x, y):return x + y@pytest.mark.parametrize("x, y, expected", [(1, 2, 3),(0, 5, 5),(-1, -1, -2),(3.2, 4.8, 8.0),
])
def test_add(x, y, expected):assert add(x, y) == expected
在这里parametrize 装饰器定义了四组x, y, expected元组,以便teat_add依次运行得出四组结果
test_example.py::test_add[1-2-3] PASSED
test_example.py::test_add[0-5-5] PASSED
test_example.py::test_add[-1--1--2] PASSED
test_example.py::test_add[3.2-4.8-8.0] FAILED
八、Fixture装饰器
8.1 基本概念
在 pytest 中,fixture 是一种用于设置测试环境的机制。它们可以用来执行一些前置或后置操作(例如:准备数据、启动服务、清理状态等),并且可以在多个测试之间共享。fixture 的设计使得代码复用和测试之间的依赖关系更加清晰,同时也让测试函数本身保持简洁
8.2 Fixture方法解析
fixture方法:
fixture(callable_or_scope=None, *args, scope="function", params=None, autouse=False, ids=None, name=None)
- scope:fixture的作用域,默认为function;
- autouse:默认:False,需要用例手动调用该fixture;如果是True,所有作用域内的测试用例都会自动调用该fixture;
- name:装饰器的名称,同一模块的fixture相互调用建议写不同的name
作用域(scope):
- (scope):决定了 fixture 的生命周期
- function (默认):每个测试函数调用一次
- class:每个测试类调用一次
- module:每个模块加载时调用一次
- session:整个测试会话期间只调用一次
参数化(params):
- 可以为 fixture 提供参数,类似于参数化测试
自动应用(autouse):
- 如果一个测试函数需要某个 fixture,pytest 会自动调用它,无需显式地传递
依赖注入(request ):
- 一个 fixture 可以依赖于另一个 fixture,并通过参数传递来实现这种依赖关系
8.3 Fixture的创建和使用
你可以通过装饰器 @pytest.fixture 来定义一个 fixture 函数。下面是一个简单的例子
import pytest@pytest.fixture
def sample_data():# 前置操作,比如初始化数据data = {"value": 42}yield data# 后置操作,比如清理资源print("Cleanup after test")
要使用fixture,只需要将其作为参数传递给测试函数
def test_with_fixture(sample_data):assert sample_data["value"] == 42
在这个例子中,sample_data 是一个 fixture 函数,它会在测试 test_with_fixture 运行之前被调用,提供了一个包含特定数据的字典给测试函数。yield 关键字之后的代码是后置操作,在测试完成后执行
8.4 调用Fixture的方式
方式一:直接作为测试函数的参数
这是最常见和推荐的方式。你只需要将 fixture 名称作为参数传递给测试函数或类的方法,pytest 就会自动为你调用该 fixture
import pytest@pytest.fixture
def sample_data():print("Setting up fixture")return {"value": 42}def test_with_fixture(sample_data):print(f"Testing with data: {sample_data}")assert sample_data["value"] == 42
执行结果
============================= test session starts ==============================
platform linux -- Python 3.x.y, pytest-7.x.y, pluggy-1.x.y
rootdir: /path/to/your/project
collected 1 itemtest_example.py::test_with_fixture Setting up fixture
Testing with data: {'value': 42}
PASSED============================== 1 passed in X.XX seconds ===============================
对于类中的方法,也可以同样地使用
class TestClass:def test_method(self, sample_data):assert sample_data["value"] == 42
方式二:使用 pytest.mark.usefixtures 标记
如果你不想在每个测试函数中都列出所有的 fixtures,或者你需要为多个测试函数应用同一个 fixture,可以使用 pytest.mark.usefixtures 来标记这些测试函数或整个测试类
import pytest@pytest.fixture
def setup():print("Setup fixture called")yieldprint("Teardown fixture called")@pytest.fixture
def another_setup():print("\nAnother setup fixture called")yieldprint("Teardown another setup fixture called")@pytest.mark.usefixtures("setup")
def test_one():print("Test one running")@pytest.mark.usefixtures("setup")
def test_two():print("Test two running")
执行结果
============================= test session starts ==============================
platform linux -- Python 3.x.y, pytest-7.x.y, pluggy-1.x.y
rootdir: /path/to/your/project
collected 2 itemstest_example.py::test_one Setup fixture called
Test one running
PASSED
Teardown fixture calledtest_example.py::test_two Setup fixture called
Test two running
PASSED
Teardown fixture called============================== 2 passed in X.XX seconds ===============================
你也可以一次性为多个测试函数或整个测试类添加多个 fixtures
@pytest.mark.usefixtures("setup", "another_setup")
class TestClass:def test_method(self):passdef test_another_method(self):pass
执行结果
============================= test session starts ==============================
platform linux -- Python 3.x.y, pytest-7.x.y, pluggy-1.x.y
rootdir: /path/to/your/project
collected 2 itemstest_example.py::TestClass::test_method
Setup fixture calledAnother setup fixture calledTest method running
PASSED
Teardown another setup fixture called
Teardown setup fixture calledtest_example.py::TestClass::test_another_method
Setup fixture calledAnother setup fixture calledTest another method running
PASSED
Teardown another setup fixture called
Teardown setup fixture called============================== 2 passed in X.XX seconds ===============================
方式三:自动应用 (autouse=True)
当你定义一个 fixture 时,可以通过设置 autouse=True 参数使其自动应用于所有测试函数,而不需要显式地将其作为参数传递或使用 pytest.mark.usefixtures 标记
import pytest@pytest.fixture(autouse=True)
def always_used_fixture():print("This fixture is automatically applied to all tests.")def test_without_explicit_dependency():print("Running a test without explicitly depending on the fixture.")
执行结果
============================= test session starts ==============================
platform linux -- Python 3.x.y, pytest-7.x.y, pluggy-1.x.y
rootdir: /path/to/your/project
collected 1 itemtest_example.py::test_with_autouse Setting up autouse fixture
Setting up sample_data fixture
Testing with autouse and sample_data fixture data: {'value': 42}
PASSED============================== 1 passed in X.XX seconds ===============================
九 、pytest跳过测试用例方法
9.1 skip – 跳过测试用例
-
您可以标记无法在某些平台上运行或预计会失败的测试功能,以便 pytest 可以相应地处理它们并提供测试会话的摘要,同时保持测试套件为绿色
-
跳过意味着您仅希望测试在满足某些条件时才能通过,否则 pytest 应完全跳过运行测试。常见示例是在非 Windows 平台上跳过仅限 Windows 的测试,或跳过依赖于当前不可用的外部资源(例如数据库)的测试
使用 pytest.mark.skip 装饰器
pytest.mark.skip() 通常用于在定义测试函数时标记该函数应该被跳过,而不是在函数内部使用
如果你想在定义测试函数时提供跳过的原因,可以使用带有 reason 参数的 pytest.mark.skip 装饰器
import pytest@pytest.mark.skip(reason="This test is skipped because it's not ready yet.")
def test_skip_with_reason():print("This test should be skipped and you should see the reason why.")
使用 pytest.skip() 在函数内部跳过
如果你需要根据某些运行时条件来决定是否跳过测试,可以在测试函数内部使用 pytest.skip() 函数
import pytestdef test_skip_inside_function():condition = False # 这里可以是任何条件判断if not condition:pytest.skip("Skipping this test based on a runtime condition.")print("This part of the test will only run if the condition is True.")
结合两种方法
下面是一个完整的例子,展示了如何使用 pytest.mark.skip 和 pytest.skip():
import pytest# 使用装饰器跳过测试并提供原因
@pytest.mark.skip(reason="This test is not implemented yet.")
def test_skip_with_reason():print("This test should be skipped.")# 根据条件在函数内部跳过测试
def test_skip_inside_function():condition = False  # 这里可以是任何条件判断if not condition:pytest.skip("Skipping this test based on a runtime condition.")print("This part of the test will only run if the condition is True.")# 正常测试用例作为对比
def test_normal_case():print("Running a normal test case.")assert True
执行结果
# 输入
pytest -v -s test_example.py# 结果
============================= test session starts ==============================
platform linux -- Python 3.x.y, pytest-7.x.y, pluggy-1.x.y
rootdir: /path/to/your/project
collected 3 itemstest_example.py::test_skip_with_reason SKIPPED (This test is not implemented yet.)
test_example.py::test_skip_inside_function
Skipping this test based on a runtime condition.
SKIPPED
test_example.py::test_normal_case Running a normal test case.
PASSED============================== 1 passed, 2 skipped in X.XX seconds ===============================
9.2 skipif – 有条件跳过测试用例
- pytest.mark.skipif 是 pytest 提供的一个装饰器,用于根据给定条件跳过测试用例。如果提供的条件为 True,则该测试将被跳过;如果条件为 False,则测试会正常运行。你可以通过传递一个布尔表达式和一个可选的 reason 参数来解释为什么跳过测试
使用 pytest.mark.skipif
import pytest# 如果条件为 True,则跳过测试
@pytest.mark.skipif(True, reason="This test is skipped because the condition is True.")
def test_skipif_with_true_condition():print("This test should be skipped.")# 如果条件为 False,则测试不会被跳过
@pytest.mark.skipif(False, reason="This test will not be skipped because the condition is False.")
def test_skipif_with_false_condition():print("This test should run.")
依赖外部条件
通常,你会使用 skipif 来检查一些外部条件,比如环境变量、操作系统类型或第三方库的存在等
以下是在 Python3.8 之前的解释器上运行时标记要跳过的测试函数的示例
import sys
import pytest# 根据 Python 版本跳过测试
@pytest.mark.skipif(sys.version_info < (3, 8), reason="Requires Python 3.8 or higher")
def test_requires_python_38():print("Running a test that requires Python 3.8 or higher.")
结合多个条件
你还可以将多个条件组合起来,或者在 fixture 中使用 skipif
import pytest# 定义一个 fixture,它可以根据条件跳过所有使用它的测试
@pytest.fixture
def check_environment():if some_condition:  # 替换为实际条件判断pytest.skip("Skipping due to environment configuration.")# 使用 fixture 的测试函数
def test_with_check_environment(check_environment):print("This test runs only if the environment check passes.")# 结合多个条件
@pytest.mark.skipif(sys.platform == "win32" and sys.version_info < (3, 8),reason="This test requires Python 3.8 or higher on Windows."
)
def test_combined_conditions():print("Running a test with combined conditions.")
输出结果
============================= test session starts ==============================
platform linux -- Python 3.x.y, pytest-7.x.y, pluggy-1.x.y
rootdir: /path/to/your/project
collected 3 itemstest_example.py::test_with_check_environment
This test runs only if the environment check passes.
PASSED
test_example.py::test_combined_conditions
Running a test with combined conditions.
PASSED
test_example.py::test_normal_case
Running a normal test case.
PASSED============================== 3 passed in X.XX seconds ===============================
十、失败重跑
10.1 使用 --last-failed 选项
- 这个选项会只运行上一次测试会话中失败的测试用例,而跳过所有通过的测试用例。这对于快速重新运行失败的测试非常有用
案例:
首先,让我们创建 50 个测试调用,其中只有 2 个失败
# content of test_50.py
import pytest@pytest.mark.parametrize("i", range(50))
def test_num(i):if i in (17, 25):pytest.fail("bad luck")
如果您第一次运行该程序,您将看到两个失败:
$ pytest -q
.................F.......F........................                   [100%]
================================= FAILURES =================================
_______________________________ test_num[17] _______________________________i = 17@pytest.mark.parametrize("i", range(50))def test_num(i):if i in (17, 25):
>           pytest.fail("bad luck")
E           Failed: bad lucktest_50.py:7: Failed
_______________________________ test_num[25] _______________________________i = 25@pytest.mark.parametrize("i", range(50))def test_num(i):if i in (17, 25):
>           pytest.fail("bad luck")
E           Failed: bad lucktest_50.py:7: Failed
========================= short test summary info ==========================
FAILED test_50.py::test_num[17] - Failed: bad luck
FAILED test_50.py::test_num[25] - Failed: bad luck
2 failed, 48 passed in 0.12s
如果你使用以下命令运行它–lf:
$ pytest --lf
=========================== test session starts ============================
platform linux -- Python 3.x.y, pytest-8.x.y, pluggy-1.x.y
rootdir: /home/sweet/project
collected 2 items
run-last-failure: rerun previous 2 failurestest_50.py FF                                                        [100%]================================= FAILURES =================================
_______________________________ test_num[17] _______________________________i = 17@pytest.mark.parametrize("i", range(50))def test_num(i):if i in (17, 25):
>           pytest.fail("bad luck")
E           Failed: bad lucktest_50.py:7: Failed
_______________________________ test_num[25] _______________________________i = 25@pytest.mark.parametrize("i", range(50))def test_num(i):if i in (17, 25):
>           pytest.fail("bad luck")
E           Failed: bad lucktest_50.py:7: Failed
========================= short test summary info ==========================
FAILED test_50.py::test_num[17] - Failed: bad luck
FAILED test_50.py::test_num[25] - Failed: bad luck
============================ 2 failed in 0.12s =============================
10.2 使用 --failed-first 选项
- 这个选项会在测试会话开始时首先运行上次失败的测试用例,然后再运行其他的测试用例。这有助于尽早发现问题,并且可以继续运行其他测试以确保没有引入新的问题
案例:
我们将编写三个测试函数:两个会成功,一个会失败。然后我们将运行这些测试,并在修复失败的测试后再次运行它们,以显示 --failed-first 的效果
import pytestdef test_success_one():print("Running test_success_one")assert Truedef test_success_two():print("Running test_success_two")assert Truedef test_failure():print("Running test_failure")assert False, "This test is supposed to fail."
第一步:初次运行测试
首先,我们运行所有测试来确定哪些测试失败了
============================= test session starts ==============================
platform linux -- Python 3.x.y, pytest-7.x.y, pluggy-1.x.y
rootdir: /path/to/your/project
collected 3 itemstest_example.py::test_success_one Running test_success_one
PASSED
test_example.py::test_success_two Running test_success_two
PASSED
test_example.py::test_failure Running test_failure
FAILED=================================== FAILURES ===================================
_______________________________ test_failure _________________________________def test_failure():print("Running test_failure")
>       assert False, "This test is supposed to fail."
E       AssertionError: This test is supposed to fail.
E       assert Falsetest_example.py:10: AssertionError
============================== short test summary info ===============================
FAILED test_example.py::test_failure - AssertionError: This test is supposed to fail.
============================== 2 passed, 1 failed in X.XX seconds ===============================
第二步:修复失败的测试
现在我们修复 test_failure 函数中的错误:
def test_failure():print("Running test_failure (fixed)")assert True, "This test has been fixed."
第三步:使用 --failed-first 重新运行测试
接下来,我们使用 --failed-first 选项来确保上次失败的测试优先运行。这有助于尽早发现问题是否已经被解决
============================= test session starts ==============================
platform linux -- Python 3.x.y, pytest-7.x.y, pluggy-1.x.y
rootdir: /path/to/your/project
collected 3 itemstest_example.py::test_failure Running test_failure (fixed)
PASSED
test_example.py::test_success_one Running test_success_one
PASSED
test_example.py::test_success_two Running test_success_two
PASSED============================== 3 passed in X.XX seconds ===============================
10.3 使用 pytest-rerunfailures 插件
- 如果你需要在同一个测试会话中多次重试失败的测试,可以安装并使用 pytest-rerunfailures 插件。这个插件允许你指定一个次数,当测试失败时它会自动重试指定的次数
安装插件
pip install pytest-rerunfailures
安装前提
pytest(>=5.3) and python>=3.6
查看安装版本
pip show pytest-rerunfailures
pytest-rerunfailures方法使用
- 命令行参数:-reruns n(重新运行次数) - rerruns -delay m (等待运行次数)
使用装饰器
@pytest.mark.flaky(reruns=5,reruns_delay=2)
命令行案例:
我们将编写三个测试函数:两个会成功,一个会失败。然后我们将运行这些测试,并在修复失败的测试后再次运行它们,以显示 pytest-rerunfailures 如何工作
import pytestdef test_success_one():print("Running test_success_one")assert Truedef test_success_two():print("Running test_success_two")assert Truedef test_failure():print("Running test_failure")# 这个断言会在第一次执行时失败,但在后续重试中通过if not hasattr(test_failure, "retry_count"):test_failure.retry_count = 0test_failure.retry_count += 1if test_failure.retry_count < 3:assert False, f"This test is supposed to fail on retry {test_failure.retry_count}"else:print("This test has been fixed and now passes.")assert True
第一步:初次运行测试
首先,我们运行所有测试来确定哪些测试失败了,并查看重试机制是否按预期工作
执行命令
pytest --reruns 3 --reruns-delay 1 -v -s test_example.py
这里,–reruns 3 表示每个失败的测试最多重试 3 次,–reruns-delay 1 表示每次重试之间等待 1 秒
预期结果
============================= test session starts ==============================
platform linux -- Python 3.x.y, pytest-7.x.y, pluggy-1.x.y
rootdir: /path/to/your/project
collected 3 itemstest_example.py::test_success_one Running test_success_one
PASSED
test_example.py::test_success_two Running test_success_two
PASSED
test_example.py::test_failure Running test_failure
FAILED---------------------------------- Captured stdout call ----------------------------------
Running test_failure=================================== FAILURES ===================================
_______________________________ test_failure _________________________________def test_failure():print("Running test_failure")if not hasattr(test_failure, "retry_count"):test_failure.retry_count = 0test_failure.retry_count += 1if test_failure.retry_count < 3:
>           assert False, f"This test is supposed to fail on retry {test_failure.retry_count}"
E           AssertionError: This test is supposed to fail on retry 1
E           assert Falsetest_example.py:16: AssertionError
----------------------------- RERUN test_failure ------------------------------
test_example.py::test_failure (re-run 1) Running test_failure
FAILED---------------------------------- Captured stdout call ----------------------------------
Running test_failure=================================== FAILURES ===================================
_______________________________ test_failure _________________________________def test_failure():print("Running test_failure")if not hasattr(test_failure, "retry_count"):test_failure.retry_count = 0test_failure.retry_count += 1if test_failure.retry_count < 3:
>           assert False, f"This test is supposed to fail on retry {test_failure.retry_count}"
E           AssertionError: This test is supposed to fail on retry 2
E           assert Falsetest_example.py:16: AssertionError
----------------------------- RERUN test_failure ------------------------------
test_example.py::test_failure (re-run 2) Running test_failure
PASSED---------------------------------- Captured stdout call ----------------------------------
Running test_failure
This test has been fixed and now passes.============================== short test summary info ===============================
FAILED test_example.py::test_failure - AssertionError: This test is supposed to fail on retry 1
FAILED test_example.py::test_failure (re-run 1) - AssertionError: This test is supposed to fail on retry 2
PASSED test_example.py::test_failure (re-run 2)
============================== 2 passed, 1 failed in X.XX seconds ===============================
在这个输出中,我们可以看到 test_failure 在前两次重试中失败了,但在第三次重试中通过了。
总结
- 初次运行:展示了哪些测试通过了,哪些失败了,并且展示了重试机制
- 重试机制:test_failure 测试在前两次重试中失败,但在第三次重试中通过了
- 使用 pytest-rerunfailures 插件:确保失败的测试可以在同一个测试会话中多次重试,从而减少由于环境或其他不稳定因素导致的假阳性失败
十一、pytest执行顺序
在 pytest 中,测试函数的执行顺序默认是按照它们在文件中的定义顺序。然而,有时候你可能希望控制测试的执行顺序,例如确保某些依赖关系得以满足或优化测试运行时间。pytest 提供了多种方式来控制测试执行顺序,包括使用 @pytest.mark.order 装饰器(需要安装 pytest-ordering 插件)和内置的 pytest-order 插件
安装插件
pip install pytest-order
案例:
我们将创建几个测试函数,并使用 @pytest.mark.order 来指定它们的执行顺序
import pytest@pytest.mark.order(2)
def test_second():print("Running second test")assert True@pytest.mark.order(1)
def test_first():print("Running first test")assert True@pytest.mark.order(3)
def test_third():print("Running third test")assert Truedef test_unordered():print("Running unordered test")assert True
在这个例子中,我们指定了三个测试的执行顺序:test_first 会最先运行,然后是 test_second,最后是 test_third。test_unordered 没有指定顺序,因此它将根据其在文件中的位置决定执行顺序,通常是在所有有序测试之后执行
预期结果
============================= test session starts ==============================
platform linux -- Python 3.x.y, pytest-7.x.y, pluggy-1.x.y
rootdir: /path/to/your/project
collected 4 itemstest_example.py::test_first Running first test
PASSED
test_example.py::test_second Running second test
PASSED
test_example.py::test_third Running third test
PASSED
test_example.py::test_unordered Running unordered test
PASSED============================== 4 passed in X.XX seconds ===============================
在这个输出中,可以看到测试按照我们指定的顺序执行:test_first -> test_second -> test_third,而 test_unordered 在最后执行
不同的排序策略
- 除了使用数字来指定顺序外,pytest-order 还支持其他排序策略,比如按字母顺序、反向顺序等。你还可以结合多个装饰器来实现更复杂的排序逻辑。
示例:按字母顺序执行
- 如果你想要按字母顺序执行测试,可以使用 @pytest.mark.order(“alphabetical”):
@pytest.mark.order("alphabetical")
def test_a():print("Running test_a")assert True@pytest.mark.order("alphabetical")
def test_b():print("Running test_b")assert True
十二、hooks(钩子函数)
12.1 钩子函数的四个阶段
12.1.1 配置阶段 (Configuration)
描述:
- 在这个阶段,pytest 解析命令行参数、读取配置文件,并进行必要的初始化工作。你可以通过这个阶段的钩子函数来添加自定义选项或修改全局配置
常用钩子函数:
- pytest_addoption(parser):
- 用途:向命令行接口添加自定义选项
- 示例:
def pytest_addoption(parser):parser.addoption("--runslow", action="store_true", help="run slow tests")
- pytest_configure(config):
- 用途:在所有测试开始前进行全局配置,比如注册 markers 或设置其他全局状态。
- 示例:
def pytest_configure(config):config.addinivalue_line("markers", "slow: mark test as slow to run")
12.2 收集阶段 (Collection)
描述:
- pytest 在此阶段会搜索并收集所有符合标准的测试项(test items)。你可以在这一阶段修改哪些测试会被收集,或者改变它们的属性。
常用钩子函数:
- pytest_collect_file(path, parent):
- 用途:自定义文件收集器,允许 pytest 收集非标准测试文件
- 示例:
def pytest_collect_file(parent, path):if path.ext == ".yaml" and path.basename.startswith("test_"):return YamlFile.from_parent(parent, fspath=path)
- pytest_collection_modifyitems(session, config, items):
- 用途:修改收集到的测试项列表,例如根据条件过滤或重新排序测试项。
- 示例:
def pytest_collection_modifyitems(items):items.sort(key=lambda item: item.name) # 按名称排序
12.3 运行阶段 (Running)
描述:
- 这是实际执行测试的阶段。pytest 会依次调用每个测试项的 setup、call 和 teardown 方法。你可以在这些方法中插入额外的逻辑,如日志记录、性能监控等
常用钩子函数:
- pytest_runtest_protocol(item, nextitem):
- 用途:控制整个测试协议,包括 setup、call 和 teardown。
- pytest_runtest_setup(item):
- 用途:在每个测试项执行之前调用,用于设置测试环境。
- 示例:
def pytest_runtest_setup(item):print(f"Setting up {item.name}")
- pytest_runtest_call(item):
- 用途:在每个测试项的实际执行过程中调用。
- 示例:
def pytest_runtest_call(item):print(f"Calling {item.name}")
- pytest_runtest_teardown(item, nextitem):
- 用途:在每个测试项执行之后调用,用于清理测试环境。
- 示例:
def pytest_runtest_teardown(item, nextitem):print(f"Tearing down {item.name}")
- pytest_report_teststatus(report, config):
- 用途:自定义测试状态报告,改变测试通过、失败或跳过的显示方式。
- 示例:
def pytest_report_teststatus(report, config):if report.when == 'call' and report.failed:return "failed", "F", "FAILED"
12.4 总结阶段 (Summary)
描述:
- 在所有测试完成后,pytest 会生成一个总结报告,显示测试结果。你可以在此阶段添加自定义的总结信息,或者修改默认的输出格式。
常用钩子函数:
- pytest_terminal_summary(terminalreporter, exitstatus, config):
- 用途:在终端输出总结信息。
- 示例:
def pytest_terminal_summary(terminalreporter, exitstatus, config):print("Custom summary information")
- 四个阶段的关系
- 配置阶段:为测试会话准备环境,确保一切就绪
- 收集阶段:确定哪些测试需要运行,并构建测试项列表
- 运行阶段:依次执行测试项,并处理每个测试的 setup、call 和 teardown
- 总结阶段:提供测试结果的汇总信息,并结束测试会话
12.2 钩子函数关键点
1. 调用顺序:了解各个阶段的钩子函数调用顺序,以便在适当的时间点插入逻辑
2. 常见钩子函数:熟悉关键的钩子函数及其用途,以实现所需的定制化功能
3. request 对象:利用 request 对象提供的上下文信息来增强灵活性
许多钩子函数接收一个 request 对象作为参数,该对象提供了访问当前测试上下文的能力。request 对象非常强大,因为它包含了关于测试会话、节点、配置等方面的信息
- request.config: 访问全局配置
- request.node: 获取当前测试项的信息
- request.addfinalizer(): 注册一个函数,在测试结束时调用
4. 插件兼容性:确保自定义插件与现有插件良好协作
5.文档和社区支持:充分利用官方文档和社区资源来解决问题和学习最佳实践
结合案例
- 假设你想确保一些测试总是最先运行,而另一些则在最后运行。你可以结合 pytest_collection_modifyitems 和 @pytest.mark.order 来实现这一点
import pytestdef pytest_collection_modifyitems(items):# 定义一个排序键,确保带有 'order' 标记的测试按照指定顺序执行items.sort(key=lambda item: (getattr(item.get_closest_marker('order'), 'args', [0])[0], item.name))@pytest.mark.order(1)
def test_first():print("Running first test")assert True@pytest.mark.order(2)
def test_second():print("Running second test")assert Truedef test_unordered():print("Running unordered test")assert True
在这个例子中,pytest_collection_modifyitems 确保了标记为 @pytest.mark.order 的测试按照指定顺序执行,而未标记的测试则排在其后
十三、Allure测试报告
13.1 前言
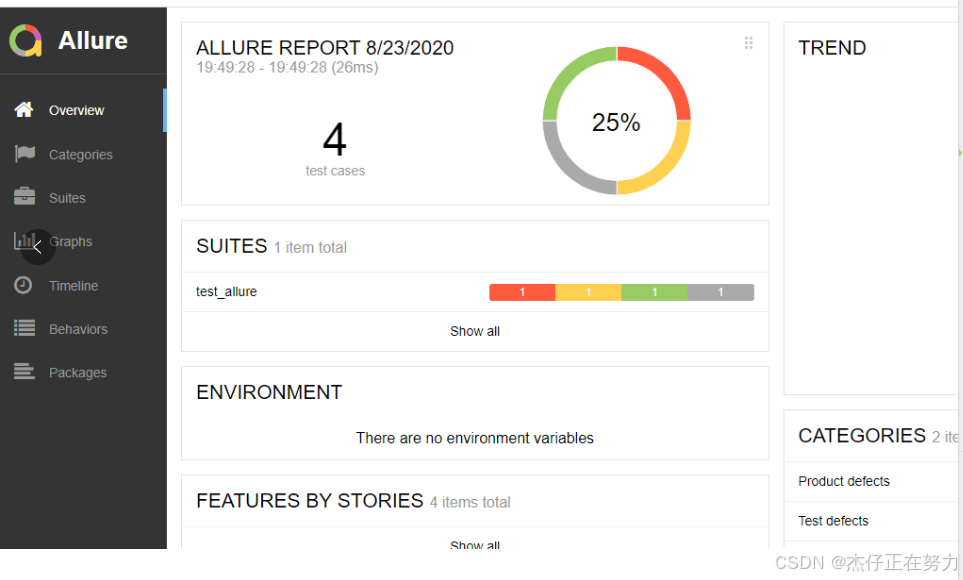
Allure 是一个灵活且功能强大的测试报告工具,支持多种编程语言和测试框架,包括 Python 的 pytest。它能够生成详细且美观的测试报告,帮助团队更好地理解和分析测试结果。以下是关于如何在 pytest 中集成 Allure 测试报告的关键点和步骤
13.2 安装 Allure
首先,你需要安装 Allure 和相关插件:
- 安装 Allure 命令行工具:
- 使用 Homebrew(MacOS):brew install allure
- 使用 Chocolatey(Windows):choco install allure
- 或者从 下载并手动安装。
- 安装 pytest-allure-adaptor 插件:
- 使用 pip 安装:pip install pytest-allure-adaptor
13.3 配置 pytest 以使用 Allure
1. 在命令行中启用 Allure
你可以直接在命令行中通过添加 --alluredir 参数来指定保存 Allure 结果的目录:
pytest --alluredir=/path/to/result/dir
2. 使用 pytest.ini 或 tox.ini 配置文件
你也可以将 Allure 配置添加到 pytest.ini 或 tox.ini 文件中,以便每次运行测试时自动应用:
[pytest]
addopts = --alluredir=allure-results
13.4 Allure装饰器函数
装饰器函数
| 方法 | 参数 | 参数说明 |
|---|---|---|
| @allure.epic() | epic描述 | 定义项目、当有多个项目是使用。往下是feature |
| @allure.feature() | 模块名称 | 用例按照模块区分,有多个模块时给每个起名字 |
| @allure.story() | 用例名称 | 一个用例的描述 |
| @allure.title(用例的标题) | 用例标题 | 一个用例的标题 |
| @allure.testcase() | 测试用例连接的地址 | 自动化用例对应的功能用例存放系统的地址 |
| @allure.issue() | 缺陷地址 | 对应缺陷管理系统里边的缺陷地址 |
| @allure.description() | 用例描述 | 对应测试用例的描述 |
| @allure.step() | 测试步骤 | 测试用例的操作步骤 |
| @allure.severity() | 用例等级 | blocker 、critical 、normal 、minor 、trivial |
| @allure.link() | 定义连接 | 用于定义一个需要在测试报告中展示的连接 |
| @allure.attachment() | 附件 | 添加测试报告附件 |
13.5 执行自动化用例 生成allure报告所需文件
测试代码
import pytestdef test_success():"""this test succeeds"""assert Truedef test_failure():"""this test fails"""assert Falsedef test_skip():"""this test is skipped"""pytest.skip('for a reason!')def test_broken():raise Exception('oops')运行
pytest --alluredir=./results

13.6 查看测试报告的两种方式
13.6.1 直接打开默认浏览器展示报告
allure serve ./result/
13.6.2 从结果生成报告
-
生成报告
- allure generate ./result/ -o ./report/ --clean (覆盖路径加–clean)
-
打开报告
- allure open -h 127.0.0.1 -p 8883 ./report/
十四、pytest中管理日志
14.1 日志级别
debug:打印全部日志,详细信息
info:打印info、warning、error、critical级别的日志,确认一切按预期运行
warning:打印warning、error、critical级别的日志
error:打印error、critical级别日志,或者一些更为严重,软件没能执行一些功能
critical:打印critical日志,一个严重的错误,表明程序可能无法正常的执行
等级顺序:
debug–》info–》warning–》error–》critical
14.2 使用logging模块
你可以直接在测试代码中使用 logging 模块来记录信息。pytest 会自动捕获这些日志并根据上述配置进行处理
import loggingdef test_example():logger = logging.getLogger(__name__)logger.info("This is an info message")logger.debug("This is a debug message")assert True
14.3 将日志保存到文件
有时你可能希望将日志保存到文件而不是仅限于终端输出。你可以通过配置 logging 模块来实现这一点
import logging# 配置日志记录器以写入文件
logging.basicConfig(filename='test.log', filemode='w', level=logging.INFO)def test_logging_to_file():logger = logging.getLogger(__name__)logger.info("Logging to file")assert True
此外,你也可以在 pytest.ini 中配置日志输出到文件:
[pytest]
log_file = test.log
log_file_level = INFO
14.4 控制日志捕获的行为
有时候你可能不想捕获某些特定的日志输出,或者想完全禁用日志捕获。你可以通过 caplog fixture 来控制日志捕获的行为
def test_control_log_capture(caplog):caplog.set_level(logging.WARNING) # 只捕获 WARNING 级别及以上的日志logging.info("This will not be captured")logging.warning("This will be captured")assert "captured" in caplog.text
14.5 示例
import logging
import os
import timefrom config.conf import BASE_DIR
import colorloglog_color_config = {'DEBUG': 'cyan','INFO': 'green','WARNING': 'yellow','ERROR': 'red','CRITICAL': 'bold_red'}log = logging.getLogger('log_name')consloe_handler = logging.StreamHandler()
daytime = time.strftime("%Y-%m-%d")
path = BASE_DIR + 'log/'if not os.path.exists(path):os.makedirs(path)filename = path + f'/run_log_{daytime}.log'file_handle = logging.FileHandler(filename=filename, mode='a', encoding="utf-8")log.setLevel(logging.DEBUG)
consloe_handler.setLevel(logging.DEBUG)
file_handle.setLevel(logging.INFO)file_formatter = logging.Formatter(fmt='%(asctime)s - %(levelname)s - %(name)s - %(module)s:%(funcName)s:%(lineno)d - %(message)s',datefmt='%Y-%m-%d %H:%M:%S')console_formatter = colorlog.ColoredFormatter(fmt='%(log_color)s%(levelname)-8s%(reset)s | %(log_color)s%(message)s%(reset)s | %(white)s%(asctime)s | %(blue)s%(name)s:%(filename)s:%(lineno)d%(reset)s',datefmt='%Y-%m-%d %H:%M:%S',  # 设置日期/时间格式    reset=True,  # 自动重置颜色到默认值    log_colors=log_color_config,  # 使用上面定义的日志等级颜色配置    secondary_log_colors={},  # 可选:为特定字段添加颜色    style='%'  # 使)
consloe_handler.setFormatter(console_formatter)
file_handle.setFormatter(file_formatter)if not log.handlers:log.addHandler(consloe_handler)log.addHandler(file_handle)consloe_handler.close()
file_handle.close()if __name__ == '__main__':log.debug("debug")log.info("info")log.warning("warning")log.critical("critical")
相关文章:
)
自动化测试之Pytest框架(万字详解)
Pytest测试框架 一、前言二、安装2.1 命令行安装2.2 验证安装 三、pytest设计测试用例注意点3.1 命名规范3.2 断言清晰3.3 fixture3.4 参数化设置3.5 测试隔离3.6 异常处理3.7 跳过或者预期失败3.8 mocking3.9 标记测试 四、以案例初入pytest4.1 第一个pytest测试4.2 多个测试分…...

YOLOv10-1.1部分代码阅读笔记-conv.py
conv.py ultralytics\nn\modules\conv.py 目录 conv.py 1.所需的库和模块 2.def autopad(k, pNone, d1): 3.class Conv(nn.Module): 4.class Conv2(Conv): 5.class LightConv(nn.Module): 6.class DWConv(Conv): 7.class DWConvTranspose2d(nn.ConvTranspose2d)…...

大模型-Ollama使用相关的笔记
大模型-Ollama使用相关的笔记 解决Ollama外网访问问题(配置ollama跨域访问)Postman请求样例 解决Ollama外网访问问题(配置ollama跨域访问) 安装Ollama完毕后, /etc/systemd/system/ollama.service进行如下修改&#…...

【机器学习】概述
文章目录 1. 机器学习三步骤2. 机器学习图谱2.1 任务类型 (Task)2.2 模型选择 (Methods)2.3 学习场景 (Scenario) 1. 机器学习三步骤 定义一个模型 (Define a set of function) 选择一组合适的函数来表示模型。 评估模型好坏 (Goodness of function) 找到一个损失函数…...
?)
什么是网络安全(Cybersecurity)?
不同组织机构对网络安全(Cybersecurity或Cyber Security)的定义不尽相同。从目标上来说,网络安全主要用于保护网络、计算机、移动设备、应用程序及数据等资产免受网络攻击,避免造成数据泄露、业务中断等安全问题。 网络钓鱼、勒索…...

3_TCP/IP连接三次握手与断开四次挥手
TCP/IP 通信是网络通信的基础协议,分为以下主要步骤: 1、建立连接(三次握手) 目的:保证双方建立可靠的通信连接。 过程: 1>客户端发送 SYN:客户端向服务器发送一个 SYN(同步&…...

基于单片机的电梯模拟控制系统
摘要: 文章主要针对基于单片机的电梯模拟控制系统进行研究,指出基于单片机的电梯模拟控制系统应用优点,并在此基础上介绍单片机控制技术,分析单片机在电梯模拟控制系统中的具体应用。 关键词: 单片机;电梯;模拟控制系统 1 基于单片机的电梯模拟控制系统应用优点概述 1…...
【5】)
区块链安全常见的攻击——ERC777 重入漏洞 (ERC777 Reentrancy Vulnerability)【5】
区块链安全常见的攻击分析——ERC777 重入漏洞 ERC777 Reentrancy Vulnerability【5】 区块链安全常见的攻击合约和简单复现,附带详细分析——ERC777 重入漏洞 (ERC777 Reentrancy Vulnerability)【5】1.1 漏洞合约1.2 漏洞分析1.3 攻击分析1.4 攻击合约1.5 hardhat…...
)
MusicFree - 免费播放全网歌曲!无广告开源网络音乐聚合播放器 (安卓电脑版)
大家平常听歌可能都会在 QQ 音乐、网易云音乐、酷狗、喜马拉雅等不同平台来回切换,体验其实很烦。曾经推荐过不少“聚合”音乐应用,比如 洛雪音乐助手、Listen1 等等。 最近又有一个新选择了!MusicFree 是一款免费开源清爽无广告的音乐播放器…...

html+css+js网页设计 美食 美拾9个页面
htmlcssjs网页设计 美食 美拾9个页面 网页作品代码简单,可使用任意HTML辑软件(如:Dreamweaver、HBuilder、Vscode 、Sublime 、Webstorm、Text 、Notepad 等任意html编辑软件进行运行及修改编辑等操作)。 获取源码 1࿰…...

RustDesk内置ID服务器,Key教程
RustDesk内置ID服务器,Key教程 首先需要准备一个域名,并将其指定到你的 rustdesk 服务器 ip 地址上,这里编译采用的是Github Actions ,说白了是就workflows,可以创建一些自动化的工作流程,例如代码的检查&a…...
)
Python学生管理系统(MySQL)
上篇文章介绍的Python学生管理系统GUI有不少同学觉得不错来找博主要源码,也有同学提到老师要增加数据库管理数据的功能,本篇文章就来介绍下python操作数据库,同时也对上次分享的学生管理系统进行了改进了,增加了数据库,…...

Spring Boot 学习笔记
学习代码第一步:如何写 Hello world ? 1、新建项目 新建一个 Maven Java 工程,在 pom.xml 文件中添加 Spring Boot Maven 依赖: <parent><groupId>org.springframework.boot</groupId><artifactId>spri…...

UML统一建模语言测试题汇总
2-UML概念模型测试 (单选题, 1.0 分) UML中的关系不包括()。 A. 抽象 B. 实现 C. 依赖 D. 关联 我的答案:A正确答案: A 知识点: UML的构成 1.0分 (单选题, 1.0 分) 下列事物不属于UML结构事物的是()。 A. 组件 B.…...

【微服务】SpringBoot 自定义消息转换器使用详解
目录 一、前言 二、SpringBoot 内容协商介绍 2.1 什么是内容协商 2.2 内容协商机制深入理解 2.2.1 内容协商产生的场景 2.3 内容协商实现的常用方式 2.3.1 前置准备 2.3.2 通过HTTP请求头 2.3.2.1 操作示例 2.3.3 通过请求参数 三、SpringBoot 消息转换器介绍 3.1 H…...
纯概念版))
数据结构(哈希表(中)纯概念版)
前言 哈希表(Hash Table)是计算机科学中的一个基础而重要的数据结构,它广泛评估各种算法和系统中,尤其是在需要快速查找、插入和删除操作的场景中。由于其O( 1)的平均时间复杂度,存储表在性能要求较高的应用中表现得非…...

Node.js 工具:在 Windows 11 中配置 Node.js 的详细步骤
一、概述 记录时间 [2024-12-25] 本文讲述如何在 Windows 11 中进行 Node.js 工具的安装和配置。 以下是详细的步骤和说明。 二、安装 Node.js 1. 官网下载 通过官网,下载 Node.js,上面有好几种下载方式,文中下载的是 zip 压缩包。 如图&…...

工作流并行网关退回思路
问题描述 在设计工作流时遇到并行的流程,会出现并行流程的退回,这里记录下想到的解决思路,后续问题会记录在这里。 流程图 这里是一个简单的流程图: 并行退回思路 若是正常流程退回,流程是: 获取回退…...

C#数学相关开发性能优化方法
本文Github地址:CSharp-MathOptimization.md 华为公司的C语言编程规范在开头就强调了: 一般情况下,代码的可阅读性高于性能,只有确定性能是瓶颈时,才应该主动优化。 本文讲述的方法没有经过大项目和大公司的检验&…...

vulnhub jangow靶机
1.扫描靶机IP arp-scan -l如果扫不到靶机的话根据以下配置 启动时点击第二个 按回车 继续选择第二个 按e进入编辑 删除"recovery nomodeset" 在末尾添加"quiet splash rw init/bin/bash" Ctrlx 启动进入如下界面 passwd修改root密码 重启电脑登录root修…...

配置搜索无人机
升级ubuntu内核 https://www.bilibili.com/video/BV11X4y1h7qN/?spm_id_from333.337.search-card.all.click 进入四个内核文件并安装 sudo dpkg -i *.deb安装ROS,PX4,XTDrone,QGC https://blog.csdn.net/qq_45493236/article/details/13…...
)
2-6-1-1 QNX编程入门之进程和线程(四)
阅读前言 本文以QNX系统官方的文档英文原版资料“Getting Started with QNX Neutrino: A Guide for Realtime Programmers”为参考,翻译和逐句校对后,对在QNX操作系统下进行应用程序开发及进行资源管理器编写开发等方面,进行了深度整理&…...
)
Vue开发环境搭建上篇:安装NVM和NPM(cpnm、pnpm)
文章目录 引言I 安装NVM1.1 Windows系统安装NVM,实现Node.js多版本管理1.2 配置下载镜像1.3 NVM常用操作命令II NPM永久使用淘宝源安装 cnpm安装pnpm【推荐】see also: vscode常用插件引言 淘宝镜像:http://npm.taobao.org 和 http://registry.npm.taobao.org 已在 2022.06.3…...
)
2.微服务灰度发布落地实践(agent实现)
文章目录 前言java agent的介绍基础实现agent端 http服务实现agent端api接口 前言 据上一篇,设计方案的分析,综合考虑,最终决定,客户端采用agent方案实现,具本原因不再赘述, 感觉兴趣的小伙伴可以回头了解一下.该篇主…...

网络安全专业术语
网络安全专有名词详解 1.肉鸡 被黑客操控的终端设备(电脑、服务器、移动设备等等),黑客可以随心所欲的操作这些终端设备而不会被发觉。 2.木马 表面上伪装成正常的程序,但是当这些程序运行时候就会获取整个系统的控制权限&#…...

SpringMVC核心、两种视图解析方法、过滤器拦截器 “ / “ 的意义
SpringMVC的执行流程 1. Spring MVC 的视图解析机制 Spring MVC 的核心职责之一是将数据绑定到视图并呈现给用户。它通过 视图解析器(View Resolver) 来将逻辑视图名称解析为具体的视图文件(如 HTML、JSP)。 核心流程 Controlle…...

ubuntu快速入门
1.进入某个文件夹 cd workspace/2.tab自动补全 3.列出当前文件夹所有文件 ls列出所有文件包括隐藏文件 ls -a 4.创建文件夹 mkdir linuxLearn 5.创建文件 gedit command.sh在commmand.sh键入 echo hello echo hi? echo how are you? PS:touch hello.txt(也可以创建新…...

HarmonyOS NEXT应用开发实战:一分钟写一个网络接口,JsonFormat插件推荐
在开发鸿蒙操作系统应用时,网络接口的实现往往是一个繁琐且重复的过程。为了提高开发效率,坚果派(nutpi.net)特别推出了一个非常实用的插件——JsonFormat。这款插件的主要功能是将JSON格式的数据直接转换为arkts的结构定义,让我们在编写接口…...

光谱相机与普通相机的区别
一、成像目的 普通相机:主要目的是记录物体的外观形态,生成人眼可见的、直观的二维图像,重点在于还原物体的形状、颜色和纹理等视觉特征,以供人们进行观赏、记录场景或人物等用途。例如,拍摄旅游风景照片、人物肖像等…...
)
贝叶斯神经网络(Bayesian Neural Network)
最近在研究贝叶斯神经网络,一些概念一直搞不清楚,这里整理一下相关内容,方便以后查阅。 贝叶斯神经网络(Bayesian Neural Network) 贝叶斯神经网络(Bayesian Neural Network)1. BNN 的核心思想2. BNN 的优化目标3. BNN 的结构与特点4. BNN 的训练过程5. BNN 的优缺点6. …...

使用FFmpeg进行拉流和推流操作
FFmpeg是一款强大的多媒体处理工具,可以用于视频的录制、转换、推流和拉流等操作。下面将详细介绍如何使用FFmpeg进行拉流和推流操作。 1. FFmpeg推流操作 推流是将本地的音视频流推送到流媒体服务器上,例如主播将本地电脑上的画面推流到直播平台的流媒…...

flutter插件开发-ios
flutter插件开发是一个重要的技能,拓展flutter与原生的通信,将一些公用的东西封装,给不同的项目使用。 阅读前置: flutter基本通道调用 objective-c基础语法 ios项目基础知识 目录 1、创建一个插件项目2、项目结构3、编写原生代码…...

【代码随想录|完全背包问题】
518.零钱兑换|| 题目链接:518. 零钱兑换 II - 力扣(LeetCode) 这里求的是组合数,就是不强调元素排列的顺序,211和121是同一个数那种,要先遍历物品,这样的话我算出来的每个值才是按顺序121&…...

xss csrf怎么预防?
一、XSS(跨站脚本攻击)预防 XSS 是指攻击者向目标网站注入恶意脚本,从而在用户浏览器中执行。 1. 输入过滤 清理用户输入: 拦截或清理HTML特殊字符(如 <, >, , ", &)。使用安全库&#x…...

黑神话悟空游戏鼠标光标使用教程与下载
效果图: 鼠标光标特点 这套鼠标光标的设计灵感来源于《黑神话:悟空》游戏中的角色和元素,具有以下特点: • 主题鲜明:光标设计紧扣游戏主题,采用了游戏中的元素,让玩家在使用电脑时也能感受到…...

<数据集>芝麻作物和杂草识别数据集<目标检测>
数据集下载链接 <数据集>芝麻作物和杂草识别数据集<目标检测>https://download.csdn.net/download/qq_53332949/90181548数据集格式:VOCYOLO格式 图片数量:1300张 标注数量(xml文件个数):130…...
——SAR成像算法系列(十一))
实测数据处理(CS算法处理:可斜视)——SAR成像算法系列(十一)
系列文章目录 《SAR学习笔记-SAR成像算法系列(一)》 《线性调频变标算法(CSA)-SAR成像算法系列(四)》 文章目录 前言 一、算法流程 1.1、回波信号生成 1.2、CS处理 1.3、距离脉压 1.4、方位脉压 1.5…...

【强化学习入门笔记】 2.4 时序差分算法
本系列为学习赵世钰老师的《强化学习的数学原理》所作的学习笔记. 本节我们将介绍强化学习中的蒙特卡洛方法. 2.4.1 Robbins-Monro算法 Robbins-Monro算法是一种随机近似方法,通过迭代的方式求解非线性方程。 假设我们要求解: g ( w ) 0 g(w)0 g(w)0, 但是我们…...

Scrapy数据解析+保存数据
Scrapy数据解析保存数据 目录 1.数据解析 2.基于item存放数据并提交给管道 3.用txt文件来保存数据 今天我们需要爬取B站数据并保存到txt文件里面。 我们先打开B站, 然后点击热门, 进去之后再点击排行榜: 我们打开F12后, 可以看到, 我们想要的请求, 轻而易举的就可以拿到(…...
)
Redis--缓存穿透、击穿、雪崩以及预热问题(面试高频问题!)
缓存穿透、击穿、雪崩以及预热问题 如何解决缓存穿透?方案一:缓存空对象方案二:布隆过滤器什么是布隆过滤器?优缺点 方案三:接口限流 如何解决缓存击穿问题?方案一:分布式锁方案一改进成双重判定…...

【Python高级353】python实现多线程版本的TCP服务器
前面学了了套接字编程、tcp服务端客户端开发、面向对象版的服务端客户端、带有端口复用的服务端。 这里使用多线程开发多任务版的服务端 多任务版本的TCP服务器 来一个客户,就为其创建一个线程 import socket import threadingclass WebServer:# 3、定义一个__ini…...

【Pandas】pandas Series to_period
Pandas2.2 Series Conversion 方法描述Series.astype用于将Series对象的数据类型转换为指定类型的方法Series.convert_dtypes用于将 Series 对象的数据类型智能地转换为最佳可能的数据类型的方法Series.infer_objects用于尝试推断 Series 中对象(object࿰…...

深度学习领域车辆识别与跟踪
深度学习中车辆识别是一个广泛应用的领域,它涵盖了从车辆检测到车型识别的多个方面。以下是对深度学习中车辆识别与车辆相关内容的详细探讨: 一、车辆检测 车辆检测是车辆识别中的基础任务,其目标是在图像或视频中准确地定位出车辆的位置。…...
)
数学建模 绘图 图表 可视化(2)
文章目录 前言柱形图条形图克利夫兰点图系列坡度图南丁格尔玫瑰图径向柱图极坐标图词云图总结参考资料 前言 承接上期 数学建模 绘图 图表 可视化(1)的总体描述,这期我们继续跟随《Python 数据可视化之美 专业图表绘制指南》步伐来学习其中l…...
—— 生命周期)
vue源码分析(十)—— 生命周期
文章目录 前言一、关键方法 callHook二、详细的钩子函数说明1.beforeCreate和create2.beforeMount & mounted注意点组件(非根组件)的渲染节点(1)invokeInsertHook函数(2)insert方法(3&#…...

[创业之路-222]:波士顿矩阵与GE矩阵在业务组合选中作用、优缺点比较
目录 一、波士顿矩阵 1、基本原理 2、各象限产品的定义及战略对策 3、应用 4、优点与局限性 二、技术成熟度模型与产品生命周期模型的配对 1、技术成熟度模型 2、产品生命周期模型 3、技术成熟度模型与产品生命周期模型的配对 三、产品生命周期与产品类型的对应关系 …...

# 【超全面了解鸿蒙生命周期】-生命周期补充
【超全面了解鸿蒙生命周期】-生命周期补充 鸿蒙所有的生命周期函数梳理 文章目录 【超全面了解鸿蒙生命周期】-生命周期补充前言一、AbilityStage的生命周期二、ExtensionAbility卡片生命周期三、Web组件常用生命周期 前言 本文是继之前写的生命周期函数梳理的进一步补充&…...

sentinel-请求限流、线程隔离、本地回调、熔断
请求限流:控制QPS来达到限流的目的 线程隔离:控制线程数量来达到限流的目录 本地回调:当线程被限流、隔离、熔断之后、就不会发起远程调用、而是使用本地已经准备好的回调去提醒用户 熔断:熔断也叫断路器,当失败、或者…...

unplugin-vue-router 的基本使用
1. 前言 在Vue3开发过程中,每次创建新的页面都需要注册路由,需要在src/router.ts中新增页面的路径,并将URL路径映射到组件中,如下所示: import { createMemoryHistory, createRouter } from vue-routerimport HomePage…...

[Leetcode] 最大子数组和 [击败99%的解法]
解法1: 暴力解法 遍历每个元素,从它当前位置一直加到最后,然后用一个最大值来记录全局最大值。 代码如下: class Solution {public int maxSubArray(int[] nums) {long sum, max nums[len-1];for (int i0; i<nums.length;…...