X-AnyLabeling开源程序借助 Segment Anything 和其他出色模型的 AI 支持轻松进行数据标记。
一、软件介绍
文末提供源码和程序下载学习
使用 X-AnyLabeling开源程序可以 导入、管理和保存数据。用户可以通过多种方式导入图像和视频文件,包括快捷方式或菜单选项。此外,它还涵盖数据删除、图像切换以及标签和图像数据的保存,以确保高效的注释过程和安全的数据管理。
二、详细使用
1.1 Data Import 1.1 数据导入
After opening the GUI, users can select the corresponding task type for import from the File dropdown menu at the top of the interface or use shortcuts.
打开 GUI 后,用户可以从界面顶部的 File 下拉菜单中选择相应的任务类型进行导入,也可以使用快捷方式。
X-AnyLabeling currently supports three data import formats:
X-AnyLabeling 目前支持三种数据导入格式:
Image File Directory (Ctrl+U): Supports importing multiple files with multi-level directory nesting.
Image File Directory (Ctrl+U):支持多级目录嵌套导入多个文件。
Single Image File (Ctrl+I): Supports importing various formats such as *.jpg, *.png, *.bmp, *.webp, and *.tif.
单个图像文件 (Ctrl+I):支持导入 *.jpg、*.png、*.bmp、*.webp 和 *.tif 等各种格式。
Single Video File (Ctrl+O): Supports importing video formats such as *.mp4, *.avi, *.mov, *.mkv, *.wmv, and *.flv.
单个视频文件 (Ctrl+O):支持导入 *.mp4、*.avi、*.mov、*.mkv、*.wmv 和 *.flv 等视频格式。
1.2 Data Deletion 1.2 数据删除
X-AnyLabeling provides data deletion functionalities as follows:
X-AnyLabeling 提供如下数据删除功能:
Delete Label File (Ctrl+Delete): Deletes the current annotation file. This operation cannot be undone, so please proceed with caution.
删除标签文件 (Ctrl+Delete):删除当前注释文件。此作无法撤消,因此请谨慎作。
Delete Image File (Ctrl+Shift+Delete): Deletes the current image file, moving it to the _delete_ folder within the current image directory.
删除图像文件 (Ctrl+Shift+Delete):删除当前图像文件,将其移动到当前图像目录中的 _delete_ 文件夹。
1.3 Image Switching 1.3 图像切换
In X-AnyLabeling, in addition to regular image switching operations, the following methods are also supported:
在 X-AnyLabeling 中,除了常规的图片切换作外,还支持以下方法:
Shortcut 捷径 switch_to_checked Description 描述
Ctrl+Shift+A Ctrl + Shift + A 组合键 true 真 Jump to the previous annotated image
跳转到上一个带注释的图像
Ctrl+Shift+D Ctrl+Shift+D 组合键 true 真 Jump to the next annotated image
跳至下一个带注释的图像
Ctrl+Shift+A Ctrl + Shift + A 组合键 false 假 Jump to the previous unannotated image
跳转到上一个未注释的图像
Ctrl+Shift+D Ctrl+Shift+D 组合键 false 假 Jump to the next unannotated image
跳转到下一个未注释的图像
You can determine the switching mode by modifying the switch_to_checked field in the user configuration file.
您可以通过修改用户配置文件中的 switch_to_checked 字段来确定切换模式。
Additionally, you can jump to a specific image by entering the image name in the file search bar at the bottom right of the interface and pressing Enter.
此外,您可以通过在界面右下角的文件搜索栏中输入图像名称并按 Enter 键来跳转到特定图像。
1.4 Saving Label Data 1.4 保存标签数据
X-AnyLabeling has an auto-save feature enabled by default. Upon initial startup, users can check if the Auto Save option is selected from the File dropdown menu.
X-AnyLabeling 默认启用自动保存功能。初始启动时,用户可以检查是否从 File 下拉菜单中选择了 Auto Save 选项。
Label files are saved in the current image directory in *.json format, with the following template:
标签文件以 *.json 格式保存在当前图像目录中,模板如下:
{
"version": "${version}",
"flags": {},
"shapes": [
{
"label": "${label}",
"score": null,
"points": [...],
"group_id": null,
"description": null,
"difficult": false,
"shape_type": "${shape_type}",
"flags": null,
"attributes": {}
}
],
"imagePath": "${filename}",
"imageData": null, // base64
"imageHeight": -1,
"imageWidth": -1
}
⚠️ To change the label save path, select the Change Output Directory option from the File dropdown menu and set the desired save path.
⚠️ 要更改标签保存路径,请选择 更改输出目录 选项从 文件 下拉菜单并设置所需的保存路径。
1.5 Saving Image Data 1.5 保存图像数据
If you want to save the current image data (default base64 encoded) during annotation, you can enable the Save Image Data option from the File dropdown menu.
如果要在注释期间保存当前图像数据(默认为 base64 编码),则可以启用 保存图像数据 下拉菜单中的选项 文件 .
2. Editing 2. 编辑
This section guides you on creating, editing, and managing various types of annotation objects and their label information in X-AnyLabeling. It covers everything from basic operations to advanced features, ensuring comprehensive guidance.
本节将指导您在 X-AnyLabeling 中创建、编辑和管理各种类型的标注对象及其标签信息。它涵盖了从基本作到高级功能的所有内容,确保全面的指导。
2.1 Creating Objects 2.1 创建对象
In X-AnyLabeling, each distinct annotated object is referred to as a shape, with key properties such as:
在 X-AnyLabeling 中,每个不同的注释对象都称为一个形状 ,其关键属性如下:
Field 田 Type 类型 Description 描述
label 标签 String 字符串 The category label of the object.
对象的类别标签。
score 得分 Float 浮 The confidence score of the object, typically used in AI inference. If unavailable, it is null.
对象的置信度分数,通常用于 AI 推理。如果不可用,则为 null。
points 点 Array 数组 List of vertices' coordinates, depending on the shape_type.
顶点坐标列表,具体取决于 shape_type。
group_id Integer 整数 Group ID to associate multiple objects within the same group; null if not available.
Group ID 关联同一组中的多个对象;如果不可用, 则为 null。
description 描述 String 字符串 Description of the object; null if not available.
对象的描述;如果不可用, 则为 null。
difficult 难 Boolean 布尔 Indicates if the object is difficult to identify; true means difficult.
指示对象是否难以识别;true 表示困难。
shape_type String 字符串 The shape type, such as "rectangle", "polygon", etc.
形状类型,如 “rectangle”、“polygon” 等。
flags 标志 Dictionary 字典 Additional flag information for extra state or attributes; null if not available.
额外状态或属性的其他标志信息;如果不可用, 则为 null。
attributes 属性 Dictionary 字典 Object's attribute information; an empty dictionary {} if not available.
对象的属性信息;如果不可用,则为空字典 {}。
kie_linking List 列表 Connection information between objects, e.g., [[1,2],[3,4]]; an empty list [] if not available.
对象之间的连接信息,例如 [[1,2],[3,4]];如果不可用,则为空列表 []。
For more details on additional fields, refer to shape.py.
有关其他字段的更多详细信息,请参阅 shape.py。
X-AnyLabeling supports creating the following types of shape objects:
X-AnyLabeling 支持创建以下类型的形状对象:
Rectangle (R): Start drawing by left-clicking, move the cursor, and click again to finish the rectangle.
矩形 (R):通过左键单击开始绘制,移动光标,然后再次单击以完成矩形。
Rotation (O): Start drawing by left-clicking, move the cursor, and click again to finish the rotated box.
旋转 (O):通过左键单击开始绘制,移动光标,然后再次单击以完成旋转的框。
Polygon (P): Start drawing by left-clicking along the object's edge, adding segmentation points. Click on the starting point to finish. A minimum of 3 points is required.
多边形 (P):通过沿对象的边缘左键单击开始绘制,并添加分段点。单击起点以完成。至少需要 3 分。
Point: Left-click to create a key point.
点 :左键单击可创建关键点。
Line: Start drawing by left-clicking, move the cursor, and click again to finish the line segment.
线条 :通过左键单击开始绘制,移动光标,然后再次单击以完成线段。
Line Strip: Start drawing by left-clicking, move the cursor, click to add line segments, and double-click to finish.
线带 :通过左键单击开始绘制,移动光标,单击以添加线段,然后双击以完成。
Circle: Start drawing by left-clicking, move the cursor to define the radius, and click again to finish.
圆 :通过左键单击开始绘制,移动光标以定义半径,然后再次单击以完成。
Users can operate through the corresponding options in the left menu, right-click, or use shortcuts.
用户可以通过左侧菜单中的相应选项进行作,右键单击或使用快捷方式。
2.2 Editing Objects 2.2 编辑对象
X-AnyLabeling has two modes: Drawing Mode and Editing Mode.
X-AnyLabeling 有两种模式:Drawing Mode 和 Editing Mode。
Drawing Mode: Users can create multiple objects continuously.
绘图模式 :用户可以连续创建多个对象。
Editing Mode: Users can edit objects (Ctrl+E), undo (Ctrl+Z), copy (Ctrl+C), paste (Ctrl+V), delete (Delete), move, scale, rotate, etc.
编辑模式 :用户可以编辑对象 (Ctrl+E)、撤消 (Ctrl+Z)、复制 (Ctrl+C)、粘贴 (Ctrl+V)、删除 (Delete)、移动、缩放、旋转等。
Users can quickly switch between drawing and editing modes using the Ctrl+J shortcut or the corresponding options mentioned in section 2.1.
用户可以使用 Ctrl+J 快捷键或第 2.1 节中提到的相应选项在绘图和编辑模式之间快速切换。
Specific operations include:
具体作包括:
For rectangular objects, besides resizing by corner points, users can select multiple objects and merge them into a bounding rectangle by right-clicking and selecting "Merge Selected Objects."
对于矩形对象,除了按角点调整大小外,用户还可以选择多个对象,并通过右键单击并选择“合并所选对象”来将它们合并为一个边界矩形。
For polygon objects, in editing mode, users can drag on an edge to add a new vertex or remove a selected vertex by holding the Shift key and left-clicking.
对于多边形对象,在编辑模式下,用户可以通过按住 Shift 键并左键单击来拖动边缘以添加新顶点或删除所选顶点。
For rotation box objects, users can control the rotation angle and direction by selecting the target and using Z, X, C, V. Real-time rotation angles can also be displayed.
对于旋转框对象,用户可以通过选择目标并使用 Z、X、C、V 来控制旋转角度和方向。还可以显示实时旋转角度。
2.3 Editing Labels 2.3 编辑标签
When creating or editing an object, a label editing box pops up for editing the object's label information.
在创建或编辑对象时,会弹出一个标签编辑框,用于编辑对象的标签信息。

Field 田 Description 描述
Object Label 对象标签 Enter the object's category label, supporting fuzzy search.
输入对象的类别标签,支持模糊搜索。
Group ID 组 ID For specific tasks like keypoint detection and multi-object tracking.
用于关键点检测和多对象跟踪等特定任务。
Difficult Label 困难标签 Indicates if the object is difficult to recognize.
指示对象是否难以识别。
Label List 标签列表 Shows the list of added labels, sorted alphabetically by default.
显示添加的标签列表,默认情况下按字母顺序排序。
Label Description 标签描述 Additional flag information for extra states or attributes, `null` if not available.
额外状态或属性的其他标志信息,如果不可用,则为 'null'。
Label Linking 标签链接 For linking fields in tasks like key information extraction and relationship extraction.
用于链接关键信息提取和关系提取等任务中的字段。
2.4 Editing Images 2.4 编辑图像
Currently, X-AnyLabeling supports adding a Caption description to the current image. To do this, enter editing mode, click on the blank area of the image, and fill in the image description in the Description area on the right.
目前 X-AnyLabeling 支持为当前图片添加 Caption 描述。为此,请进入编辑模式,单击图像的空白区域,然后在右侧的 Description 区域填写图像描述。
3. View 3. 视图
This section demonstrates how to optimize and customize the display of images and annotation objects in X-AnyLabeling, including visual adjustments of the canvas and images, as well as object information visualization settings, ensuring an efficient and intuitive annotation workflow.
本节演示了如何在 X-AnyLabeling 中优化和自定义图像和注释对象的显示,包括画布和图像的视觉调整,以及对象信息可视化设置,确保高效、直观的注释工作流程。
3.1 Canvas Visualization 3.1 画布可视化
X-AnyLabeling currently supports the following canvas operations:
X-AnyLabeling 目前支持以下 canvas 作:
Zoom In (Ctrl++)
放大 (Ctrl++)
Zoom Out (Ctrl+-)
缩小 (Ctrl+-)
Reset (Ctrl+0) 重置 (Ctrl+0)
Besides setting the zoom ratio in the left window and using shortcuts, users can also zoom in on specific areas by holding the Ctrl key and using the mouse scroll wheel for precise annotation and small object labeling. To apply this change globally, ensure to select the Keep Previous Zoom Ratio option from the View dropdown menu.
除了在左侧窗口中设置缩放比例和使用快捷方式外,用户还可以通过按住 Ctrl 键和使用鼠标滚轮来放大特定区域,以进行精确注释和小对象标记。要全局应用此更改,请确保从 View 下拉菜单中选择 Keep Previous Zoom Ratio 选项。
3.2 Image Visualization 3.2 图像可视化
X-AnyLabeling supports color adjustment for the current image. Operations include:
X-AnyLabeling 支持对当前图片进行颜色调整。作包括:
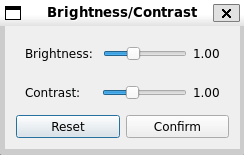
Select Brightness Contrast from the View dropdown menu at the top of the interface to adjust the brightness and contrast for better visual effects.
选择 亮度对比度 来自 查看 界面顶部的下拉菜单来调整亮度和对比度以获得更好的视觉效果。
To apply this change globally, select Keep Current Brightness and Keep Current Contrast from the View dropdown menu.
要全局应用此更改,请从 View 下拉菜单中选择 Keep Current Brightness 和 Keep Current Contrast 。
Additionally, as the cursor moves, the information bar at the bottom of the GUI displays the current image's filename and annotation progress in real time.
此外,当光标移动时,GUI 底部的信息栏会实时显示当前图像的文件名和注释进度。
3.3 Shape Visualization 3.3 形状可视化
Shape visualization features display text descriptions of labeled shapes (Ctrl+T), label names (Ctrl+L), group IDs, rotation angles, prediction scores, and more.
形状可视化功能显示标记形状的文本描述 (Ctrl+T)、标签名称 (Ctrl+L)、组 ID、旋转角度、预测分数等。
Configure these display options using the indicated keyboard shortcuts or by selecting them in the View dropdown menu at the top.
使用指示的键盘快捷键或在顶部的 View 下拉菜单中选择它们来配置这些显示选项。
Hovering your cursor over a shape will dynamically display its width and height in the GUI's bottom information bar.
将光标悬停在形状上将在 GUI 的底部信息栏中动态显示其宽度和高度。
3.4 Crosshair 3.4 准星
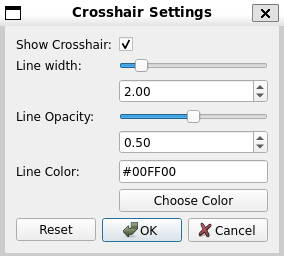
对于十字准线,用户可以通过选择 设置十字准线 界面顶部的下拉菜单中的选项。
Moreover, as the cursor moves, the information bar at the bottom of the GUI displays real-time position coordinates.
此外,当光标移动时,GUI 底部的信息栏会显示实时位置坐标。
4. Annotation Import and Export
4. 注释导入和导出
At present, X-AnyLabeling provides functionalities for importing and exporting a variety of mainstream label file formats. Below is a brief guide on how to use these features.
目前 X-AnyLabeling 提供了多种主流标签文件格式的导入和导出功能。以下是有关如何使用这些功能的简要指南。
4.1 YOLO Annotation 4.1 YOLO 注释
The latest version of X-AnyLabeling supports one-click import/export for YOLOv5/v8 label files (*.txt) for object detection, instance segmentation, rotated bounding box detection, and keypoint detection tasks.
最新版本的 X-AnyLabeling 支持一键导入/导出 YOLOv5/v8 标签文件 (*.txt),用于对象检测、实例分割、旋转边界框检测和关键点检测任务。
Before importing/exporting YOLO label files, you need to prepare a label configuration file:
在导入/导出 YOLO 标签文件之前,您需要准备一个标签配置文件:
For YOLO object detection, instance segmentation, and rotated bounding box detection tasks, refer to classes.txt. Each line represents a class, with numbers incrementing from 0.
有关 YOLO 对象检测、实例分割和旋转边界框检测任务,请参阅 classes.txt。每行代表一个类,数字从 0 开始递增。
For YOLO keypoint detection tasks, refer to yolov8_pose.yaml. For the has_visible parameter, please refer to the official definition.
YOLO 关键点检测任务请参考 yolov8_pose.yaml。has_visible 参数请参考官方定义 。
To export in YOLO-Pose format, you need to assign a group_id to each set (bounding box and its keypoints) during annotation so that X-AnyLabeling can understand their relationships during export.
要以 YOLO-Pose 格式导出,您需要在注释过程中为每组(边界框及其关键点)分配一个 group_id,以便 X-AnyLabeling 在导出过程中可以理解它们之间的关系。
Import Task: 导入任务 :
Click the Upload button in the top menu bar.
点击 上传 顶部菜单栏中的按钮。
Select the corresponding task.
选择相应的任务。
Upload the prepared configuration file.
上传准备好的配置文件。
Choose the directory where the label files are located and click OK.
选择标签文件所在的目录,然后单击 OK。
Export Task: 导出任务 :
Click the Export button in the top menu bar.
点击 出口 顶部菜单栏中的按钮。
Upload the prepared configuration file.
上传准备好的配置文件。
Check the appropriate options as needed and click OK.
根据需要检查相应的选项,然后单击 OK。
The export path defaults to the labels folder in the same directory as the current image directory.
导出路径默认为当前镜像目录下同目录下的 labels 文件夹。
For a sample YOLO label file, refer to demo.txt.
有关 YOLO 标签文件示例,请参阅 demo.txt。
4.2 VOC Annotation 4.2 VOC 注释
The latest version of X-AnyLabeling supports one-click import/export for Pascal-VOC label files (*.xml) for detection and segmentation tasks.
最新版本的 X-AnyLabeling 支持一键导入/导出 Pascal-VOC 标签文件 (*.xml),用于检测和分割任务。
Import Task: 导入任务 :
Click the Upload button in the top menu bar.
点击 上传 顶部菜单栏中的按钮。
Select the corresponding task.
选择相应的任务。
Choose the directory where the label files are located and click OK.
选择标签文件所在的目录,然后单击 OK。
Export Task: 导出任务 :
Click the Export button in the top menu bar.
点击 出口 顶部菜单栏中的按钮。
Check the appropriate options as needed and click OK.
根据需要检查相应的选项,然后单击 OK。
The export path defaults to the Annotations folder in the same directory as the current image directory.
导出路径默认为当前镜像目录下同目录下的 Annotations 文件夹。
For a sample VOC label file, refer to demo.xml.
有关 VOC 标签文件示例,请参阅 demo.xml。
4.3 COCO Annotation 4.3 COCO 注解
The latest version of X-AnyLabeling supports one-click import/export for COCO label files (*.json) related to object detection, instance segmentation, and keypoint detection tasks.
最新版本的 X-AnyLabeling 支持一键导入/导出与对象检测、实例分割和关键点检测任务相关的 COCO 标签文件 (*.json)。
Before importing or exporting COCO label files, ensure you have a label configuration file prepared. For object detection and instance segmentation tasks, refer to classes.txt, and for keypoint detection tasks, refer to yolov8_pose.yaml.
在导入或导出 COCO 标签文件之前,请确保您已准备好标签配置文件。对象检测和实例分割任务请参考 classes.txt,关键点检测任务请参考 yolov8_pose.yaml。
Import Task: 导入任务 :
Click the Upload button in the top menu bar.
点击 上传 顶部菜单栏中的按钮。
Select the corresponding task.
选择相应的任务。
Upload the prepared configuration file.
上传准备好的配置文件。
Choose the directory where the label files are located and click OK.
选择标签文件所在的目录,然后单击 OK。
Export Task: 导出任务 :
Click the Export button in the top menu bar.
点击 出口 顶部菜单栏中的按钮。
Select the corresponding task.
选择相应的任务。
Upload the prepared configuration file.
上传准备好的配置文件。
Click OK. 单击 OK(确定)。
The export path defaults to the annotations folder in the same directory as the current image directory.
导出路径默认为与当前镜像目录位于同一目录下的 annotations 文件夹。
For a sample COCO label file, refer to instances_default.json.
有关 COCO 标签文件示例,请参阅 instances_default.json。
4.4 DOTA Annotation 4.4 DOTA 注解
The latest version of X-AnyLabeling supports one-click import/export for DOTA label files (*.txt). The label format is defined as:
最新版本的 X-AnyLabeling 支持一键导入/导出 DOTA 标签文件 (*.txt)。标签格式定义为:
x1 y1 x2 y2 x3 y3 x4 y4 class_name difficult
x1 y1 x2 y2 x3 y3 x4 y4 class_name 困难
Import Task: 导入任务 :
Click the Upload button in the top menu bar.
点击 上传 顶部菜单栏中的按钮。
Select the corresponding task.
选择相应的任务。
Choose the directory where the label files are located and click OK.
选择标签文件所在的目录,然后单击 OK。
Export Task: 导出任务 :
Click the Export button in the top menu bar.
点击 出口 顶部菜单栏中的按钮。
Click OK. 单击 OK(确定)。
The export path defaults to the labelTxt folder in the same directory as the current image directory.
导出路径默认为当前镜像目录下同目录下的 labelTxt 文件夹。
For a sample DOTA label file, refer to demo_obb.txt.
有关 DOTA 标签文件示例,请参阅 demo_obb.txt。
4.5 MASK Annotation 4.5 MASK 注释
The latest version of X-AnyLabeling supports one-click import/export for semantic segmentation mask label files (*.png).
最新版本的 X-AnyLabeling 支持一键导入/导出语义分割掩码标签文件 (*.png)。
Before importing/exporting mask label files, prepare the configuration file as follows:
在导入/导出蒙版标签文件之前,请准备如下配置文件:
For color images, refer to mask_color_map.json.
有关彩色图像,请参阅 mask_color_map.json。
For grayscale images, refer to mask_grayscale_map.json.
对于灰度图像,请参阅 mask_grayscale_map.json。
Import Task: 导入任务 :
Click the Upload button in the top menu bar.
点击 上传 顶部菜单栏中的按钮。
Select the corresponding task.
选择相应的任务。
Upload the prepared configuration file.
上传准备好的配置文件。
Choose the directory where the label files are located and click OK.
选择标签文件所在的目录,然后单击 OK。
Export Task: 导出任务 :
Click the Export button in the top menu bar.
点击 出口 顶部菜单栏中的按钮。
Upload the prepared configuration file.
上传准备好的配置文件。
Click OK. 单击 OK(确定)。
The export path defaults to the mask folder in the same directory as the current image directory.
导出路径默认为与当前 image 目录位于同一目录下的 mask 文件夹。
4.6 MOT Annotation 4.6 AGAINST 注释
The latest version of X-AnyLabeling supports one-click import/export for multi-object tracking label files.
最新版本的 X-AnyLabeling 支持一键导入/导出多对象跟踪标签文件。
Before importing/exporting label files, prepare a label configuration file, referring to classes.txt, where each line represents a class, with numbers incrementing from 0.
在导入/导出标签文件之前,请参考 classes.txt 准备一个标签配置文件,其中每行代表一个类,数字从 0 开始递增。
Export Task: 导出任务 :
Click the Export button in the top menu bar.
点击 出口 顶部菜单栏中的按钮。
Upload the prepared configuration file.
上传准备好的配置文件。
Choose the save path and click OK.
选择保存路径,然后单击 OK。
Import Task: 导入任务 :
Click the Upload button in the top menu bar.
点击 上传 顶部菜单栏中的按钮。
Select the corresponding task.
选择相应的任务。
Upload the prepared configuration file.
上传准备好的配置文件。
Choose the directory containing the label file (gt.txt) and click OK.
选择包含标签文件的目录 (gt.txt),然后单击 OK。
For sample label files, refer to the MOT directory, which includes three subfiles: seqinfo.ini, det.txt, and gt.txt.
有关示例标签文件,请参阅 MOT 目录,其中包括三个子文件:seqinfo.ini、det.txt 和 gt.txt。
seqinfo.ini
The seqinfo.ini file contains sequence information, describing metadata for the dataset. The file includes:
seqinfo.ini 文件包含序列信息,用于描述数据集的元数据。该文件包括:
[Sequence]
name = MOT # Sequence name
imdir = mot_label # Image directory
framerate = 30 # Frame rate
seqlength = 249 # Sequence length (number of frames)
imwidth = 1280 # Image width
imheight = 720 # Image height
imext = .jpg # Image file extension
det.txt
The det.txt file contains detection results, with each line representing a detection box. The file includes:
det.txt 文件包含检测结果,每行代表一个检测框。该文件包括:
Frame number, Track ID, Top-left x-coordinate, Top-left y-coordinate, Width, Height, Confidence, <x>, <y>, <z>
The last three fields are for the MOT3D task and are set to -1 by default.
最后三个字段用于 MOT3D 任务,默认情况下设置为 -1。
gt.txt
The gt.txt file contains tracking annotation information, with each line representing an annotation box. The file includes:
gt.txt 文件包含跟踪注释信息,每行代表一个注释框。该文件包括:
Frame number, Track ID, Top-left x-coordinate, Top-left y-coordinate, Width, Height, Validity flag, Class ID, Visibility ratio
The validity flag indicates whether the current trajectory is valid, with 0 for invalid data (ignore) and 1 for valid data (activate). Users can set this using the useDifficult flag in the label manager, where ☑️ indicates an invalid trajectory.
有效性标志指示当前轨迹是否有效, 其中 0 表示无效数据 (ignore),1 表示有效数据 (activate)。用户可以使用标签管理器中的 useDifficult 标志进行设置,其中☑️表示无效的轨迹。
Additionally, for the MOTS dataset format, the v2.4.0+ version offers corresponding export settings. The specific steps for implementation are as follows:
此外,对于 MOTS 数据集格式,v2.4.0+ 版本提供了相应的导出设置。具体实施步骤如下:
Click on the Export - Export MOTS Annotations button in the top menu bar.
单击顶部菜单栏中的 Export - Export MOTS Annotations 按钮。
Upload the prepared configuration file.
上传准备好的配置文件。
Select the save path and click 'OK' to proceed.
选择保存路径,然后单击“确定”继续。
It is important to note that the default exported mots labels are not in the final official dataset format. Here, we provide the corresponding conversion code for reference:
请务必注意,默认导出的 mots 标签不是最终的官方数据集格式。这里,我们提供相应的转换码供参考:
python3 tools/label_converter.py --task mots --mode custom_to_gt --src_path /path/to/your/custom_gt.txt
Note
注意
Before executing the conversion, you need to install the pycocotools library first.
在执行转换之前,您需要先安装 pycocotools 库。
4.7 PPOCR Annotation 4.7 PPOCR 注释
The latest version of X-AnyLabeling (v2.4.0+) supports one-click import/export for the following two PPOCR tasks:
最新版本的 X-AnyLabeling (v2.4.0+) 支持一键导入/导出以下两个 PPOCR 任务:
Text Detection and Recognition: Locates text areas in the input image and recognizes the text content.
文本检测和识别:在输入图像中定位文本区域并识别文本内容。
Key Information Extraction: Extracts key information from images, including semantic entity recognition and relation extraction.
关键信息提取:从图像中提取关键信息,包括语义实体识别和关系提取。
Import Task: 导入任务 :
Click the Upload button in the top menu bar.
点击 上传 顶部菜单栏中的按钮。
Select the corresponding task.
选择相应的任务。
Choose the appropriate label file and click OK to upload.
选择适当的标签文件,然后单击 OK 上传。
Export Task: 导出任务 :
Click the Export button in the top menu bar.
点击 出口 顶部菜单栏中的按钮。
Click OK. 单击 OK(确定)。
For the Text Detection and Recognition task, the export path defaults to the ppocr-rec folder in the same directory as the current image directory, which contains:
对于 Text Detection and Recognition 任务,导出路径默认为与当前图像目录位于同一目录中的 ppocr-rec 文件夹,其中包含:
Label.txt: Annotation results
Label.txt:注释结果
rec_gt.txt: Recognition results
rec_gt.txt:识别结果
crop_img: Images corresponding to the recognition results for training
crop_img:用于训练的识别结果对应的图像
For the Key Information Extraction task, the export path defaults to the ppocr-kie folder in the same directory as the current image directory, which contains:
对于 Key Information Extraction 任务,导出路径默认为与当前图像目录位于同一目录下的 ppocr-kie 文件夹,其中包含:
class_list.txt: List of label classes
class_list.txt:标签分类列表
ppocr_kie.json: KIE annotation results
ppocr_kie.json:KIE 注释结果
For sample label files, refer to ppocr-rec and ppocr-kie.
有关示例标签文件,请参阅 ppocr-rec 和 ppocr-kie。
4.8 ODVG Annotation 4.8 ODVG 注释
The latest version of X-AnyLabeling supports one-click import/export for Grounding task-related label files, specifically ODVG annotations.
最新版本的 X-AnyLabeling 支持一键导入/导出 Grounding 任务相关的标签文件,特别是 ODVG 注释。
Before importing/exporting ODVG label files, you need to prepare a label configuration file. For reference, see classes.txt, where each line represents a category, with the numbering incrementing from top to bottom.
在导入/导出 ODVG 标签文件之前,您需要准备一个标签配置文件。有关参考,请参阅 classes.txt,其中每行表示一个类别,编号从上到下递增。
Import Task: 导入任务 :
Click the Upload button in the top menu bar.
点击 上传 顶部菜单栏中的按钮。
Select the corresponding task.
选择相应的任务。
Choose the directory where the label files are located and click OK.
选择标签文件所在的目录,然后单击 OK。
Export Task: 导出任务 :
Click the Export button in the top menu bar.
点击 出口 顶部菜单栏中的按钮。
Select the corresponding task.
选择相应的任务。
Upload the prepared configuration file.
上传准备好的配置文件。
Choose the save path and click OK.
选择保存路径,然后单击 OK。
For the style of ODVG label files, refer to ODVG.
有关 ODVG 标签文件的样式,请参阅 ODVG。
5. Toolbar 5. 工具栏
5.1 Data Statistics 5.1 数据统计
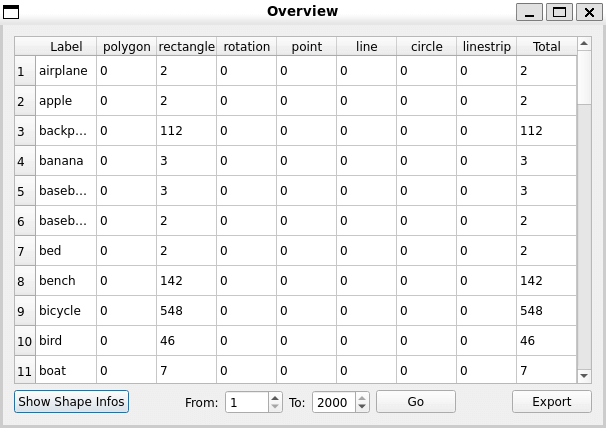
X-AnyLabeling includes a data statistics feature, allowing users to easily access an overview of the current task's data. By selecting Tools -> Overview in the top menu bar, users can view the current data status. It supports the following features:
X-AnyLabeling 包括数据统计功能,允许用户轻松访问当前任务数据的概览。通过选择顶部菜单栏中的 工具 -> 概览 ,用户可以查看当前数据状态。它支持以下功能:
Data Export Functionality
数据导出功能
Export statistical reports in CSV format
以 CSV 格式导出统计报告
Automatically generate a zip file containing label information, shape statistics and class list
自动生成包含标签信息、形状统计和类列表的 zip 文件
Export files include: 导出文件包括:
label_infos.csv: Label count statistics
label_infos.csv:标签计数统计信息
shape_infos.csv: Annotation shape statistics
shape_infos.csv:注释形状统计信息
classes.txt: List of all classes
classes.txt:所有类的列表
Flexible Statistics Range
灵活的统计范围
Support selecting specific range of images for statistics
支持选择特定范围的图片进行统计
View statistics for single or multiple images
查看单个或多个图像的统计信息
Real-time statistics updates
实时统计数据更新
Multi-dimensional Data Analysis
多维度数据分析
By label category: Shows annotation count for each class
按标签类别:显示每个类的注释计数
By shape type: Including polygon, rectangle, rotated box, point, line, circle etc.
按形状类型:包括多边形、矩形、旋转框、点、线、圆等。
Overall data overview: Shows dataset distribution
整体数据概览:显示数据集分布
Usage Instructions: 使用说明:
Click "Tools" -> "Overview" in the top menu bar
单击顶部菜单栏中的 “Tools” -> “Overview”
View data distribution in the statistics window
在统计信息窗口中查看数据分布
Optionally select specific image range for statistics
(可选)选择特定的图像范围进行统计
Click "Export" button to save statistics as zip file
单击“导出”按钮将统计信息保存为 zip 文件
5.2 Save Sub-Images 5.2 保存子图片
To use the save sub-images feature, follow these steps:
要使用保存子图像功能,请执行以下步骤:
Prepare a custom class file. For an example, refer to classes.txt.
准备自定义类文件。有关示例,请参阅 classes.txt。
Click on the Tools -> Save Sub-Images option in the top menu bar, and upload the corresponding custom class file. A sub-image folder named x-anylabeling-crops will be generated in the current directory, containing the targets categorized by class name.
单击顶部菜单栏中的 Tools -> Save Sub-Images 选项,然后上传相应的自定义类文件。将在当前目录中生成一个名为 x-anylabeling-crops 的子图像文件夹,其中包含按类名分类的目标。
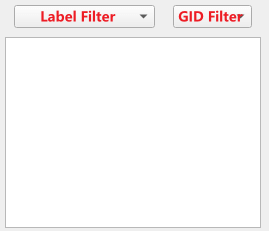
5.3 Object Manager 5.3 对象管理器
X-AnyLabeling offers global management of label objects. Users can perform the following operations:
X-AnyLabeling 提供标签对象的全局管理。用户可以执行以下作:
Delete Labels: Remove unnecessary labels.
删除标签 :删除不必要的标签。
Rename Labels: Update label names to align with new classification standards.
重命名标签 :更新标签名称以符合新的分类标准。
Change Label Colors: Adjust label colors to improve distinguishability.
更改标签颜色 :调整标签颜色以提高可区分性。
These actions can be accessed through the Tools -> Object Manager option in the top menu bar, opening the label management window.
可以通过顶部菜单栏中的 Tools -> Object Manager 选项访问这些作,打开标签管理窗口。
Also, to quickly select all annotation shapes on the canvas, follow these steps:
此外,要快速选择画布上的所有批注形状,请执行以下步骤:
Switch to Edit Mode 切换到编辑模式
Click the corresponding icon in the left toolbar (or press Ctrl+E) to enter edit mode
单击左侧工具栏中的相应图标(或按 Ctrl+E)进入编辑模式
Activate Label List 激活标签列表
In the right shape label panel, left-click on any target label
在右侧形状标签面板中,左键单击任何目标标签
Execute Select All 执行全选
While holding down the Shift key:
按住 Shift 键时:
First press Home to select all objects above the current label
首先按 Home 键可选择当前标签上方的所有对象
Then press End to select all objects below the current label
然后按 End 键选择当前标签下的所有对象
5.4 Shape Type Conversion
5.4 形状类型转换
X-AnyLabeling provides a shape type conversion feature, allowing users to change shape types through the Tools option in the top menu bar. The supported conversions include:
X-AnyLabeling 提供了形状类型转换功能,允许用户通过顶部菜单栏中的 Tools 选项更改形状类型。支持的转换包括:
Rectangular Box to Rotated Box: Convert rectangular box labels to rotated box labels.
矩形框到旋转框 :将矩形框标签转换为旋转框标签。
Rotated Box to Rectangular Box: Convert rotated box labels to rectangular box labels.
旋转框到矩形框 :将旋转的框标签转换为矩形框标签。
Polygon to Bounding Box: Convert polygon labels to bounding box labels.
多边形到边界框 :将多边形标签转换为边界框标签。
Note: The Rotated Box to Rectangular Box and Polygon to Bounding Box conversions use the maximum bounding rectangle by default, which may result in the loss of some label information, such as rotation angle. These actions are irreversible, so use them with caution.
注: 默认情况下, Rotated Box to Rectangular Box 和 Polygon to Bounding Box 转换使用最大边界矩形,这可能会导致某些标签信息丢失,例如旋转角度。这些作是不可逆的 ,因此请谨慎使用。
5.5 Saving Masked Images 5.5 保存蒙版图像
To implement the masked image saving feature, follow the steps below:
要实现蒙版图像保存功能,请执行以下步骤:
For areas that require masking, they can be identified using rectangle, rotation, or polygon objects, with the label name set to __mask__;
对于需要掩膜的区域,可以使用矩形 、 旋转或多边形对象进行标识,并将标签名称设置为 __mask__;
Click on the Tools -> Save Masked Image option in the top menu bar to set the fill color block. The default value is (114, 114, 114). The resulting images are saved by default in the x-anylabeling-mask-image folder.
单击顶部菜单栏中的 Tools -> Save Masked Image 选项以设置填充颜色块。默认值为 (114, 114, 114)。默认情况下,生成的图像保存在 x-anylabeling-mask-image 文件夹中。
三、软件下载
夸克网盘分享
本文信息来源于GitHub作者地址:https://github.com/CVHub520/X-AnyLabeling
相关文章:

X-AnyLabeling开源程序借助 Segment Anything 和其他出色模型的 AI 支持轻松进行数据标记。
一、软件介绍 文末提供源码和程序下载学习 使用 X-AnyLabeling开源程序可以 导入、管理和保存数据。用户可以通过多种方式导入图像和视频文件,包括快捷方式或菜单选项。此外,它还涵盖数据删除、图像切换以及标签和图像数据的保存,以确保高效…...

简易 Python 爬虫实现,10min可完成带效果源码
目录 准备工作 编写爬虫代码 运行爬虫 查看结果 遇到的问题及解决 总结 前言和效果 本文记录了使用 Python 实现一个简单网页爬虫的过程,目标是爬取 quotes.toscrape.com 的名言和作者,并将结果保存到文本文件。以下是完整步骤,包含环境…...

全志H5,NanopiKP1lus移植QT5.12记录
移植步骤 机器环境下载QT5.12.0源码安装交叉编译器修改qmake.conf文件配置编译选项qt5的configure选项说明基本配置选项编译器和链接器选项功能模块配置第三方库集成注意事项 配置过程报错解决配置完成编译过程报错解决编译完成将arm-qt文件夹传送到开发板配置板子环境变量运行…...

Spring Boot 依赖注入与Bean管理:JavaConfig如何取代XML?
大家好呀!今天我们来聊一个超级实用的技术话题 —— Spring Boot 中的依赖注入和Bean管理,特别是JavaConfig是如何一步步取代XML配置的。我知道很多小伙伴一听到"依赖注入"、"Bean管理"这些词就头大,别担心!我…...
AUTOSAR图解==>AUTOSAR_SWS_E2ETransformer
AUTOSAR E2E Transformer详解 基于AUTOSAR标准的端到端通信保护变换器技术解析 目录 1. E2E Transformer概述 1.1 E2E Transformer的作用1.2 功能特点1.3 应用场景限制 2. 模块架构 2.1 架构设计2.2 与其他模块的关系 3. 初始化与状态机 3.1 模块状态流转3.2 初始化与去初始化…...

从Archery到NineData:积加科技驱动数据库研发效能与数据安全双升级
积加科技作为国内领先的企业级数字化解决方案服务商,依托自研的 A4X 数字化平台(https://a4x.io/),专注于为全球范围内的视觉物联网(IoT)设备提供 PaaS/SaaS 服务。致力于运用 AI 技术赋能物联网世界的各类…...

hadoop和Yarn的基本介绍
Hadoop的三大结构及各自作用? Hadoop是一个由Apache基金会开发的分布式系统基础架构,主要用于处理大规模数据集的分布式存储和计算。Hadoop的三大核心结构是HDFS(Hadoop Distributed File System)、MapReduce和YARN(Y…...

神经接口安全攻防:从技术漏洞到伦理挑战
随着脑机接口(BCI)技术的快速发展,神经接口设备已从实验室走向消费市场。然而,2025年曝光的某品牌脑机接口设备漏洞(CVE-2025-3278)引发了行业对神经数据安全的深度反思。本文围绕神经接口安全的核心矛盾&a…...

云轴科技ZStack入选中国人工智能产业发展联盟《大模型应用交付供应商名录》
2025年4月8日至9日,中国人工智能产业发展联盟(以下简称AIIA)第十四次全体会议暨人工智能赋能新型工业化深度行(南京站)在南京召开。工业和信息化部科技司副司长杜广达,中国信息通信研究院院长、中国人工智能…...

SpringBoot项目异常处理
一、异常问题描述 进行添加员工测试的时候,服务端报错, 报错信息如下: java.sql.SQLIntegrityConstraintViolationException:主要就是因为在 employee 表结构中,我们针对于username字段,建立了唯一索引,添…...

机器学习05-CNN
CNN(卷积神经网络)学习文档 一、引言 卷积神经网络(Convolutional Neural Network,CNN)是深度学习中的一种重要网络结构,在图像识别、计算机视觉等领域取得了巨大成功。CNN 的设计灵感来源于生物视觉系统…...

Java Web 之 Servlet 100问
Filter 是什么? 在Java Web开发中,Filter(过滤器)是一种用于在请求到达目标资源(如Servlet、JSP)之前或响应返回客户端之前进行预处理和后处理的组件。Filter可以拦截请求和响应,执行特定的操作…...

z-library电子图书馆最新地址的查询方法
对于喜欢读书的伙伴们,应该都听说过z站(z-library),优点多多,缺点就是地址不稳定,经常会变化网站地址。然后我最近发现了一个工具,可以不间断更新官方可用的z站地址:电子书最新地址...

PyCharm入门导览
一、项目视图 项目视图位置如下所示: 项目视图是主要工具窗口之一。它包含项目目录、SDK特定的外部库和临时文件。点击带条纹的按 钮可以预览演示项目。也可以按Alt 1 打开。 二、Python解释器 点击右下角项目的名字,可以快速进入【Python解释器】界面…...
:最大子段和)
算法题(127):最大子段和
审题: 本题需要我们找到n个整数中连续且非空的最大子段和 思路: 方法一:前缀和 我们的思路是将每个索引位置的最大子段和求出,然后用answer进行max维护,最后输出answer即可 最大子段和怎么求? 子段和 f[i]…...

物联网分层架构全解析:从感知到应用的智能生态构建
物联网分层架构一般可细分为感知层、网络层、平台层和应用层,以下是各层更详细的介绍: 一、感知层 1.功能 数据采集:利用各类传感器对物理世界的各种信息进行采集,包括环境参数(如温度、湿度、光照、气压等…...

系统架构师2025年论文通用模板
搭建自己的模板 1、项目选择与实施建议整理 一、项目选择标准 金额与周期要求:优先选择金额在 200万以上 的中大型商业项目,研发周期建议 不少于8个月。避免选择小型项目(如金额低于100万、周期短于1年)。 …...

Flink 2.0 编译
文章目录 Flink 2.0 编译第一个问题 java 版本太低maven 版本太低maven 版本太高开始编译扩展多版本jdk 配置 Flink 2.0 编译 看到Flink2.0 出来了,想去玩玩,看看怎么样,当然第一件事,就是编译代码,但是没想到这么多问…...

Java线程的几种状态
线程状态我们在此介绍六种线程状态 1.NEW 2.RUNNABLE 3.TIMED_WAITING 4.BLOCKED 5.WAITING 6.TERMINATED 1.初始状态 (NEW) 当一个线程对象被创建但尚未调用 start() 方法时,线程处于初始状态。此时,线程还没有开始执行。 通俗的讲就是安排了工作但是…...
等级考试试卷(一级)真题)
2025年03月中国电子学会青少年软件编程(Python)等级考试试卷(一级)真题
青少年软件编程(Python)等级考试试卷(一级) 分数:100 题数:37 答案解析:https://blog.csdn.net/qq_33897084/article/details/147335019?spm1001.2014.3001.5501 一、单选题(共25题࿰…...

「数据可视化 D3系列」入门第十章:饼图绘制详解与实现
饼图绘制详解与实现 一、饼图绘制核心知识1. d3.arc() 弧形生成器2. d3.pie() 布局函数3. arc.centroid() 中心点计算4. 颜色方案 二、饼图实现代码小结核心知识点下章预告:力导向图 一、饼图绘制核心知识 1. d3.arc() 弧形生成器 功能: 生成圆形、扇形…...

三维点拟合平面ransac c++
理论 平面的一般定义 在三维空间中,一个平面可以由两个要素唯一确定: 法向量 n(a,b,c):垂直于平面的方向 平面上一点 平面上任意一点 p(x,y,z) 满足: ( p − p 0 ) ∗ n 0 (p - p0) * n 0 (p−p0)∗n0 即 a ( x − x 0 ) …...

第六章:6.6输入以下的杨辉三角形,要求输出10行
//输入以下的杨辉三角形,要求输出10行 #include<stdio.h> int main() {int a[10][10] { 0 };int i 0, j 0;for (i 0; i < 10; i){for (j 0; j < 10; j){if (j 0){a[i][j] 1;}else if (i j){a[i][j] 1;}else{a[i][j] a[i - 1][j - 1] a[i - …...

初识Redis · C++客户端string
目录 前言: string的API使用 set get: expire: NX XX: mset,mget: getrange setrange: incr decr 前言: 在前文,我们已经学习了Redis的定制化客户端怎么来的,以及如何配置好Redis定制化客户端&…...

React 事件处理基础
React 中最常见的两个需求,一个是列表渲染,另一个就是绑定点击事件。 这一篇就是从最基础的按钮点击开始,分四个阶段,逐步理解 React 中事件的写法和参数传递方式。 📍阶段一:最简单的点击事件 function A…...

插入排序和希尔排序
今天给小伙伴们分享两个比较基础的排序算法,插入排序和希尔排序,这两个排序算法之间联系还是挺多的,所以放在一起。希尔排序可以看作是插入排序的升级版,在面对一些更为复杂的场景时,希尔排序的效率往往要比插入排序高…...
 开放协议对医疗多模态数据整合的分析路径【附代码】)
Model Context Protocol (MCP) 开放协议对医疗多模态数据整合的分析路径【附代码】
Model Context Protocol (MCP) 作为一种革命性的开放协议,正在重塑医疗领域多模态数据整合的方式。本文将深入分析MCP协议在医疗多模态数据整合中的具体路径、技术实现、应用场景及未来发展方向,揭示这一协议如何成为连接AI与医疗数据的关键桥梁。 MCP协议概述及其在医疗多模…...

Oracle 11g通过dg4odbc配置dblink连接PostgreSQL
1、安装unixodbc 2、安装postgresql yum install -y postgresql17-odbc 3、配置postgresqlodbc数据源 vim /usr/local/etc/odbcinst.ini##添加如下 [mypg] Driver /usr/lib64/psqlodbcw.so Servername localhost Port 5432 Database postgres Username postgres Pas…...

docker 安装prometheus普罗米修斯
prometheus(普罗米修斯):天生为采集存储监控数据而生的时序数据库。prometheus通过各种Exporter采集到监控数据,然后存储进prometheus中,以供查询展示 grafana:一个监控仪表系统。grafana的数据来源可以有…...

Ubuntu上安装Mysql
步骤 1:安装 MySQL Server sudo apt update sudo apt install mysql-server -y这将安装最新版本的 MySQL 8.0 以及所有依赖组件。 步骤 2:检查安装是否成功 mysql --version sudo systemctl status mysql如果状态是 active (running),说明成…...
到应用就绪的完整旅程)
Spring Boot启动流程深度解析:从main()到应用就绪的完整旅程
🌱 Spring Boot启动流程深度解析:从main()到应用就绪的完整旅程 #SpringBoot核心 #启动原理 #自动配置 #源码解析 一、启动流程图解 (1) 启动类执行 → (2) SpringApplication初始化 → (3) 事件驱动模型启动 ↓ …...

2025TGCTF Web WP复现
AAA 偷渡阴平 <?php$tgctf2025$_GET[tgctf2025];if(!preg_match("/0|1|[3-9]|\~|\|\|\#|\\$|\%|\^|\&|\*|\(|\)|\-|\|\|\{|\[|\]|\}|\:|\|\"|\,|\<|\.|\>|\/|\?|\\\\/i", $tgctf2025)){//hint:你可以对着键盘…...

交叉注意力层的实质作用:连接编码器和解码器
交叉注意力层的实质作用 在Transformer架构里,交叉注意力层主要作用是连接编码器和解码器,让解码器能够利用编码器输出的上下文信息 。具体来说: 聚焦相关信息:以机器翻译任务为例,在将源语言句子翻译成目标语言时,交叉注意力能使解码器生成的每个词,都聚焦于源语言序列…...

conversation_template | conversation_actors | conversation_line_template
目录 conversation_template conversation_actors conversation_line_template 实例应用 conversation_template id:某段谈话的唯一编号FirstLineId:谈话开始的第一段话的编号,取值来源 ConversationLine.db2 的 ID 字段TextureKitId&am…...

C++ `shared_ptr` 多线程使用
C shared_ptr 多线程使用 一、核心结论 引用计数:shared_ptr 的引用计数操作是原子的,线程安全控制块修改:修改 shared_ptr 指向的对象需要同步被管理对象:若对象本身非线程安全,访问时仍需加锁 二、分场景详解 场景…...

十天借助 Trae 实现 “幸运塔塔屋” 小程序时光记忆功能之旅
在软件开发的广阔天地中,创新与效率始终是开发者们不懈追求的目标。近期,我成功完成了一次极具挑战性与创新性的实践 —— 仅用十天时间,借助 Trae 这款强大的 AI 工具,开发出了 “幸运塔塔屋” 小程序,其中的 “时光记…...

WiFi“管家”------hostapd的工作流程
目录 1. 启动与初始化 1.1 解析命令行参数 1.2 读取配置文件 1.3 创建接口和 BSS 数据结构 1.4 初始化驱动程序 2. 认证和关联处理 2.1 监听认证请求 2.2 处理认证请求 2.3 处理关联请求 3. 数据转发 3.1 接收客户端数据 3.2 转发数据 4. 断开连接处理 4.1 处理客…...

计算机视觉——基于使用 OpenCV 与 Python 实现相机标定畸变校正
概述 相机标定是一种旨在通过确定相机的内参(焦距、光学中心、畸变系数)和外参(相机的位置和方向),提高图像在现实世界中的几何精度的过程。该过程可以纠正相机拍摄的图像中的畸变,使相机能够准确感知现实…...

OOM 未触发 JVM 崩溃的可能原因
1. OOM 未触发 JVM 崩溃的可能原因 (1) 未配置 JVM 参数强制崩溃 关键参数缺失: 若未添加 -XX:CrashOnOutOfMemoryError,JVM 在 OOM 时可能仅抛出异常并正常退出,而非崩溃,因此不会生成 hs_err_pid.log。 # 正确配置示例&…...

计算机视觉cv2入门之车牌号码识别
前边我们已经讲解了使用cv2进行图像预处理与边缘检测等方面的知识,这里我们以车牌号码识别这一案例来实操一下。 大致思路 车牌号码识别的大致流程可以分为这三步:图像预处理-寻找车牌轮廓-车牌OCR识别 接下来我们按照这三步来进行讲解。 图像预处理 …...

xml+html 概述
1.什么是xml xml 是可扩展标记语言的缩写: Extensible Markup Language。 <root><h1> text 1</h1> </root> web 应用开发,需要配置 web.xml,就是个典型的 xml文件 <web-app><servlet><servlet-name&…...

C++数据结构与二叉树详解
前言: 在C编程的世界里,数据结构是构建高效程序的基石,而二叉树则是其中最优雅且应用广泛的数据结构之一。本文将带你深入理解二叉树的本质、实现与应用,助你在算法设计中游刃有余。 一、二叉树的基本概念 1. 什么是二叉树 二叉树…...

解决6栈6层码头集装箱堆栈翻箱最优解问题
‘’’ con 1 origin_stack = [ [4, 4, 1, 0, 0, 0], # 第一栈 [4, 3, 2, 1, 0, 0], # 第二栈 [4, 2, 2, 1, 0, 0], # 第三栈 [3, 3, 3, 1, 0, 0], # 第四栈 [3, 4, 2, 1, 0, 0], # 第五栈 [4, 2, 3, 2, 0, 0] # 第六栈 ] con 2 origin_stack = [ [4, 4, 3, 0, 0, 0], # 第一栈…...

Java 序列化与反序列化终极解析
Java 序列化与反序列化终极解析 1. 核心概念 (1) 什么是序列化? 定义:将对象转换为字节流的过程(对象 → 字节) 目的: 持久化存储(如保存到文件) 网络传输(如RPC调用)…...

YOLOv5、YOLOv6、YOLOv7、YOLOv8、YOLOv9、YOLOv10、YOLOv11、YOLOv12的网络结构图
文章目录 一、YOLOv5二、YOLOv6三、YOLOv7四、YOLOv8五、YOLOv9六、YOLOv10七、YOLOv11八、YOLOv12九、目标检测系列文章 本文将给出YOLO各版本(YOLOv5、YOLOv6、YOLOv7、YOLOv8、YOLOv9、YOLOv10、YOLOv11、YOLOv12)网络结构图的绘制方法及图。本文所展…...

leetcode0145. 二叉树的后序遍历-easy
1 题目:二叉树的后序遍历 官方标定难度:易 给你一棵二叉树的根节点 root ,返回其节点值的 后序遍历 。 示例 1: 输入:root [1,null,2,3] 输出:[3,2,1] 解释: 示例 2: 输入…...

【Leetcode 每日一题】2364. 统计坏数对的数目
问题背景 给你一个下标从 0 0 0 开始的整数数组 n u m s nums nums。如果 i < j i < j i<j 且 j − i ≠ n u m s [ j ] − n u m s [ i ] j - i \ne nums[j] - nums[i] j−inums[j]−nums[i],那么我们称 ( i , j ) (i, j) (i,j) 是一个 坏数对 。…...
)
完整的 .NET 6 分布式定时任务实现(Hangfire + Redis 分布式锁)
完整的 .NET 6 分布式定时任务实现(Hangfire Redis 分布式锁) 以下是完整的解决方案,包含所有必要组件: 1. 基础设施层 1.1 分布式锁服务 // IDistributedLockService.cs public interface IDistributedLockService {ValueTa…...

人脸识别联合行为检测的办公管理新模式
基于人脸识别与行为检测的办公智能化解决方案 一、背景 在传统办公场景中,员工考勤管理、工位使用情况统计、安全监控等环节存在诸多痛点。例如,传统考勤方式如指纹打卡、刷卡等存在代打卡现象,考勤数据不准确;对于员工是否在工…...
)
鸿蒙NEXT开发键盘工具类(ArkTs)
export declare type KeyboardCallBack (show: boolean, height: number) > void; import { AppUtil } from ./AppUtil; import { LogUtil } from ./LogUtil; import { ArrayUtil } from ./ArrayUtil;/*** 键盘工具类* author 鸿蒙布道师* since 2025/04/18*/ export class…...