【学习笔记】LLM推理与部署
文章目录
- 1 [LLMs inference] quantization 量化整体介绍(bitsandbytes、GPTQ、GGUF、AWQ)
- 2 [LLMs inference] quantization 量化整体介绍(bitsandbytes、GPTQ、GGUF、AWQ)
- 3 [LLMs serving] openrouter & vllm host LLM 推理服务,openai api 兼容
- openrouter
- vllm
- 4 [LLMs inference] vllm & sglang offline inference,tensor parallel vs. data parall
- dynamic batch to inference
- Parameters
- gsm8k的案例
LLM推理及部署:https://www.bilibili.com/video/BV1VpU6YcEuS
1 [LLMs inference] quantization 量化整体介绍(bitsandbytes、GPTQ、GGUF、AWQ)
Quantize量化概念与技术细节
题外话,在七八年前,一些关于表征的研究,会去做表征的压缩,比如二进制嵌入这种事情,其实做得很简单,无非是找个阈值,然后将浮点数划归为零一值,现在的Quantize差不多也是这么一回事,冷饭重炒,但在当下LLM的背景下,明显比那时候更有意义。
- HuggingFace bitsandbytes包
- GPTQ: data compression, GPU,arxiv.2210.17323
- GPTQ is a post-training quantization (PTQ) method for 4-bit quantization that focuses primarily on GPU inference and performance.
- to quantizing the weights of transformer-based models
- first applies scalar quant to the weights, followed by vector quant to the residuals
- The idea behind the method is that it will try to compress all weights to a 4-bit quantization by minimizing the mean squared error to that weight.
- During inference, it will dynamically dequantize its weights to float16 for improved performance whilst keeping memory low.
- GGUF: ggml, CPU, 这是与GPTQ相对应的量化方法,在CPU上实现推理优化。(过时)
- c++,
- llama.cpp, https://github.com/ggerganov/llama.cpp
- AWQ:activation aware quantization,arxiv.2306.00978
- 声称是对GPTQ的优化,提升了速度,但牺牲的精度小(都这样说)
安装(源码安装更容易成功):
# Latest HF transformers version for Mistral-like models
# !pip install git+https://github.com/huggingface/transformers.git
# !pip install accelerate bitsandbytes xformers# GPTQ Dependencies
# !pip install optimum
# !pip install auto-gptq --extra-index-url https://huggingface.github.io/autogptq-index/whl/cu118/
# 我这边走的是源码安装# GGUF Dependencies
# !pip install 'ctransformers[cuda]'
在llama3-8b上的测试:
from torch import bfloat16
import torch
from transformers import pipeline, AutoTokenizer, AutoModelForCausalLM
# Load in your LLM without any compression tricks
model_id = "meta-llama/Meta-Llama-3-8B-Instruct"
# model_id = "HuggingFaceH4/zephyr-7b-beta"
pipe = pipeline("text-generation",model=model_id,torch_dtype=bfloat16,device_map="auto"
)
pipe.model
输出模型的结构:
LlamaForCausalLM((model): LlamaModel((embed_tokens): Embedding(128256, 4096)(layers): ModuleList((0-31): 32 x LlamaDecoderLayer((self_attn): LlamaSdpaAttention((q_proj): Linear(in_features=4096, out_features=4096, bias=False)(k_proj): Linear(in_features=4096, out_features=1024, bias=False)(v_proj): Linear(in_features=4096, out_features=1024, bias=False)(o_proj): Linear(in_features=4096, out_features=4096, bias=False)(rotary_emb): LlamaRotaryEmbedding())(mlp): LlamaMLP((gate_proj): Linear(in_features=4096, out_features=14336, bias=False)(up_proj): Linear(in_features=4096, out_features=14336, bias=False)(down_proj): Linear(in_features=14336, out_features=4096, bias=False)(act_fn): SiLU())(input_layernorm): LlamaRMSNorm()(post_attention_layernorm): LlamaRMSNorm()))(norm): LlamaRMSNorm())(lm_head): Linear(in_features=4096, out_features=128256, bias=False)
)
一个细节,查看任意一个layer的权重值的分布(查看前10000个),发现是基本呈现零均值的正态分布的,这也是后面normal float(nf4)就是基于这样的前提做的量化:
import seaborn as sns
q_proj = pipe.model.model.layers[0].self_attn.q_proj.weight.detach().to(torch.float16).cpu().numpy().flatten()
plt.figure(figsize=(10, 6))
sns.histplot(q_proj[:10000], bins=50, kde=True)

chat template:
- llama3
<|begin_of_text|><|start_header_id|>system<|end_header_id|>....<|eot_id|><|start_header_id|>user<|end_header_id|>...<|eot_id|><|start_header_id|>assistant<|end_header_id|>...
- zephyr
<|system|> ... </s><|user|> ... </s><|assistant|> ... </s>
具体使用template:
# See https://huggingface.co/docs/transformers/main/en/chat_templating
messages = [{"role": "system","content": "You are a friendly chatbot.",},{"role": "user","content": "Tell me a funny joke about Large Language Models."},
]
prompt = pipe.tokenizer.apply_chat_template(messages, tokenize=False, add_generation_prompt=True)
print(prompt)
T = AutoTokenizer.from_pretrained(model_id)
# T
# T.encode('<|system|>')
<|begin_of_text|><|start_header_id|>system<|end_header_id|>You are a friendly chatbot.<|eot_id|><|start_header_id|>user<|end_header_id|>Tell me a funny joke about Large Language Models.<|eot_id|><|start_header_id|>assistant<|end_header_id|>
使用pipe进行生成:
outputs = pipe(prompt,max_new_tokens=256,do_sample=True,temperature=0.1,top_p=0.95
)
(torch.cuda.max_memory_allocated(device='cuda:0') + torch.cuda.max_memory_allocated(device='cuda:1')) / (1024*1024*1024) # 15.021286964416504,差不多是15GB
print(outputs[0]['generated_text'])
"""
<|begin_of_text|><|start_header_id|>system<|end_header_id|>You are a friendly chatbot.<|eot_id|><|start_header_id|>user<|end_header_id|>Tell me a funny joke about Large Language Models.<|eot_id|><|start_header_id|>assistant<|end_header_id|>Here's one:Why did the Large Language Model go to therapy?Because it was struggling to "process" its emotions and was feeling a little "disconnected" from its users! But in the end, it just needed to "retrain" its thoughts and "update" its perspective!Hope that made you LOL!
"""
使用accelerate作sharding(分片)
from accelerate import Accelerator# Shard our model into pieces of 1GB
accelerator = Accelerator()
accelerator.save_model(model=pipe.model,save_directory="./content/model",max_shard_size="4GB"
)
量化概述
- 4bit-NormalFloat (NF4, qlora: lora on a quantize LLMs,arxiv.2305.14314) consists of three steps:
- Normalization: The weights of the model are normalized so that we expect the weights to fall within a certain range. This allows for more efficient representation of more common values.(密度高的地方多分配离散值,密度低的地方少分配离散值,前提就是上面的正态分布)
- The weights of the model are first normalized to have zero mean and unit variance. This ensures that the weights are distributed around zero and fall within a certain range.
- Quantization: The weights are quantized to 4-bit. In NF4, the quantization levels are evenly spaced with respect to the normalized weights, thereby efficiently representing the original 32-bit weights.(所谓那些int4模型,就是每个权重都由16个离散值表示,int8就是64个,以此类推,这个主意之前bf16, float32, float16的具体表征,三者都有1bit用来存符号,bf16跟float32的区别在于小数位减少,float16则两者都变少,分别是1+8+7,1+8+23,1+5+10,比如同样一个0.1234,三者的结果就是0.1235351…,0.1234000…,0.1234130…,而75505则对应75505,inf,75264,即bf16是做了一个权衡,能表示很大的数,但是精度不够)
- The normalized weights are then quantized to 4 bits. This involves mapping the original high-precision weights to a smaller set of low-precision values. In the case of NF4, the quantization levels are chosen to be evenly spaced in the range of the normalized weights.
- Dequantization: Although the weights are stored in 4-bit, they are dequantized during computation which gives a performance boost during inference.
- During the forward pass and backpropagation, the quantized weights are dequantized back to full precision. This is done by mapping the 4-bit quantized values back to their original range. The dequantized weights are used in the computations, but they are stored in memory in their 4-bit quantized form.
- Normalization: The weights of the model are normalized so that we expect the weights to fall within a certain range. This allows for more efficient representation of more common values.(密度高的地方多分配离散值,密度低的地方少分配离散值,前提就是上面的正态分布)
- bitsandbytes 的分位数计算
- 密度高的地方多分配,密度低的地方少分配
- https://github.com/bitsandbytes-foundation/bitsandbytes/blob/main/bitsandbytes/functional.py#L267
- https://zhuanlan.zhihu.com/p/647378373
验证一下上面bf16, f32, f16的区别:
torch.set_printoptions(sci_mode=False)
X = torch.tensor([0.1234, 75535])
print(X, X.dtype) # tensor([    0.1234, 75535.0000]) torch.float32
print(X.to(torch.float16)) # tensor([0.1234,    inf], dtype=torch.float16)
print(X.to(torch.bfloat16)) # tensor([    0.1235, 75776.0000], dtype=torch.bfloat16)
接下来手动量化(用BitsAndBytes)
# Delete any models previously created
# del pipe, accelerator
del pipe# Empty VRAM cache
import gc
gc.collect()
torch.cuda.empty_cache()from transformers import BitsAndBytesConfig
from torch import bfloat16
model_id = "meta-llama/Meta-Llama-3-8B-Instruct" # Our 4-bit configuration to load the LLM with less GPU memory
bnb_config = BitsAndBytesConfig(load_in_4bit=True,  # 4-bit quantizationbnb_4bit_quant_type='nf4',  # Normalized float 4bnb_4bit_use_double_quant=True,  # Second quantization after the firstbnb_4bit_compute_dtype=bfloat16  # Computation type
)# Zephyr with BitsAndBytes Configuration
tokenizer = AutoTokenizer.from_pretrained(model_id)
model = AutoModelForCausalLM.from_pretrained(model_id,quantization_config=bnb_config,device_map='auto',
)# Create a pipeline
pipe = pipeline(model=model, tokenizer=tokenizer, task='text-generation')(torch.cuda.max_memory_allocated('cuda:0') +  torch.cuda.max_memory_allocated('cuda:1')) / (1024*1024*1024) # 5.5174360275268555,内存占用相较于上面的15G明显减少
参数含义在论文中都有,同样可以打印prompt都是没有区别的,输出发生变化
# See https://huggingface.co/docs/transformers/main/en/chat_templating
messages = [{"role": "system","content": "You are a friendly chatbot.",},{"role": "user","content": "Tell me a funny joke about Large Language Models."},
]
prompt = pipe.tokenizer.apply_chat_template(messages, tokenize=False, add_generation_prompt=True)
print(prompt)
"""
<|begin_of_text|><|start_header_id|>system<|end_header_id|>You are a friendly chatbot.<|eot_id|><|start_header_id|>user<|end_header_id|>Tell me a funny joke about Large Language Models.<|eot_id|><|start_header_id|>assistant<|end_header_id|>
"""outputs = pipe(prompt,max_new_tokens=256,do_sample=True,temperature=0.1,top_p=0.95
)
print(outputs[0]["generated_text"])"""
<|begin_of_text|><|start_header_id|>system<|end_header_id|>You are a friendly chatbot.<|eot_id|><|start_header_id|>user<|end_header_id|>Tell me a funny joke about Large Language Models.<|eot_id|><|start_header_id|>assistant<|end_header_id|>Why did the Large Language Model go to therapy?Because it was struggling to "process" its emotions and was worried it would "overfit" to its own biases!
"""
但是这个量化是不完全的混合精度量化(有int8也有float16):
-
load_in_8bit:
- embed_tokens 继续是 torch.float16
- 每个layer的内部(self attention)以及 mlp 部分是 int8
- 每个layer的output(layernorm)部分是 float16(如果 load 时传入了
torch_dtype=torch.bfloat16,则这部分为 torch.float16) - 同理适用于 load_in_4bit
model.embed_tokens.weight torch.float16 cuda:0
model.layers.0.self_attn.q_proj.weight torch.int8 cuda:0
model.layers.0.self_attn.k_proj.weight torch.int8 cuda:0
model.layers.0.self_attn.v_proj.weight torch.int8 cuda:0
model.layers.0.self_attn.o_proj.weight torch.int8 cuda:0
model.layers.0.mlp.gate_proj.weight torch.int8 cuda:0
model.layers.0.mlp.up_proj.weight torch.int8 cuda:0
model.layers.0.mlp.down_proj.weight torch.int8 cuda:0
model.layers.0.input_layernorm.weight torch.float16 cuda:0
model.layers.0.post_attention_layernorm.weight torch.float16 cuda:0
具体的参数输出和推理:
import torch
from torch import nn
from transformers import BitsAndBytesConfig, AutoModelForCausalLM, AutoTokenizer
from transformers.optimization import AdamW
# del model
import gc         # garbage collect library
gc.collect()
torch.cuda.empty_cache()
model = AutoModelForCausalLM.from_pretrained("meta-llama/Meta-Llama-3-8B", quantization_config=BitsAndBytesConfig(load_in_8bit=True,# load_in_4bit=True), torch_dtype=torch.bfloat16,device_map="auto")
for name, para in model.named_parameters():print(name, para.dtype, para.shape, para.device)
# ------
tokenizer = AutoTokenizer.from_pretrained('meta-llama/Meta-Llama-3-8B')
tokenizer.pad_token = tokenizer.eos_token
# 示例训练数据
texts = ["Hello, how are you?","The quick brown fox jumps over the lazy dog."
]# Tokenize数据
inputs = tokenizer(texts, return_tensors="pt", padding=True, truncation=True)
input_ids = inputs["input_ids"]
attention_mask = inputs["attention_mask"]# 移动到GPU(如果可用)
device = torch.device("cuda" if torch.cuda.is_available() else "cpu")
input_ids = input_ids.to(device)
attention_mask = attention_mask.to(device)
# model.to(device)# 设置优化器和损失函数
optimizer = AdamW(model.parameters(), lr=5e-5)
loss_fn = nn.CrossEntropyLoss()# 模型训练步骤
model.train()
outputs = model(input_ids, attention_mask=attention_mask, labels=input_ids)
loss = outputs.loss# 反向传播
optimizer.zero_grad()
loss.backward()
optimizer.step()
GPTQ
# Delete any models previously created
del tokenizer, model, pipe# Empty VRAM cache
import torch
import gc
gc.collect()
torch.cuda.empty_cache()
- https://huggingface.co/MaziyarPanahi/Meta-Llama-3-8B-Instruct-GPTQ
- install
- https://github.com/AutoGPTQ/AutoGPTQ
- 走源码安装是 ok 的;
- https://github.com/AutoGPTQ/AutoGPTQ
# GPTQ Dependencies
# !pip install optimum
# !pip install auto-gptq --extra-index-url https://huggingface.github.io/autogptq-index/whl/cu118/
from transformers import AutoModelForCausalLM, AutoTokenizer, pipeline# Load LLM and Tokenizer
model_id = "MaziyarPanahi/Meta-Llama-3-8B-Instruct-GPTQ"
tokenizer = AutoTokenizer.from_pretrained(model_id, use_fast=True)
model = AutoModelForCausalLM.from_pretrained(model_id,device_map="auto",trust_remote_code=False,revision="main"
)# Create a pipeline
pipe = pipeline(model=model, tokenizer=tokenizer, task='text-generation')# See https://huggingface.co/docs/transformers/main/en/chat_templating
messages = [{"role": "system","content": "You are a friendly chatbot.",},{"role": "user","content": "Tell me a funny joke about Large Language Models."},
]
prompt = pipe.tokenizer.apply_chat_template(messages, tokenize=False, add_generation_prompt=True)
print(prompt)outputs = pipe(prompt,max_new_tokens=256,do_sample=True,temperature=0.1,top_p=0.95
)
print(outputs[0]["generated_text"])(torch.cuda.max_memory_allocated('cuda:0') +  torch.cuda.max_memory_allocated('cuda:1')) / (1024*1024*1024) # 5.626893043518066,跟上面bytesandbits差不太多
GGUF
HUGGINGFACE的QuantFactory仓库下有很多量化模型,比如llama3-8b的:https://huggingface.co/QuantFactory/Meta-Llama-3-8B-instruct-GGUF
- GPT-Generated Unified Format,是由Georgi Gerganov定义发布的一种大模型文件格式。Georgi Gerganov是著名开源项目llama.cpp的创始人。
- GGML:GPT-Generated Model Language
- Although GPTQ does compression well, its focus on GPU can be a disadvantage if you do not have the hardware to run it.
- GGUF, previously GGML, is a quantization method that allows users to use the CPU to run an LLM but also offload some of its layers to the GPU for a speed up (
llama.cpp中的-ngl). Although using the CPU is generally slower than using a GPU for inference, it is an incredible format for those running models on CPU or Apple devices. - Especially since we are seeing smaller and more capable models appearing, like Mistral 7B, the GGUF format might just be here to stay!
- GGUF, previously GGML, is a quantization method that allows users to use the CPU to run an LLM but also offload some of its layers to the GPU for a speed up (
- Q4_K_M
- Q stands for Quantization.
- 4 indicates the number of bits used in the quantization process.
- K refers to the use of k-means clustering in the quantization.
- M represents the size of the model after quantization.
- (S = Small, M = Medium, L = Large).
这里说GGUF用的K均值聚类来做的量化,下面是一个通用的idea(不代表GGUF就是这么做的),其实就是一种分层聚类,还是数值型的,很浅然:
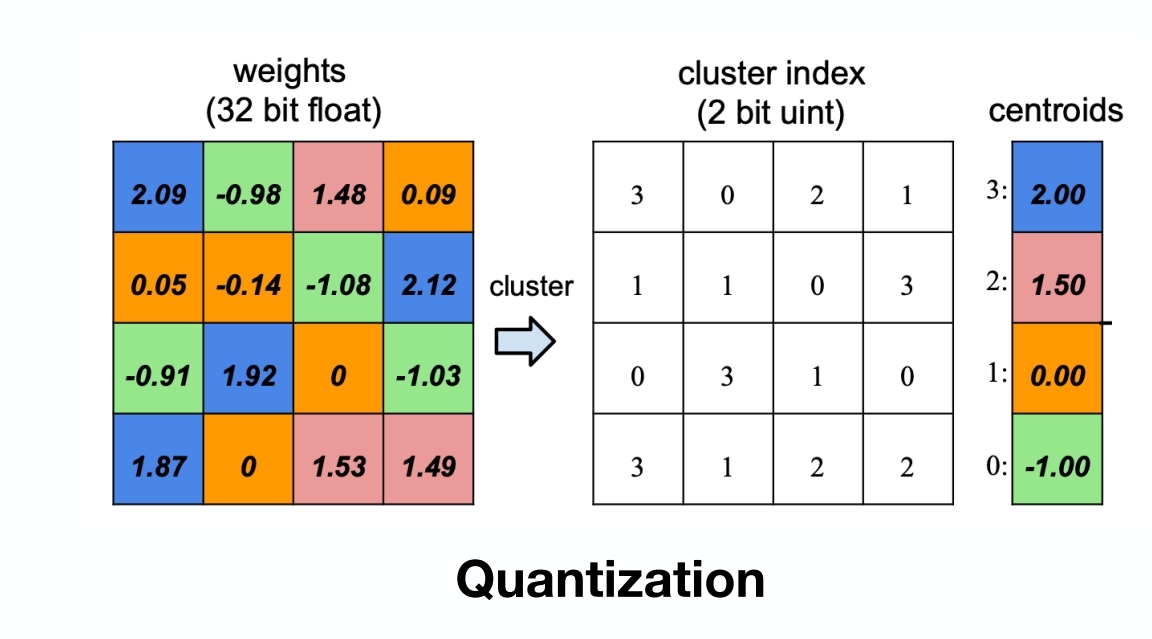
代码实现:
import numpy as np
from sklearn.cluster import KMeans# 原始权重矩阵
weights = np.array([[2.09, -0.98, 1.48, 0.09],[0.05, -0.14, -1.08, 2.12],[-0.91, 1.92, 0, -1.03],[1.87, 0, 1.53, 1.49]
])# K-means聚类
kmeans = KMeans(n_clusters=4)
kmeans.fit(weights.reshape(-1, 1))
cluster_indices = kmeans.predict(weights.reshape(-1, 1)).reshape(weights.shape)
centroids = kmeans.cluster_centers_.flatten()# 根据质心值排序
sorted_indices = np.argsort(centroids)
sorted_centroids = centroids[sorted_indices]# 创建索引映射
index_map = {old_idx: new_idx for new_idx, old_idx in enumerate(sorted_indices)}# 更新量化索引矩阵
new_cluster_indices = np.vectorize(index_map.get)(cluster_indices)print("重新排序后的量化索引矩阵:\n", new_cluster_indices)
print("重新排序后的质心值:\n", sorted_centroids)
"""
重新排序后的量化索引矩阵:[[3 0 2 1][1 1 0 3][0 3 1 0][3 1 2 2]]
重新排序后的质心值:[-1.   0.   1.5  2. ]
"""
使用GGUF进行推理优化:(建议用llama.cpp,否则容易失败)
del tokenizer, model, pipe# Empty VRAM cache
import torch
import gc
gc.collect()
torch.cuda.empty_cache()from ctransformers import AutoModelForCausalLM
from transformers import AutoTokenizer, pipeline# Load LLM and Tokenizer
# Use `gpu_layers` to specify how many layers will be offloaded to the GPU.
model = AutoModelForCausalLM.from_pretrained("QuantFactory/Meta-Llama-3-8B-Instruct-GGUF",model_file="Meta-Llama-3-8B-Instruct.Q4_K_M.gguf",# model_type="llama", gpu_layers=20, hf=True
)
tokenizer = AutoTokenizer.from_pretrained("QuantFactory/Meta-Llama-3-8B-Instruct-GGUF", use_fast=True
)# Create a pipeline
pipe = pipeline(model=model, tokenizer=tokenizer, task='text-generation')
AWQ
A new format on the block is AWQ (Activation-aware Weight Quantization) which is a quantization method similar to GPTQ. There are several differences between AWQ and GPTQ as methods but the most important one is that AWQ assumes that not all weights are equally important for an LLM’s performance.
In other words, there is a small fraction of weights that will be skipped during quantization which helps with the quantization loss.
As a result, their paper mentions a significant speed-up compared to GPTQ whilst keeping similar, and sometimes even better, performance.
下面使用vllm框架进行部署:
from vllm import LLM, SamplingParams# Load the LLM
sampling_params = SamplingParams(temperature=0.0, top_p=1.0, max_tokens=256)
llm = LLM(model="casperhansen/llama-3-8b-instruct-awq",quantization='awq',dtype='half',gpu_memory_utilization=.95,max_model_len=4096
)
tokenizer = AutoTokenizer.from_pretrained("casperhansen/llama-3-8b-instruct-awq")
# See https://huggingface.co/docs/transformers/main/en/chat_templating
messages = [{"role": "system","content": "You are a friendly chatbot.",},{"role": "user","content": "Tell me a funny joke about Large Language Models."},
]
prompt = tokenizer.apply_chat_template(messages, tokenize=False, add_generation_prompt=True)
print(prompt)
# Generate output based on the input prompt and sampling parameters
output = llm.generate(prompt, sampling_params)
print(output[0].outputs[0].text)
2 [LLMs inference] quantization 量化整体介绍(bitsandbytes、GPTQ、GGUF、AWQ)
hf transformers 中的 KV cache
import os
os.environ['http_proxy'] = 'http://127.0.0.1:7890'
os.environ['https_proxy'] = 'http://127.0.0.1:7890'import torch
from transformers import GPT2LMHeadModel, GPT2Tokenizer# 加载预训练模型和分词器
model = GPT2LMHeadModel.from_pretrained('gpt2')
tokenizer = GPT2Tokenizer.from_pretrained('gpt2')# 编码初始输入
input_ids = tokenizer.encode("Hello, my name is", return_tensors='pt')# batch_size, seq_len
input_ids, input_ids.shape
# (tensor([[15496,    11,   616,  1438,   318]]), torch.Size([1, 5]))
第一步生成
2 × batch_size × seq_len × n layers × d m o d e l × p r e c i s o n 2\times \text{batch\_size}\times \text{seq\_len}\times n_{\text{layers}}\times d_{model}\times precison 2×batch_size×seq_len×nlayers×dmodel×precison
past_key_values = ((key_layer_1, value_layer_1),(key_layer_2, value_layer_2),...(key_layer_N, value_layer_N)
)
{key/value}_layer_ishape- (batch_size, num_heads, seq_length, head_dim)
- d_model = num_heads * head_dim
具体实现:
# 第一步生成
output = model(input_ids, use_cache=True)
next_token_logits = output.logits[:, -1, :]  # 获取最后一个时间步的 logits
past_key_values = output.past_key_values    # 缓存键和值
output.logits.shape # torch.Size([1, 5, 50257])
len(past_key_values), past_key_values[0][0].shape # (12, torch.Size([1, 12, 5, 64]))
看一下模型的配置:
# "vocab_size": 50257
# "n_layer": 12,
# "n_head": 12,
# "n_embd": 768,
model.config
GPT2Config {"_name_or_path": "gpt2","activation_function": "gelu_new","architectures": ["GPT2LMHeadModel"],"attn_pdrop": 0.1,"bos_token_id": 50256,"embd_pdrop": 0.1,"eos_token_id": 50256,"initializer_range": 0.02,"layer_norm_epsilon": 1e-05,"model_type": "gpt2","n_ctx": 1024,"n_embd": 768,"n_head": 12,"n_inner": null,"n_layer": 12,"n_positions": 1024,"reorder_and_upcast_attn": false,"resid_pdrop": 0.1,"scale_attn_by_inverse_layer_idx": false,"scale_attn_weights": true,"summary_activation": null,"summary_first_dropout": 0.1,"summary_proj_to_labels": true,"summary_type": "cls_index","summary_use_proj": true,"task_specific_params": {"text-generation": {"do_sample": true,"max_length": 50}},"transformers_version": "4.45.0.dev0","use_cache": true,"vocab_size": 50257
}
然后采样下一个token:
raw_past_key_values = output.past_key_values
raw_past_key_values[0][0].shape # (1, 12, 5, 64)# 采样下一个令牌(例如取最大概率的令牌)
next_token = torch.argmax(next_token_logits, dim=-1).unsqueeze(-1)# 第二步生成,使用缓存
output = model(next_token, past_key_values=past_key_values, use_cache=True)
next_token_logits = output.logits[:, -1, :]
past_key_values = output.past_key_values# 重复上述步骤,直到生成结束
可以检验一下结果是否正确:
past_key_values[0][0].shape # torch.Size([1, 12, 6, 64])
raw_past_key_values[0][0].shape, past_key_values[0][0].shape # (torch.Size([1, 12, 5, 64]), torch.Size([1, 12, 6, 64]))
torch.allclose(past_key_values[0][0][:, :, :5, :], raw_past_key_values[0][0]) # True
对比一下使用kvcache和不使用kvcache的区别:
model_name = 'gpt2'
model = GPT2LMHeadModel.from_pretrained(model_name)
tokenizer = GPT2Tokenizer.from_pretrained(model_name)# 将模型设置为评估模式
model.eval()device = torch.device('cuda' if torch.cuda.is_available() else 'cpu')
model.to(device)
模型结构:
GPT2LMHeadModel((transformer): GPT2Model((wte): Embedding(50257, 768)(wpe): Embedding(1024, 768)(drop): Dropout(p=0.1, inplace=False)(h): ModuleList((0-11): 12 x GPT2Block((ln_1): LayerNorm((768,), eps=1e-05, elementwise_affine=True)(attn): GPT2SdpaAttention((c_attn): Conv1D(nf=2304, nx=768)(c_proj): Conv1D(nf=768, nx=768)(attn_dropout): Dropout(p=0.1, inplace=False)(resid_dropout): Dropout(p=0.1, inplace=False))(ln_2): LayerNorm((768,), eps=1e-05, elementwise_affine=True)(mlp): GPT2MLP((c_fc): Conv1D(nf=3072, nx=768)(c_proj): Conv1D(nf=768, nx=3072)(act): NewGELUActivation()(dropout): Dropout(p=0.1, inplace=False))))(ln_f): LayerNorm((768,), eps=1e-05, elementwise_affine=True))(lm_head): Linear(in_features=768, out_features=50257, bias=False)
)
测试用例
input_text = "Once upon a time"
input_ids = tokenizer.encode(input_text, return_tensors='pt').to(device)  # 形状: (1, seq_length)
max_length = 30  # 生成的最大长度,包括输入长度
import os
os.environ["CUDA_LAUNCH_BLOCKING"] = "1"
# 使用 model.generate 生成文本(贪婪搜索)
greedy_output = model.generate(input_ids,max_length=max_length,num_return_sequences=1,do_sample=False  # 关闭采样,使用贪婪搜索
)
greedy_text = tokenizer.decode(greedy_output[0], skip_special_tokens=True)
print("\n=== 使用 model.generate(贪婪搜索)生成的文本 ===")
print(greedy_text)
输出结果:
=== 使用 model.generate(贪婪搜索)生成的文本 ===
Once upon a time, the world was a place of great beauty and great danger. The world was a place of great danger, and the world was
然后我们可以手动逐步生成文本(贪心搜索):
# 手动逐步生成文本(贪婪搜索)
generated_tokens = input_ids
past_key_values = Nonesteps = max_length - input_ids.shape[1]for step in range(steps):if step == 0:# 第一轮,传递整个输入outputs = model(generated_tokens, use_cache=True)else:# 后续轮次,只传递最后一个 tokenoutputs = model(next_token, use_cache=True, past_key_values=past_key_values)# 更新 past_key_valuespast_key_values = outputs.past_key_values# 获取 logits 并选择下一个 tokennext_token_logits = outputs.logits[:, -1, :]  # 取最后一个时间步的 logits# 选择概率最高的 token(贪婪搜索)next_token = torch.argmax(next_token_logits, dim=-1).unsqueeze(-1)  # 形状: (batch_size, 1)# 将新生成的 token 添加到生成的序列中generated_tokens = torch.cat((generated_tokens, next_token), dim=1)# 解码生成的文本
greedy_loop_text = tokenizer.decode(generated_tokens[0], skip_special_tokens=True)
print("\n=== 使用循环和 past_key_values(贪婪搜索)逐步生成的文本 ===")
print(greedy_loop_text)
输出结果:
=== 使用循环和 past_key_values(贪婪搜索)逐步生成的文本 ===
Once upon a time, the world was a place of great beauty and great danger. The world was a place of great danger, and the world was
3 [LLMs serving] openrouter & vllm host LLM 推理服务,openai api 兼容
openrouter
A unified interface for LLMs。大模型的中间商,也可能是中间商的中间商;
- 不是所有的模型都可以方便地本地部署 (*2 gpu memory)
- qwen/qwen-2.5-72b-instruct
- deepseek-v3;
- llama3.1-405b;
- 远端api快速验证,evaluate,科研或者工程;
- 虚拟信用卡
- https://bewildcard.com/i/CHUNHUI3
- 关于一个模型的不同 provider 的路由策略(provider routing)
- https://openrouter.ai/docs/provider-routing
from openai import OpenAI
from dotenv import load_dotenv, find_dotenv
import os
assert load_dotenv(find_dotenv())
client = OpenAI(base_url="https://openrouter.ai/api/v1",api_key=os.getenv('OPENROUTER_API_KEY'),
)completion = client.chat.completions.create(model="deepseek/deepseek-chat",messages=[{"role": "user","content": "what model are you?"}]
)
print(completion.choices[0].message.content)
"""
I am an instance of OpenAI's language model, specifically based on the GPT-4 architecture. My design allows me to understand and generate human-like text based on the input I receive. I can assist with a wide range of tasks, from answering questions and providing explanations to generating creative content and offering advice. Let me know how I can help you today!
"""
vllm
- https://docs.vllm.ai/en/latest/getting_started/quickstart.html
- vllm
- easy, fast, cheap llm serving
- serving/deploying/hosting
- fastapi-based (uvicorn) server for online serving
- OpenAI-Compatible Server
- finish_reason
- https://platform.openai.com/docs/api-reference/chat/object
- length: if the maximum number of tokens specified in the request was reached
- stop: which means the API returned the full chat completion generated by the model without running into any limits.
- This will be stop if the model hit a natural stop point or a provided stop sequence,
快速上手
from vllm import LLM
prompts = ['Hello, my name is ', 'The captail of China is ']
llm = LLM(model='meta-llama/Meta-Llama-3.1-8B', max_model_len=4096)
outputs = llm.generate(prompts)
print(outputs[0].outputs[0].text)
print(outputs[1].outputs[0].text)
- the current vLLM instance can use total_gpu_memory (23.65GiB) x gpu_memory_utilization (0.90) = 21.28GiB
- model weights take 14.99GiB;
- non_torch_memory takes 0.09GiB;
- PyTorch activation peak memory takes 1.20GiB;
- the rest of the memory reserved for KV Cache is 5.01GiB.
- the current vLLM instance can use total_gpu_memory (23.65GiB) x gpu_memory_utilization (0.95) = 22.47GiB
- model weights take 14.99GiB;
- non_torch_memory takes 0.09GiB;
- PyTorch activation peak memory takes 1.20GiB;
- the rest of the memory reserved for KV Cache is 6.19GiB.
- the current vLLM instance can use total_gpu_memory (23.65GiB) x gpu_memory_utilization (0.95) = 22.47GiB
- model weights take 7.51GiB;
- non_torch_memory takes 0.28GiB;
- PyTorch activation peak memory takes 1.20GiB;
- the rest of the memory reserved for KV Cache is 13.47GiB.
OpenAI-Compatible Server
$ vllm serve meta-llama/Llama-3.1-8B-Instruct --max_model_len 8192
$ vllm serve meta-llama/Llama-3.1-8B-Instruct --dtype auto --api-key keytest --gpu_memory_utilization 0.95  --max_model_len 8192
$ nohup vllm serve meta-llama/Llama-3.1-8B-Instruct --dtype auto --api-key keytest --gpu_memory_utilization 0.95  --max_model_len 8192 &$  python -m vllm.entrypoints.openai.api_server \
--model meta-llama/Llama-3.1-8B-Instruct \
--max_model_len 8192
http://localhost:8000/- 默认参数
- ip: localhost
- port: 8000
- dtype: auto
- device: auto
- api_key: None
- gpu_memory_utilization: 0.9
- max_model_len: None
4 [LLMs inference] vllm & sglang offline inference,tensor parallel vs. data parall
video: https://www.bilibili.com/video/BV1jGXHYfEdx
code: https://github.com/chunhuizhang/llm_rl/tree/main/tutorials/infra/inference/scripts
dynamic batch to inference
- vllm/sglang is dynamic batch to inference,
- Validation datasets are sent to inference engines as a whole batch, which will schedule the memory themselves.
目前OpenRouter也很好用,但VLLM可能是受众面最广的
Parameters
vllm的一些参数
LLM--max-model-len: Model context length. If unspecified, will be automatically derived from the model config.max_seq_lenQwen/Qwen2.5-7B-Instruct-1M(config.json,max_position_embeddings: 1010000)
max_num_seqs=256, # 控制批处理中的最大序列数(batch size)max_num_batched_tokens=4096, # 控制批处理中的最大token数
SamplingParamsmax_tokens: Maximum number of tokens to generate per output sequence.stop,stop_token_idsstop=stop_condition
llm = LLM('Qwen/Qwen2.5-7B-Instruct')
llm.llm_engine.scheduler_config.max_model_len # 32768
llm.llm_engine.scheduler_config.max_num_seqs # 256
llm.llm_engine.scheduler_config.max_num_batched_tokens # 32768
sglang的参考:
- https://docs.sglang.ai/backend/server_arguments.html
- https://docs.sglang.ai/backend/offline_engine_api.html
vllm推理的示例脚本:
import os
from tqdm import tqdm
import torch
from transformers import AutoTokenizer
from vllm import LLM, SamplingParamsos.environ["NCCL_IGNORE_DISABLED_P2P"] = "1"
os.environ["TOKENIZERS_PARALLELISM"] = "true"def generate(question_list,model_path):llm = LLM(model=model_path,trust_remote_code=True,tensor_parallel_size=torch.cuda.device_count(),gpu_memory_utilization=0.90,)sampling_params = SamplingParams(max_tokens=8192,temperature=0.0,n=1)outputs = llm.generate(question_list, sampling_params, use_tqdm=True)completions = [[output.text for output in output_item.outputs] for output_item in outputs]return completionsdef make_conv_hf(question, tokenizer):# for math problemcontent = question + "\n\nPresent the answer in LaTex format: \\boxed{Your answer}"# for code problem# content = question + "\n\nWrite Python code to solve the problem. Present the code in \n```python\nYour code\n```\nat the end." msg = [{"role": "user", "content": content}]chat = tokenizer.apply_chat_template(msg, tokenize=False, add_generation_prompt=True)return chatdef run():model_path = "Qwen/Qwen2.5-7B-Instruct"all_problems = ["which number is larger? 9.11 or 9.9?"]tokenizer = AutoTokenizer.from_pretrained(model_path)completions = generate([make_conv_hf(problem_data, tokenizer) for problem_data in all_problems],model_path)print(completions)if __name__ == "__main__":run()
推理测试:
-
baseline vs. new model
- qwen2.5-7B-Instruct on gsm8k test dataset
- report 85.4%;
- https://arxiv.org/pdf/2412.15115
-
new model 训练用数据集,及超参等;
-
evaluate metrics
- accuracy
-
实验前,列好表,留好空,跑实验就是填空的过程;
-
Qwen/Qwen2.5-7B-Instructongsm8ktest set, on a dual 4090s:
# 单卡
python vllm_tp_dp.py --mode dp --num_gpus 1
# dp = 2
python vllm_tp_dp.py --mode dp --num_gpus 2
# tp = 2
python vllm_tp_dp.py --mode tp --num_gpus 2# 单卡
python sglang_tp_dp.py --mode dp --num_gpus 1
# dp = 2
python sglang_tp_dp.py --mode dp --num_gpus 2
# tp = 2
python sglang_tp_dp.py --mode tp --num_gpus 2| time(s) | accuracy | ||
|---|---|---|---|
| vllm | 单卡 | 115.24 | 1034.0/1319 = 0.7839 |
| vllm | dp=2 | 80.88 | 1031.0/1319=0.7817 |
| vllm | tp=2 | 132.45 | 1034.0/1319 = 0.7839 |
| sglang | 单卡 | 120.17 | 1062.0/1319 = 0.8051 |
| sglang | dp=2 | 82.96 | 1069.0/1319 = 0.8105 |
| sglang | tp=2 | 91.41 | 1058.0/1319 = 0.8021 |
- dp & tp
- dp size: 就是模型复制的次数(model replicas)
- num_gpus = dp_size x tp_size
- vllm
- https://docs.vllm.ai/en/latest/serving/offline_inference.html
- dual 4090s (不支持 p2p access)
# GPU blocks: 25626, # CPU blocks: 9362
INFO 03-21 20:07:55 distributed_gpu_executor.py:57] # GPU blocks: 25626, # CPU blocks: 9362 INFO 03-21 20:07:55 distributed_gpu_executor.py:61] Maximum concurrency for 32768 tokens per request: 12.51x-- 25626 * 16 / 32768 = 12.51x
- sglang
python3 -m sglang.check_env- https://docs.sglang.ai/backend/offline_engine_api.html
- dp
- sglang::scheduler_DP0_TP0
- sglang::scheduler_DP1_TP0
- tp
- sglang::scheduler_TP0
- sglang::scheduler_TP1
vllm对于kv-cache的处理:
- vllm管理空间的级别是block级别,gpu-block,比如一个block可以生成16个token,那么最多浪费15个token
- 测试中很容易发现vllm肯定是有省内存的操作的,直接调用模型进行forward很多时候都会OOM
gsm8k的案例
GSM8K的数据脚本(gsm.py):
import re
import os
import datasetsdef extract_raw_solution(solution_str):solution = re.search("#### (\\-?[0-9\\.\\,]+)", solution_str)assert solution is not Nonefinal_solution = solution.group(0)final_solution = final_solution.split('#### ')[1].replace(',', '')return final_solutiondef make_map_fn(split):def process_fn(example, idx):question_raw = example.pop('question')question = question_raw + ' ' + instruction_followinganswer_raw = example.pop('answer')solution = extract_raw_solution(answer_raw)data = {"data_source": data_source,"prompt": [{"role": "user","content": question,}],"ability": "math","reward_model": {"style": "rule","ground_truth": solution},"extra_info": {'split': split,'index': idx,'answer': answer_raw,"question": question_raw,}}return datareturn process_fndef extract_solution(solution_str, method='strict'):assert method in ['strict', 'flexible']if method == 'strict':# this also tests the formatting of the modelsolution = re.search("#### (\\-?[0-9\\.\\,]+)", solution_str)if solution is None:final_answer = Noneelse:final_answer = solution.group(0)final_answer = final_answer.split('#### ')[1].replace(',', '').replace('$', '')elif method == 'flexible':answer = re.findall("(\\-?[0-9\\.\\,]+)", solution_str)final_answer = Noneif len(answer) == 0:# no reward is there is no answerpasselse:invalid_str = ['', '.']# find the last number that is not '.'for final_answer in reversed(answer):if final_answer not in invalid_str:breakreturn final_answerdef compute_score(solution_str, ground_truth, method='strict', format_score=0., score=1.):"""The scoring function for GSM8k.Reference: Trung, Luong, et al. "Reft: Reasoning with reinforced fine-tuning." Proceedings of the 62nd Annual Meeting of the Association for Computational Linguistics (Volume 1: Long Papers). 2024.Args:solution_str: the solution textground_truth: the ground truthmethod: the method to extract the solution, choices are 'strict' and 'flexible'format_score: the score for the formatscore: the score for the correct answer"""answer = extract_solution(solution_str=solution_str, method=method)if answer is None:return 0else:if answer == ground_truth:return scorereturn format_scoreif __name__ == "__main__":  data_source = 'openai/gsm8k'dataset = datasets.load_dataset(data_source, 'main')# train_dataset = dataset['train']test_dataset = dataset['test']instruction_following = "Let's think step by step and output the final answer after \"####\"."test_dataset = test_dataset.map(function=make_map_fn('test'), with_indices=True)test_dataset.to_parquet(os.path.join('./data', 'gsm8k_test.parquet'))
使用sglang推理gsm8k的示例:
import time
import sglang as sgl
import argparse
from datasets import load_dataset
from transformers import AutoTokenizer
from gsm8k import extract_solution, compute_score
import os
os.environ["NCCL_IGNORE_DISABLED_P2P"] = '1'def generate(llm, prompts, args=None):    sampling_params = {"max_new_tokens": args.max_tokens,"temperature": args.temperature,}outputs = llm.generate(prompts, sampling_params)responses = [output['text'] for output in outputs]return responsesif __name__ == "__main__":args = argparse.ArgumentParser()args.add_argument("--model_name", type=str, default="Qwen/Qwen2.5-7B-Instruct")args.add_argument("--num_gpus", type=int, default=2)# tp or dpargs.add_argument("--mode", type=str, default="tp")args.add_argument("--data_path", type=str, default="./data/gsm8k_test.parquet")args.add_argument("--temperature", type=float, default=0.0)args.add_argument("--max_tokens", type=int, default=2048)args.add_argument("--max_model_len", type=int, default=4096)args.add_argument("--n", type=int, default=1)args.add_argument("--extract_method", type=str, default="strict")args.add_argument("--num_prompts", type=int, default=-1)args = args.parse_args()tokenizer = AutoTokenizer.from_pretrained(args.model_name)test_parquet = load_dataset('parquet', data_files=args.data_path)['train']prompts = []for example in test_parquet:prompt = [example['prompt'][0]]prompt = tokenizer.apply_chat_template(prompt, tokenize=False, add_generation_prompt=True)prompts.append(prompt)if args.num_prompts != -1:prompts = prompts[:args.num_prompts]t0 = time.time()if args.mode == "tp":llm = sgl.Engine(model_path=args.model_name,dp_size=1,tp_size=args.num_gpus,mem_fraction_static=0.8,enable_p2p_check=True)elif args.mode == "dp":llm = sgl.Engine(model_path=args.model_name,dp_size=args.num_gpus,tp_size=1)all_responses = generate(llm, prompts, args=args)t1 = time.time()total_score = 0for example, response in zip(test_parquet, all_responses):gt_answer = example['reward_model']['ground_truth']model_resp = responsemodel_answer = extract_solution(model_resp, args.extract_method)score = compute_score(model_resp, gt_answer, args.extract_method)print(f"Example: {example['prompt'][0]}")print(f"Response: {model_resp}")print(f"Solution: {model_answer}")print(f"Score: {score}")print("-"*100)total_score += scoreprint(f"accuray: {total_score}/{len(prompts)} = {total_score / len(prompts)}")print(f"Time taken of {args.mode} mode: {t1 - t0} seconds")
这个是vllm推理gsm8k的示例:
import argparse
import os
import pandas as pd
import torch
from vllm import LLM, SamplingParams
from vllm.utils import get_open_port
from datasets import load_dataset
from transformers import AutoTokenizer
from multiprocessing import Process
import re
from multiprocessing import Queue
import time
from gsm8k import extract_solution, compute_scoredef generate(llm, prompts, use_tqdm=False, args=None):    sampling_params = SamplingParams(max_tokens=args.max_tokens,temperature=args.temperature,n=args.n)outputs = llm.generate(prompts, sampling_params, use_tqdm=use_tqdm)responses = [[output.text for output in output_item.outputs] for output_item in outputs]return responsesdef tp_generate(prompts, args):llm = LLM(model=args.model_name,trust_remote_code=True,tensor_parallel_size=args.num_gpus,max_model_len=args.max_model_len,)responses = generate(llm, prompts, use_tqdm=True, args=args)return responsesdef sub_dp(prompts, DP_size, dp_rank, TP_size, args, results_queue):os.environ["VLLM_DP_RANK"] = str(dp_rank)os.environ["VLLM_DP_SIZE"] = str(DP_size)os.environ["VLLM_DP_MASTER_IP"] = args.dp_master_ipos.environ["VLLM_DP_MASTER_PORT"] = str(args.dp_master_port)# tp_size = 1:# dp_rank = 0: 0;# dp_rank = 1: 1;# tp_size = 2:# dp_rank = 0: 0, 1;# dp_rank = 1: 2, 3;# dp size = # gpus / tp sizeos.environ["CUDA_VISIBLE_DEVICES"] = ",".join(str(i) for i in range(dp_rank * TP_size, (dp_rank + 1) * TP_size))promts_per_rank = len(prompts) // DP_sizestart = dp_rank * promts_per_rankend = start + promts_per_rankprompts = prompts[start:end]if len(prompts) == 0:prompts = ["Placeholder"]print(f"DP rank {dp_rank} needs to process {len(prompts)} prompts")llm = LLM(model=args.model_name, trust_remote_code=True, max_model_len=args.max_model_len,tensor_parallel_size=TP_size)responses = generate(llm, prompts, use_tqdm=False, args=args)print(f"DP rank {dp_rank} finished processing {len(responses)} prompts")results_queue.put((dp_rank, start, end, responses))print(f'results queue size: {results_queue.qsize()}')return responsesdef dp_generate(prompts, args):DP_size = args.num_gpusTP_size = 1procs = []results_queue = Queue()for i in range(DP_size):proc = Process(target=sub_dp, args=(prompts, DP_size, i, TP_size, args, results_queue))proc.start()procs.append(proc)all_results = []for _ in range(DP_size):dp_rank, start, end, responses = results_queue.get()all_results.append((dp_rank, start, end, responses))for proc in procs:proc.join()all_results.sort(key=lambda x: x[0])  # 按 dp_rank 排序all_responses = []for _, start, end, responses in all_results:if responses and responses[0][0] != "Placeholder":all_responses.extend(responses)return all_responsesif __name__ == "__main__":args = argparse.ArgumentParser()args.add_argument("--model_name", type=str, default="Qwen/Qwen2.5-7B-Instruct")args.add_argument("--num_gpus", type=int, default=2)# tp or dpargs.add_argument("--mode", type=str, default="tp")args.add_argument("--data_path", type=str, default="./data/gsm8k_test.parquet")args.add_argument("--temperature", type=float, default=0.0)args.add_argument("--max_tokens", type=int, default=8192)args.add_argument("--max_model_len", type=int, default=4096)args.add_argument("--n", type=int, default=1)args.add_argument("--dp_master_ip", type=str, default="127.0.0.1")args.add_argument("--dp_master_port", type=int, default=get_open_port())args.add_argument("--extract_method", type=str, default="strict")args.add_argument("--num_prompts", type=int, default=-1)args = args.parse_args()tokenizer = AutoTokenizer.from_pretrained(args.model_name)test_parquet = load_dataset('parquet', data_files=args.data_path)['train']prompts = []for example in test_parquet:prompt = [example['prompt'][0]]prompt = tokenizer.apply_chat_template(prompt, tokenize=False, add_generation_prompt=True)prompts.append(prompt)if args.num_prompts != -1:prompts = prompts[:args.num_prompts]t0 = time.time()if args.mode == "tp":all_responses = tp_generate(prompts, args)elif args.mode == "dp":all_responses = dp_generate(prompts, args)t1 = time.time()total_score = 0for example, response in zip(test_parquet, all_responses):gt_answer = example['reward_model']['ground_truth']model_resp = response[0]model_answer = extract_solution(model_resp, args.extract_method)score = compute_score(model_resp, gt_answer, args.extract_method)print(f"Example: {example['prompt'][0]}")print(f"Response: {model_resp}")print(f"Solution: {model_answer}")print(f"Score: {score}")print("-"*100)total_score += scoreprint(f"accuray: {total_score}/{len(prompts)} = {total_score / len(prompts)}")print(f"Time taken of {args.mode} mode: {t1 - t0} seconds")
相关文章:

【学习笔记】LLM推理与部署
文章目录 1 [LLMs inference] quantization 量化整体介绍(bitsandbytes、GPTQ、GGUF、AWQ)2 [LLMs inference] quantization 量化整体介绍(bitsandbytes、GPTQ、GGUF、AWQ)3 [LLMs serving] openrouter & vllm host LLM 推理服…...

leetcode-134.加油站
油箱容积无限,要求能环岛,说明总共加起来的油是不少于消耗量的,这是唯一一个决定能否环岛的变量,只要油量够,那么必定有一段路是攒油的路,它供给后续的消耗,使得油箱总是不空。 如果油量足够&am…...

companion object和object 从kotlin转java分析
说明 companion object 中 companion类中的方法是普通的方法 在外部类中生成静态变量,静态companion 对象 object MyClass2 中 类中方法是普通方法 在MyClass2中生成静态变量,静态MyClass2对象, 一 companion object 使用 kotlin转java pa…...
本地PDF 本地嵌入模型)
检索增强生成(2)本地PDF 本地嵌入模型
from langchain_community.document_loaders import PyPDFLoader from pathlib import Pathdef load_local_pdf(file_path):if not Path(file_path).exists():raise FileNotFoundError(f"文件 {file_path} 不存在!")loader PyPDFLoader(file_path)try:do…...

关于TVS管漏电流的问题?
问题描述: 在量产的带电池故事机生产中,工厂产线测试电流时,有1台机器电流比正常机器大10mA左右。 原因分析: 1、分析电路原理图,去除可能出现问题的电压或器件(不影响系统),发现…...

2025前端面试题记录
vue项目目录的执行顺序是怎么样的? 1、package.json 在执行npm run dev时,会在当前目录寻找package.json文件,此文件包含了项目的名称版本、项目依赖等相关信息。 2、webpack.config.js(会被vue-cli脚手架隐藏) 3、vue.config.js 对…...

Linux系统docker部署Ollama本地大模型及部署Hugging Face开源模型,ollama相关注意点,非ollama模型创建,模型量化,显存建议
本文主要描述在Linux系统使用docker部署ollama自有模型以及Hugging Face开源模型,也涉及到一些相关注意点,欢迎沟通讨论~ 拉取镜像 拉取ollama最新镜像:docker pull ollama/ollama:latest 运行ollama 执行:docker run -d --res…...
 到 Scalar)
.NET 9 彻底改变了 API 文档:从 Swashbuckle(Swagger) 到 Scalar
示例代码下载:https://download.csdn.net/download/hefeng_aspnet/90404652 摘要 API 文档是现代软件开发的支柱。随着 .NET 9 从 Swashbuckle 转向 Microsoft.AspNetCore.OpenApi,开发人员需要新的策略来保持高效。本文探讨了这些变化,并介…...

C++——权限初识
权限初识 C中的访问权限主要分为三种: public 、 private 和 protected 。这些权限决定了类成员(包括数据成员和成员函数)的可访问性。以下是一个总结表格,说明了在不同情况下这些权限如何应用: 使用权限(…...

如何让自动驾驶汽车“看清”世界?坐标映射与数据融合概述
在自动驾驶领域,多传感器融合技术是实现车辆环境感知和决策控制的关键。其中,坐标系映射和对应是多传感器融合的重要环节,它涉及到不同传感器数据在统一坐标系下的转换和匹配,以实现对车辆周围环境的准确感知。本文将介绍多传感器融合中坐标系映射和对应的数学基础和实际应…...

如何在 Linux 系统中部署 FTP 服务器:从基础配置到安全优化
一、为什么选择 Linux 部署 FTP 服务器? FTP(文件传输协议)作为互联网最早的文件传输标准,至今仍在企业内部文件共享、镜像站点同步等场景中广泛应用。Linux 系统凭借其稳定性、开源特性及丰富的工具链,成为搭建 FTP 服…...

C++——引用
目录 举个例子: 引用的基本特性 引用的定义语法如下: 1. 引用必须初始化: 2. 引用是别名: 3. 引用不能为空: 4. 引用不能重新绑定: 引用的使用场景 函数参数传递: 函数返回值…...

unity开发效率提升笔记
本文将记录提升Unity开发效率的若干细节,持续更新 一.VSCode文件标签多行显示 1.File->Preference->Settings (快捷键Ctrl 逗号) 2.搜索workbench.editor.wrapTabs 3.勾选上这个单选开关 若依然不是多行 4.搜索workbench.editor.tabSizing,选择fi…...

VScode页面错误,可以编译C++20版本,但页面显示有错误的解决方案
问题回顾 学习信号量时使用到了C20版本的一些变量,可以正常编译和运行,但在编辑器上显示存在错误,如图所示 显示结果,提示命名空间std没有成员变量counting_semaphore,如图所示 解决办法 1、确保自己安装了C/C插件…...

[WEB开发] JDBC
一. JDBC基础 JDBC (Java DataBase Connectivity): 就是使用 java 语言操作数据库的一套API. JDBC本质: 一套标准接口, 规范各个数据库厂商实现这套接口, 提供驱动使用接口, 真正执行的是实现类 二. 实战 2.1 非预编译sql // 1. 注册数据库驱动Class.forName("com.my…...

Linux shell脚本2-test条件测试语句:文件类型、字符串是否相等、数字大小比较、多重条件判断,测试语句验证
目录 1.条件测试语句 2.文件表达式测试 2.1测试文件状态的条件表达式 2.2程序验证 2.2.1 单个文件验证 2.2.3.两个文件验证 3.字符串表达式测试 4.数字表达式测试 5.复合表达式测试 1.条件测试语句 在写shell脚本时,经常遇到的问题就是判断字符串是否相等&…...

linux_git使用
1. git的历史 git是开源的 2. git的理解 版本控制 只进行管理源文件 3. git的使用 3.1. git命令安装 sudo yum install git sudo apt install -y git 查看是否安装成功 $git --version 3.2. git使用注意事项 首次使用git需要输入用户名和邮件 gitignore࿱…...
(UDP套接字编程、聊天室的实现、观察者模式))
Linux网络相关概念和重要知识(2)(UDP套接字编程、聊天室的实现、观察者模式)
目录 1.UDP套接字编程 (1)socket编程 (2)UDP的使用 ①socket ②bind ③recvfrom ④sendto 2.聊天室的实现 (1)整体逻辑 (2)对sockaddr_in的封装 (3)…...
一面前端面试)
2025年03月18日柯莱特(外包宁德)一面前端面试
目录 自我介绍你怎么从0到1搭建项目的webpack 的构建流程手写webpack插件你有什么想问我的吗 2. 你怎么从 0 到 1 搭建项目的 在面试中回答从 0 到 1 搭建前端项目,可按以下详细步骤阐述: 1. 项目前期准备 需求理解与分析 和产品经理、客户等相关人…...
)
汇川EASY系列之以太网通讯(MODBUS_TCP做主站)
汇川Easy系列以太网通讯中(MODBUSTCP,plc做主站),终于可以不用使用指令就可以完成了,全程通过简单的配置就可通讯。本文将通过EASY系列PLC与调试助手之间完成此操作。具体演示如下; 关于主站和从站的介绍 A/请求:即主动方 向被动方发送的一个要求的信息。 B/主站:发…...

uni-app jyf-parser将字符串转化为html 和 rich-text
uni-app jyf-parser将字符串转化为html-CSDN博客 方法二: rich-text | uni-app...

PyTorch中Batch Normalization1d的实现与手动验证
PyTorch中Batch Normalization1d的实现与手动验证 一、介绍 Batch Normalization(批归一化)是深度学习中常用的技术,用于加速训练并减少对初始化的敏感性。本文将通过PyTorch内置函数和手动实现两种方式,展示如何对三维输入张量…...

LoRA中黑塞矩阵、Fisher信息矩阵是什么
LoRA中黑塞矩阵、Fisher信息矩阵是什么 1. 三者的核心概念 黑塞矩阵(Hessian) 二阶导数矩阵,用于优化问题中判断函数的凸性(如牛顿法),或计算参数更新方向(如拟牛顿法)。 Fisher信息矩阵(Fisher Information Matrix, FIM) 统计学中衡量参数估计的不确定性,反映数据…...
Transformer中,Fisher矩阵与权重之间关系
Transformer中,Fisher矩阵与权重之间关系 目录 Transformer中,Fisher矩阵与权重之间关系一、Fisher矩阵与Transformer权重的关系二、Fisher矩阵的更新方式三、举例说明给出案例:Transformer权重矩阵,Fisher矩阵,说明对应关系和怎么更新二阶导数计算需要大量算力有什么方法…...

本地安装deepseek大模型,并使用 python 调用
首先进入 ollama 官网 https://ollama.com/点击下载 下载完成后所有都是下一步,就可以 点击搜索 Models : https://ollama.com/search然后点击下载: 选择后复制: ollama run deepseek-r1:32b例如: 让它安装完成后࿱…...

asp.net mvc 向前端响应json数据。用到jquery
最近在给客户开发提醒软件时,用asp.net mvc 开发。该框架已经集成了bootstrap,直接贴asp.net mvc 端代码: {Layout null; }<!DOCTYPE html><html> <head><meta name"viewport" content"widthdevice-width" /…...

《基于深度学习的指纹识别智能门禁系统》开题报告
个人主页:大数据蟒行探索者 1研究背景 1.1开发目的和意义 指纹识别作为生物特征识别领域的一项重要技术,在安全认证、犯罪侦查和个人身份验证等方面具有广泛应用前景。随着深度学习技术的迅猛发展,基于深度学习的指纹识别系统成为了当前研究…...

数据预处理流程与关键步骤解析
数据预处理流程图(Markdown格式): #mermaid-svg-b3mhJcpFWaJ9qMZ8 {font-family:"trebuchet ms",verdana,arial,sans-serif;font-size:16px;fill:#333;}#mermaid-svg-b3mhJcpFWaJ9qMZ8 .error-icon{fill:#552222;}#mermaid-svg-b3m…...

单片机开发资源分析实战——以STM32F103ZET6为例子,分析我们的单片机
目录 第一件事情:为什么叫STM32F103ZET6 分析我们的资源手册 第二件事情,关心我们的GPIO引脚输出 第三件事情:去找对应外设的说明部分 本文章隶属于项目: Charliechen114514/BetterATK: This is a repo that helps rewrite ST…...
)
uv命令介绍(高性能Python包管理工具,旨在替代pip、pip-tools和virtualenv等传统工具)
文章目录 **主要功能**1. **快速安装和管理 Python 包**2. **生成和管理锁文件 (requirements.lock)**3. **创建虚拟环境**4. **与 poetry 兼容** **核心优势**1. **极快的速度**:基于 Rust 实现,利用多线程和缓存大幅加速依赖解析。2. **轻量且独立**&a…...
:webview实现屏蔽所嵌套web页面异常弹窗)
React Native进阶(六十):webview实现屏蔽所嵌套web页面异常弹窗
文章目录 一、前言二、解决方案三、注意事项四、拓展阅读 一、前言 在React Native项目集成web页面时,webview嵌套方式是常用方式。如果所嵌套的web页面由于某种不可控因素导致出现错误弹窗信息,webview作为web嵌套方式应该对其行为可控。 React Nativ…...

IS-IS原理与配置
一、IS-IS概述 IS-IS(Intermediate System to Intermediate System,中间系统到中间系统)是ISO(International Organization for Standardization,国际标准化组织)为它的CLNP(ConnectionLessNet…...

响应式CMS架构优化SEO与用户体验
内容概要 在数字化内容生态中,响应式CMS架构已成为平衡搜索引擎可见性与终端用户体验的核心载体。该系统通过多终端适配技术,确保PC、移动端及平板等设备的内容渲染一致性,直接降低页面跳出率并延长用户停留时长。与此同时,智能S…...

mysql 主从配置
核心概念: 主服务器(Master):负责处理客户端的写操作,并将数据更改记录到二进制日志(binlog)中。从服务器(Slave):负责读取主服务器的二进制日志,…...

Windows下编译安装Qt5.15.0指南
1. 系统要求 操作系统: Windows 7 或更高版本(推荐 Windows 10/11)。 磁盘空间: 至少 20-30 GB(编译过程会生成大量中间文件)。 内存: 建议 8GB 或更高。 编译器: 需要安装 Visual Studio(推荐 MSVC 2017 或 MSVC 2…...

001-JMeter的安装与配置
1.前期准备 下载好JMeter : https://jmeter.apache.org/download_jmeter.cgi 下载好JDK : :Java Downloads | Oracle 中国 下载图中圈蓝的JMeter和JDK就行,让它边下载,我们边往下看 2.为什么要下载并安装JDK ? JMeter 是基于 Java 开发的工具&#…...

kube-score K8S Yaml静态代码分析工具详解
kube-score 是一款专注于 Kubernetes 配置文件的静态代码分析工具,旨在通过自动化检查帮助用户识别资源配置中的潜在问题,并遵循最佳实践以提升集群的安全性、稳定性和性能。以下是其核心功能、使用方法和应用场景的详细解析: 一、核心功能与…...

【Go】Go语言结构体笔记
整体介绍 虽然 Go 语言不是传统意义上的面向对象语言,但它提供了结构体(struct)来组织数据,并且可以为结构体绑定方法,从而达到面向对象的部分效果。 关键知识点包括: 结构体定义与实例化 定义结构体时使用…...

Oracle数据库性能优化全攻略:十大关键方向深度解析与实践指南
文章目录 一、SQL查询优化二、索引优化三、内存管理四、I/O优化五、分区表与分区索引六、并行处理七、统计信息管理八、锁与并发控制九、数据库参数调优十、应用设计优化结论 在当今数据驱动的时代,数据库的性能优化成为了确保企业应用高效运行的关键。Oracle作为业…...

Modern C++面试题及参考答案
目录 解释右值引用的定义及其与左值引用的核心区别 std::move 的实现原理是什么?为什么它本身不执行移动操作? 移动构造函数与拷贝构造函数的调用场景有何不同? 实现一个支持移动语义的类需要遵循哪些原则? 完美转发(Perfect Forwarding)的实现原理及 std::forward 的…...

【单片机通信技术应用——学习笔记三】液晶屏显示技术,取模软件的应用
一、液晶显示技术简介 1.RGB信号线 RGB是一种色彩模式,是工业界的一种颜色标准,是通过红(R)、绿(G)、蓝(B)三个颜色通道的变化,以及它们相互之间的叠加来得到各式各样的…...

Git push后撤销提交
一、介绍 当某次更改完工程后,push了本地仓库到云端,但是发现有地方改错了,想撤销这次推送,或者某次提交就更改了很小一部分,想和本地这次修改的合并为一次推送,省的在云端显示特别多次提交,显得…...

React多层级对象改变值--immer
reduxjs/toolkit底层就是immer,,,所以在使用redux的时候,直接赋值,就会响应式的数据 如果不使用reduxjs/toolkit,可以自己使用immer来实现 安装immer npm install immer引入produce函数,,prod…...
)
17153. 班级活动(蓝桥杯-python)
代码写法 import os import sys# 请在此输入您的代码n int(input()) a list(map(int,input().split()))da {} flag1 0 flag2 0for i in a:da[i] da.get(i,0)1for i,j in da.items():if j 1:flag1 1if j > 2:flag2 j-2if flag2 > flag1:print(flag2) else:print(…...

html5-qrcode前端打开摄像头扫描二维码功能
实现的效果如图所示,全屏打开并且扫描到二维码后弹窗提醒,主要就是使用html5-qrcode这个依赖库,html5-qrcode开源地址:GitHub - mebjas/html5-qrcode: A cross platform HTML5 QR code reader. See end to end implementation at:…...

【后端】【Django】【ORM】SearchFilter 详解
SearchFilter 详解 SearchFilter 是 Django REST Framework(DRF)提供的一个过滤器,用于在 ModelViewSet 视图集中支持搜索功能。它允许用户通过 URL 查询参数(默认 search)对多个字段进行模糊匹配。 一、基本用法 &a…...

python 实现一个简单的window 任务管理器
import tkinter as tk from tkinter import ttk import psutil# 运行此代码前,请确保已经安装了 psutil 库,可以使用 pip install psutil 进行安装。 # 由于获取进程信息可能会受到权限限制,某些进程的信息可能无法获取,代码中已经…...

使用密码连接Redis服务的两种方式
说明:本文介绍连接需要密码的Redis服务的两种方式 方式一 连接时,携带密码,如下: redis-cli -a [密码]如下: 有两个问题: 密码直接放在命令里,可通过 history 找到,不安全&#x…...

基于C语言实现的观察者模式 以温度监控系统为例
场景为 温度监控系统:当温度传感器检测到温度变化时,自动通知所有注册的显示器(如LCD、手机App)更新显示。 场景描述 主题(Subject):温度传感器,负责检测温度变化并通知观察者。 观察者(Observer):显示器(LCD显示器、手机App),订阅温度数据并在温度变化时更新显…...

英伟达黄仁勋2025GTC演讲深度解析:液冷GPU、AI工厂、机器人AI…...
目录 一、技术产品与架构升级:从芯片到算力工厂1. 新一代GPU与计算架构2. AI工厂与算力操作系统 二、AI技术演进:从生成式到物理AI1. AI发展的三大阶段2. 推理算力需求爆炸式增长 三、生态合作与行业落地1. CUDA生态与开源工具2. 跨行业合作案例 四、未来…...