NVIDIA k8s-device-plugin源码分析与安装部署
在《kubernetes Device Plugin原理与源码分析》一文中,我们从源码层面了解了kubelet侧关于device plugin逻辑的实现逻辑,本文以nvidia管理GPU的开源github项目k8s-device-plugin为例,来看看设备插件侧的实现示例。
一、Kubernetes Device Plugin
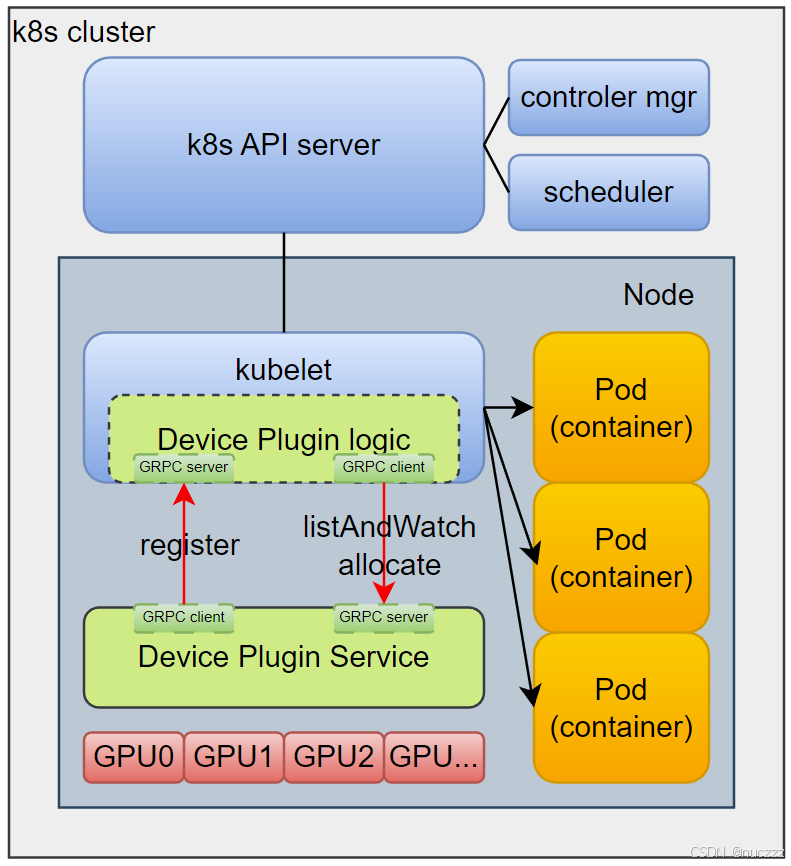
回顾上文kubelet侧的实现逻辑可知,设备插件侧应该实现如下逻辑:
- 启动一个GRPC service,该service需实现以下方法(v1beta1):
// DevicePlugin is the service advertised by Device Plugins
service DevicePlugin {// GetDevicePluginOptions returns options to be communicated with Device// Managerrpc GetDevicePluginOptions(Empty) returns (DevicePluginOptions) {}// ListAndWatch returns a stream of List of Devices// Whenever a Device state change or a Device disappears, ListAndWatch// returns the new listrpc ListAndWatch(Empty) returns (stream ListAndWatchResponse) {}// GetPreferredAllocation returns a preferred set of devices to allocate// from a list of available ones. The resulting preferred allocation is not// guaranteed to be the allocation ultimately performed by the// devicemanager. It is only designed to help the devicemanager make a more// informed allocation decision when possible.rpc GetPreferredAllocation(PreferredAllocationRequest) returns (PreferredAllocationResponse) {}// Allocate is called during container creation so that the Device// Plugin can run device specific operations and instruct Kubelet// of the steps to make the Device available in the containerrpc Allocate(AllocateRequest) returns (AllocateResponse) {}// PreStartContainer is called, if indicated by Device Plugin during registeration phase,// before each container start. Device plugin can run device specific operations// such as resetting the device before making devices available to the containerrpc PreStartContainer(PreStartContainerRequest) returns (PreStartContainerResponse) {}
}
最主要的是ListAndWatch和Allocate两个方法,其中ListAndWatch方法负责上报设备上GPU的状态数据给kubelet,Allocate方法则是kubelet创建带有GPU资源的pod容器真正分配资源的方法。
- 启动上述GRPC service后调用kubelet的Register方法,把自己注册到k8s中
二、k8s-device-plugin源码解读
以下内容基于github.com/NVIDIA/k8s-device-plugin@v0.16.2
2.1 main
由于k8s-device-plugin代码量和逻辑并不算复杂,我们直接从main函数开始:
// k8s-device-plugin/cmd/nvidia-device-plugin/main.go
func main() {...c.Action = func(ctx *cli.Context) error {return start(ctx, c.Flags)}...
}// k8s-device-plugin/cmd/nvidia-device-plugin/main.go
func start(c *cli.Context, flags []cli.Flag) error {...klog.Info("Starting FS watcher.")// pluginapi.DevicePluginPath = /var/lib/kubelet/device-plugins/watcher, err := watch.Files(pluginapi.DevicePluginPath) if err != nil {return fmt.Errorf("failed to create FS watcher for %s: %v", pluginapi.DevicePluginPath, err)}defer watcher.Close()...plugins, restartPlugins, err := startPlugins(c, flags)...for {select {...case event := <-watcher.Events:// pluginapi.KubeletSocket = /var/lib/kubelet/device-plugins/kubelet.sockif event.Name == pluginapi.KubeletSocket && event.Op&fsnotify.Create == fsnotify.Create {klog.Infof("inotify: %s created, restarting.", pluginapi.KubeletSocket)goto restart}...}}...
}
这里注意一个逻辑:k8s-device-plugin在启动的时候会监听/var/lib/kubelet/device-plugins/kubelet.sock文件,当创建这个文件后,k8s-device-plugin会重启(goto restart)。之所以有这个逻辑,是因为kubelet重启会重新创建这个文件,而kubelet重启会清除其它设备插件放在这个目录下的socket文件,而且由于kubelet和设备插件之间通过ListAndWatch方法建立了长连接,这个长连接需要设备插件调用kubelet的Register方法触发,断连后k8s-device-plugin goto restart才能重新建立连接。
2.2 startPlugins
startPlugins主要代码逻辑如下:
// k8s-device-plugin/cmd/nvidia-device-plugin/main.go
func startPlugins(c *cli.Context, flags []cli.Flag) ([]plugin.Interface, bool, error) {...driverRoot := root(*config.Flags.Plugin.ContainerDriverRoot)// We construct an NVML library specifying the path to libnvidia-ml.so.1// explicitly so that we don't have to rely on the library path.nvmllib := nvml.New(nvml.WithLibraryPath(driverRoot.tryResolveLibrary("libnvidia-ml.so.1")),)devicelib := device.New(nvmllib)infolib := nvinfo.New(nvinfo.WithNvmlLib(nvmllib),nvinfo.WithDeviceLib(devicelib),)...pluginManager, err := NewPluginManager(infolib, nvmllib, devicelib, config)if err != nil {return nil, false, fmt.Errorf("error creating plugin manager: %v", err)}plugins, err := pluginManager.GetPlugins()if err != nil {return nil, false, fmt.Errorf("error getting plugins: %v", err)}...for _, p := range plugins {// Just continue if there are no devices to serve for plugin p.if len(p.Devices()) == 0 {continue}// Start the gRPC server for plugin p and connect it with the kubelet.if err := p.Start(); err != nil {klog.Errorf("Failed to start plugin: %v", err)return plugins, true, nil}started++}...
}
在startPlugins函数中,有以下几个逻辑本文会深入解读下:
2.2.1 初始化nvmllib对象
driverRoot := root(*config.Flags.Plugin.ContainerDriverRoot)// We construct an NVML library specifying the path to libnvidia-ml.so.1// explicitly so that we don't have to rely on the library path.nvmllib := nvml.New(nvml.WithLibraryPath(driverRoot.tryResolveLibrary("libnvidia-ml.so.1")),)
调用nvml.New方法基于动态库libnvidia-ml.so.1初始化好一个nvmllib对象,nvml是NVIDIA Management Library的简写,nvmllib对象显然就是对接nvml库的一个对象,而查找libnvidia-ml.so.1动态库则会按顺序在(默认)/driver-root子目录/usr/lib64、/usr/lib/x86_64-linux-gnu、/usr/lib/aarch64-linux-gnu、/lib64、/lib/x86_64-linux-gnu、/lib/aarch64-linux-gnu目录下查找,知道找到第一个符合条件的库文件。
func (r root) tryResolveLibrary(libraryName string) string {if r == "" || r == "/" {return libraryName}librarySearchPaths := []string{"/usr/lib64","/usr/lib/x86_64-linux-gnu","/usr/lib/aarch64-linux-gnu","/lib64","/lib/x86_64-linux-gnu","/lib/aarch64-linux-gnu",}for _, d := range librarySearchPaths {l := r.join(d, libraryName)resolved, err := resolveLink(l)if err != nil {continue}return resolved}return libraryName
}
2.2.2 初始化devicelib对象
调用device.New方法基于nvmllib初始化一个用于设备管理的对象,初始化时WithSkippedDevices初始化好后续会跳过的设备"DGX Display"、“NVIDIA DGX Display”。
// New creates a new instance of the 'device' interface.
func New(nvmllib nvml.Interface, opts ...Option) Interface {d := &devicelib{nvmllib: nvmllib,}for _, opt := range opts {opt(d)}if d.verifySymbols == nil {verify := trued.verifySymbols = &verify}if d.skippedDevices == nil {WithSkippedDevices("DGX Display","NVIDIA DGX Display",)(d)}return d
}
2.2.3 初始化infolib对象
调用nvinfo.New方法基于nvmllib和devicelib初始化一个nvidia设备汇总信息的对象:
// New creates a new instance of the 'info' interface.
func New(opts ...Option) Interface {o := &options{}for _, opt := range opts {opt(o)}if o.logger == nil {o.logger = &nullLogger{}}if o.root == "" {o.root = "/"}if o.nvmllib == nil {o.nvmllib = nvml.New(nvml.WithLibraryPath(o.root.tryResolveLibrary("libnvidia-ml.so.1")),)}if o.devicelib == nil {o.devicelib = device.New(o.nvmllib)}if o.platform == "" {o.platform = PlatformAuto}if o.propertyExtractor == nil {o.propertyExtractor = &propertyExtractor{root:      o.root,nvmllib:   o.nvmllib,devicelib: o.devicelib,}}return &infolib{PlatformResolver: &platformResolver{logger:            o.logger,platform:          o.platform,propertyExtractor: o.propertyExtractor,},PropertyExtractor: o.propertyExtractor,}
}
2.2.4 初始化pluginManager对象并获取plugin列表
先调用NewPluginManager方法得到pluginManager设备管理对象,再调用该对象的GetPlugins方法获取插件列表。先思考这里的plugins指什么呢?这里的plugins其实指的是一组具体管理某种特定类型GPU资源的插件实例,这些实例会根据GPU硬件配置和用户策略动态生成,每个插件负责一种特定资源类型的上报和分配。
常见的GPU“类型”有:
1)基础GPU设备:
// 节点有2块未启用MIG的T4 GPU
plugins = [&NvidiaDevicePlugin{resourceName: "nvidia.com/gpu", devices: [GPU0, GPU1] // 管理所有基础GPU设备}
]
资源类型:nvidia.com/gpu
调度表现:
$ kubectl describe node
Capacity:nvidia.com/gpu: 2
2)启用MIG的A100
// A100 GPU被切分为4个1g.10gb实例
plugins = [&NvidiaDevicePlugin{resourceName: "nvidia.com/mig-1g.10gb",devices: [MIG0, MIG1, MIG2, MIG3]}
]
资源类型:nvidia.com/mig-1g.10gb
调度表现:
$ kubectl describe node
Capacity:nvidia.com/mig-1g.10gb: 4
3)时间切片配置
# values.yaml配置
timeSlicing:resources:- name: nvidia.com/gpureplicas: 4
// 生成虚拟设备
plugins = [&NvidiaDevicePlugin{resourceName: "nvidia.com/gpu",devices: [GPU0-0, GPU0-1, GPU0-2, GPU0-3] // 单卡虚拟为4个设备}
]
资源类型:nvidia.com/gpu(虚拟化后)
调度表现:
$ kubectl describe node
Capacity:nvidia.com/gpu: 4 # 物理卡数*replicas
当一台机器上同时存在基础GPU和MIG设备时:
plugins = [&NvidiaDevicePlugin{ // 管理非MIG设备resourceName: "nvidia.com/gpu",devices: [GPU0]},&NvidiaDevicePlugin{ // 管理MIG切片resourceName: "nvidia.com/mig-2g.20gb",devices: [MIG0, MIG1]}
]
此时k8s-device-plugin将同时上报两种资源:
$ kubectl describe node
Capacity:nvidia.com/gpu: 1nvidia.com/mig-2g.20gb: 2
k8s-device-plugin这么设计的意义:
1)架构灵活性:支持混合部署不同GPU类型
2)资源隔离性:不同插件管理独立资源池
3)策略扩展性:新增策略只需实现新的Plugin生成逻辑
通过这种设计,k8s-device-plugin可以同时支持裸金属GPU、MIG切片、时间切片等多种资源管理模式,而无需修改核心分配逻辑。
再来看看NewPluginManager和pluginManager.GetPlugins的实现。先是NewPluginManager:判断MigStrategy,有三种选项:none、single、mixed。之后用cdi.New方法初始化一个cdiHandler,这里的cdi是Container Device Interface的简写,CDI也是社区设备管理的一个方向。
// NewPluginManager creates an NVML-based plugin manager
func NewPluginManager(infolib info.Interface, nvmllib nvml.Interface, devicelib device.Interface, config *spec.Config) (manager.Interface, error) {var err errorswitch *config.Flags.MigStrategy {case spec.MigStrategyNone:case spec.MigStrategySingle:case spec.MigStrategyMixed:default:return nil, fmt.Errorf("unknown strategy: %v", *config.Flags.MigStrategy)}// TODO: We could consider passing this as an argument since it should already be used to construct nvmllib.driverRoot := root(*config.Flags.Plugin.ContainerDriverRoot)deviceListStrategies, err := spec.NewDeviceListStrategies(*config.Flags.Plugin.DeviceListStrategy)if err != nil {return nil, fmt.Errorf("invalid device list strategy: %v", err)}cdiHandler, err := cdi.New(infolib, nvmllib, devicelib,cdi.WithDeviceListStrategies(deviceListStrategies),cdi.WithDriverRoot(string(driverRoot)),cdi.WithDevRoot(driverRoot.getDevRoot()),cdi.WithTargetDriverRoot(*config.Flags.NvidiaDriverRoot),cdi.WithTargetDevRoot(*config.Flags.NvidiaDevRoot),cdi.WithNvidiaCTKPath(*config.Flags.Plugin.NvidiaCTKPath),cdi.WithDeviceIDStrategy(*config.Flags.Plugin.DeviceIDStrategy),cdi.WithVendor("k8s.device-plugin.nvidia.com"),cdi.WithGdsEnabled(*config.Flags.GDSEnabled),cdi.WithMofedEnabled(*config.Flags.MOFEDEnabled),)if err != nil {return nil, fmt.Errorf("unable to create cdi handler: %v", err)}m, err := manager.New(infolib, nvmllib, devicelib,manager.WithCDIHandler(cdiHandler),manager.WithConfig(config),manager.WithFailOnInitError(*config.Flags.FailOnInitError),manager.WithMigStrategy(*config.Flags.MigStrategy),)if err != nil {return nil, fmt.Errorf("unable to create plugin manager: %v", err)}if err := m.CreateCDISpecFile(); err != nil {return nil, fmt.Errorf("unable to create cdi spec file: %v", err)}return m, nil
}
pluginManager.GetPlugins则是借助nvml对象获取机器上的设备信息:
// GetPlugins returns the plugins associated with the NVML resources available on the node
func (m *nvmlmanager) GetPlugins() ([]plugin.Interface, error) {rms, err := rm.NewNVMLResourceManagers(m.infolib, m.nvmllib, m.devicelib, m.config)if err != nil {return nil, fmt.Errorf("failed to construct NVML resource managers: %v", err)}var plugins []plugin.Interfacefor _, r := range rms {plugin, err := plugin.NewNvidiaDevicePlugin(m.config, r, m.cdiHandler)if err != nil {return nil, fmt.Errorf("failed to create plugin: %w", err)}plugins = append(plugins, plugin)}return plugins, nil
}
2.3 plugin.Start
// k8s-device-plugin/internal/plugin/server.go
func (plugin *NvidiaDevicePlugin) Start() error {...// 启动gRPC服务err := plugin.Serve()...// 向kubelet注册插件err = plugin.Register()...// 启动一个协程对设备go func() {// TODO: add MPS health checkerr := plugin.rm.CheckHealth(plugin.stop, plugin.health)if err != nil {klog.Infof("Failed to start health check: %v; continuing with health checks disabled", err)}}()return nil
}
在plugin.Start函数中主要做了三件事:
1)plugin.Serve启动一个gRPC服务,该服务实现如下方法
// DevicePlugin is the service advertised by Device Plugins
service DevicePlugin {// GetDevicePluginOptions returns options to be communicated with Device// Managerrpc GetDevicePluginOptions(Empty) returns (DevicePluginOptions) {}// ListAndWatch returns a stream of List of Devices// Whenever a Device state change or a Device disappears, ListAndWatch// returns the new listrpc ListAndWatch(Empty) returns (stream ListAndWatchResponse) {}// GetPreferredAllocation returns a preferred set of devices to allocate// from a list of available ones. The resulting preferred allocation is not// guaranteed to be the allocation ultimately performed by the// devicemanager. It is only designed to help the devicemanager make a more// informed allocation decision when possible.rpc GetPreferredAllocation(PreferredAllocationRequest) returns (PreferredAllocationResponse) {}// Allocate is called during container creation so that the Device// Plugin can run device specific operations and instruct Kubelet// of the steps to make the Device available in the containerrpc Allocate(AllocateRequest) returns (AllocateResponse) {}// PreStartContainer is called, if indicated by Device Plugin during registeration phase,// before each container start. Device plugin can run device specific operations// such as resetting the device before making devices available to the containerrpc PreStartContainer(PreStartContainerRequest) returns (PreStartContainerResponse) {}
}
2)plugin.Register向kubelet注册自己
3)plugin.rm.CheckHealth启动一个协程对相关设备做健康检查
2.4 plugin.rm.CheckHealth
当前版本实现了nvml和tegra(always ok)的健康检查,以nvml为例,CheckHealth的实现方式如下,其实就是一个for循环调用nvml对设备进行检查:
// k8s-device-plugin/internal/rm/nvml_manager.go
// CheckHealth performs health checks on a set of devices, writing to the 'unhealthy' channel with any unhealthy devices
func (r *nvmlResourceManager) CheckHealth(stop <-chan interface{}, unhealthy chan<- *Device) error {return r.checkHealth(stop, r.devices, unhealthy)
}// k8s-device-plugin/internal/rm/health.go
func (r *nvmlResourceManager) checkHealth(stop <-chan interface{}, devices Devices, unhealthy chan<- *Device) error {...eventSet, ret := r.nvml.EventSetCreate()...for {select {case <-stop:return nildefault:}e, ret := eventSet.Wait(5000)if ret == nvml.ERROR_TIMEOUT {continue}if ret != nvml.SUCCESS {klog.Infof("Error waiting for event: %v; Marking all devices as unhealthy", ret)for _, d := range devices {unhealthy <- d}continue}if e.EventType != nvml.EventTypeXidCriticalError {klog.Infof("Skipping non-nvmlEventTypeXidCriticalError event: %+v", e)continue}if skippedXids[e.EventData] {klog.Infof("Skipping event %+v", e)continue}klog.Infof("Processing event %+v", e)eventUUID, ret := e.Device.GetUUID()if ret != nvml.SUCCESS {// If we cannot reliably determine the device UUID, we mark all devices as unhealthy.klog.Infof("Failed to determine uuid for event %v: %v; Marking all devices as unhealthy.", e, ret)for _, d := range devices {unhealthy <- d}continue}d, exists := parentToDeviceMap[eventUUID]if !exists {klog.Infof("Ignoring event for unexpected device: %v", eventUUID)continue}if d.IsMigDevice() && e.GpuInstanceId != 0xFFFFFFFF && e.ComputeInstanceId != 0xFFFFFFFF {gi := deviceIDToGiMap[d.ID]ci := deviceIDToCiMap[d.ID]if !(uint32(gi) == e.GpuInstanceId && uint32(ci) == e.ComputeInstanceId) {continue}klog.Infof("Event for mig device %v (gi=%v, ci=%v)", d.ID, gi, ci)}klog.Infof("XidCriticalError: Xid=%d on Device=%s; marking device as unhealthy.", e.EventData, d.ID)unhealthy <- d}
}
2.5 ListAndWatch
ListAndWatch负责向kubelet上报设备健康状态的方法,实现逻辑如下,逻辑比较简单:先调用s.Send通过gRPC长连接向kubelet上报当前插件类型所有设备信息,之后监听plugin.health,而plugin.health来源于前文的健康检查。当从plugin.health收到有设备异常的消息后,会立刻调用s.Send向kubelet上报该信息。
// k8s-device-plugin/internal/plugin/server.go
// ListAndWatch lists devices and update that list according to the health status
func (plugin *NvidiaDevicePlugin) ListAndWatch(e *pluginapi.Empty, s pluginapi.DevicePlugin_ListAndWatchServer) error {if err := s.Send(&pluginapi.ListAndWatchResponse{Devices: plugin.apiDevices()}); err != nil {return err}for {select {case <-plugin.stop:return nilcase d := <-plugin.health:// FIXME: there is no way to recover from the Unhealthy state.d.Health = pluginapi.Unhealthyklog.Infof("'%s' device marked unhealthy: %s", plugin.rm.Resource(), d.ID)if err := s.Send(&pluginapi.ListAndWatchResponse{Devices: plugin.apiDevices()}); err != nil {return nil}}}
}
2.6 Allocate
Allocate作为kubelet创建pod容器时分配设备资源调用的方法,实现逻辑如下:
// k8s-device-plugin/internal/plugin/server.go
// Allocate which return list of devices.
func (plugin *NvidiaDevicePlugin) Allocate(ctx context.Context, reqs *pluginapi.AllocateRequest) (*pluginapi.AllocateResponse, error) {responses := pluginapi.AllocateResponse{}for _, req := range reqs.ContainerRequests {if err := plugin.rm.ValidateRequest(req.DevicesIDs); err != nil {return nil, fmt.Errorf("invalid allocation request for %q: %w", plugin.rm.Resource(), err)}response, err := plugin.getAllocateResponse(req.DevicesIDs)if err != nil {return nil, fmt.Errorf("failed to get allocate response: %v", err)}responses.ContainerResponses = append(responses.ContainerResponses, response)}return &responses, nil
}// k8s-device-plugin/internal/plugin/server.go
func (plugin *NvidiaDevicePlugin) getAllocateResponse(requestIds []string) (*pluginapi.ContainerAllocateResponse, error) {deviceIDs := plugin.deviceIDsFromAnnotatedDeviceIDs(requestIds)// Create an empty response that will be updated as required below.response := &pluginapi.ContainerAllocateResponse{Envs: make(map[string]string),}if plugin.deviceListStrategies.AnyCDIEnabled() {responseID := uuid.New().String()if err := plugin.updateResponseForCDI(response, responseID, deviceIDs...); err != nil {return nil, fmt.Errorf("failed to get allocate response for CDI: %v", err)}}if plugin.config.Sharing.SharingStrategy() == spec.SharingStrategyMPS {plugin.updateResponseForMPS(response)}// The following modifications are only made if at least one non-CDI device// list strategy is selected.if plugin.deviceListStrategies.AllCDIEnabled() {return response, nil}if plugin.deviceListStrategies.Includes(spec.DeviceListStrategyEnvvar) {plugin.updateResponseForDeviceListEnvvar(response, deviceIDs...)}if plugin.deviceListStrategies.Includes(spec.DeviceListStrategyVolumeMounts) {plugin.updateResponseForDeviceMounts(response, deviceIDs...)}if *plugin.config.Flags.Plugin.PassDeviceSpecs {response.Devices = append(response.Devices, plugin.apiDeviceSpecs(*plugin.config.Flags.NvidiaDevRoot, requestIds)...)}if *plugin.config.Flags.GDSEnabled {response.Envs["NVIDIA_GDS"] = "enabled"}if *plugin.config.Flags.MOFEDEnabled {response.Envs["NVIDIA_MOFED"] = "enabled"}return response, nil
}
getAllocateResponse是nvidia k8s-device-plugin的核心函数,它负责根据Pod的GPU资源请求生成容器级别的设备分配响应。其核心作用是将GPU设备的物理资源映射到容器的运行时环境中,确保容器能正确访问分配的GPU。代码逐段解析:
1)设备 ID 转换
deviceIDs := plugin.deviceIDsFromAnnotatedDeviceIDs(requestIds)
作用:将Kubernetes传递的抽象设备请求ID(如GPU-fef8089b)转换为实际的物理设备ID(如0表示第0号GPU)
输入:requestIds来自Kubelet的AllocateRequest
输出:物理设备ID列表(例如 [“0”, “1”])
2)响应体初始化
response := &pluginapi.ContainerAllocateResponse{Envs: make(map[string]string),
}
作用:创建空的响应对象,后续逐步填充环境变量、设备挂载等信息
3)CDI(Container Device Interface)处理
if plugin.deviceListStrategies.AnyCDIEnabled() {responseID := uuid.New().String()plugin.updateResponseForCDI(response, responseID, deviceIDs...)
}
CDI是什么:新一代容器设备接口标准,替代传统的环境变量/Volume挂载方式
关键行为:生成唯一响应ID(用于审计追踪);将设备信息按CDI规范注入响应(生成cdi.k8s.io/<device>=<cdi-device-name>注解);
4)MPS(Multi-Process Service)支持
if plugin.config.Sharing.SharingStrategy() == spec.SharingStrategyMPS {plugin.updateResponseForMPS(response)
}
MPS作用:允许多个进程共享同一GPU的算力
注入内容:设置NVIDIA_MPS_ENABLED=1;挂载MPS控制目录(如/var/run/nvidia/mps)
5)传统设备列表策略处理
// 环境变量模式(默认启用)
if plugin.deviceListStrategies.Includes(spec.DeviceListStrategyEnvvar) {response.Envs["NVIDIA_VISIBLE_DEVICES"] = strings.Join(deviceIDs, ",")
}// Volume 挂载模式(已废弃)
if plugin.deviceListStrategies.Includes(spec.DeviceListStrategyVolumeMounts) {response.Mounts = append(response.Mounts, &pluginapi.Mount{ContainerPath: "/var/run/nvidia-container-devices",HostPath:      plugin.deviceListAsVolumeMounts(deviceIDs),})
}
环境变量模式:设置NVIDIA_VISIBLE_DEVICES=0,1,由nvidia-container-runtime根据该变量挂载设备
Volume挂载模式:旧版本兼容方式,通过文件传递设备列表(现已被CDI取代)
6)设备规格透传
if *plugin.config.Flags.Plugin.PassDeviceSpecs {response.Devices = append(response.Devices, plugin.apiDeviceSpecs(...))
}
作用:将GPU设备文件(如/dev/nvidia0)直接暴露给容器
典型场景:需要直接访问GPU设备文件的特殊应用
7)高级功能标记
// GPU 直接存储(GDS)
if *plugin.config.Flags.GDSEnabled {response.Envs["NVIDIA_GDS"] = "enabled"
}// Mellanox 网络加速(MOFED)
if *plugin.config.Flags.MOFEDEnabled {response.Envs["NVIDIA_MOFED"] = "enabled"
}
GDS:启用GPU直接访问存储的能力(需硬件支持)
MOFED:集成Mellanox网络加速库(用于RDMA场景)
总结起来该函数实现了GPU资源的多维度适配:
- 兼容性:同时支持CDI 新标准和传统环境变量模式
- 灵活性:通过策略开关支持不同共享策略(MPS/Time-Slicing)
- 扩展性:可扩展注入GDS/MOFED等高级功能
- 安全性:通过设备ID转换实现物理资源到逻辑资源的映射隔离
三、部署实践
3.1 环境配置
在安装部署前先介绍下我本地环境:
- 运行环境
windows WSL ubuntu22.04
$ uname -a
Linux DESKTOP-72RD6OV 5.15.167.4-microsoft-standard-WSL2 #1 SMP Tue Nov 5 00:21:55 UTC 2024 x86_64 x86_64 x86_64 GNU/Linux
- k8s信息
$ kubectl version
Client Version: version.Info{Major:"1", Minor:"22", GitVersion:"v1.22.7", GitCommit:"b56e432f2191419647a6a13b9f5867801850f969", GitTreeState:"clean", BuildDate:"2022-02-16T11:50:27Z", GoVersion:"go1.16.14", Compiler:"gc", Platform:"linux/amd64"}
Server Version: version.Info{Major:"1", Minor:"22", GitVersion:"v1.22.7", GitCommit:"b56e432f2191419647a6a13b9f5867801850f969", GitTreeState:"clean", BuildDate:"2022-02-16T11:43:55Z", GoVersion:"go1.16.14", Compiler:"gc", Platform:"linux/amd64"}$ kubectl get node
NAME              STATUS   ROLES                  AGE    VERSION
desktop-72rd6ov   Ready    control-plane,master   333d   v1.22.7$ kubectl get pod -A
NAMESPACE      NAME                                      READY   STATUS    RESTARTS        AGE
kube-flannel   kube-flannel-ds-bpxfq                     1/1     Running   41 (133m ago)   333d
kube-system    coredns-7f6cbbb7b8-lqfrh                  1/1     Running   39 (132m ago)   333d
kube-system    coredns-7f6cbbb7b8-n4snt                  1/1     Running   39 (132m ago)   333d
kube-system    etcd-desktop-72rd6ov                      1/1     Running   41 (133m ago)   333d
kube-system    kube-apiserver-desktop-72rd6ov            1/1     Running   41 (132m ago)   333d
kube-system    kube-controller-manager-desktop-72rd6ov   1/1     Running   40 (133m ago)   333d
kube-system    kube-proxy-rtjfm                          1/1     Running   38 (133m ago)   333d
kube-system    kube-scheduler-desktop-72rd6ov            1/1     Running   42 (132m ago)   333d
- 容器运行时
$ kubectl describe node desktop-72rd6ov | grep 'Container Runtime Version'Container Runtime Version: docker://26.0.0
- GPU设备与cuda
GPU:NVIDIA GeForce RTX4060Ti,16G显存
cuda:12.6
$ nvidia-smi
Sat Mar  8 10:20:00 2025
+-----------------------------------------------------------------------------------------+
| NVIDIA-SMI 560.35.02              Driver Version: 560.94         CUDA Version: 12.6     |
|-----------------------------------------+------------------------+----------------------+
| GPU  Name                 Persistence-M | Bus-Id          Disp.A | Volatile Uncorr. ECC |
| Fan  Temp   Perf          Pwr:Usage/Cap |           Memory-Usage | GPU-Util  Compute M. |
|                                         |                        |               MIG M. |
|=========================================+========================+======================|
|   0  NVIDIA GeForce RTX 4060 Ti     On  |   00000000:01:00.0  On |                  N/A |
|  0%   32C    P8              8W /  165W |     954MiB /  16380MiB |      9%      Default |
|                                         |                        |                  N/A |
+-----------------------------------------+------------------------+----------------------++-----------------------------------------------------------------------------------------+
| Processes:                                                                              |
|  GPU   GI   CI        PID   Type   Process name                              GPU Memory |
|        ID   ID                                                               Usage      |
|=========================================================================================|
|    0   N/A  N/A        33      G   /Xwayland                                   N/A      |
+-----------------------------------------------------------------------------------------+$ nvcc --version
nvcc: NVIDIA (R) Cuda compiler driver
Copyright (c) 2005-2024 NVIDIA Corporation
Built on Tue_Oct_29_23:50:19_PDT_2024
Cuda compilation tools, release 12.6, V12.6.85
Build cuda_12.6.r12.6/compiler.35059454_0
3.2 安装部署
3.2.1 安装nvidia-container-toolkit
nvidia-container-toolkit官网:https://docs.nvidia.com/datacenter/cloud-native/container-toolkit/latest/index.html
官方安装流程:https://docs.nvidia.com/datacenter/cloud-native/container-toolkit/latest/install-guide.html
国内可使用国内镜像源安装,也是本文的安装方法:
- 下载中国科技大学(USTC)镜像gpgkey
curl -fsSL https://mirrors.ustc.edu.cn/libnvidia-container/gpgkey | sudo gpg --dearmor -o /usr/share/keyrings/nvidia-container-toolkit-keyring.gpg
- 配置中国科技大学(USTC)镜像APT源
curl -s -L https://mirrors.ustc.edu.cn/libnvidia-container/stable/deb/nvidia-container-toolkit.list | \sed 's#deb https://nvidia.github.io#deb [signed-by=/usr/share/keyrings/nvidia-container-toolkit-keyring.gpg] https://mirrors.ustc.edu.cn#g' | \sudo tee /etc/apt/sources.list.d/nvidia-container-toolkit.list
- 更新APT包列表
sudo apt-get update
- 安装NVIDIA Container Toolkit
sudo apt-get install -y nvidia-container-toolkit
- 验证安装
$ nvidia-container-cli --version
cli-version: 1.17.4
lib-version: 1.17.4
build date: 2025-01-23T10:53+00:00
build revision: f23e5e55ea27b3680aef363436d4bcf7659e0bfc
build compiler: x86_64-linux-gnu-gcc-7 7.5.0
build platform: x86_64
build flags: -D_GNU_SOURCE -D_FORTIFY_SOURCE=2 -DNDEBUG -std=gnu11 -O2 -g -fdata-sections -ffunction-sections -fplan9-extensions -fstack-protector -fno-strict-aliasing -fvisibility=hidden -Wall -Wextra -Wcast-align -Wpointer-arith -Wmissing-prototypes -Wnonnull -Wwrite-strings -Wlogical-op -Wformat=2 -Wmissing-format-attribute -Winit-self -Wshadow -Wstrict-prototypes -Wunreachable-code -Wconversion -Wsign-conversion -Wno-unknown-warning-option -Wno-format-extra-args -Wno-gnu-alignof-expression -Wl,-zrelro -Wl,-znow -Wl,-zdefs -Wl,--gc-sections// 输入后按tab键
$ nvidia-
nvidia-cdi-hook                nvidia-container-cli           nvidia-container-runtime       nvidia-container-runtime-hook  nvidia-container-toolkit       nvidia-ctk                     nvidia-pcc.exe                 nvidia-smi                     nvidia-smi.exe$ whereis nvidia-container-runtime
nvidia-container-runtime: /usr/bin/nvidia-container-runtime /etc/nvidia-container-runtime
- 修改docker配置
新版本执行以下命令配置/etc/docker/daemon.json使用nvidia的runtime:
$ sudo nvidia-ctk runtime configure --runtime=docker
INFO[0000] Loading config from /etc/docker/daemon.json
INFO[0000] Wrote updated config to /etc/docker/daemon.json
INFO[0000] It is recommended that docker daemon be restarted.$ cat /etc/docker/daemon.json
{"default-runtime": "nvidia", # 注意一定要有这一行"registry-mirrors": ["https://hub-mirror.c.163.com","https://ustc-edu-cn.mirror.aliyuncs.com","https://ghcr.io","https://mirror.baidubce.com"],"runtimes": { # 注意一定要有这一个配置"nvidia": {"args": [],"path": "nvidia-container-runtime"}}
}
- 重启docker
$ sudo systemctl restart docker
$ docker info | grep -i runtimeRuntimes: nvidia runc io.containerd.runc.v2Default Runtime: runc$ docker info | grep -i runtimeRuntimes: io.containerd.runc.v2 nvidia runcDefault Runtime: nvidia
- 验证
$ docker run --rm --gpus all nvcr.io/nvidia/cuda:12.2.0-runtime-ubuntu22.04 nvidia-smi==========
== CUDA ==
==========CUDA Version 12.2.0Container image Copyright (c) 2016-2023, NVIDIA CORPORATION & AFFILIATES. All rights reserved.This container image and its contents are governed by the NVIDIA Deep Learning Container License.
By pulling and using the container, you accept the terms and conditions of this license:
https://developer.nvidia.com/ngc/nvidia-deep-learning-container-licenseA copy of this license is made available in this container at /NGC-DL-CONTAINER-LICENSE for your convenience.Sat Mar  8 06:26:38 2025
+-----------------------------------------------------------------------------------------+
| NVIDIA-SMI 560.35.02              Driver Version: 560.94         CUDA Version: 12.6     |
|-----------------------------------------+------------------------+----------------------+
| GPU  Name                 Persistence-M | Bus-Id          Disp.A | Volatile Uncorr. ECC |
| Fan  Temp   Perf          Pwr:Usage/Cap |           Memory-Usage | GPU-Util  Compute M. |
|                                         |                        |               MIG M. |
|=========================================+========================+======================|
|   0  NVIDIA GeForce RTX 4060 Ti     On  |   00000000:01:00.0  On |                  N/A |
|  0%   34C    P8              8W /  165W |    1162MiB /  16380MiB |      0%      Default |
|                                         |                        |                  N/A |
+-----------------------------------------+------------------------+----------------------++-----------------------------------------------------------------------------------------+
| Processes:                                                                              |
|  GPU   GI   CI        PID   Type   Process name                              GPU Memory |
|        ID   ID                                                               Usage      |
|=========================================================================================|
|    0   N/A  N/A        33      G   /Xwayland                                   N/A      |
+-----------------------------------------------------------------------------------------+
3.2.2 安装nvidia k8s-device-plugin
执行以下命令安装k8s-device-plugin@v0.16.2(官网yaml:https://raw.githubusercontent.com/NVIDIA/k8s-device-plugin/v0.16.2/deployments/static/nvidia-device-plugin.yml):
$ kubectl apply -f - <<EOF
# Copyright (c) 2019, NVIDIA CORPORATION.  All rights reserved.
#
# Licensed under the Apache License, Version 2.0 (the "License");
# you may not use this file except in compliance with the License.
# You may obtain a copy of the License at
#
#     http://www.apache.org/licenses/LICENSE-2.0
#
# Unless required by applicable law or agreed to in writing, software
# distributed under the License is distributed on an "AS IS" BASIS,
# WITHOUT WARRANTIES OR CONDITIONS OF ANY KIND, either express or implied.
# See the License for the specific language governing permissions and
# limitations under the License.apiVersion: apps/v1
kind: DaemonSet
metadata:name: nvidia-device-plugin-daemonsetnamespace: kube-system
spec:selector:matchLabels:name: nvidia-device-plugin-dsupdateStrategy:type: RollingUpdatetemplate:metadata:labels:name: nvidia-device-plugin-dsspec:tolerations:- key: nvidia.com/gpuoperator: Existseffect: NoSchedule- effect: NoSchedule # 由于我只有一个master节点,该节点打了污点,因此需要加上这个容忍,否则无法调度podkey: node-role.kubernetes.io/masteroperator: Exists# Mark this pod as a critical add-on; when enabled, the critical add-on# scheduler reserves resources for critical add-on pods so that they can# be rescheduled after a failure.# See https://kubernetes.io/docs/tasks/administer-cluster/guaranteed-scheduling-critical-addon-pods/priorityClassName: "system-node-critical"containers:- image: nvcr.io/nvidia/k8s-device-plugin:v0.16.2name: nvidia-device-plugin-ctrenv:- name: FAIL_ON_INIT_ERRORvalue: "false"securityContext:allowPrivilegeEscalation: falsecapabilities:drop: ["ALL"]volumeMounts:- name: device-pluginmountPath: /var/lib/kubelet/device-pluginsvolumes:- name: device-pluginhostPath:path: /var/lib/kubelet/device-plugins
EOF
检查daemonset:
$ kubectl -n kube-system get ds nvidia-device-plugin-daemonset
NAME                             DESIRED   CURRENT   READY   UP-TO-DATE   AVAILABLE   NODE SELECTOR   AGE
nvidia-device-plugin-daemonset   1         1         0       1            0           <none>          38m$ kubectl -n kube-system get pod nvidia-device-plugin-daemonset-jl6nc -o wide
NAME                                   READY   STATUS    RESTARTS   AGE   IP            NODE              NOMINATED NODE   READINESS GATES
nvidia-device-plugin-daemonset-jl6nc   1/1     Running   0          78s   10.244.0.80   desktop-72rd6ov   <none>           <none>$ kubectl -n kube-system logs nvidia-device-plugin-daemonset-jl6nc
I0310 11:30:39.696659       1 main.go:199] Starting FS watcher.
I0310 11:30:39.696723       1 main.go:206] Starting OS watcher.
I0310 11:30:39.697075       1 main.go:221] Starting Plugins.
I0310 11:30:39.697092       1 main.go:278] Loading configuration.
I0310 11:30:39.699210       1 main.go:303] Updating config with default resource matching patterns.
I0310 11:30:39.699332       1 main.go:314]
Running with config:
{"version": "v1","flags": {"migStrategy": "none","failOnInitError": false,"mpsRoot": "","nvidiaDriverRoot": "/","nvidiaDevRoot": "/","gdsEnabled": false,"mofedEnabled": false,"useNodeFeatureAPI": null,"deviceDiscoveryStrategy": "auto","plugin": {"passDeviceSpecs": false,"deviceListStrategy": ["envvar"],"deviceIDStrategy": "uuid","cdiAnnotationPrefix": "cdi.k8s.io/","nvidiaCTKPath": "/usr/bin/nvidia-ctk","containerDriverRoot": "/driver-root"}},"resources": {"gpus": [{"pattern": "*","name": "nvidia.com/gpu"}]},"sharing": {"timeSlicing": {}}
}
I0310 11:30:39.699348       1 main.go:317] Retrieving plugins.
I0310 11:30:39.729583       1 server.go:216] Starting GRPC server for 'nvidia.com/gpu'
I0310 11:30:39.729982       1 server.go:147] Starting to serve 'nvidia.com/gpu' on /var/lib/kubelet/device-plugins/nvidia-gpu.sock
I0310 11:30:39.730798       1 server.go:154] Registered device plugin for 'nvidia.com/gpu' with Kubelet
到这里其实就部署成功了,查看节点信息验证一下:
$ kubectl get node
NAME              STATUS   ROLES                  AGE    VERSION
desktop-72rd6ov   Ready    control-plane,master   334d   v1.22.7$ kubectl get node desktop-72rd6ov -oyaml
...
status:...allocatable:cpu: "16"ephemeral-storage: "972991057538"hugepages-1Gi: "0"hugepages-2Mi: "0"memory: 16146768Kinvidia.com/gpu: "1" # 上报上来的GPU数据pods: "110"capacity:cpu: "16"ephemeral-storage: 1055762868Kihugepages-1Gi: "0"hugepages-2Mi: "0"memory: 16249168Kinvidia.com/gpu: "1" # 上报上来的GPU数据pods: "110"
3.3 k8s调度GPU功能验证
准备如下pod:
apiVersion: v1
kind: Pod
metadata:name: gpu-pod
spec:restartPolicy: Nevercontainers:- name: cuda-containerimage: nvcr.io/nvidia/cuda:12.2.0-runtime-ubuntu22.04imagePullPolicy: IfNotPresentcommand: ["nvidia-smi"]resources:limits:nvidia.com/gpu: 1 # requesting 1 GPUsecurityContext:capabilities:add: ["SYS_ADMIN"]tolerations:- key: nvidia.com/gpuoperator: Existseffect: NoSchedule- effect: NoSchedule # 由于我只有一个master节点,该节点打了污点,因此需要加上这个容忍,否则无法调度podkey: node-role.kubernetes.io/masteroperator: Exists
apply该yaml并查看pod日志:
$ kubectl apply -f pod.yaml
pod/gpu-pod created$ kubectl get pod -o wide
NAME      READY   STATUS      RESTARTS   AGE   IP             NODE              NOMINATED NODE   READINESS GATES
gpu-pod   0/1     Completed   0          5s    10.244.0.127   desktop-72rd6ov   <none>           <none>$ kubectl logs gpu-pod
Mon Mar 10 11:35:13 2025
+-----------------------------------------------------------------------------------------+
| NVIDIA-SMI 560.35.02              Driver Version: 560.94         CUDA Version: 12.6     |
|-----------------------------------------+------------------------+----------------------+
| GPU  Name                 Persistence-M | Bus-Id          Disp.A | Volatile Uncorr. ECC |
| Fan  Temp   Perf          Pwr:Usage/Cap |           Memory-Usage | GPU-Util  Compute M. |
|                                         |                        |               MIG M. |
|=========================================+========================+======================|
|   0  NVIDIA GeForce RTX 4060 Ti     On  |   00000000:01:00.0  On |                  N/A |
|  0%   38C    P8              7W /  165W |    1058MiB /  16380MiB |      0%      Default |
|                                         |                        |                  N/A |
+-----------------------------------------+------------------------+----------------------++-----------------------------------------------------------------------------------------+
| Processes:                                                                              |
|  GPU   GI   CI        PID   Type   Process name                              GPU Memory |
|        ID   ID                                                               Usage      |
|=========================================================================================|
|    0   N/A  N/A        33      G   /Xwayland                                   N/A      |
+-----------------------------------------------------------------------------------------+
相关文章:

NVIDIA k8s-device-plugin源码分析与安装部署
在《kubernetes Device Plugin原理与源码分析》一文中,我们从源码层面了解了kubelet侧关于device plugin逻辑的实现逻辑,本文以nvidia管理GPU的开源github项目k8s-device-plugin为例,来看看设备插件侧的实现示例。 一、Kubernetes Device Pl…...

面向联邦学习隐私保护的同态加密库优化算法研究
面向联邦学习隐私保护的同态加密库优化算法研究 一、引言 联邦学习作为一种新兴的分布式机器学习范式,允许各参与方在不共享原始数据的前提下协同训练模型,有效解决了数据孤岛和隐私保护问题。同态加密作为实现联邦学习隐私保护的关键技术之一,能够在密文上直接进行特定运算…...

20250212:linux系统DNS解析卡顿5秒的bug
问题: 1:人脸离线识别记录可以正常上传云端 2:人脸在线识别请求却一直超时 3:客户使用在线网络 思路:...

动态规划 -第1篇
前言:在计算机科学中,动态规划(Dynamic Programming,简称DP)是解决最优化问题的一种重要方法。通过将大问题拆解为小问题,动态规划不仅能够显著降低计算复杂度,还能提高效率。无论是经典的背包问…...

uni-app打包成H5使用相对路径
网上找了一圈,没用,各种试,终于给试出来了,导致打包之后请求的路径没有带上域名 直接去 config.js文件里面的baseUrl路径改成空字符就行了,千万别写/...

【每日学点HarmonyOS Next知识】swiper样式、日期选择、自定义弹窗键盘、文本组件换行、富文本适配
1、HarmonyOS swiper组件样式? 可在样式中设置即可,参考如下demo Entry Component struct SwiperDemo {private swiperController: SwiperController new SwiperController();build() {Column({ space: 5 }) {Swiper(this.swiperController) {Text(0)…...

STM32 I2C驱动开发全解析:从理论到实战 | 零基础入门STM32第五十步
主题内容教学目的/扩展视频I2C总线电路原理,跳线设置,I2C协议分析。驱动程序与调用。熟悉I2C总线协议,熟练调用。 师从洋桃电子,杜洋老师 📑文章目录 引言一、I2C驱动分层架构二、I2C总线驱动代码精析2.1 初始化配置&a…...

Ragflow技术栈分析及二次开发指南
Ragflow是目前团队化部署大模型+RAG的优质方案,不过其仍不适合直接部署使用,本文将从实际使用的角度,对其进行二次开发。 1. Ragflow 存在问题 Ragflow 开源仓库地址:https://github.com/infiniflow/ragflow Ragflow 当前版本: v0.17.0 Ragflow 目前主要存在以下问题: …...

力扣hot100二刷——链表
第二次刷题不在idea写代码,而是直接在leetcode网站上写,“逼”自己掌握常用的函数。 标志掌握程度解释办法⭐Fully 完全掌握看到题目就有思路,编程也很流利⭐⭐Basically 基本掌握需要稍作思考,或者看到提示方法后能解答⭐⭐⭐Sl…...

【Godot4.3】斜抛运动轨迹曲线点求取函数
概述 原文写于去年9月。一篇测试性的文章。 基于初始位置和初始速度的抛物线 # 抛物运动轨迹曲线 - 基于初始位置和初始速度计算 func projectile_motion_curve(start_pos:Vector2, # 物体的起始位置velocity:Vector2, # 初始速度nums:int, …...

SpringBoot基础Kafka示例
这里将生产者和消费者放在一个应用中 使用的Boot3.4.3 引入Kafka依赖 <dependency><groupId>org.springframework.kafka</groupId><artifactId>spring-kafka</artifactId> </dependency>yml配置 spring:application:name: kafka-1#kafka…...

【安卓逆向】安卓病毒介绍及其简单案例分析
目录 引言 一、Android 病毒介绍及分析方法 1.1 Android 病毒预览 1.2 Android 病毒分析必备知识 1.3 Android 病毒的常见类型及恶意行为 1.3.1 常见病毒类型 1.3.2 常见病毒行为 1.4 病毒激活条件 1.5 Android 病毒的传播方式 1.6 Android 病毒分析的一般方法 二…...

Git的命令学习——适用小白版
浅要了解一下Git是什么: Git是目前世界上最先进的的分布式控制系统。Git 和其他版本控制系统的主要差别在于,Git 只关心文件数据的整体是否发生变化,而大多数其他系统则只关心文件内容的具体差异。Git 并不保存这些前后变化的差异数据。实际上…...

Bad owner or permissions on ssh/config - 解决方案
问题 在Windows系统通过ssh连接远程服务器时报错: ssh [ssh_user][ip] Bad owner or permissions on C:\\Users\\[win_user]/.ssh/config原因 这是因为.ssh文件夹或.ssh/config文件的权限异常,当前Windows账号没有读写权限导致的。 Windows系统重装&a…...

AI 赋能软件开发:从工具到思维的全面升级
喜欢可以到主页订阅专栏 引言 在当今技术飞速发展的时代,人工智能(AI)正以前所未有的速度渗透到各个领域,软件开发行业也不例外。AI 不仅改变了开发工具的使用方式,更深刻地影响了开发者的思维模式和工作流程。从代码生成到错误检测,从性能优化到项目管理,AI 正在全面…...

【Ubuntu系统设置固定内网ip,且不影响访问外网 】
Ubuntu系统安装后,由于每次重新开机会被重新分配内网ip,所以我们可以设置固定内网ip,且不影响访问外网,亲测有效 打开【终端】,查看当前内网ip(inet),子网掩码(netmask&a…...

VSCode集成C语言开发环境
下载MinGW https://sourceforge.net/projects/mingw/ 点击download按钮下载exe文件到本地 点击exe文件安装 选择基础包和c编译版 vscode安装部分跳过 安装code runner和c/c插件 **(1) 创建 C 文件** 新建一个测试文件(例如 hello.c)…...

力扣:3305.元音辅音字符串计数
给你一个字符串 word 和一个 非负 整数 k。 返回 word 的 子字符串 中,每个元音字母(a、e、i、o、u)至少 出现一次,并且 恰好 包含 k 个辅音字母的子字符串的总数。 示例 1: 输入:word "aeioqq"…...

vscode接入DeepSeek 免费送2000 万 Tokens 解决DeepSeek无法充值问题
1. 在vscode中安装插件 Cline 2.打开硅基流动官网 3. 注册并登陆,邀请码 WpcqcXMs 4.登录后新建秘钥 5. 在vscode中配置cline (1) API Provider 选择 OpenAI Compatible ; (2) Base URL设置为 https://api.siliconflow.cn](https://api.siliconfl…...

【ELK】ElasticSearch 集群常用管理API操作
目录 常用_cat 概览 集群状态 集群配置 集群磁盘使用 索引信息与配置 shard - 分片 查看段信息 nodes -节点 用户与权限 tasks 和 pending_tasks allocation - 均衡 thread_pool -线程 templete 模版 ILM 生命周期 其他 集群版本: 7.17.6 API地址&…...

BambuStudio学习笔记:MTUtils
# MTUtils.hpp 功能解析## 文件概述 该头文件提供了多线程同步工具和数值生成功能,主要包含以下组件:### 核心组件1. **自旋锁 (SpinMutex)**- 基于原子操作的高性能锁- 实现Lockable概念,可与标准库锁守卫配合使用2. **缓存对象模板 (Cached…...

DeepSeek开启AI办公新模式,WPS/Office集成DeepSeek-R1本地大模型!
从央视到地方媒体,已有多家媒体机构推出AI主播,最近杭州文化广播电视集团的《杭州新闻联播》节目,使用AI主持人进行新闻播报,且做到了0失误率,可见AI正在逐渐取代部分行业和一些重复性的工作,这一现象引发很…...

Ubuntu 22.04 安装配置 FTP服务器 教程
今天搞定在 Ubuntu 22.04 系统上安装和配置 VSFTPD ,还会涉及防火墙设置、SSL/TLS 设置,以及创建专门登录 FTP 服务器的账户。开始! 一、安装 VSFTPD 首先,咱得让系统知道有啥新软件包可以安装。打开终端,输入下面这…...

2021-05-28 C++自己写一个strcmp函数
规则 当s1<s2时,返回为负数-1; 当s1s2时,返回值 0; 当s1>s2时,返回正数1。 即:两个字符串自左向右逐个字符相比(按ASCII值大小相比较),直到出现不同的字符或遇…...
)
版本控制器Git(3)
文章目录 前言一、分支管理策略二、Bug分支管理遇到Bug时的处理方法使用 git stash 暂存工作区内容创建并切换到Bug修复分支恢复之前的工作 三、临时分支的删除总结 前言 我们在上篇讲到了分支,现在我们就着这个继续来讲解! 一、分支管理策略 master分支…...

TDengine 使用教程:从入门到实践
TDengine 是一款专为物联网(IoT)和大数据实时分析设计的时序数据库。它能够高效地处理海量的时序数据,并提供低延迟、高吞吐量的性能表现。在本文中,我们将带领大家从 TDengine 的安装、基本操作到一些高级功能,帮助你…...

Python Web项目的服务器部署
一.部署运行 1.虚拟环境的安装:(一行一行运行) wget https://repo.anaconda.com/miniconda/Miniconda3-latest-Linux-x86_64.sh -O miniconda.sh bash miniconda.sh -b -p /opt/miniconda3 echo export PATH"/opt/miniconda3/bin:$PAT…...

linux - ubuntu 使用时一些小问题整理 --- 持续更新
目录 ubuntu 中 root用户默认不存在解决办法 在Ubuntu系统中,将用户添加到sudoers文件中,使其能够以超级用户权限执行命令,通常可以通过以下几种方法实现: 方法1:将用户添加到sudo组 方法2:直接编辑sud…...

道路运输安全员考试:备考中的心理调适与策略
备考道路运输安全员考试,心理调适同样重要。考试压力往往会影响考生的学习效率和考试发挥。 首先,要正确认识考试压力。适度的压力可以激发学习动力,但过度的压力则会适得其反。当感到压力过大时,要学会自我调节。可以通过运动…...

关于WPS的Excel点击单元格打开别的文档的两种方法的探究【为单元格添加超链接】
问题需求 目录和文件结构如下: E:\Dir_Level1 │ Level1.txt │ └─Dir_Level2│ Level2.txt│ master.xlsx│└─Dir_Level3Level3.txt现在要在master.xlsx点击单元格进而访问Level1.txt、Level2.txt、Level3.txt这些文件。 方法一:“单元格右键…...

深入理解Tomcat:Java Web服务器的安装与配置
大家好!今天我们来聊聊Java Web开发中最重要的工具之一——Apache Tomcat。Tomcat是一个开源的Java Servlet容器和Web服务器,它是运行Java Web应用程序的核心环境。无论是开发、测试还是部署Java Web应用,Tomcat都是不可或缺的工具。本文将详…...
语法制导翻译)
【从零开始学习计算机科学】编译原理(五)语法制导翻译
【从零开始学习计算机科学】编译原理(五)语法制导翻译 语法制导翻译语法制导定义SDDSDD的求值顺序两类重要的SDD语法制导的翻译方案SDTSDT的实现L属性定义的SDT左递归翻译方案语法制导翻译 语法表述的是语言的形式,或者说是语言的样子和结构。而程序设计语言中另一方面,是…...
--如何配置 GitHub 远程仓库及本地 Git 环境)
Git使用(二)--如何配置 GitHub 远程仓库及本地 Git 环境
在日常的开发过程中,使用版本控制工具 Git 是一个非常重要的技能,特别是对于管理和协作开发。通过 GitHub,我们可以轻松地进行代码版本管理和共享。这篇博客将带您一步步学习如何配置 Git 环境并将本地仓库与 GitHub 远程仓库连接起来。 一、…...

【MySQL是怎么运行的】0、名词解释
聚簇索引:聚簇索引和数据在一起,又名主键索引,是主键id构建的一颗B树,非叶节点是主键id,叶子节点是真实数据。其他索引统称二级索引,也称为非聚簇索引。覆盖索引:查找的数据就在索引树上&#x…...
)
网络安全事件响应--应急响应(windows)
应用系统日志 Windows主要有以下三类日志记录系统事件:应用程序日志、系统日志和安全日志。 系统和应用程序日志存储着故障排除信息,对于系统管理员更为有用。安全日志记录着事件审计信息,包括用户验证(登录、远程访问等&#x…...

使用 UNIX 命令在设计中搜索标识符:vcsfind 的入门指南
在现代软件开发和硬件设计中,快速准确地定位和搜索特定标识符是提高开发效率的关键。本文将介绍如何使用 UNIX 命令 vcsfind 在设计中搜索标识符,帮助您更高效地管理您的项目。 什么是 vcsfind? vcsfind 是一个强大的 UNIX 命令行工具&#x…...

Qt不同窗口类的控件信号和槽绑定
做项目的时候我使用了Qt,不同的界面使用了不同的ui的类进行解耦,但是信号和槽绑定的时候可能是不同界面的控件互相进行通讯连接,然而ui指针对于各个界面类是私有成员,无法直接跳过访问,在网上看了一些参考资料…...

【Godot4.2】Vector2向量插值的应用
求线段的等分点 extends Node2Dvar pos:Vector2 var split_num:int var p1 Vector2(200,200) var p2 Vector2(100,100)func _input(event: InputEvent) -> void:if event is InputEventMouseButton:if event.button_index MOUSE_BUTTON_WHEEL_DOWN:split_num clamp(spl…...

Java线程安全
Java线程安全实现方式及原理详解 一、线程安全的核心概念 线程安全指多线程环境下,程序能正确且一致地处理共享资源的状态,不会因线程调度顺序导致数据不一致或逻辑错误。例如多个线程同时修改共享变量时,需通过同步机制确保操作原子性。 二、主要实现方式及原理 synchro…...
)
电机控制常见面试问题(九)
文章目录 一、谈谈电机死区时间1.死区时间过短的后果:2.如何判断死区时间不足?3.解决方案 二、请描述对实时操作系统(RTOS)的理解三.解释FOC算法的原理并比较与其他无刷电机控制算法的优劣四.什么是电机堵转,如何避免电机堵转五.…...

Django与模板
我叫补三补四,很高兴见到大家,欢迎一起学习交流和进步 今天来讲一讲视图 Django与模板文件工作流程 模板引擎:主要参与模板渲染的系统。 内容源:输入的数据流。比较常见的有数据库、XML文件和用户请求这样的网络数据。 模板&am…...

UFW 配置 Ubuntu 防火墙并设置防火墙规则
一、什么是 UFW? UFW,全称为 Uncomplicated Firewall,顾名思义,它是一种简单易用的防火墙管理工具。与传统的防火墙配置工具相比,UFW 以其简洁明了的命令行界面而闻名。虽然它主要为普通用户设计,但它也具…...

在Keil 5中如何建立一个STM32项目
大家在使用Keil时大多都是利用样板项目来建立自己的项目,为了了解基本建立项目的知识写下了本篇文章。 项目建立流程 1.建立项目文件夹并明确其作用 —— 2.下载HAL库 —— 3.拷贝相关文件到对应文件夹 —— 4.打开Keil 5新建项目 —— 5.将项目文件夹添加到项目 …...

Linux 系统负载过高的排查思路
技术探讨:Linux系统负载过高的排查思路 在Linux服务器运行过程中,如果系统负载过高,可能会导致性能下降和服务不稳定。以下是针对Linux系统负载过高问题的排查思路和解决方法: 1. 查看系统负载: 使用uptime或top命令查…...

kotlin高级用法总结
Kotlin 是一门功能强大且灵活的编程语言,除了基础语法外,它还提供了许多高级特性,可以帮助你编写更简洁、高效和可维护的代码。以下是 Kotlin 的一些高级用法,涵盖了协程、扩展函数、属性委托、内联类、反射等内容。 协程&#x…...

Windows Wise Care 365 PRO-中文便携版
Windows Wise Care 365 PRO 链接:https://pan.xunlei.com/s/VOL9UE-i-GLXYr-6KhdyghHOA1?pwdajqe# - 禁止后续强制升级提示弹窗,杜绝后台下载升级文件 - 禁止自动创建开机启动项、任务计划,删除相关选项 - 去右侧无用区域:用户…...

SpringBoot 自动配置原理
自动配置是Spring Boot的关键特性之一,它简化了传统Spring应用繁琐的配置,通过智能推断和条件化配置简化了Spring应用的开发。 1. 自动配置的核心思想 目标:根据项目的依赖(如类路径中的 JAR 包)和已有的配置…...

HTMLCSS绘制三角形
1.代码: <!DOCTYPE html> <html lang"en"><head><meta charset"UTF-8"><meta name"viewport" content"widthdevice-width, initial-scale1.0"><title>01triangle</title><s…...

WorkTool 技术解析:企业微信自动化办公的合规实现方案
引言:企业微信生态中的自动化需求 随着企业微信用户规模突破4亿(据腾讯2023年财报),其开放生态催生了自动化办公的技术需求。传统RPA(机器人流程自动化)工具在PC端已广泛应用,但移动端自动化仍…...

Linux机器之间排查网络连通问题
网络连通性排查步骤(基于五层模型) 以下按照网络五层架构,从底层到高层逐层排查,并分别列出Ubuntu和CentOS对应的命令。 1. 物理层 排查点:网线、网卡状态、物理连接。 命令(通用):…...