vue学习笔记
结合目录,点击阅读
文章目录
- 案例1:第一行vue代码
- App.vue引入Person.vue
- 案例:改变变量的值
- 案例:改变对象属性值
- 案例:toRefs进行解包
- 案例:给名字首字母大写
- 案例:监视变量值的变化
- 案例:监视对象属性值的变化
- 案例:监视reactive对象属性值的变化
- 案例:监视reactive对象定义的某个属性值
- 案例:监视reactive对象定义的多个属性值
- 案例:watchEffect监视ref变量的值
- 案例:defineExpose通信
- 案例:组件通信
- 案例:状态与钩子函数
- 案例:Component声明与使用
- 案例:创建路由器
- 案例:创建子路由
- 案例:路由传参
- 案例:路由props
- 案例:路由重定向
- 案例:store
- 案例:数据修改
- 案例:pina中storeToRefs
- 案例:pinia进行数据改变
- 案例:defineProps
- 案例:shallowRef
- 案例:readOnly与shallowReadOnly
- 案例:markRaw与toRaw
- 案例:customRef
- 案例:telePort
- 案例:fallback
- app相关的操作
- 案例:作用域插槽
- 案例:组件通信1
- 案例:组件通信2-customEvent
- 案例:组件通信3-mitt
- 案例:组件通信4
- 案例:组件通信5
- 案例:组件通信6
- 案例:组件通信7
- 案例:组件通信8
案例1:第一行vue代码
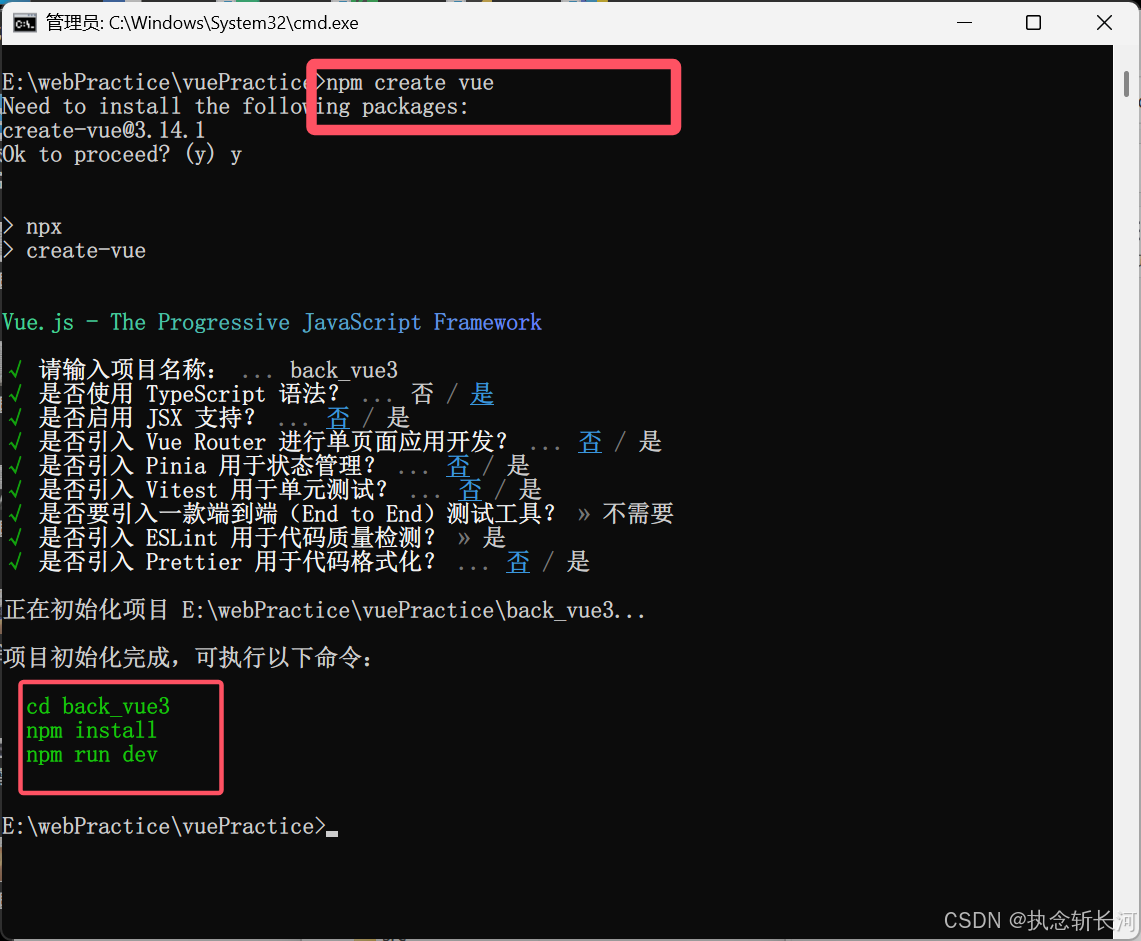
App.vue引入Person.vue
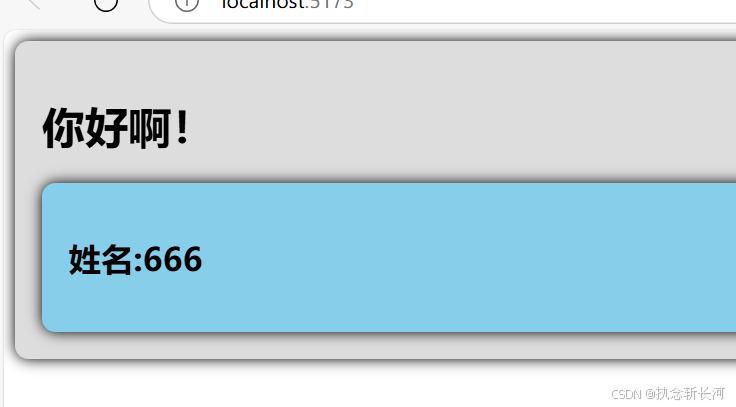
<template><div class="app"><h1>你好啊!</h1><Person/></div>
</template><script lang="ts">
import Person from './Person.vue'export default {name: 'App',components: {Person}
}
</script>
Person.vue
<template><div class="person"><h2>姓名:{{a}}</h2></div></template><script lang="ts" setup name="Person5467">let a = 666
</script><style scoped>.person {background-color: skyblue;box-shadow: 0 0 10px;border-radius: 10px;padding: 20px;}
</style>
案例:改变变量的值
const age = ref(18)age.value = 21
案例:改变对象属性值
html遍历游戏列表
<ul><li v-for="g in games" :key="g.id">{{g.name}}</li>
</ul>
let car = reactive({brand:'奔驰',price:100})let games = reactive([{id:'001',name:'王者荣耀'},{id:'002',name:'原神'},{id:'003',name:'三国志'}])
function changePrice() {car.price += 10console.log(car.price)
}
function changeFirstGame() {games[0].name = "三国志123"
}
案例:toRefs进行解包
let person = reactive({name:'张三',age:18})//toRef与toRefs都是将响应式对象进行解包let {name,age} = toRefs(person)
案例:给名字首字母大写
全名: <span>{{ fullname }}</span><br> <button @click="changeFullName">将全名改</button>
ts代码
let fullname = computed({get() {return firstname.value.slice(0,1).toUpperCase() + firstname.value.slice(1) + "-" + lastname.value},set(val) {const[str1,str2] = val.split('-')firstname.value = str1lastname.value = str2}})
案例:监视变量值的变化
let sum = ref(0)
function changeSum() {sum.value += 1
}watch(sum,(newValue,oldValue)=>{console.log('sum变化了',newValue,oldValue)
})
案例:监视对象属性值的变化
let person = ref({name:'张三',age:18})
watch(person,(newValue,oldValue)=>{console.log('person变化了',newValue,oldValue)
},{deep:true})
案例:监视reactive对象属性值的变化
let person = reactive({name:'张三',age:18
})
let obj = reactive({a :{b:{c:555}}
})
watch(person,(newValue,oldValue)=>{console.log('person变化了',newValue,oldValue)
})
watch(obj,(newValue,oldValue)=>{console.log('Obj变化了',newValue,oldValue)
})
案例:监视reactive对象定义的某个属性值
let person = reactive({name:'张三',age:31,model:'汽车',car:{c1:'奔驰',c2:'宝马'}
})
watch(()=>person.name,(newValue,oldValue)=>{console.log(newValue,oldValue)
})
案例:监视reactive对象定义的多个属性值
let person = reactive({name:'张三',age:31,model:'汽车',car:{c1:'奔驰',c2:'宝马'}
})
watch(()=>person.name,(newValue,oldValue)=>{console.log(newValue,oldValue)
})
watch([()=>person.name,()=>person.car.c1],(newValue,oldValue)=>{console.log('person变化了',oldValue,newValue)
},{deep:true})
案例:watchEffect监视ref变量的值
let tempature = ref(0)
let height = ref(10)
watchEffect(()=>{if(tempature.value > 20 || height.value > 30 ){console.log("aa")}
})
案例:defineExpose通信
<Person ref="ren"/>
<script lang="ts" setup name="App">import {ref} from 'vue'//ts或者jsimport Person from './components/Person.vue'let title2 = ref()let ren = ref()function showLog(){console.log(ren.value)}
</script>
<script lang="ts" setup name="Person5467">import {ref,defineExpose} from 'vue'let title2 = ref()let a = ref(0)let b = ref(0)let c = ref(0)function showLog() {console.log("Person.Log")}defineExpose({a,b,c})</script>
案例:组件通信
<script lang="ts" setup name="App">
import {reactive} from 'vue'
//ts或者js
let x = 4
import {type Persons} from '@/types'
import Person from './components/Person.vue'
let personList = reactive<Persons>([{id:'001',name:'张三',age:13},{id:'002',name:'李四',age:20},{id:'003',name:'王五',age:22},
])</script>
<script lang="ts" setup name="Person5467">
import type { Persons } from '@/types';
import { defineProps,withDefaults } from 'vue';
//   接收list
//   defineProps(['list'])
//接收list+限制类型
// defineProps<{list:Persons}>()
//接收list+限制类型+限制必要性+指定默认值
withDefaults(defineProps<{list?:Persons}>(),{list:()=>[{id:'1',name:'张三',age:12}]
})
</script>
案例:状态与钩子函数
<script lang="ts" setup name="Person5467">
import { onBeforeMount, onBeforeUnmount, onBeforeUpdate, onMounted, onUnmounted, onUpdated, ref } from 'vue';let sum = ref(0)function add(){sum.value += 1}//挂载前onBeforeMount(()=>{console.log('挂载前')})//挂载后onMounted(()=>{console.log("已挂载")})//更新前onBeforeUpdate(()=>{console.log("更新前")})//更新完毕onUpdated(()=>{console.log("更新完毕")})//卸载前onBeforeUnmount(()=>{console.log("卸载前")})//卸载完毕onUnmounted(()=>{console.log("卸载完毕")})
</script>
案例:Component声明与使用
ts文件
import { ref } from "vue"export default function (){let sum =ref(0)function add(){sum.value += 1}return {sum,add}
}
vue文件组件加载
<template><Person/>
</template><script lang="ts">import Person from "./components/Person.vue"export default {name:'App',components:{Person} //注册组件}
</script>
vue文件:ts文件加载
<script lang="ts" setup name="Person5467">import useDog from '@/hooks/useDog'import useSum from '@/hooks/useSum'const {sum,add} = useSum()const {dogList,getDog} = useDog()
</script>
案例:创建路由器
import {createRouter, createWebHistory} from 'vue-router'
import Home from '@/pages/Home.vue'
import News from '@/pages/News.vue'
import About from '@/pages/About.vue'
//第二部:创建路由器
const router = createRouter({history:createWebHistory(),routes:[{path:'/home',component:Home},{path:'/about',component:About},{path:'/news',component:News},]
})
export default router
<template><div class="app"><h2 class="title">Vue路由测试</h2><div class="navigate"><RouterLink  to="/home" active-class="active">首页</RouterLink><RouterLink to="/news" active-class="active">新闻</RouterLink><RouterLink  :to="{path:'/about'}" active-class="active">关于</RouterLink></div><div class="main-content"><RouterView></RouterView></div></div>
</template>
案例:创建子路由
import {createRouter, createWebHistory} from 'vue-router'import Home from '@/pages/Home.vue'
import News from '@/pages/News.vue'
import About from '@/pages/About.vue'
import Detail from '@/pages/Detail.vue'
//第二部:创建路由器
const router = createRouter({history:createWebHistory(),routes:[{path:'/home',component:Home},{path:'/about',component:About},{path:'/news',component:News,children:[{path:'detail',component:Detail}]},]
})
export default router
案例:路由传参
<RouterLink
:to = "{name:'detail',params:{id:news.id,title:news.title,content:news.content,}
}">{{ news.title }}</RouterLink>
案例:路由props
<script setup lang="ts" name="News">
import { useRoute } from 'vue-router';defineProps(['id','title','content'])
</script>
案例:路由重定向
const router = createRouter({history:createWebHistory(),routes:[{path:'/home',component:Home},{path:'/about',component:About},{path:'/news',component:News,children:[{name:'detail',path:'detail/:id/:title/:content',component:Detail,//第一种写法,将路由收到的所有params参数作为props传给路由组件props:true,//第二种写法:可以自己决定讲什么作为参数// props(to) {//     console.log(to.query.id,to.query.title,to.query.content)//     return to.query// },}]},{path:'/',redirect:'/home'}]
})
案例:store
ts文件
import { defineStore } from "pinia"export const useCountStore = defineStore('count',{state() {return {sum:6}}
})
<script setup lang="ts" name="Count">
import { ref } from 'vue';
import { useCountStore } from '@/store/count'
const countStore = useCountStore()
//reactive 里面包含ref,就不需要拆包value
console.log('@@@',countStore.sum)let n = ref(1)function add() {}function minus() {}
</script>
案例:数据修改
<script setup lang="ts" name="Count">
import { ref } from 'vue';
import { useCountStore } from '@/store/count'
const countStore = useCountStore()
//reactive 里面包含ref,就不需要拆包value
console.log('@@@',countStore.sum)let n = ref(1)function add() {// countStore.sum += 1//第二种改变方式// countStore.$patch({//     sum:888,//     school:'尚硅谷',//     address:'北京'// })//第三宗countStore.increment(n.value)}
</script>
import { defineStore } from "pinia"export const useCountStore = defineStore('count',{actions:{increment(value: number){console.log("increment被调用了",value)this.sum += value}},state() {return {sum:6,school:'atguigu',address:'hong'}}
})
案例:pina中storeToRefs
<script setup lang="ts" name="Count">
import { ref } from 'vue';
import { useCountStore } from '@/store/count'
import { storeToRefs } from 'pinia';
const countStore = useCountStore()
//reactive 里面包含ref,就不需要拆包value
console.log('@@@',countStore.sum)
let n = ref(1)
const {school,address,sum} = storeToRefs(countStore)
function add() {countStore.increment(n.value)
}</script>
import { defineStore } from "pinia"
export const useCountStore = defineStore('count',{actions:{increment(value: number){console.log("increment被调用了",value)this.sum += value}},state() {return {sum:6,school:'atguigu',address:'hong'}}
})
案例:pinia进行数据改变
import { defineStore } from "pinia"export const useCountStore = defineStore('count',{actions:{increment(value: number){console.log("increment被调用了",value)this.sum += value}},state() {return {sum:6,school:'atguigu',address:'hong'}},getters:{bigSum:state =>state.sum * 10,upperSchool():string{return this.school.toUpperCase()}}})
案例:defineProps
Father.vue
<template><div class="father"><h3>父组件</h3><h4>父亲的玩具:{{ car }}</h4><h4>儿子的玩具:{{ toy }}</h4><Child :car="car" :sendToy="getToy"/></div>
</template><script setup lang="ts" name="Father">import Child from './Child.vue'import {ref} from 'vue'let car = ref('帕拉梅拉')let toy = ref('')function getToy(v:string){toy.value = v}
</script>
<style scoped>.father {background-color: rgb(165,164,164);padding: 20px;border-radius: 10px;}
</style>
Child.vue
<template><div class="child"><h3>子组件</h3><h4>儿子的玩具:{{   toy }}</h4><h4>父亲的玩具:{{ car }}</h4><button @click="sendToy(toy)">玩具给父亲</button></div>
</template><script setup lang="ts" name="Child">import {ref} from 'vue'let toy = ref('奥特玛')defineProps(['car','sendToy'])function send() {}
</script><style scoped>.child {background-color: skyblue;padding:10px;box-shadow: 0 0 10px black;border-radius: 10px;}
</style>
案例:shallowRef
<template><div class="app"><h3>求和为:{{ sum }}</h3><h3>名字为:{{ person.name }}</h3><h3>年龄为:{{ person.age }}</h3><h3>车子为{{car}}</h3><button @click="changeSum">sum+1</button><button @click="changeName">修改名字</button><button @click="changeAge">修改年龄</button><button @click="changePerson">修改整个人</button><span>|</span><button @click="changeBrand">修改品牌</button><button @click="changeColor">修改品牌</button><button @click="changeEngine">修改品牌</button></div></template><script lang="ts" setup name="App">import {reactive, ref, shallowReactive, shallowRef} from 'vue'//shallowRef只关心浅层次,也就是第一层**.value//实战中更关心整体替换,下面是一串官方的话//通过使用shallowRef()和shallowReactive()来绕开深度相应,//浅层式api创建的状态只在其顶层是响应式的,对所有深层的对象不会做任何处理//避开了对每一个内部属性做响应式所带来的性能成本,这使得//属性的访问变得更快,可提升性能let sum = shallowRef(0)let person = shallowRef({name:'张三',age:18})let car = shallowReactive({brand:'帕拉梅拉',options:{engine:'v8',color:'purple'}})function changeSum(){sum.value += 1}function changeName(){person.value.name += '李四'}function changeAge(){person.value.age += 1}function changePerson(){person.value.age += 3person.value.name += '王五'}function changeBrand(){car.brand = "法拉利"}function changeColor(){car.options.color = "blue"}function changeEngine(){car.options.engine = "v12"}
</script><style scoped>.app{background-color: #ddd;border-radius: 10px;box-shadow: 0 0 10px;padding: 10px;}
</style>
案例:readOnly与shallowReadOnly
<template><div class="app"><h3>当前sum1为:{{ sum1 }}</h3><h3>当前sum2为:{{ sum2 }}</h3><h3>当前车为{{car1}}</h3><h3>当前车为{{car2}}</h3><button @click="changeSum1">点我sum1+1</button><button @click="changeSum2">点我sum2+1</button><button @click="changeBrand">修改品牌</button><button @click="changeColor">修改颜色</button><button @click="changePrice">修改价格</button></div></template><script lang="ts" setup name="App">import {ref,readonly,reactive, shallowReadonly} from 'vue';let sum1 = ref(0)let sum2 = readonly(sum1) //深只读副本let car1 = reactive({brand:'奔驰',options:{color:'红色',price:100}})let car2 = shallowReadonly(car1) //只用于对象的顶层属性function changeSum1(){sum1.value += 1}function changeSum2() {sum2.value += 1}function changeBrand() {car2.brand = '帕拉梅拉'}function changeColor() {car2.options.color = 'purple'   }function changePrice() {car2.options.price = 200}
</script><style scoped>.app{background-color: #ddd;border-radius: 10px;box-shadow: 0 0 10px;padding: 10px;}
</style>
案例:markRaw与toRaw
<template>
<!-- toRaw:用于获取一个响应式对象的原始对象, -->
<!-- toRaw返回的对象不再是响应式的,不会触发视图更新 -->
<!-- markRow:标记一个对象,使其永远不会变成响应式的 -->
<h2>姓名:{{ person2.name }}</h2>
<h2>年龄:{{ person2.age }}</h2>
<h2>一个车子{{ car2 }}</h2>
<button @click="person2.age += 1">修改年龄</button>
<button @click="changePerson(person2)">修改整个人</button>
<button @click="car2.price += 10">修改车的价格</button>
</template><script lang="ts" setup name="App">import {markRaw, reactive,toRaw} from 'vue'let person2 = reactive({name:'tony',age:17})let rawPerson = toRaw(person2)function changePerson(p){p.age +=1 p.name = 'tom'}let car = markRaw({brand:'帕拉梅拉',price:100})let car2 = reactive(car)</script><style scoped>.app{background-color: #ddd;border-radius: 10px;box-shadow: 0 0 10px;padding: 10px;}
</style>
案例:customRef
自定义ref useMsg.ts
import { customRef } from 'vue';export default function(initValue:string,delay:number){let timer:numberlet msg = customRef((track,trigger)=>{return {get() {track()return initValue},set(value){clearTimeout(timer)timer = setTimeout(()=>{console.log('set',value)initValue = valuetrigger()},delay)}}})return {msg}
}
.vue
<template><h3>我想要的:{{ msg }}</h3><input type="text" v-model="msg"></template><script lang="ts" setup name="App">
import useMsg from './useMsg';let {msg} = useMsg('你好',2000)</script><style scoped>.app{background-color: #ddd;border-radius: 10px;box-shadow: 0 0 10px;padding: 10px;}
</style>
案例:telePort
Modal.vue
<template><button @click="isShow=true">暂时弹窗</button><div class="modal" v-show="isShow"><h2>我是标题</h2><p>我是内容</p><button>我是弹窗</button></div><!-- 创建一个自定义的ref,并对其依赖项追踪和更新触发进行逻辑控制 -->
</template><script lang="ts" setup name="Modal">
import { ref } from 'vue';let isShow = ref(false)</script><style scoped>.modal{width: 200px;height: 150px;background-color: skyblue;border-radius: 10px;box-shadow: 0 0 10px;padding: 5px;text-align: center;position: fixed;left:50%;top:20px;margin-left: -100px;}
</style>
App.vue
<template><div class="outer"><h2>我是app组件</h2><img src="./tmp.png" alt=""><br><Modal /></div></template><script lang="ts" setup name="App">import Modal from './Modal.vue'
</script><style scoped>
.outer {background-color: #ddd;border-radius: 10px;padding: 5px;box-shadow: 0 0 10px;
}
img {width: 400px;filter: saturate(280%);
}
</style>
案例:fallback
<template><div class="app"><h2>我是app组件</h2><Suspense><template v-slot:default><Child/></template><template v-slot:fallback><h2>加载中....</h2></template></Suspense></div></template><script lang="ts" setup name="App">import Child from './Child.vue'import { Suspense } from 'vue';
</script><style scoped>.app {background-color: #add;border-radius: 10px;padding: 10px;box-shadow: 0 0 10px;}
</style>
<template><div class="child"><img :src="message"></div></template><script lang="ts" setup name="Child">import {ref} from 'vue'import axios from 'axios';let sum = ref(0)let {data:{message}} = await axios.get('https://dog.ceo/api/breed/pembroke/images/random')console.log(message)
</script><style scoped>.child {background-color: #bce;border-radius: 10px;padding: 10px;box-shadow: 0 0 10px;}
</style>
app相关的操作
main.ts
import {createApp} from 'vue'
import App from './App.vue'
import Hello from './Hello.vue'const app = createApp(App)app.component('Hello',Hello)
app.config.globalProperties.x = 99
declare module 'vue' {interface ComponentCustomProperties {x:number}
}
app.directive('beauty',(element,{value})=>{element.innerText += valueelement.style.color = 'green'element.style.backgroundColor = 'yellow'
})
app.mount('#app')
// setTimeout(()=>{
//     app.unmount()
// },2000)
App.vue
<template><div class="app"><h2>我是app组件</h2><Hello/><Child/></div></template><script lang="ts" setup name="App">import Child from './Child.vue'</script><style scoped>.app {background-color: #add;border-radius: 10px;padding: 10px;box-shadow: 0 0 10px;}
</style>
Child.vue
<template><div class="child"><h2>我是child组件</h2><h3 >当前求和为:{{ sum }}</h3><h3 v-beauty="sum">差值</h3><Hello/></div></template><script lang="ts" setup name="Child">import {ref} from 'vue'let sum  = ref(3)
</script><style scoped>.child {background-color: #bce;border-radius: 10px;padding: 10px;box-shadow: 0 0 10px;}
</style>
案例:作用域插槽
Father.vue
<template><div class="father"><h3>父组件</h3><div class="content"><Game><template v-slot:games="params"><ul><li v-for="g in params.games" :key="g.id">{{ g.name }}</li></ul></template></Game><Game v-slot:games="{games}"><ol><li v-for="g in games" :key="g.id">{{ g.name }}</li></ol></Game><Game v-slot:games="params"><h3 v-for="g in params.games" :key="g.id">{{ g.name }}</h3></Game></div></div>
</template><script setup lang="ts" name="Category">
import Game from './Game.vue';</script><style scoped>
.father {background-color: rgb(165, 164, 164);padding: 10px;border-radius: 10px;
}.content {display: flex;justify-content: space-evenly;
}img,
video {width: 100%;
}
</style>
Child.vue
<template><div class="game"><h2>游戏列表</h2><slot name ="games" :games="games"></slot></div>
</template><script setup lang="ts" name="Game">import {reactive } from 'vue';let games = reactive([{id:'001',name:'英雄联盟'},{id:'002',name:'王者农药'},{id:'003',name:'红色警戒'},{id:'004',name:'斗罗大陆'},])
</script><style scoped>
.game {width: 200px;height: 300px;background-color: skyblue;border-radius: 10px;box-shadow: 0 0 10px;
}
h2 {background-color: orange;text-align: center;font-size: 14px;font-weight: 800;}
</style>
案例:组件通信1
Father.vue
<template><div class="father"><h3>父组件</h3><h4>父亲的玩具:{{ car }}</h4><h4>儿子的玩具:{{ toy }}</h4><Child :car="car" :sendToy="getToy"/></div>
</template><script setup lang="ts" name="Father">import Child from './Child.vue'import {ref} from 'vue'let car = ref('帕拉梅拉')let toy = ref('')function getToy(v:string){toy.value = v}
</script>
<style scoped>.father {background-color: rgb(165,164,164);padding: 20px;border-radius: 10px;}
</style>
Child.vue
<template><div class="child"><h3>子组件</h3><h4>儿子的玩具:{{   toy }}</h4><h4>父亲的玩具:{{ car }}</h4><button @click="sendToy(toy)">玩具给父亲</button></div>
</template><script setup lang="ts" name="Child">import {ref} from 'vue'let toy = ref('奥特玛')defineProps(['car','sendToy'])function send() {}
</script><style scoped>.child {background-color: skyblue;padding:10px;box-shadow: 0 0 10px black;border-radius: 10px;}
</style>
案例:组件通信2-customEvent
<template><div class="father"><h3>父组件</h3><h4 v-show="toy">子给的玩具:{{ toy }}</h4><!-- //  <button @click="test()">点我</button> --><Child @send-toy="saveToy"/></div>
</template><script setup lang="ts" name="Father">import Child from './Child.vue'import {ref} from 'vue'let toy = ref('')function saveToy(val:string) {console.log('saveToy',val)toy.value = val}
</script><style scoped >.father {background-color: rgb(165,164,164);padding: 20px;border-radius: 10px;}.father button {margin-right: 5px;}
</style>
<template><div class="child"><h3>子组件</h3><h4>玩具:{{ toy }}</h4><button @click="emit('send-toy',toy)">测试</button></div>
</template><script setup lang="ts" name="Child">
import { ref } from 'vue';let toy = ref('奥特玛')
const emit = defineEmits(['send-toy'])
</script><style scoped>.child {background-color: rgb(76,209,76);padding: 10px;margin-top: 10px;box-shadow: 0 0 10px black;border-radius: 10px;}
</style>
案例:组件通信3-mitt
<template><div class="father"><h3>父组件</h3><Child1 /><Child2 />
</div>
</template><script setup lang="ts" name="Father">import Child2 from './Child2.vue';import Child1 from './Child1.vue';
</script><style scoped>.father{background-color: yellow;padding: 20px;border-radius: 10px;}
</style>
<template><div class="child1"><h3>子组件1</h3><h4>玩具:{{ toy }}</h4><button @click="emitter.emit('send-toy',toy)">玩具给弟弟</button></div>
</template><script setup lang="ts" name="Child1">import {ref} from 'vue'import emitter from '@/utils/emitter';let toy = ref('奥特曼')
</script><style scoped>.child1 {margin-top: 50px;background-color: skyblue;padding: 10px;box-shadow: 0 0 10px black;border-radius: 10px;}.child1 button {margin-right: 10px;}
</style>
<template><div class="child2"><h3>子组件2</h3><h4>电脑::{{ computer }}</h4><h4>玩具:{{ toy }}</h4></div>
</template><script setup lang="ts" name="Child2">
import { onUnmounted, ref } from 'vue';let computer = ref('联想')
let toy = ref('')
//数据
import emitter from '@/utils/emitter';
emitter.on('send-toy', (val: any) => {console.log('Received value:', val);  // 确认 val 的值toy.value = val;  // 更新 toy 的值
});
onUnmounted(()=>{emitter.off('send-toy')
})
</script>
<style scoped>
.child2 {margin-top: 50px;background-color: rgb(133, 112, 218);padding: 10px;box-shadow: 0 0 10px black;border-radius: 10px;
}.child1 button {margin-right: 10px;}
</style>
案例:组件通信4
<template><div class="father"><h3>父组件</h3><!---v-model 用在html标签上--><!-- <input type="text" v-model="username"> --><!--<input type="text" :value="username" @input="username"=(<HTMLInputElement>$event.target).value--><!-- <AtHome :modelValue="username" @update:modelValue="username = $event"/>--><AtHome v-model:name="username" v-model:pwd="password"/><!-- <AtHome v-model="username" /> --></div>
</template><script setup lang="ts" name="Father">
import { ref } from "vue"
import AtHome from "./AtHome.vue";
let username = ref('zhangsan')
let password = ref('123456')
</script><style scoped>
.father {padding: 20px;background-color: rgb(165, 164, 164);border-radius: 10px;
}
</style>
<template><input type="text":value="name"@input="emit('update:name',(<HTMLInputElement>$event.target).value)"><input type="text":value="pwd"@input="emit('update:pwd',(<HTMLInputElement>$event.target).value)">
</template><script setup lang="ts" name="AtHome">defineProps(['name','pwd'])const emit = defineEmits(['update:name','update:pwd'])
</script><style scoped>
input {border:2px solid black;background-image: linear-gradient(45deg,red,yellow,green);height:30px;font-size:20px;color: white;
}
</style>
案例:组件通信5
<template><div class="grand-child"><h3>孙组件</h3><h4>{{ a }}</h4><h4>{{ b }}</h4><h4>{{ c }}</h4><h4>{{ d }}</h4><button @click="updateA(1)">点我更新爷爷</button></div>
</template><script setup lang="ts" name="GrandChild">
defineProps(['a','b','c','d','updateA'])
</script><style scoped>.grand-child {background-color: orange;padding:20px;margin-top: 20px;border-radius: 10px;box-shadow: 0 0 10px black;}
</style>
<template><div class="father"><h3>父组件</h3><h4>a:{{ a }}</h4><h4>b:{{ b }}</h4><h4>c:{{ c }}</h4><h4>d:{{ d }}</h4><Child :a="a" :b="b" :c="c" :d="d" :updateA="updateA"/></div>
</template><script setup lang="ts" name="Father">import Child from "./Child.vue"import {ref} from 'vue'let a = ref(1)let b = ref(2)let c = ref(3)let d = ref(4)function updateA(val:number) {a.value += val}
</script><style scoped>.father {background-color: rgb(165,164,164);padding:20px;border-radius: 10px;}
</style>
<template><div class="child"><h3>子组件</h3><GrandChild v-bind="$attrs"/></div>
</template><script setup lang="ts" name="Child">import GrandChild from "./GrandChild.vue"
</script><style scoped>.child {background-color: skyblue;padding:20px;margin-top: 20px;border-radius: 10px;box-shadow: 0 0 10px black;}
</style>
案例:组件通信6
<template>
<div class="father"><h3>父组件</h3><h4>房产:{{ house }}</h4><button @click="changeToy">修改child1玩具</button><Child1 ref="c1"/><button @click="changeToy2">修改child2玩具</button><button @click="getAllChild($refs)">获取所有子组件实例对象</button><Child2 ref="c2"/>
</div>
</template>
<script setup lang="ts" name="Father">import Child1 from './Child1.vue'import Child2 from './Child2.vue'import { ref } from 'vue'let house = ref(4)let c1 = ref()function changeToy(){console.log(c1.value)c1.value.toy = "杰瑞"}let c2 = ref()function changeToy2(){c2.value.computer = "华硕"}function getAllChild(obj:any){for (let key in obj){obj[key].book +=3}}defineExpose({house})
</script><style scoped >.father {background-color: rgb(165,164,164);padding:20px;border-radius: 10px;}
</style>
<template><div class="child1"><h3>子组件1</h3><h4>儿子1的玩具:{{ toy }}</h4><h4>儿子1的书籍:{{ book }}本</h4><button @click="minusHouse($parent)">干掉父亲的一套房产</button></div>
</template>
<script setup lang="ts" name="Child2">
import { ref } from 'vue';let toy = ref('汤姆')
let book = ref(3)
defineExpose({toy,book})
function minusHouse(parent:any) {parent.house -= 1
}
</script><style scoped>
.child1 {margin-top: 20px;padding: 20px;background-color: skyblue;border-radius: 10px;box-shadow: 0 0 10px black;
}
</style>
<template><div class="child2"><h3>子组件2</h3><h4>儿子2的玩具:{{ computer }}</h4><h4>儿子2的书籍:{{ book }}本</h4></div></template><script setup lang="ts" name="Child2">import { ref } from 'vue';let computer = ref('联想')
let book = ref(6)
defineExpose({computer,book})</script><style scoped >.child2 {margin-top: 20px;padding:20px;background-color: orange;border-radius: 10px;box-shadow: 0 0 10px black;}</style>
案例:组件通信7
<template><div class="father"><h3>父组件</h3><h4>银子:{{ money }}</h4><h4>车子: 一辆{{ car.brand }}车,价值{{ car.price }}万元</h4><Child/></div></template><script setup lang="ts" name="Father">import Child from './Child.vue'import {ref,reactive, provide} from 'vue'let money = ref(100)let car = reactive({brand:'奔驰',price:100,})function updateMoney(val:number){money.value -= val}provide('moneyContext',{money,updateMoney})provide('che',car)
</script><style scoped>.father {background-color: rgb(165,164,164);padding:20px;border-radius: 10px;}
</style>
<template><div class="child"><h3>子组件</h3><GrandChild/></div></template><script setup lang="ts" name="Child">import GrandChild from './GrandChild.vue'
</script><style scoped>.father {margin-top: 20px;background-color: skyblue;padding:20px;border-radius: 10px;box-shadow: 0 0 10px black;}
</style>
<template><div class="grand-child"><h3>我是孙组件</h3><h4>钱:{{ money }}</h4><button @click="updateMoney(6)">花爷爷的钱</button></div>
</template><script setup lang="ts" name="GrandChild">
import { inject } from 'vue';let {money,updateMoney} = inject('moneyContext',{money:0,updateMoney:(parma:number)=>{}})
let car = inject('car',{brand:'未知',price:0})
</script><style scoped>
.grand-child{background-color: orange;padding:20px;border-radius: 10px;box-shadow: 0 0 10px black;
}
</style>
案例:组件通信8
<template><div class="father"><h3>父组件</h3><div class="content"><Category ><template v-slot:s2><ul><li v-for="g in games" :key="g.id">{{g.name}}</li></ul></template><template v-slot:s1><h2>热门游戏列表</h2></template></Category><Category ><template v-slot:s2><img src="./tmp.png" alt="111"></template><template v-slot:s1><h2>今日美食城市</h2></template></Category><Category ><template #s1><h2>今日影视推荐</h2></template><template #s2><video src="./1.mp4" alt="222" controls></video></template></Category></div></div>
</template><script setup lang="ts" name="Category">
import { reactive,ref } from 'vue';
import Category from './Category.vue';
let games = reactive([{id:'001',name:'英雄联盟'},{id:'002',name:'王者农药'},{id:'003',name:'红色警戒'},{id:'004',name:'斗罗大陆'},
])
let imgUrl = ref('@/09_slot/tmp.png')
let mp4Url = ref('./1.mp4')</script><style scoped>/* .category {background-color: rgb(165,164,164);padding:10px;border-radius: 10px;} */.content {display: flex;justify-content: space-evenly;}img,video {width: 100% ;}h2 {background-color: orange;text-align: center;font-size: 14px;font-weight: 800;}
</style>
<template><div class="category"><h2>{{ title }}</h2><slot name="s1">默认内</slot><slot name="s2">默认内</slot></div>
</template><script setup lang="ts" name="Category">
defineProps(['title'])
</script><style scoped>.category {background-color: skyblue;border-radius: 10px;box-shadow: 0 0 10px;padding:10px;width:200px;height:300px;}h2 {background-color: orange;text-align: center;font-size: 14px;font-weight: 800;}
</style>
相关文章:

vue学习笔记
结合目录,点击阅读 文章目录 案例1:第一行vue代码App.vue引入Person.vue案例:改变变量的值案例:改变对象属性值案例:toRefs进行解包案例:给名字首字母大写案例:监视变量值的变化案例࿱…...

前端构建工具——Webpack和Vite的主要区别
目录 1. 设计理念2. 性能表现3. 使用场景4. 配置复杂度5. 生态系统6. 性能对比总结7. 选择建议 1. 设计理念 Webpack 设计理念:Webpack是一个通用的模块打包工具,它将项目中的各种资源(如JavaScript、CSS、图片等)视为模块&…...

Letsencrypt+certbot为域名免费配置ssl
1、基础概念 Let’s Encrypt 是一个提供免费 SSL/TLS 证书的认证机构,它的目标是让互联网上的通信更加安全,特别是普及 HTTPS。通过 Let’s Encrypt 提供的证书,网站可以使用加密连接,保护用户的数据传输。 Certbot 是一个由电子…...

达梦数据库针对慢SQL,收集统计信息清除执行计划缓存
前言:若遇到以下场景,大概率是SQL走错了执行计划: 1、一条SQL在页面上查询特别慢,但拿到数据库终端执行特别快 2、一条SQL在某种检索条件下查询特别慢,但拿到数据库终端执行特别快 此时,可以尝试按照下述步…...

IDEA通过Contince接入Deepseek
Deepseek 的出色表现,上期【Deepseek得两种访问方式与本地部署】 安装Continue插件 第一步、下载插件 在编辑栏【File】->设置【Settiings】或快捷键【CtrlAltS】,弹窗的左侧导航树,选择【plugins】,在marketplace 搜索【Continue】,点…...

Windows 10 ARM工控主板CAN总线实时性能测试
在常规的Windows系统中支持CAN总线应用,需要外接CAN总线适配器,通常为USB转CAN模块或PCI接口CAN卡。实时性本身是CAN总线的显著特性之一,但由于Windows并非实时操作系统,应用程序容易受到系统CPU负载影响,导致调度周期…...

深入理解无锁队列与C++原子操作
文章目录 深入理解无锁队列与C原子操作引言原子操作基础什么是原子操作?内存顺序(Memory Order) 无锁队列实现环形缓冲区队列(单生产者/单消费者)链表式无锁队列(多生产者/多消费者) 关键问题与…...

OpenGL: QOpenGLShaderProgram
一、QOpenGLShaderProgram 编译过程的封装 1、bool addShaderFromSourceCode(QGLShader::ShaderType type, const char * source); 2、bool addShaderFromSourceFile(QGLShader::ShaderType type, const QString & fileName); 3、virtual bool link(); 4、bool bind(); 5、…...

【网络编程】之数据链路层
【网络编程】之数据链路层 数据链路层基本介绍基本功能常见协议 以太网什么是以太网以太网协议帧格式数据链路层的以太网帧报文如何封装/解封装以及分用以太网通信原理传统的以太网与集线器现代以太网与交换机碰撞域的概念 Mac地址基本概念为什么要使用Mac地址而不是使用IP地址…...

HTTP 和 TCP/IP-傻傻分不清
HTTP 和 TCP/IP 是计算机网络中不同层次的协议,它们的核心区别在于功能和所属的网络层次。以下是详细对比: 1. 所属网络层次 TCP/IP 定位:TCP/IP 是一个协议族(包含多个协议),涵盖网络通信的传输层和网络层…...

【SQL】SQL约束
🎄约束 📢作用:是用于限制存储再表中的数据。可以再创建表/修改表时添加约束。 📢目的:保证数据库中数据的正确、有效性和完整性。 📢对于一个字段可以同时添加多个约束。 🎄常用约束: 约束分类 约束 描述关键字非…...
测试用例CAPL代码全解析⑧】)
【ISO 14229-1:2023 UDS诊断(ECU复位0x11服务)测试用例CAPL代码全解析⑧】
ISO 14229-1:2023 UDS诊断【ECU复位0x11服务】_TestCase08 作者:车端域控测试工程师 更新日期:2025年02月17日 关键词:UDS诊断协议、ECU复位服务、0x11服务、ISO 14229-1:2023 TC11-008测试用例 用例ID测试场景验证要点参考条款预期结果TC…...

解决vue-awesome-swiper 4.x + swiper 5.x 分页pagination配置不生效问题
这次给的需求需要实现几个轮播图,我打算用swiper来做。刚开始我参照同事之前实现的swiper,复制到我的新页面中,是可用的。但是这次的需求需要有底下的分页pagination,而且因为版本比较老,比较难找到配置项。这里说一下…...

Spring Boot 开发入门
文章来源:开发您的第一个 Spring Boot 应用程序 (Developing Your First Spring Boot Application) _ Spring Boot3.4.0中文文档(官方文档中文翻译)|Spring 教程 —— CADN开发者文档中心 本节介绍如何开发一个小型的 “Hello World!” Web 应用程序&…...
)
MATLAB算法实战应用案例精讲-【数模应用】空间插值(附MATLAB、R语言和python代码实现)
目录 前言 算法原理 什么是插值? 为什么要插值? 常见插值方法 插值方法选择 GIS中常用的空间分析方法 一、空间插值 二、缓冲区分析 三、空间统计 四、领域分析 五、网络分析 六、多标准决策 插值分析 插值应用示例 空间插值的类型 不同工具箱中的空间插值工…...

碰一碰发视频@技术原理与实现开发步骤
碰一碰发视频系统:技术原理与实现方案解析 引言 近年来,随着移动支付和近场通信技术(NFC)的普及,“碰一碰”功能逐渐成为商家与用户交互的新入口。通过“碰一碰加盟”模式,企业可以快速赋能线下商户&…...

14.学成在线开发小结
1.统计两张表的数据,表1和表2是一对多的关系,如果既要统计表1又要统计表2的数据,要分开进行统计,否则表1一条数据在表2中可能有多条数据对应,导致表1的数据被多次统计。 2.nacos配置文件的数据读取不到可能原因有&…...

图像处理之CSC
CSC 是 Color Space Conversion(色彩空间转换)的缩写,它涉及图像处理中的亮度、饱和度、对比度和色度等参数的调整。这些参数是图像处理中的核心概念,通常用于描述和操作图像的颜色信息。 以下是亮度、饱和度、对比度和色度与 CS…...
及其实现)
数据结构:顺序表(Sequence List)及其实现
什么是顺序表? 顺序表是一种最简单的数据结构,它就像一排连续的小房子,每个房子里都住着一个数据元素。这些房子是按顺序排列的,每个房子都有一个门牌号(下标),我们可以通过门牌号快速找到对应…...

微信云开发小程序音频播放踩坑记录 - 从熄屏播放到iOS静音
在开发小程序冥想功能时,我们遇到了几个棘手的问题:用户反馈手机熄屏后音频停止、iOS设备播放没声音、冥想音频没有访问计数和CDN缓存优化等。本文将分享这些问题的解决过程和实践经验。 微信小程序简称:Moodo 微信小程序全程:AIMoodo心情日记系统 简…...

Python基础
https://www.w3schools.com/https://docs.python.org/3/ Python 介绍 Python是跨平台的,它可以运行在Windows、Mac和各种Linux/Unix系统上。在Windows上写Python程序,放到Linux上也是能够运行的。 要开始学习Python编程,首先就得把Python安装…...

基于Go语言 XTA AI聊天界面实现
项目开源地址: XTA-AI-SDK 人工智能技术的迅速发展,AI聊天应用变得越来越流行。本文将介绍如何使用Go语言和LCL库( Lazarus Component Library)创建一个功能丰富的AI聊天界面。项目主要包含以下模块: 项目背景 本项目旨在为开发…...

线上项目报错OOM常见原因、排查方式、解决方案
概述 OutOfMemoryError(OOM)是 Java 应用程序中常见的问题,通常是由于应用程序占用的内存超过了 JVM 分配的最大内存限制。在 Spring Boot 项目中,OOM 问题可能由多种原因引起。 1. OOM 的常见原因 OOM 通常由以下几种情况引起&…...
:多模态大模型实战——让AI看懂世界)
AI大模型零基础学习(6):多模态大模型实战——让AI看懂世界
从“文字交互”到“全感官认知”的维度突破 一、多模态大模型:AI的“五感觉醒” 1.1 基础概念重塑 单模态局限:传统大模型仅处理文本(如ChatGPT) 多模态进化: 输入:支持文本、图像、音频、视频、3D模型 …...
)
基于Spring Boot+Vue的宠物服务管理系统(源码+文档)
项目简介 宠物服务管理系统实现了以下功能: 基于Spring BootVue的宠物服务管理系统的主要使用者分为用户管理模块,由于系统运行在互联网络中,一些游客或者病毒恶意进行注册,产生大量的垃圾用户信息,管理员可以对这些…...
)
简要分析LeetCode树经典题目(Java)
目录 开场白 实战环节 准备工作 遍历问题 LeetCode144. 二叉树的前序遍历 方法一 方法二 LeetCode94. 二叉树的中序遍历 LeetCode145. 二叉树的后序遍历 方法一 方法二 LeetCode102. 二叉树的层序遍历 LeetCode103. 二叉树的锯齿形层序遍历 LeetCode107. 二叉树的…...

vue3开发打年兽功能
1.效果 WeChat_20250217192041 2.代码 2.1 index.vue <template><div class"pages"><TopNavigationYleftTitle"打年兽"ruleIconColor"#fff"backgroundImage""svgIpcn"backIcon4"gradientBackgroundColor&q…...

动手学Agent——Day2
文章目录 一、用 Llama-index 创建 Agent1. 测试模型2. 自定义一个接口类3. 使用 ReActAgent & FunctionTool 构建 Agent 二、数据库对话 Agent1. SQLite 数据库1.1 创建数据库 & 连接1.2 创建、插入、查询、更新、删除数据1.3 关闭连接建立数据库 2. ollama3. 配置对话…...

如何在 GitHub 中创建一个空目录 ?
GitHub 是开发人员必不可少的工具,它提供了存储、共享和协作代码的平台。一个常见的问题是如何在 GitHub 存储库中创建一个空目录或文件夹。GitHub 不支持直接创建空目录。但是,有一种解决方法是使用一个虚拟文件,通常是一个 .gitkeep 文件。…...

3. 导入官方dashboard
官方dashboard:https://grafana.com/grafana/dashboards 1. 点击仪表板 - 新建 - 导入 注:有网络的情况想可以使用ID,无网络情况下使用仪表板josn文件 2. 在官方dashboard网页上选择符合你现在数据源的dashboard - 点击进入 3. 下拉网页选…...

前端知识速记--HTML篇:HTML5的新特性
前端知识速记–HTML篇:HTML5的新特性 一、语义化标签 HTML5引入了许多新的语义化标签,如 <header>、<footer>、<article>、<section> 等。这些标签不仅提高了网页的可读性和结构性,还有助于SEO(搜索引擎…...
)
【数据分享】1929-2024年全球站点的逐年降雪深度数据(Shp\Excel\免费获取)
气象数据是在各项研究中都经常使用的数据,气象指标包括气温、风速、降水、能见度等指标,说到气象数据,最详细的气象数据是具体到气象监测站点的数据! 有关气象指标的监测站点数据,之前我们分享过1929-2024年全球气象站…...

鸿蒙面试题
1.0penHarmony的系统架构是怎样的? 2.电话服务的框架? 3.OpenHarmony与HarmonyOS有啥区别?...
)
pdf-extract-kit paddle paddleocr pdf2markdown.py(效果不佳)
GitHub - opendatalab/PDF-Extract-Kit: A Comprehensive Toolkit for High-Quality PDF Content Extraction https://github.com/opendatalab/PDF-Extract-Kit pdf2markdown.py 运行遇到的问题: 错误: -------------------------------------- C Tra…...
驱动程序设计)
基于STM32、HAL库、RX8025T(I2C接口)驱动程序设计
一、简介: RX8025T 是一款低功耗、高精度的实时时钟芯片,具有以下特性: I2C 接口通信 内置 32.768 kHz 晶振 提供秒、分、时、日、月、年等时间信息 支持温度补偿,提高时间精度 低功耗设计,适合电池供电的应用 二、I2C初始化: #include "stm32l4xx_hal.h&…...

基于Ubuntu+vLLM+NVIDIA T4高效部署DeepSeek大模型实战指南
一、 前言:拥抱vLLM与T4显卡的强强联合 在探索人工智能的道路上,如何高效地部署和运行大型语言模型(LLMs)一直是一个核心挑战。尤其是当我们面对资源有限的环境时,这个问题变得更加突出。原始的DeepSeek-R1-32B模型虽…...

【Go语言快速上手】第二部分:Go语言进阶之并发编程
文章目录 一、并发编程1. goroutine:创建和调度 goroutine2. channel:无缓冲 channel、有缓冲 channel、select 语句2.1 无缓冲 channel2.2 有缓冲 channel2.3 select 语句 3. sync 包:Mutex、RWMutex、WaitGroup 等同步原语3.1 Mutex&#x…...

《机器学习数学基础》补充资料:四元数、点积和叉积
《机器学习数学基础》第1章1.4节介绍了内积、点积的有关概念,特别辨析了内积空间、欧几里得空间;第4章4.1.1节介绍了叉积的有关概念;4.1.2节介绍了张量积(也称外积)的概念。 以上这些内容,在不同资料中&…...

蓝桥杯篇---IAP15F2K61S2矩阵键盘
文章目录 前言简介矩阵键盘的工作原理1.行扫描2.检测列状态3.按键识别 硬件连接1.行线2.列线 矩阵键盘使用步骤1.初始化IO口2.扫描键盘3.消抖处理4.按键识别 示例代码:4x4矩阵键盘扫描示例代码:优化后的矩阵键盘扫描注意事项1.消抖处理2.扫描频率3.IO口配…...
通过小型语言模型尽可能简单地解释 Transformer
介绍 在过去的几年里,我阅读了无数关于 Transformer 网络的文章,观看了许多视频。其中大部分都非常好,但我很难理解 Transformer 架构,而其背后的主要直觉(上下文敏感嵌入)则更容易掌握。在做演讲时&#…...

GcExcel
GcExcel 简述:GcExcel Java 是一款基于 Java 平台,支持批量创建、编辑、打印、导入/导出Excel文件的服务端表格组件,能够高性能处理和高度兼容 Excel。功能特性(图1)文档查询(图2)...

封装红黑树实现map和set
" 喜欢了你十年,却用整个四月,编织了一个不爱你的谎言。 " 目录 1 源码及其框架分析 2 模拟实现map和set 2.1 实现出复用红黑树的框架 2.2 支持iterator迭代器的实现 2.2.1 代码实现和--这两个运算符 2.3 map支持[ ] Hello,大家…...

Redis进阶使用
在日常工作中,使用Redis有什么需要注意的? 设置合适的过期时间。尽量避免大key问题,避免用字符串存储过大的数据;避免集合的数据量太大,要定期清除。 常用的数据结构有哪些?用在什么地方? 按…...

【ISO 14229-1:2023 UDS诊断全量测试用例清单系列:第四节】
ISO 14229-1:2023 UDS诊断服务测试用例全解析(Read DTC Information0x19服务) 作者:车端域控测试工程师 更新日期:2025年2月13日 关键词:UDS诊断协议、0x19服务、DTC信息读取、ISO 14229-1:2023、ECU测试 一、服务功能…...

使用Node.js进行串口通信
目录 一、 安装 serialport 库二.、实现方法1.打开串口并配置参数2. 向串口传递信息3. 接收串口信息4. 处理错误5. 关闭串口6. 使用解析器7. 获取串口列表 三、 完整示例代码 一、 安装 serialport 库 首先,需要安装 serialport 库。可以通过 npm 安装:…...

vue3+elementplus新建项目
更新node.js和npm node.js官网更新指南 可以根据自己的操作系统进行选择 我的电脑操作系统是mac os所以我的步骤如下 # Download and install nvm: curl -o- https://raw.githubusercontent.com/nvm-sh/nvm/v0.40.1/install.sh | bash# in lieu of restarting the shell \. &…...

【网络安全 | 漏洞挖掘】跨子域账户合并导致的账户劫持与删除
未经许可,不得转载。 文章目录 概述正文漏洞成因概述 在对目标系统进行安全测试时,发现其运行着两个独立的域名——一个用于司机用户,一个用于开发者/企业用户。表面上看,这两个域名各自独立管理账户,但测试表明它们在处理电子邮件变更时存在严重的逻辑漏洞。该漏洞允许攻…...

VLSM基础知识
VLSM(Variable Length Subnet Mask,变长子网掩码)是一种更灵活的子网划分技术,允许在同一网络中使用不同长度的子网掩码,以满足不同子网对主机数量的需求,最大化IP地址利用率。 一、基础概念 传统子网划分…...
(~_~|))
小小小病毒(3)(~_~|)
一分耕耘一分收获 声明: 仅供损害电脑,不得用于非法。损坏电脑,作者一律不负责。此作为作者原创,转载请经过同意。 欢迎来到小小小病毒(3) 感谢大家的支持 还是那句话:上代码! …...

WebRTC与EasyRTC:开启智能硬件音视频通讯的全新旅程
在当今数字化时代,音视频通讯技术正以前所未有的速度革新着我们的生活与工作方式。WebRTC与EasyRTC作为这一领域的佼佼者,正携手为智能硬件的音视频通讯注入强大动力,开启全新的篇章。 一、WebRTC与智能硬件融合的崭新趋势 WebRTC技术&…...