Android Native 函数 Hook 技术介绍
版权归作者所有,如有转发,请注明文章出处:https://cyrus-studio.github.io/blog/
前言
Android Native 函数 Hook 技术是一种在应用运行时拦截或替换系统或自身函数行为的手段,常见实现包括 PLT Hook、Inline Hook。
PLT Hook 和 Inline Hook 是两种不同层次和机制的函数 Hook 技术,常用于逆向工程、安全分析、壳保护或热修复等场景。
PLT hook 和 Inline hook 有什么区别?
| 特性 | PLT Hook(符号级) | Inline Hook(指令级) |
|---|---|---|
| Hook 层级 | 链接层(.plt 或 GOT) | 指令层(函数入口指令) |
| Hook 对象 | 动态库导出的函数 | 任意函数(不一定导出) |
| 修改内容 | 修改函数地址指针 | 修改指令流(如跳转指令) |
| Hook 粒度 | 通常是库间调用 | 可以精确到任意函数、库内调用 |
| 稳定性 | 较高 | 稍差(依赖指令结构、架构) |
| 跨平台兼容性 | 更好 | 架构相关(ARM32/ARM64) |
PLT Hook 原理(也叫 GOT Hook)
ELF 中动态链接时使用 PLT(Procedure Linkage Table) 和 GOT(Global Offset Table);
程序调用外部函数(如 malloc、fopen)时,实际上是跳到 GOT 表中的地址;
可以通过修改 GOT 表,将目标函数地址替换为你自己的函数。
✅优点:
-
修改一次,全局生效(所有调用者都被 hook)
-
不需要写复杂汇编指令
❌ 缺点:
-
只能 Hook 动态链接函数(如 libc.so 中的函数)
-
无法 Hook 静态链接或内部函数调用
Inline Hook 原理
直接修改目标函数的前几条机器指令(通常是函数入口),替换成跳转指令(如 b <new_func> 或 ldr pc, [addr]);
原函数内容被破坏,因此会备份原始指令并在新函数中支持“回调原函数”(trampoline)。
✅ 优点:
-
可以 Hook 几乎任意函数(导出或非导出、静态或动态)
-
精细控制,适合保护/加壳/代码注入等底层用途
❌ 缺点:
-
对 CPU 架构高度依赖(ARM64、ARMv7)
-
对汇编、内存保护、缓存等有要求(必须关闭写保护)
-
稳定性较低,不当使用可能 crash
举个例子
假设目标函数是 malloc(),我们希望 Hook 它:
PLT Hook 方式:
-
找到 .got 中 malloc 的地址
-
改成我们自己的函数地址
void* my_malloc(size_t size) {printf("Intercepted malloc(%zu)\n", size);return real_malloc(size); // 调用原函数
}
Inline Hook 方式:
-
找到 malloc 函数地址,直接改入口 4~8 字节为跳转指令
-
替换后的入口可能变成:
b my_malloc ; ARM
App 中函数 Hook 是否会影响其他应用?
是否互相影响,取决于 Hook 的层级 和 Hook 方式,以下是详细分析:
关键点:Android 的进程隔离机制
在 Android 中,每个 App 通常运行在自己独立的进程(除非使用 android:sharedUserId 和特定签名),所以:
-
Java 层 Hook(如 Xposed):是 per-process(每个进程生效),不同 App 之间互不影响
-
Native 层 Hook(如 inline/PLT):也通常在当前进程生效
-
系统全局 Hook(如内核级 syscall hook):才可能影响所有进程,包括其他 App
示例分析
情况 1:两个 App 分别使用 inline hook hook 自己的 libc.so 的 open()
✅ 各自 Hook 的是自己进程中的 open
❌ 不会互相影响
情况 2:你 Hook 了 system_server 的某个系统服务(如 ActivityManager)
✅ 如果你有权限(如 Riru、Zygisk 模块),就能影响整个系统服务,其他 App 可能间接受影响
情况 3:你在内核或 system-wide 层 hook 了 syscall(比如使用 LKM hook read())
❗ 会影响整个系统,包括所有 App
🧨 风险大,容易被检测或引发稳定性问题
ShadowHook
ShadowHook 是一个 Android inline hook 库,它支持 thumb、arm32 和 arm64。
ShadowHook 现在被用于 TikTok,抖音,今日头条,西瓜视频,飞书中。
开源地址:https://github.com/bytedance/android-inline-hook
文档:https://github.com/bytedance/android-inline-hook/blob/main/README.zh-CN.md
ShadowHook 手册:https://github.com/bytedance/android-inline-hook/blob/main/doc/manual.zh-CN.md
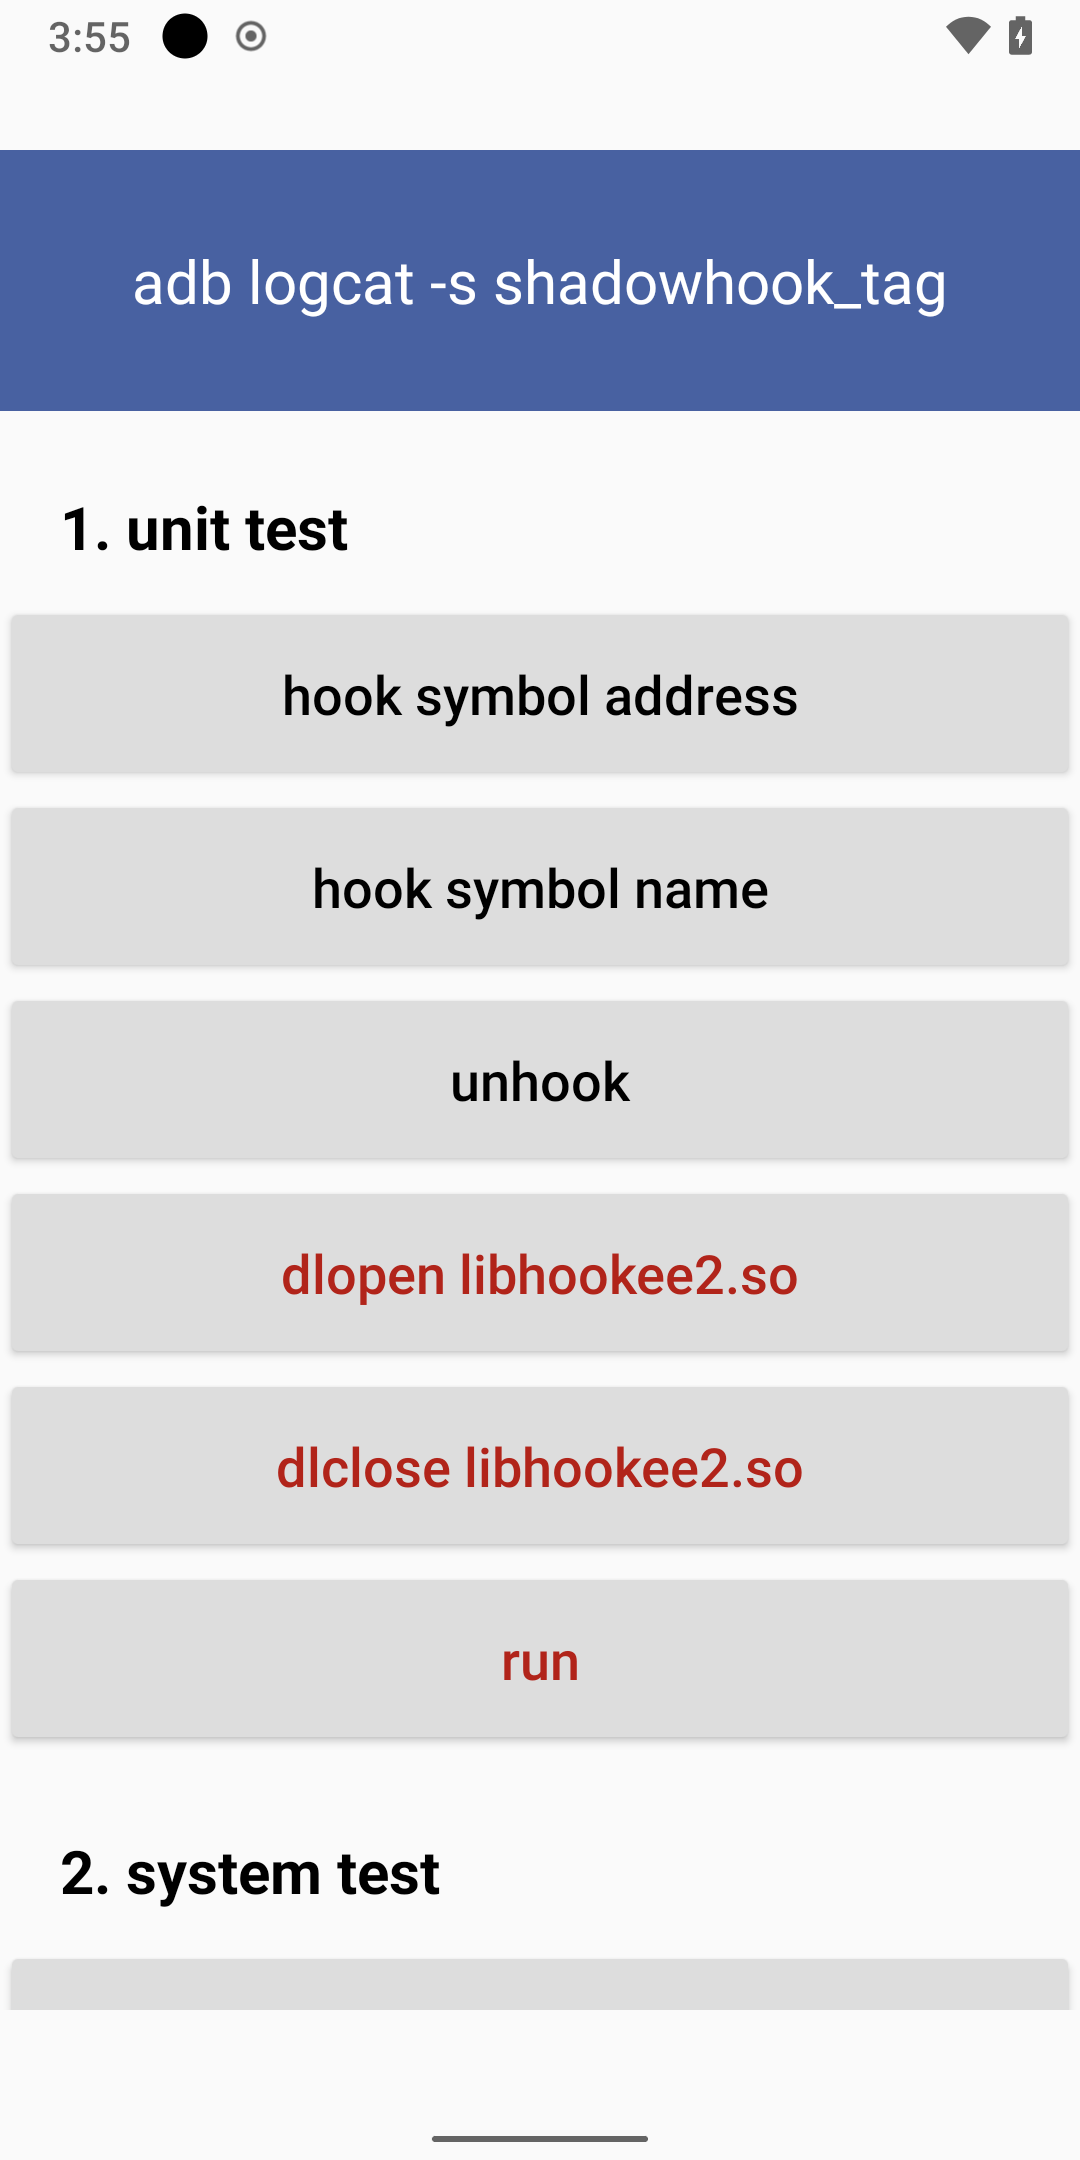
运行 ShadowHook
首先把 ShadowHook 源码 clone 到本地并导入到 Android Studio。
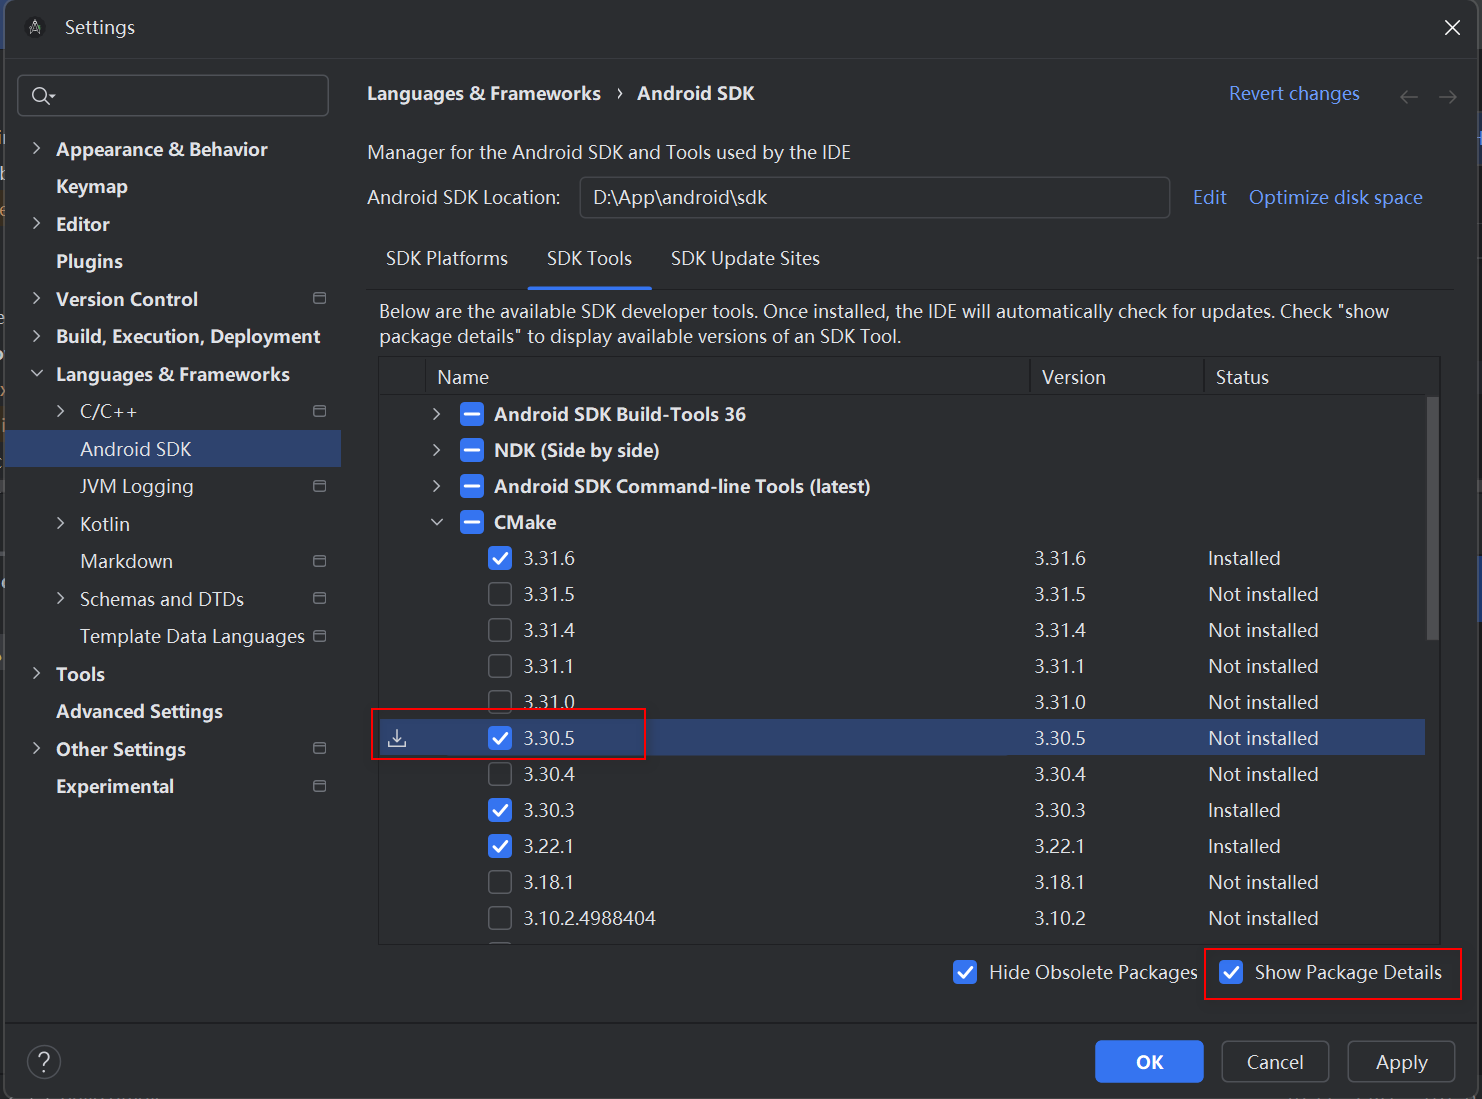
点击运行,提示找不到 CMake ‘3.30.5’
[CXX1300] CMake '3.30.5' was not found in SDK, PATH, or by cmake.dir property.
Affected Modules: app, shadowhook, systest
打开 Android SDK 配置
-
点击右下角 Show Package Details。
-
找到并勾选 CMake 3.30.5。
-
点击 Apply → 自动下载并安装。
也可以用命令行工具安装:
cd D:\App\android\sdk\cmdline-tools\latest\bin./sdkmanager "cmake;3.30.5"Warning: Observed package id 'system-images;android-34;lineage;arm64-v8a' in inconsistent location 'D:\App\android\sdk\system-images\android-34\google_apis_playstore\arm64-v8a' (Expected 'D:\App\android\sdk\system-images\android-34\lineage\arm64-v8a')
Warning: Observed package id 'system-images;android-34;lineage;x86_64' in inconsistent location 'D:\App\android\sdk\system-images\android-34\google_apis_playstore\x86_64' (Expected 'D:\App\android\sdk\system-images\android-34\lineage\x86_64')
Warning: Observed package id 'system-images;android-34;lineage;arm64-v8a' in inconsistent location 'D:\App\android\sdk\system-images\android-34\google_apis_playstore\arm64-v8a' (Expected 'D:\App\android\sdk\system-images\android-34\lineage\arm64-v8a')
Warning: Observed package id 'system-images;android-34;lineage;x86_64' in inconsistent location 'D:\App\android\sdk\system-images\android-34\google_apis_playstore\x86_64' (Expected 'D:\App\android\sdk\system-images\android-34\lineage\x86_64')
[=======================================] 100% Unzipping... share/vim/vimfiles/s
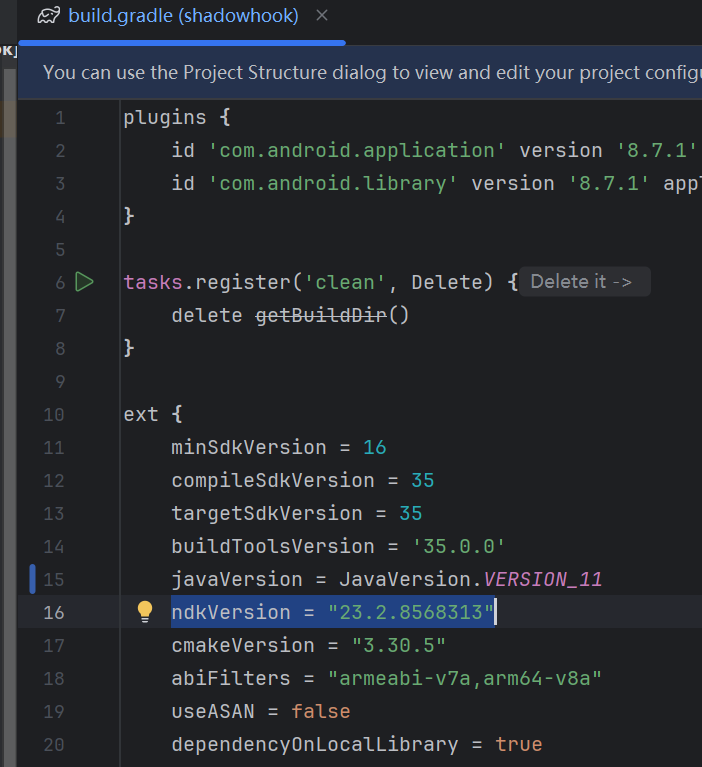
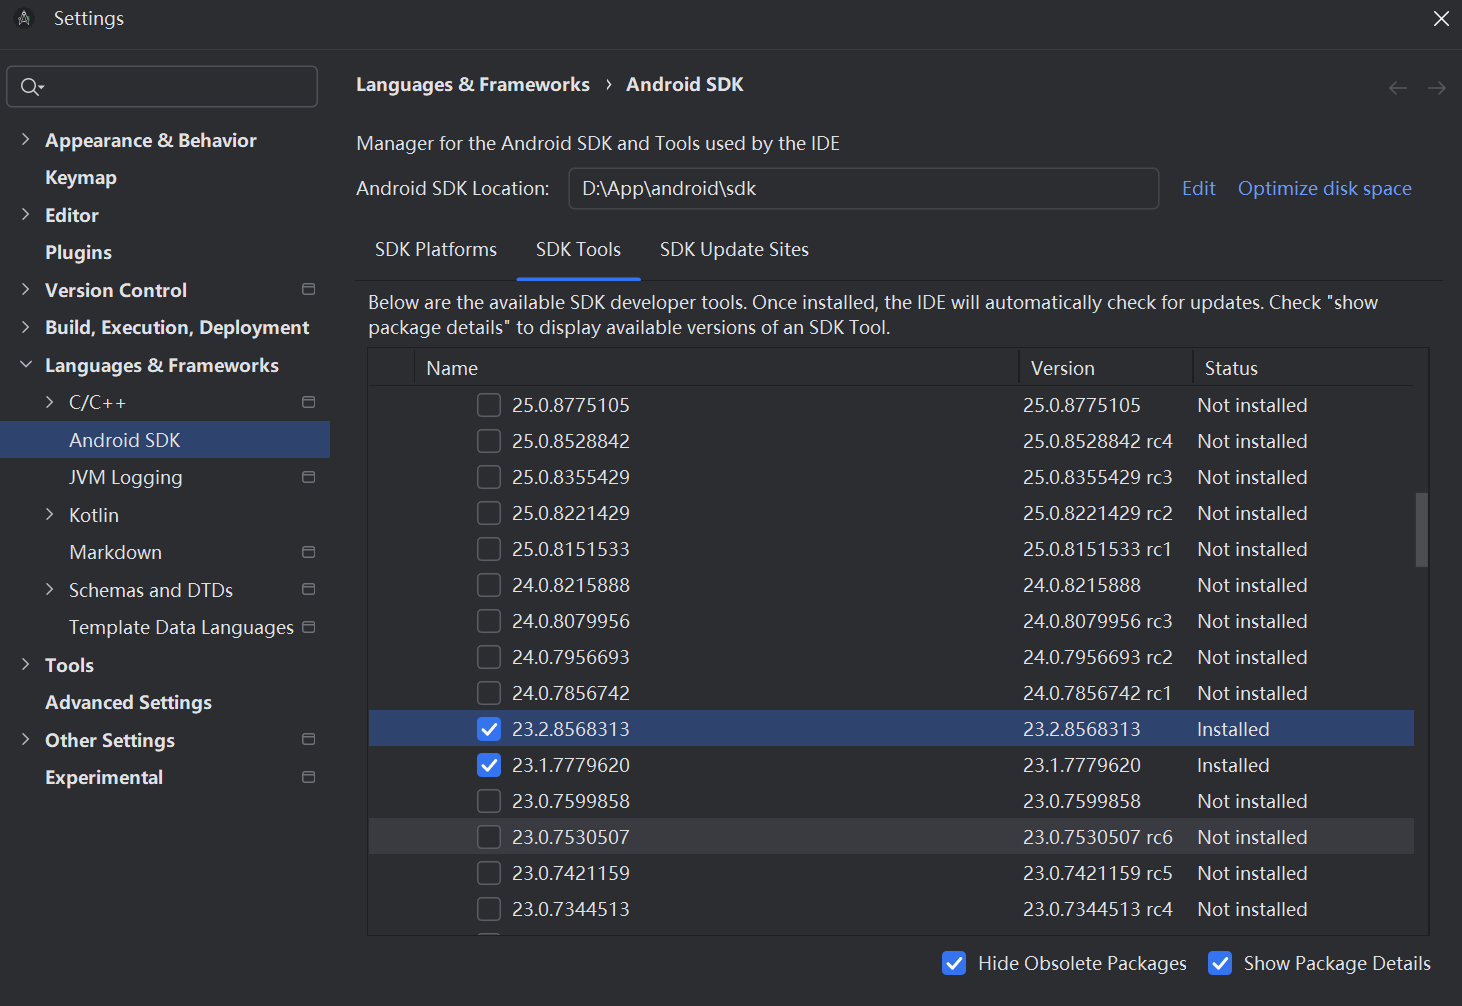
需要下载对应版本的 ndk
再次运行,提示如下错误
Execution failed for task ':shadowhook:compileDebugJavaWithJavac'.
> Java compiler version 21 has removed support for compiling with source/target version 7.Try one of the following options:1. [Recommended] Use Java toolchain with a lower language version2. Set a higher source/target version3. Use a lower version of the JDK running the build (if you're not using Java toolchain)For more details on how to configure these settings, see https://developer.android.com/build/jdks.Set Java Toolchain to 11
Change Java language level and jvmTarget to 11 in all modules if using a lower level.
Pick a different compatibility level...
Pick a different JDK to run Gradle...
More information...
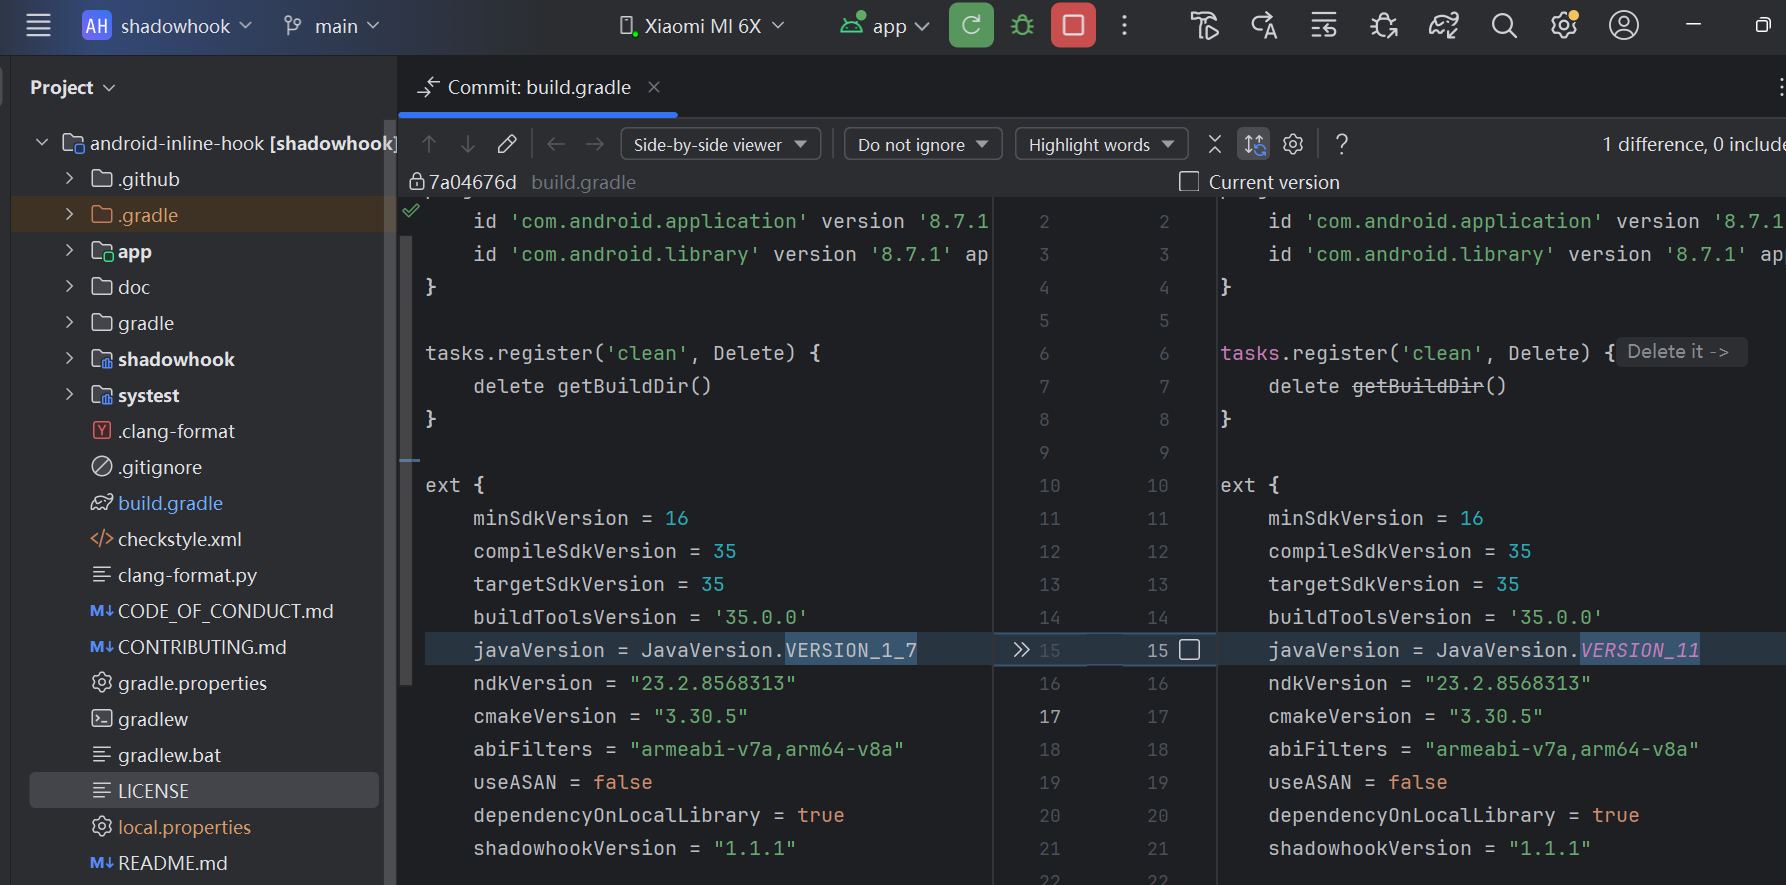
这个错误的意思是你使用的是 JDK 21,而你的项目设置了 sourceCompatibility = 1.7(也就是 Java 7),但 JDK 21 已经移除了对 Java 7 的编译支持。
设置 Java Toolchain 为 Java 11
编译运行成功!
集成 ShadowHook
启用 Android 的 Prefab 功能,这是用于支持 C/C++ 依赖包管理 的功能。
android {buildFeatures {prefab = true}
}
在 gradle/libs.versions.toml 增加 shadowhook
[versions]
shadowhook = "x.y.z"[libraries]
shadowhook = { group = "com.bytedance.android", name = "shadowhook", version.ref = "shadowhook" }
x.y.z 请替换成版本号,建议使用最新的 release 版本。
在 build.gradle.kts 中增加依赖
dependencies {implementation(libs.shadowhook)
}
参考:ShadowHook 手册
初始化 ShadowHook
// 初始化 ShadowHook
ShadowHook.init(ConfigBuilder()// 设置 hook 模式:// UNIQUE 模式:同一个 hook 点只能被 hook 一次(unhook 后可以再次 hook)。// SHARED 模式:可对同一个 hook 点并发执行多个 hook 和 unhook,彼此互不干扰。.setMode(ShadowHook.Mode.UNIQUE)// 启用调试日志,方便开发阶段查看 hook 的行为.setDebuggable(true)// 启用 hook 记录功能,可以记录每一次 hook 的详细信息,开发调试有用(建议发布时设为 false).setRecordable(true)// 构建配置对象.build()
)
CMakeLists.txt 配置
add_library( # 设置库的名称cyrus_studio_hook# 设置库的类型SHARED# 设置源文件路径cyrus_studio_hook.cpp
)target_link_libraries(cyrus_studio_hook# 链接 log 库${log-lib}# 链接 shadowhookshadowhook::shadowhook
)
hook execve 函数,禁用 dex2oat
通过 hook dex2oat 调用来禁用 dex2oat,防止 OAT 文件生成(避免反编译、加壳保护)
目标函数:execve(当执行 /system/bin/dex2oat)
wayne:/ # cd /system/bin/
wayne:/system/bin # ls -hl | grep dex2oat
lrwxr-xr-x 1 root   shell      37 2009-01-01 08:00 dex2oat -> /apex/com.android.runtime/bin/dex2oat
execve 函数源码:
#include <unistd.h>
#include "syscall.h"int execve(const char *path, char *const argv[], char *const envp[])
{
/* do we need to use environ if envp is null? */
return syscall(SYS_execve, path, argv, envp);
}
https://cs.android.com/android/platform/superproject/+/android10-release:bionic/libc/include/unistd.h;l=95
https://cs.android.com/android/platform/superproject/main/+/main:external/musl/src/process/execve.c
dex2oat 是 Android ART 在安装 APK 或运行时优化 dex 时调用的工具,通常通过 execve 执行。我们可以 Hook 掉这个 execve,当它的第一个参数包含 dex2oat 时直接返回一个错误码(如 -1),从而实现 跳过 dex2oat 执行。
cyrus_studio_hook.cpp
#include <unistd.h>
#include <android/log.h>
#include <jni.h>
#include <string>
#include <stddef.h>
#include "shadowhook.h"#define LOG_TAG "cyrus_studio_hook"
#define LOGI(...) __android_log_print(ANDROID_LOG_INFO, LOG_TAG, __VA_ARGS__)
#define LOGW(...) __android_log_print(ANDROID_LOG_WARN, LOG_TAG, __VA_ARGS__)
#define LOGE(...) __android_log_print(ANDROID_LOG_ERROR, LOG_TAG, __VA_ARGS__)// 原始 execve 函数指针
int (*orig_execve)(const char *__file, char *const *__argv, char *const *__envp);// 替代 execve 实现
int my_execve(const char *__file, char *const *__argv, char *const *__envp) {LOGI("execve called: %s", __file);if (__file && strstr(__file, "dex2oat")) {LOGW("Blocked dex2oat execution: %s", __file);// 返回失败,模拟 dex2oat 调用失败return -1;}// 调用原始 execvereturn orig_execve(__file, __argv, __envp);
}extern "C"
JNIEXPORT void JNICALL
Java_com_cyrus_example_hook_CyrusStudioHook_hookExecve(JNIEnv *, jclass) {void *handle = shadowhook_hook_sym_name("libc.so",  // 函数所在模块"execve", // 要 hook 的符号名reinterpret_cast<void *>(my_execve),reinterpret_cast<void **>(&orig_execve));if (handle != nullptr) {LOGI("Successfully hooked execve");} else {LOGW("Failed to hook execve");}
}
kotlin 代码如下:
package com.cyrus.example.hookimport com.bytedance.shadowhook.ShadowHook
import com.bytedance.shadowhook.ShadowHook.ConfigBuilderobject CyrusStudioHook {init {System.loadLibrary("cyrus_studio_hook") // 加载 native 实现}fun init(){// 初始化 ShadowHookShadowHook.init(ConfigBuilder()// 设置 hook 模式:// UNIQUE 模式:同一个 hook 点只能被 hook 一次(unhook 后可以再次 hook)。// SHARED 模式:可对同一个 hook 点并发执行多个 hook 和 unhook,彼此互不干扰。.setMode(ShadowHook.Mode.UNIQUE)// 启用调试日志,方便开发阶段查看 hook 的行为.setDebuggable(true)// 启用 hook 记录功能,可以记录每一次 hook 的详细信息,开发调试有用(建议发布时设为 false).setRecordable(true)// 构建配置对象.build())}@JvmStaticexternal fun hookExecve()
}
执行 hookExecve() 方法,日志输出如下:
2025-05-07 00:14:51.790 21783-21783 shadowhook_tag          com.cyrus.example                    I  shadowhook: hook_sym_name(libc.so, execve, 0x7a178a9874) ...
2025-05-07 00:14:51.790 21783-21783 shadowhook_tag          com.cyrus.example                    I  exit: alloc out library, exit 7aaa27b020, pc 7aabaa5f70, distance 182af50, range [-8000000, 7fffffc]
2025-05-07 00:14:51.790 21783-21783 shadowhook_tag          com.cyrus.example                    I  a64 rewrite: type 0, inst d2801ba8
2025-05-07 00:14:51.790 21783-21783 shadowhook_tag          com.cyrus.example                    I  a64: hook (WITH EXIT) OK. target 7aabaa5f70 -> exit 7aaa27b020 -> new 7a178a9874 -> enter 7aaa2e7200 -> remaining 7aabaa5f74
2025-05-07 00:14:51.790 21783-21783 shadowhook_tag          com.cyrus.example                    I  switch: hook in UNIQUE mode OK: target_addr 7aabaa5f70, new_addr 7a178a9874
2025-05-07 00:14:51.791 21783-21783 shadowhook_tag          com.cyrus.example                    I  shadowhook: hook_sym_name(libc.so, execve, 0x7a178a9874) OK. return: 0x7aacaa2a80. 0 - OK
2025-05-07 00:14:51.791 21783-21783 cyrus_studio_hook       com.cyrus.example                    I  Successfully hooked execve
Successfully hooked execve
ClassLinker::LoadMethod
ClassLinker::LoadMethod 是 ART 中负责将 dex 文件中的方法信息解析并填充到 ArtMethod 结构体中的关键函数,用于方法加载过程中的元数据初始化。
找到导出符号
ART 使用 Clang/LLVM 编译,符号导出受 C++ 名字修饰(name mangling)影响:
-
不同版本可能使用不同的 Clang 版本;
-
编译参数变化(如 -fvisibility=hidden)会改变导出符号行为。
C 函数没有 Name Mangler 的概念,所以 execve 函数的符号就是函数名字;但 ClassLinker::LoadMethod 是 C++ 函数,如果要实现更好的 Android 版本兼容性,需要自己处理函数符号名的差异。
1、找到 libart.so
wayne:/ # find /system -iname 'libart.so'
/system/apex/com.android.runtime.release/lib64/libart.so
2、把 libart.so pull 下来
adb pull /system/apex/com.android.runtime.release/lib64/libart.so
3、使用 nm 确认符号名
cyrus@cyrus:/mnt/d$ nm -D libart.so | grep LoadMethod
000000000016b168 T _ZN3art11ClassLinker10LoadMethodERKNS_7DexFileERKNS_13ClassAccessor6MethodENS_6HandleINS_6mirror5ClassEEEPNS_9ArtMethodE
得到 LoadMethod 方法的符号如下:
_ZN3art11ClassLinker10LoadMethodERKNS_7DexFileERKNS_13ClassAccessor6MethodENS_6HandleINS_6mirror5ClassEEEPNS_9ArtMethodE
hook ClassLinker::LoadMethod
ClassLinker::LoadMethod 函数原型如下:
void ClassLinker::LoadMethod(const DexFile& dex_file,const ClassAccessor::Method& method,Handle<mirror::Class> klass,ArtMethod* dst)
https://cs.android.com/android/platform/superproject/+/android10-release:art/runtime/class_linker.cc;l=3732
声明一个函数指针变量,存放原 ClassLinker::LoadMethod 函数,由于访问不了系统中的类,用 void * (通用指针)代替。
void *(*orig_LoadMethod)(void *, void *, void *, void *, void *);
注意:实际上有 5 个参数,第一个是 ClassLinker 对象。
自定义替换的函数
void *my_LoadMethod(void *linker, void *dex_file, void *method, void *klass_handle, void *dst) {...// 调用原始函数void *result = orig_LoadMethod(linker, dex_file, method, klass_handle, dst);...return result;
}
根据导出符号 hook ClassLinker::LoadMethod 函数
void *handle = shadowhook_hook_sym_name("libart.so","_ZN3art11ClassLinker10LoadMethodERKNS_7DexFileERKNS_13ClassAccessor6MethodENS_6HandleINS_6mirror5ClassEEEPNS_9ArtMethodE", // 要 hook 的符号名reinterpret_cast<void *>(my_LoadMethod),reinterpret_cast<void **>(&orig_LoadMethod)
);if (handle != nullptr) {LOGI("Successfully hooked LoadMethod");
} else {LOGW("Failed to hook LoadMethod");
}
访问 DexFile
如果你想访问 DexFile 和 ArtMethod 的内容(比如打印 base、size 或 method_index),你需要将这些 void* 转换回真实的类型指针。
我们可以根据 android 源码 在工程中增加 DexFile 的结构定义,通过 namespace 区分不同版本的 DexFile
https://cs.android.com/android/platform/superproject/+/android-9.0.0_r60:art/libdexfile/dex/dex_file.h;l=1042
https://cs.android.com/android/platform/superproject/+/android-15.0.0_r9:art/libdexfile/dex/dex_file.h;l=920
#ifndef CYURS_DEX_FILE_H
#define CYURS_DEX_FILE_H#include <stdint.h>
#include <string>namespace cyurs {namespace dex {struct Header {public:uint8_t magic_[8];uint32_t checksum_;  // See also location_checksum_uint8_t signature_[20];uint32_t file_size_;  // size of entire fileuint32_t header_size_;  // offset to start of next sectionuint32_t endian_tag_;uint32_t link_size_;  // unuseduint32_t link_off_;  // unuseduint32_t map_off_;  // unuseduint32_t string_ids_size_;  // number of StringIdsuint32_t string_ids_off_;  // file offset of StringIds arrayuint32_t type_ids_size_;  // number of TypeIds, we don't support more than 65535uint32_t type_ids_off_;  // file offset of TypeIds arrayuint32_t proto_ids_size_;  // number of ProtoIds, we don't support more than 65535uint32_t proto_ids_off_;  // file offset of ProtoIds arrayuint32_t field_ids_size_;  // number of FieldIdsuint32_t field_ids_off_;  // file offset of FieldIds arrayuint32_t method_ids_size_;  // number of MethodIdsuint32_t method_ids_off_;  // file offset of MethodIds arrayuint32_t class_defs_size_;  // number of ClassDefsuint32_t class_defs_off_;  // file offset of ClassDef arrayuint32_t data_size_;  // unuseduint32_t data_off_;  // unused};struct MapItem {uint16_t type_;uint16_t unused_;uint32_t size_;uint32_t offset_;};struct MapList {uint32_t size_;MapItem list_[1];};// Raw string_id_item.struct StringId {uint32_t string_data_off_;  // offset in bytes from the base address};// Raw type_id_item.struct TypeId {uint32_t descriptor_idx_;  // index into string_ids};// Raw field_id_item.struct FieldId {uint16_t class_idx_;  // index into type_ids_ array for defining classuint16_t type_idx_;  // index into type_ids_ array for field typeuint32_t name_idx_;  // index into string_ids_ array for field name};// Raw method_id_item.struct MethodId {uint16_t class_idx_;  // index into type_ids_ array for defining classuint16_t proto_idx_;  // index into proto_ids_ array for method prototypeuint32_t name_idx_;  // index into string_ids_ array for method name};// Raw proto_id_item.struct ProtoId {uint32_t shorty_idx_;  // index into string_ids array for shorty descriptoruint16_t return_type_idx_;  // index into type_ids array for return typeuint16_t pad_;             // padding = 0uint32_t parameters_off_;  // file offset to type_list for parameter types};// Raw class_def_item.struct ClassDef {public:uint32_t class_idx_;  // index into type_ids_ array for this classuint32_t access_flags_;uint32_t superclass_idx_;  // index into type_ids_ array for superclassuint32_t interfaces_off_;  // file offset to TypeListuint32_t source_file_idx_;  // index into string_ids_ for source file nameuint32_t annotations_off_;  // file offset to annotations_directory_itemuint32_t class_data_off_;  // file offset to class_data_itemuint32_t static_values_off_;  // file offset to EncodedArray};// Raw code_item.struct CodeItem {public:uint16_t registers_size_;            // the number of registers used by this code//   (locals + parameters)uint16_t ins_size_;                  // the number of words of incoming arguments to the method//   that this code is foruint16_t outs_size_;                 // the number of words of outgoing argument space required//   by this code for method invocationuint16_t tries_size_;                // the number of try_items for this instance. If non-zero,//   then these appear as the tries array just after the//   insns in this instance.uint32_t debug_info_off_;            // file offset to debug info streamuint32_t insns_size_in_code_units_;  // size of the insns array, in 2 byte code unitsuint16_t insns_[1];                  // actual array of bytecode.};// Raw try_item.struct TryItem {uint32_t start_addr_;uint16_t insn_count_;uint16_t handler_off_;};struct ClassDataHeader {uint32_t static_fields_size_;  // the number of static fieldsuint32_t instance_fields_size_;  // the number of instance fieldsuint32_t direct_methods_size_;  // the number of direct methodsuint32_t virtual_methods_size_;  // the number of virtual methods};struct ClassDataField {public:uint32_t field_idx_delta_;  // delta of index into the field_ids array for FieldIduint32_t access_flags_;  // access flags for the fieldClassDataField(uint32_t field_idx_delta_, uint32_t access_flags_) :field_idx_delta_(field_idx_delta_), access_flags_(access_flags_) {}ClassDataField() : field_idx_delta_(0), access_flags_(0) {}};// A decoded version of the method of a class_data_itemstruct ClassDataMethod {public:uint32_t method_idx_delta_;  // delta of index into the method_ids array for MethodIduint32_t access_flags_;uint32_t code_off_;ClassDataMethod(uint32_t method_idx_delta_, uint32_t access_flags_, uint32_t code_off_):method_idx_delta_(method_idx_delta_), access_flags_(access_flags_),code_off_(code_off_) {}ClassDataMethod() :method_idx_delta_(0), access_flags_(0), code_off_(0) {}};};namespace V21 {class DexFile {public://vtable pointervoid *_;// The base address of the memory mapping.const uint8_t *const begin_;// The size of the underlying memory allocation in bytes.const size_t size_;// Typically the dex file name when available, alternatively some identifying string.//// The ClassLinker will use this to match DexFiles the boot class// path to DexCache::GetLocation when loading from an image.const std::string location_;const uint32_t location_checksum_;// Manages the underlying memory allocation.std::unique_ptr<void *> mem_map_;// Points to the header section.const dex::Header *const header_;// Points to the base of the string identifier list.const dex::StringId *const string_ids_;// Points to the base of the type identifier list.const dex::TypeId *const type_ids_;// Points to the base of the field identifier list.const dex::FieldId *const field_ids_;// Points to the base of the method identifier list.const dex::MethodId *const method_ids_;// Points to the base of the prototype identifier list.const dex::ProtoId *const proto_ids_;// Points to the base of the class definition list.const dex::ClassDef *const class_defs_;};} //namespace V21namespace V28 {class DexFile {public://vtable pointervoid *_;// The base address of the memory mapping.const uint8_t *const begin_;// The size of the underlying memory allocation in bytes.const size_t size_;// The base address of the data section (same as Begin() for standard dex).const uint8_t *const data_begin_;// The size of the data section.const size_t data_size_;// Typically the dex file name when available, alternatively some identifying string.//// The ClassLinker will use this to match DexFiles the boot class// path to DexCache::GetLocation when loading from an image.const std::string location_;const uint32_t location_checksum_;// Points to the header section.const dex::Header *const header_;// Points to the base of the string identifier list.const dex::StringId *const string_ids_;// Points to the base of the type identifier list.const dex::TypeId *const type_ids_;// Points to the base of the field identifier list.const dex::FieldId *const field_ids_;// Points to the base of the method identifier list.const dex::MethodId *const method_ids_;// Points to the base of the prototype identifier list.const dex::ProtoId *const proto_ids_;// Points to the base of the class definition list.const dex::ClassDef *const class_defs_;};} //namespace V28namespace V35 {template <typename T>class ArrayRef {private:T* array_;size_t size_;};class DexFile {public:void *_;// The base address of the memory mapping.const uint8_t* begin_;size_t unused_size_ = 0;  // Preserve layout for DRM (b/305203031).// Data memory range: Most dex offsets are relative to this memory range.// Standard dex: same as (begin_, size_).// Dex container: all dex files (starting from the first header).// Compact: shared data which is located after all non-shared data.//// This is different to the "data section" in the standard dex header.ArrayRef<const uint8_t> const data_;// The full absolute path to the dex file, if it was loaded from disk.//// Can also be a path to a multidex container (typically apk), followed by// DexFileLoader.kMultiDexSeparator (i.e. '!') and the file inside the// container.//// On host this may not be an absolute path.//// On device libnativeloader uses this to determine the location of the java// package or shared library, which decides where to load native libraries// from.//// The ClassLinker will use this to match DexFiles the boot class// path to DexCache::GetLocation when loading from an image.const std::string location_;uint32_t location_checksum_;// Points to the header section.const dex::Header*  header_;// Points to the base of the string identifier list.const dex::StringId*  string_ids_;// Points to the base of the type identifier list.const dex::TypeId* type_ids_;// Points to the base of the field identifier list.const dex::FieldId* field_ids_;// Points to the base of the method identifier list.const dex::MethodId* method_ids_;// Points to the base of the prototype identifier list.const dex::ProtoId* proto_ids_;// Points to the base of the class definition list.const dex::ClassDef* class_defs_;};} //namespace V35
};//namespace cyrus#endif //CYURS_DEX_FILE_H
参考:https://github.com/luoyesiqiu/dpt-shell/tree/main/shell/src/main/cpp/dex
在 so 初始化的时候获取当前系统的 api level
int g_sdkLevel = 0;__attribute__ ((constructor)) void init() {// api levelg_sdkLevel = android_get_device_api_level();
}
根据 api level 把 void* 类型的 dex_file 参数强转成对应版本的 DexFile,这样就可以访问 DexFile 的成员变量了
// DexFile
std::string location;
uint8_t *begin = nullptr;
uint64_t dexSize = 0;
if (g_sdkLevel >= 35) {auto *dexFileV35 = (V35::DexFile *) dex_file;location = dexFileV35->location_;begin = (uint8_t *) dexFileV35->begin_;dexSize = dexFileV35->header_->file_size_;
} else if (g_sdkLevel >= __ANDROID_API_P__) {auto *dexFileV28 = (V28::DexFile *) dex_file;location = dexFileV28->location_;begin = (uint8_t *) dexFileV28->begin_;dexSize = dexFileV28->size_ == 0 ? dexFileV28->header_->file_size_ : dexFileV28->size_;
} else {auto *dexFileV21 = (V21::DexFile *) dex_file;location = dexFileV21->location_;begin = (uint8_t *) dexFileV21->begin_;dexSize = dexFileV21->size_ == 0 ? dexFileV21->header_->file_size_ : dexFileV21->size_;
}// 打印 DexFile 信息
LOGI("[pid=%d][API=%d] enter my_LoadMethod:\n  DexFile Base    = %p\n  DexFile Size    = %zu bytes\n  DexFile Location= %s",getpid(), g_sdkLevel, begin, dexSize, location.c_str());
访问 ArtMethod
ArtMethod 源码:

https://cs.android.com/android/platform/superproject/+/android-10.0.0_r47:art/runtime/art_method.h;l=744
其中,GcRoot<mirror::Class> declaring_class_; 是 ART(Android Runtime)内部定义的一个模板类,用于在 native 层持有对 Java 对象的 GC 安全引用。它是 ART 中替代裸指针的“托管指针”。
本质上它只是封装了一个指针,所以 arm64 中实际占用 8 字节,这里用 uint8_t 代替。
class ArtMethod {
public:// Field order required by test "ValidateFieldOrderOfJavaCppUnionClasses".// The class we are a part of.uint8_t declaring_class_;// Access flags; low 16 bits are defined by spec.// Getting and setting this flag needs to be atomic when concurrency is// possible, e.g. after this method's class is linked. Such as when setting// verifier flags and single-implementation flag.uint32_t access_flags_;/* Dex file fields. The defining dex file is available via declaring_class_->dex_cache_ */// Offset to the CodeItem.uint32_t dex_code_item_offset_;// Index into method_ids of the dex file associated with this method.uint32_t dex_method_index_;/* End of dex file fields. */// Entry within a dispatch table for this method. For static/direct methods the index is into// the declaringClass.directMethods, for virtual methods the vtable and for interface methods the// ifTable.uint16_t method_index_;union {// Non-abstract methods: The hotness we measure for this method. Not atomic,// as we allow missing increments: if the method is hot, we will see it eventually.uint16_t hotness_count_;// Abstract methods: IMT index (bitwise negated) or zero if it was not cached.// The negation is needed to distinguish zero index and missing cached entry.uint16_t imt_index_;};
};
my_LoadMethod 函数实现
在 my_LoadMethod 函数中:
-
根据 g_sdkLevel 解析 DexFile 并打印其 begin、size 和 location;
-
调用原始 LoadMethod 以保证 ArtMethod 已初始化;
-
在不同 Android 版本下提取 ArtMethod 的 dex_method_index_ 和 dex_code_item_offset_;
void *my_LoadMethod(void *linker, void *dex_file, void *method, void *klass_handle, void *dst) {// DexFilestd::string location;uint8_t *begin = nullptr;uint64_t dexSize = 0;if (g_sdkLevel >= 35) {auto *dexFileV35 = (V35::DexFile *) dex_file;location = dexFileV35->location_;begin = (uint8_t *) dexFileV35->begin_;dexSize = dexFileV35->header_->file_size_;} else if (g_sdkLevel >= __ANDROID_API_P__) {auto *dexFileV28 = (V28::DexFile *) dex_file;location = dexFileV28->location_;begin = (uint8_t *) dexFileV28->begin_;dexSize = dexFileV28->size_ == 0 ? dexFileV28->header_->file_size_ : dexFileV28->size_;} else {auto *dexFileV21 = (V21::DexFile *) dex_file;location = dexFileV21->location_;begin = (uint8_t *) dexFileV21->begin_;dexSize = dexFileV21->size_ == 0 ? dexFileV21->header_->file_size_ : dexFileV21->size_;}// 打印 DexFile 信息LOGI("[pid=%d][API=%d] enter my_LoadMethod:\n  DexFile Base    = %p\n  DexFile Size    = %zu bytes\n  DexFile Location= %s",getpid(), g_sdkLevel, begin, dexSize, location.c_str());// 调用原始函数,使 ArtMethod 数据填充完成void *result = orig_LoadMethod(linker, dex_file, method, klass_handle, dst);// ArtMethoduint32_t dex_code_item_offset_ = -1;uint32_t dex_method_index_;if (g_sdkLevel >= 31) {auto *dstV31 = (V31::ArtMethod *) dst;auto classAccessor_method = reinterpret_cast<Method &>(method);dex_code_item_offset_ = classAccessor_method.code_off_;dex_method_index_ = dstV31->dex_method_index_;} else {auto *dstV28 = (V28::ArtMethod *) dst;dex_code_item_offset_ = dstV28->dex_code_item_offset_;dex_method_index_ = dstV28->dex_method_index_;}// 打印 Method 信息LOGI("[pid=%d][API=%d] enter my_LoadMethod:\n""  ArtMethod.dex_code_item_offset_ = 0x%x\n""  ArtMethod.dex_method_index_     = %d",getpid(), g_sdkLevel, dex_code_item_offset_, dex_method_index_);return result;
}
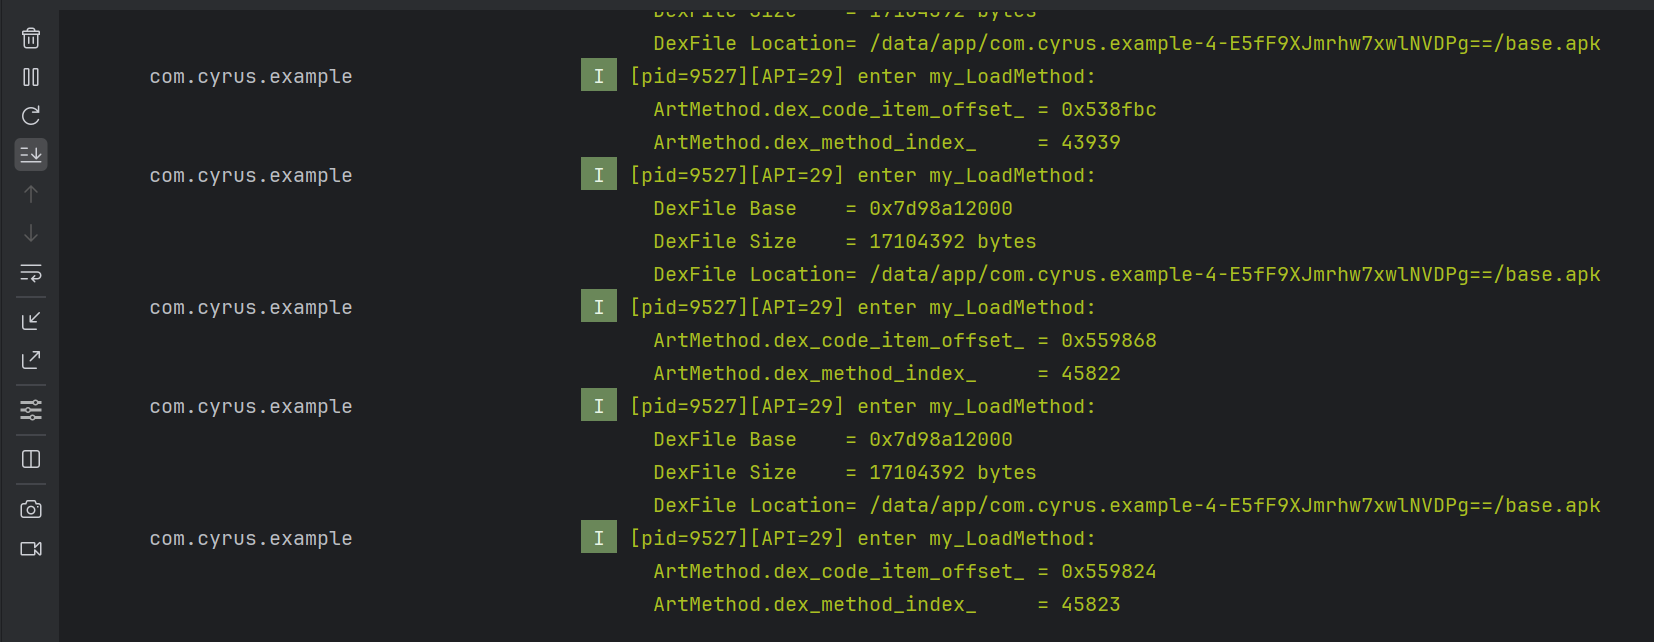
测试
运行后输出如下,可以看到正常打印了 DexFile 和 ArtMethod 中的信息。
完整源码
开源地址:https://github.com/CYRUS-STUDIO/AndroidExample
相关文章:

Android Native 函数 Hook 技术介绍
版权归作者所有,如有转发,请注明文章出处:https://cyrus-studio.github.io/blog/ 前言 Android Native 函数 Hook 技术是一种在应用运行时拦截或替换系统或自身函数行为的手段,常见实现包括 PLT Hook、Inline Hook。 PLT Hook 和…...

代码随想录算法训练营第60期第三十二天打卡
大家好,今天是我们贪心算法章节的第三阶段,前面我们讲过的几道题不知道大家理解的情况如何,还是那句话,贪心算法没有固定的套路与模板,一道题一个思路,我们要多思考这样慢慢地我就就可以水到渠成。今天我们…...

Problem C: 异常1
1.题目描述 检测年龄,其中若为负数或大于等于200岁皆为异常,请将下列代码补充完整。 // 你的代码将被嵌入这里 class Main{ public static void main(String[] args){ Person p1new Person("John",80); Person p2new Pers…...

Ollama部署使用以及模型微调和本地部署
ollama是一款开源的本地大语言模型管理工具,专注于简化大语言模型(LLM)的本地部署和使用。以下是关于 Ollama 应用的详细介绍: Ollama 的主要功能 本地化部署: Ollama 支持在本地运行模型,无需依赖外部云…...

汇编学习——iOS开发对arm64汇编的初步了解
汇编学习——iOS开发对arm64汇编的初步了解 文章目录 汇编学习——iOS开发对arm64汇编的初步了解前言栈 指令 寄存器寄存器指令运算指令寻址指令前变基 与 后变基 栈堆(Heap)内存机制三、栈(Stack)内存机制 3. 多级调用示例 例子A…...

前端代理问题
在前后端联调的时候,有一次因为前端项目代理配置有问题,导致请求接口对不上, transpileDependencies: true,devServer: {hot: true,port: 8081,proxy: {/api: {target: http://localhost:8080,changeOrigin: true,ws: true,pathRewrite: {^/a…...

E+H流量计通过Profibus DP主站转Modbus TCP网关与上位机轻松通讯
EH流量计通过Profibus DP主站转Modbus TCP网关与上位机轻松通讯 在现代工业自动化的广阔舞台上,Profibus DP与Modbus TCP这两种通信协议各领风骚,它们在不同的应用场景中发挥着举足轻重的作用。但工业生产的复杂性往往要求不同设备、系统之间能够顺畅沟…...

TCP/IP 模型每层的封装格式
TCP/IP 模型是一个四层网络架构,每一层在数据传输时都会对数据进行封装,添加相应的头部(和尾部)信息。以下是各层的封装格式及关键字段说明: 1. 应用层(Application Layer) 封装格式:…...
——汇编指令及指令编码基础)
openjdk底层汇编指令调用(一)——汇编指令及指令编码基础
汇编指令 计算机在执行过程时只识别代表0或者1的电信号。因此为了让计算机能够执行则须向计算机输入一系列01构成的指令。 例如在x64平台下,0x53,二进制为01010011,表示将rbx寄存器中的值压栈。 但是,对于程序员而言,…...

5G-A来了!5G信号多个A带来哪些改变?
5G-A来了!5G信号多个A带来哪些改变? 随着科技不断进步,通信网络的迭代升级也在加速。自4G、5G的推出以来,我们见证了通信技术的飞跃式发展。最近,越来越多的用户发现自己手机屏幕右上角的5G标识已经变成了“5G-A”。那…...

探索虚拟化:云计算时代的资源优化之道
前言 如果您想知道云提供商如何在全球范围内运行无数应用程序,而每个应用程序都没有机架服务器,那么答案就在于虚拟化。 它是为云提供支持的核心技术之一,在幕后悄悄工作,使现代计算高效、可扩展且具有成本效益。 在本文中&#x…...

用户登录构件示例
目录 一、登录构件概述 二、构件内部结构 1. 构件组成元素(表格形式) 2. 组件连接件设计...

【软件测试】基于项目驱动的功能测试报告
目录 一、项目的介绍 1.1 项目背景 二、测试目标 2.1 用户服务模块 2.1.1 用户注册模块 2.1.1.1 测试点 2.1.1.2 边界值分析法(等价类+边界值) 2.1.1.2.1 有效等价类 2.1.1.2.2 无效等价类 2.1.1.2.3 边界值 2.1.1.2.4 测试用例设计 2.2 文章标签模块 2.3 文章模…...

【QT】UDP通讯本地调试
qt已经写好了udp通讯代码,现在要进行测试。 1、终端输入ipconfig查看本机网卡的ipv4地址 2、 用udpBind函数,绑定到此ip和自定义的端口号。 3、 打开网络调试助手,自动检测到本机的ip地址,输入任意一个和程序里不一样的端口号。 …...
)
web animation API 锋利的css动画控制器 (更新中)
什么是web animation api 以及为什么要使用web animation api? web animation API 是web页面中控制DOM元素动画效果的javascript原生API。 它能够逐个关键帧控制动画效果,具有Timeline 机制能通过javascript来实现动画的暂停,播放&#x…...

Nginx的增强与可视化!OpenResty Manager - 现代化UI+高性能反向代理+安全防护
以下是对OpenResty Manager的简要介绍: OpenResty Manager (Nginx 增强版),是一款容易使用、功能强大且美观的反向代理工具 ,可以作为OpenResty Edge 的开源替代品基于 OpenResty 开发,支持并继承 OpenRes…...

Spring Boot 中的重试机制
Retryable 注解简介 Retryable 注解是 Spring Retry 模块提供的,用于自动重试可能会失败的方法。在微服务架构和分布式系统中,服务之间的调用可能会因为网络问题、服务繁忙等原因失败。使用 Retryable 可以提高应用的稳定性和容错能力 1。 使用步骤 &…...
)
[Java实战]Spring Boot 整合 Freemarker (十一)
[Java实战]Spring Boot 整合 Freemarker (十一) 引言 Apache FreeMarker 作为一款高性能的模板引擎,凭借其简洁语法、卓越性能和灵活扩展性,在 Java Web 开发中占据重要地位。结合 Spring Boot 的自动化配置能力,开发者能快速构建动态页面、…...

现有预测式外呼系统如何接入AI系统,使用AI辅助,判断出意向客户再转人工
很多用户还在使用老旧的预测式外呼系统,只能外呼接通后播放一个提示音,播放完提示音后在转给人工坐席, 如果重新部署一套AI外呼系统,涉及到业务系统的迁移,非常不方便。 现在我就做一个如何让现有外呼系统,…...
)
实战项目3(04)
目录 任务场景一 【r1配置】 【sw1配置】 任务场景二 【r1配置】 【sw1配置】 【sw2配置】 任务场景一 某公司网络为了减少广播包对网络的影响,网络管理员对网络进行了VLAN划分,完成VLAN划分后,为了不影响VL…...
)
[Java实战]Spring Boot 静态资源配置(十三)
[Java实战]Spring Boot 静态资源配置(十三) 引言 静态资源(如 HTML、CSS、JavaScript、图片等)是 Web 应用的基石。Spring Boot 通过自动化配置简化了静态资源管理,但面对复杂场景(如多模块项目、CDN 集成…...

ESP-ADF wifi_service子模块wifi_ssid_manager凭证管理函数详解
目录 ESP-ADF wifi_service子模块wifi_ssid_manager凭证管理函数详解WiFi凭证管理函数分析wifi_ssid_manager_savewifi_ssid_manager_erase_all 内部实现机制存储策略分析内部数据流向关键辅助函数分析重要的内部辅助函数详解get_stored_id_by_ssidnvs_get_write_idnvs_set_cou…...

数据分析预备篇---NumPy数组
NumPy是数据分析时常用的库,全称为Numerical Python,是很多数据或科学相关Python包的基础,包括pandas,scipy等等,常常被用于科学及工程领域。NumPy最核心的数据结构是ND array,意思是N维数组。 #以下是一个普通列表的操作示例:arr = [5,17,3,26,31]#打印第一个元素 prin…...
与主机(windows)之间互相复制粘贴(文本))
解决VirtualBox中虚拟机(ubuntu)与主机(windows)之间互相复制粘贴(文本)
一.开始的设置 1.在VirtualBox中打开设置,常规中修改主机与虚拟机交互设置 2.虚拟机关闭状态下,存储中选中控制器SATA,勾选‘使用主机输入输出’ 3.选中操作系统对应的虚拟文件,.vdi文件,勾选右边的固态驱动器。 4.启…...

单细胞RNA测序数据分析与可视化:从基础原理到高级应用
引言 单细胞RNA测序(scRNA-seq)技术的出现彻底改变了我们研究复杂生物系统的方式,使科学家能够在前所未有的精细水平上解析细胞异质性。传统的bulk RNA测序只能捕获细胞群体的平均表达特征,而单细胞转录组测序允许我们检测每个细…...

嵌入式硬件篇---UART
文章目录 前言1. UART协议基础1.1 物理层特性两根信号线无时钟信号电平标准TTL UARTRS-232 1.2 数据帧格式1.3 波特率计算波特率 2. STM32F103RCT6的UART配置2.1 硬件连接2.2 CubeMX配置启用USART1引脚分配中断启用(可选) 3. HAL库代码实现3.1 UART初始化…...

C# 通过ConfigurationManager读写配置文件App.Config
目录 简述代码描述一、构建App.config二、调用代码1、代码步骤说明2、输出结果说明 简述 App.config 是 C#中最常用的配置文件类型。 通常位于项目的根目录中,以 XML 格式存储配置信息。App.config 文件可以包含多个配置节,如 appSettings、connectionS…...

Python3安装HTMLTestRunner
1.下载HTMLTestRunner地址:http://tungwaiyip.info/software/HTMLTestRunner.html 2.下载的HTMLTestRunner.py是针对python2写的,所以需要改成python3适合的内容: 问题1:No module named StringIO, 原因:py…...

图形化编程革命:iVX携手AI 原生开发范式
一、技术核心:图形化编程的底层架构解析 1. 图形化开发的效率优势:代码量减少 72% 的秘密 传统文本编程存在显著的信息密度瓶颈。以 "按钮点击→条件判断→调用接口→弹窗反馈" 流程为例,Python 实现需定义函数、处理缩进并编写 …...

GC垃圾回收
Gc是语言提供的自动的内存管理机制,自动释放不需要的内存对象,让出存储器资源。 Go语言变革: V1.5的三色并发标记法 V1.5的三色并发标记为什么需要STW V1.5的三色标记为什么需要屏障机制(“强-弱”,三色不变式、插入屏障、删除屏障…...

“多端多接口多向传导”空战数据链体系——从异构融合架构到抗毁弹性网络的系统性设计
“多端多接口多向传导”空战数据链体系——从异构融合架构到抗毁弹性网络的系统性设计 文章目录 “多端多接口多向传导”空战数据链体系——从异构融合架构到抗毁弹性网络的系统性设计第一章 引言:空战数据链体系的范式革新1.1 空战数据链的演进逻辑1.2 新架构的核心理论价值1…...

Unity3D仿星露谷物语开发42之粒子系统
1、目标 使用例子系统,实现割草后草掉落的特效。 通过PoolManager获取特效预制体,通过VFXManager来触发特效。 2、配置例子特效 在Hierarchy -> PersistentScene下创建新物体命名为Reaping。 给该物体添加Particle System组件。 配置例子系统参数…...

python打卡训练营打卡记录day22
复习日 仔细回顾一下之前21天的内容,没跟上进度的同学补一下进度。 作业: 自行学习参考如何使用kaggle平台,写下使用注意点,并对下述比赛提交代码 kaggle泰坦尼克号人员生还预测 导入数据 # 导入所需库 import pandas as pd impor…...
网络编程入门)
网络编程(一)网络编程入门
本节课学习TCP客户端和服务器端编程架构,其分为分为C/S(客户端/服务器模式)和B/S(浏览器/服务器架构模式)两种模式。接下来我们分别了解这两种模式 C/S模式 C/S模式:服务器首先先启动,并根据客…...
)
华为IP(6)
VLAN聚合 VLAN聚合产生的技术背景 在一般是三层交换机中,通常采用一个VLAN接口的方式实现广播域之间的互通,这在某些情况下导致了IP地址的浪费 因为一个VLAN对应的子网中,子网号、子网广播地址、子网网关地址不能用作VLAN内的主机IP地址&a…...

初探机器学习与深度学习
本文以水果摊销量预测为例,揭示机器学习通过数据训练模型的核心逻辑,对比传统编程规则驱动模式。解析分类(疾病诊断)与回归(房价预测)两大任务的技术本质,类比前端开发中的类型定义与图表拟合。…...

3. 仓颉 CEF 库封装
文章目录 1. capi 使用说明2. Cangjie CEF2. 1实现目标 3. 实现示例 1. capi 使用说明 根据上一节 https://blog.csdn.net/qq_51355375/article/details/147880718?spm1011.2415.3001.5331 所述, cefcapi 是libcef 共享库导出一个 C API, 而以源代码形式分发的 li…...
序列化)
Linux-TCP套接字编程简易实践:实现EchoServer与远程命令执行及自定义协议(反)序列化
一.TCP Socket常用API 1.1socket() NAMEsocket - create an endpoint for communicationSYNOPSIS#include <sys/types.h> /* See NOTES */#include <sys/socket.h>int socket(int domain, int type, int protocol); socket()打开一个网络通讯端口,如果…...
:本地缓存作用 及 数据一致性 实现策略)
缓存(3):本地缓存作用 及 数据一致性 实现策略
概述 CAP 什么是CAP CAP理论,指的是在一个分布式系统中, Consistency(一致性)、 Availability(可用性)、Partition tolerance(分区容错性),三者不可得兼。 三者关系如…...

【leetcode】《BFS扫荡术:如何用广度优搜索征服岛屿问题》
前言 🌟🌟本期讲解关于力扣的几篇题解的详细介绍~~~ 🌈感兴趣的小伙伴看一看小编主页:GGBondlctrl-CSDN博客 🔥 你的点赞就是小编不断更新的最大动力 🎆那么废话不…...

vue中理解MVVM
理解 在 Vue 中,MVVM(Model-View-ViewModel) 是其核心设计思想之一,它帮助实现了数据驱动的视图更新和良好的代码结构分离。我们来具体解析 Vue 是如何实现 MVVM 模式的。 🌐 MVVM 是什么? 角色含义Vue…...
)
[工具]B站缓存工具箱 (By 郭逍遥)
📌 项目简介 B站缓存工具箱是一个多功能的B站缓存工具,包含视频下载、缓存重载、文件合并及系统设置四大核心功能。基于yutto开发,采用图形化界面操作,极大简化B站资源获取与管理流程。 工具可以直接将原本缓存的视频读取&#…...

Docker Compose 完全指南:从入门到生产实践
Docker Compose 完全指南:从入门到生产实践 1. Docker Compose 简介与核心价值 Docker Compose 是一个用于定义和运行多容器 Docker 应用程序的工具。通过一个 YAML 文件来配置应用的服务,只需简单命令就能创建和启动所有服务。 核心优势:…...

《Redis应用实例》学习笔记,第二章:缓存二进制数据
前言 最近在学习《Redis应用实例》,这本书并没有讲任何底层,而是聚焦实战用法,梳理了 32 种 Redis 的常见用法。我的笔记在 Github 上,用 Jupyter 记录,会有更好的阅读体验,作者的源码在这里:h…...
亲和路由:GICD_IROUTER寄存器具体如何与MPIDR配合使用?)
ARM GIC(七)亲和路由:GICD_IROUTER寄存器具体如何与MPIDR配合使用?
ARM GIC(一) GIC V3架构基础学习笔记 完善亲和路由章节。 一、MPIDR MPIDR(Multiprocessor Affinity Register)寄存器在ARM架构中用于标识处理器的亲和性信息,这对于中断处理非常重要,特别是在多处理器系…...

stm32之SPI
目录 1.SPI通信协议1.1 简介1.2 硬件电路1.3 移位示意图1.4 SPI时序基本单元1.5 SPI时序 2.W25Q642.1 简介2.2 硬件电路2.3 框图2.3.1 结构介绍2.3.2 混淆 2.4 Flash操作注意事项2.4.1 写操作2.4.2 读取操作 2.5 芯片手册补充2.5.1 状态寄存器2.5.2 指令集 3.软件操作W25Q644.S…...

数据库事务以及JDBC实现事务
一、数据库事务 数据库事务(Database Transaction)是数据库管理系统中的一个核心概念,它代表一组操作的集合,这些操作要么全部执行成功,要么全部不执行,即操作数据的最小执行单元,保证数据库的…...

C语言_函数调用栈的汇编分析
在 C 语言的底层实现中,函数调用栈是程序运行时内存管理的核心机制。它不仅负责函数间的控制转移,还管理局部变量、参数传递和返回值。本文将结合 C 语言代码和 x86-64 汇编指令,深入解析函数调用栈的工作原理。 一、函数调用栈的基本概念 …...

单片机调用printf概率性跑飞解决方法
最近移植软件到不同平台的单片机上时,遇到了软件概率性跑飞的问题,分析后原因均指向和printf相关的库函数(包括sprintf, vsnsprinft),在任务里调用这些函数就有概率在ucos切换任务时跑飞(中断)。…...

无人机空中物流优化:用 Python 打造高效配送模型
友友们好! 我是Echo_Wish,我的的新专栏《Python进阶》以及《Python!实战!》正式启动啦!这是专为那些渴望提升Python技能的朋友们量身打造的专栏,无论你是已经有一定基础的开发者,还是希望深入挖掘Python潜力的爱好者,这里都将是你不可错过的宝藏。 在这个专栏中,你将会…...