基于YOLOv的目标检测训练数据构建方法研究—图像采集、标注、划分与增强一体化流程设计
在目标检测任务中,高质量的训练数据是模型性能提升的关键。本文围绕
YOLOv系列模型,系统性地研究了目标检测训练数据的构建方法,提出了一套从图像采集、标注、数据集划分到数据增强的一体化流程设计 。通过多源图像采集策略确保样本多样性,结合LabelImg工具完成VOC格式标注,并采用标准化方式将XML标签转换为YOLOv所需的TXT格式。在数据集划分阶段,按照8:1:1的比例将数据划分为训练集、验证集和测试集,以提高模型泛化能力。同时引入多种数据增强手段,包括Gamma变换、滤波操作、缩放、翻转和任意角度旋转,进一步提升了模型对光照变化、尺度差异和目标方向变化的鲁棒性。实验表明,该数据构建方法不仅有效解决了小样本训练中的过拟合问题,还显著提高了模型在实际场景下的识别精度与稳定性,为YOLOv系列模型的训练提供了可靠的数据支持。
1.🌟收集数据集:高质量图像样本获取与多源融合策略
构建目标检测模型训练数据的第一步是获取具有代表性的图像样本,确保模型在实际部署中具备良好的泛化能力。
1.1 🔍 数据来源建议
- 公开数据集:如 COCO、PASCAL VOC、Open Images、VisDrone(根据任务选择)
- 网络爬取图像:使用工具(如 Google Images、Bing Image Downloader)采集特定类别的图像
- 自建数据采集:通过摄像头、无人机、监控设备等拍摄真实场景图像
- 视频帧提取:从相关视频中抽帧获取多样化的连续样本
1.2 ⚙️ 数据质量控制要点
| 要素 | 说明 |
|---|---|
| 分辨率 | 建议统一为 640×640 或以上 |
| 光照条件 | 包含白天、夜晚、低光、反光等多种光照环境 |
| 角度多样性 | 不同视角、角度和姿态的目标图像 |
| 拍摄设备 | 多种设备采集以增强泛化性(如手机、相机、监控) |
| 样本筛选 | 剔除模糊、重复、低质量图像 |
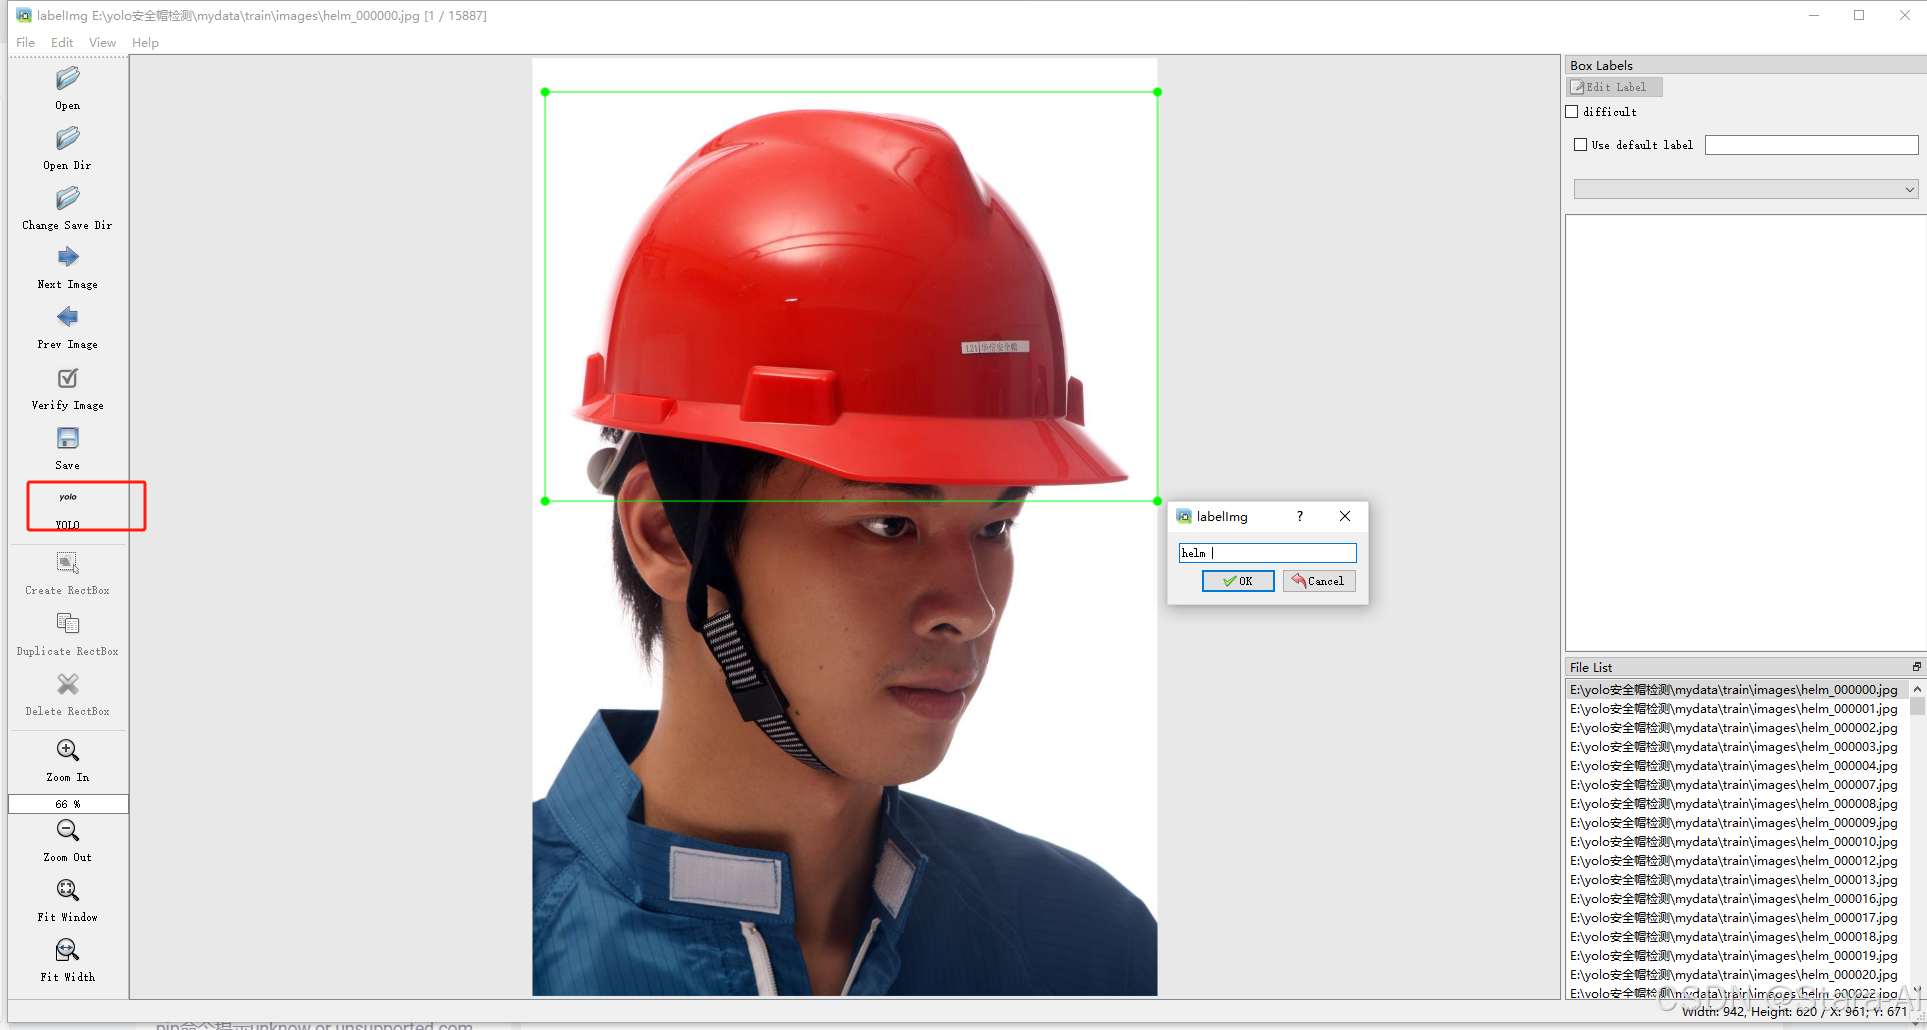
2.🌟标注数据集:YOLO格式标注规范与标签一致性管理
将原始图像中的目标用边界框进行标注,并转换为 YOLOv 所需的归一化坐标格式,形成可用于模型训练的
.txt标签文件。
2.1 🛠️ 常用标注工具推荐
| 工具 | 特点 |
|---|---|
| LabelImg | 开源、轻量、支持 YOLO 格式输出 |
| CVAT | 支持多人协作、在线标注平台 |
| LabelMe | 支持多边形标注,适用于非矩形目标 |
| Roboflow Annotate | 在线标注工具,集成数据增强功能 |
| Make Sense | 界面友好、完全免费的在线图像标注工具,非常适合用于目标检测、实例分割等任务的数据 |
2.2 📄 YOLO 格式标签文件结构
每个 .txt 文件对应一张图像,内容如下:
<class_id> <x_center> <y_center> <width> <height>
其中:
class_id: 类别编号(从0开始)x_center, y_center: 边界框中心点坐标(相对于图像宽高的归一化值)width, height: 边界框的宽度和高度(同样为归一化值)
示例:
0 0.45 0.32 0.15 0.20
1 0.78 0.63 0.10 0.12
2.3 🧩 标注流程步骤
- 创建类别列表:定义你的检测类别,如
person,car,drone等; - 批量标注图像:使用 LabelImg 或 CVAT 对每张图像进行目标框选;
- 导出为 YOLO 格式:确保生成
.txt文件并保存为(x_center, y_center, width, height)归一化格式; - 标签一致性校验:检查是否出现误标、漏标或类别错位问题;
- 版本控制与备份:定期保存标注结果,防止数据丢失;


3.🌟划分数据集:训练/验证/测试集标准化比例设计
将标注后的数据集划分为训练集、验证集和测试集,以便于后续模型训练与性能评估。
3.1 🔢 常见划分比例推荐
| 阶段 | 推荐比例 | 用途 |
|---|---|---|
| 训练集(train) | 70% - 80% | 模型参数学习 |
| 验证集(valid) | 10% - 15% | 超参数调优与模型选择 |
| 测试集(test) | 10% - 15% | 最终性能评估 |
3.2 📜 划分逻辑说明(Python 示例脚本片段)
import os
import random
import shutildef copy_files(src_dir, dst_dir, filenames, extension):os.makedirs(dst_dir, exist_ok=True)missing_files = 0for filename in filenames:src_path = os.path.join(src_dir, filename + extension)dst_path = os.path.join(dst_dir, filename + extension)# Check if the file exists before copyingif os.path.exists(src_path):shutil.copy(src_path, dst_path)else:print(f"Warning: File not found for {filename}")missing_files += 1return missing_filesdef split_and_copy_dataset(image_dir, label_dir, output_dir, train_ratio=0.8, valid_ratio=0.11, test_ratio=0.1):# 获取所有图像文件的文件名(不包括文件扩展名)image_filenames = [os.path.splitext(f)[0] for f in os.listdir(image_dir)]# 随机打乱文件名列表random.shuffle(image_filenames)# 计算训练集、验证集和测试集的数量total_count = len(image_filenames)train_count = int(total_count * train_ratio)valid_count = int(total_count * valid_ratio)test_count = total_count - train_count - valid_count# 定义输出文件夹路径train_image_dir = os.path.join(output_dir, 'train', 'images')train_label_dir = os.path.join(output_dir, 'train', 'labels')valid_image_dir = os.path.join(output_dir, 'valid', 'images')valid_label_dir = os.path.join(output_dir, 'valid', 'labels')test_image_dir = os.path.join(output_dir, 'test', 'images')test_label_dir = os.path.join(output_dir, 'test', 'labels')# 复制图像和标签文件到对应的文件夹train_missing_files = copy_files(image_dir, train_image_dir, image_filenames[:train_count], '.jpg')train_missing_files += copy_files(label_dir, train_label_dir, image_filenames[:train_count], '.txt')valid_missing_files = copy_files(image_dir, valid_image_dir, image_filenames[train_count:train_count + valid_count],'.jpg')valid_missing_files += copy_files(label_dir, valid_label_dir,image_filenames[train_count:train_count + valid_count], '.txt')test_missing_files = copy_files(image_dir, test_image_dir, image_filenames[train_count + valid_count:], '.jpg')test_missing_files += copy_files(label_dir, test_label_dir, image_filenames[train_count + valid_count:], '.txt')# Print the count of each datasetprint(f"Train dataset count: {train_count}, Missing files: {train_missing_files}")print(f"Validation dataset count: {valid_count}, Missing files: {valid_missing_files}")print(f"Test dataset count: {test_count}, Missing files: {test_missing_files}")# 使用例子
image_dir = 'datasets/coco128/images/train2017'
label_dir = 'datasets/coco128/labels/train2017'
output_dir = './my_dataset'
split_and_copy_dataset(image_dir, label_dir, output_dir)
3.3 🧱 文件目录结构建议
my_dataset/└── train└── images (folder including all training images)└── labels (folder including all training labels)└── test└── images (folder including all testing images)└── labels (folder including all testing labels)└── valid└── images (folder including all testing images)└── labels (folder including all testing labels)
4.🌟基于数据增强的方法(自动生成图片和xml文件)
小样本目标检测方法主要基于传统的经典成熟的目标检测方法,借鉴小样本学习框架,构建针对目标检测的小样本解决方案。现有的方法主要为:
(1)基于度量学习(metric learning)的方法
(2)基于数据增强的方法
(3)基于模型结构的方法
(4)基于微调(fine-tune)的方法
(5)基于元学习的方法
(6)基于集成的方法
数据增强(也叫数据扩增)的目的是为了扩充数据和提升模型的泛化能力。有效的数据扩充不仅能扩充训练样本数量,还能增加训练样本的多样性,一方面可避免过拟合,另一方面又会带来模型性能的提升。
数据增强(DataAugmentation)是一种使用少量数据通过先验知识产生更多的相似生成数据来扩展训练数据集的方法。数据增强方法常用于解决现实业务中的小样本问题。
数据增强几种常用方法有:图像水平/竖直翻转、随机抠取、尺度变换和旋转。其中尺度变换(scaling)、旋转(rotating)等方法用来增加卷积卷积神经网络对物体尺度和方向上的鲁棒性。
小样本学习主要问题是样本量过少,从而导致样本多样性不足以刻画完整样本分布,可以通过样本增强来提升样本多样性;基于数据增强的方法是利用辅助数据集或者辅助信息增强目标数据集中进行数据扩充
或特征增强,使模型能更好拟合。数据扩充可以是无标签或者合成带标签数据;特征增强是在原样本的特征空间中添加便于分类的特征,增加特征多样性;
4.1 ✅Gamma 变化增强(Gamma Correction)
# -*- coding: utf-8 -*-
import cv2
import numpy as np
import xml.etree.ElementTree as ET
import os
from skimage import exposurexmlpath = './VOC2007/Annotations/'
imgpath = './VOC2007/JPEGImages/'
hist_imgpath = './VOC2007/gammma/'
hist_xmlpath = './xmlgammma/'for i in os.listdir(imgpath):a, b = os.path.splitext(i)img = cv2.imread(imgpath + a + '.jpg', 0)w = img.shape[1]h = img.shape[0]img2 = np.zeros([h, w], img.dtype)aa = 1.1gg = 5img1 = cv2.addWeighted(img, aa, img2, 1 - aa, gg)# img1 = exposure.adjust_gamma(img,0.9)# img1= exposure.adjust_log(img)   #对数调整cv2.imwrite(hist_imgpath + a + '_gamma' + str(1) + '_' + str(9) + '.jpg', img1)tree = ET.parse(xmlpath + a + '.xml')root = tree.getroot()for file1 in root.findall('filename'):# filename=str(file1.find('filename').text)file1.text = str(a + '_gamma' + str(1) + '_' + str(9) + '.jpg')tree.write(hist_xmlpath + a + '_gamma' + str(1) + '_' + str(9) + '.xml')print(str(a) + '.xml has been gamma  ')
4.2 ✅滤波类增强(GaussianBlur、medianBlur、blur)
# -*- coding: utf-8 -*-
import cv2
import numpy as np
import xml.etree.ElementTree as ET
import os
from skimage import exposurexmlpath = './Annotations/'
imgpath = './JPEGImages/'
blur_imgpath = './motionblur/'
blur_xmlpath = './xmlmotion/'for i in os.listdir(imgpath):a, b = os.path.splitext(i)img = cv2.imread(imgpath + a + '.jpg', 1)# img1 = cv2.bilateralFilter(img,15,15,2,4)img1 = cv2.blur(img, (3, 3));# img1 = cv2.GaussianBlur(img,(3,3),3); #(9,9),5and3# img1 = cv2.medianBlur(img,3);cv2.imwrite(blur_imgpath + a + '_blur_' + str(3) + '.jpg', img1)tree = ET.parse(xmlpath + a + '.xml')root = tree.getroot()for file1 in root.findall('filename'):# filename=str(file1.find('filename').text)file1.text = str(a + '_blur_' + str(3) + '.jpg')tree.write(blur_xmlpath + a + '_blur_' + str(3) + '.xml')print(str(a) + '.xml has been gamma  ')
4.3 ✅缩放类增强(Scaling)
# -*- coding: utf-8 -*-
import cv2
import math
import numpy as np
import xml.etree.ElementTree as ET
import osxmlpath = './Annotations/'
imgpath = './JPEGImages/'
resize_imgpath = './resize/'
rotated_xmlpath = './resizexml/'
for i in os.listdir(imgpath):a, b = os.path.splitext(i)  # 分离出文件名aimg = cv2.imread(imgpath + a + '.jpg')w = img.shape[1]h = img.shape[0]scale_h = 0.98scale_w = 0.98resize_img = cv2.resize(img, (int(w * scale_w), int(h * scale_h)), interpolation=cv2.INTER_CUBIC)cv2.imwrite(resize_imgpath + a + '_' + str(98) + '.jpg', resize_img)# print str(i) + ' has been rotated for '+ st12°'tree = ET.parse(xmlpath + a + '.xml')root = tree.getroot()for file1 in root.findall('filename'):# filename=str(file1.find('filename').text)file1.text = str(a + '_' + str(98) + '.jpg')for box in root.iter('bndbox'):xmin = float(box.find('xmin').text)ymin = float(box.find('ymin').text)xmax = float(box.find('xmax').text)ymax = float(box.find('ymax').text)x = int(xmin * scale_h)y = int(ymin * scale_w)x1 = int(xmax * scale_h)y1 = int(ymax * scale_w)cv2.rectangle(resize_img, (x, y), (x1, y1), [0, 0, 255], 2)  # 可在该步骤测试新画的框位置是否正确# cv2.imshow('xmlbnd',rotated_img)# cv2.waitKey(200)box.find('xmin').text = str(x)box.find('ymin').text = str(y)box.find('xmax').text = str(x1)box.find('ymax').text = str(y1)# cv2.imwrite("E:/test/VOC07/3/" + a + "_" + str(1000) +".jpg",resize_img)tree.write(rotated_xmlpath + a + '_' + str(98) + '.xml')print(str(a) + '.xml has been rotated for ' + str(98))
4.4 ✅翻转类增强(Flipping)
# -*- coding: utf-8 -*-
import cv2
import math
import numpy as np
import xml.etree.ElementTree as ET
import osdef GetUDFlipLoc(h, xmin, ymin, xmax, ymax):H = hNewXmin = xminNewYmin = H - ymaxNewXmax = xmaxNewYmax = H - yminreturn NewXmin, NewYmin, NewXmax, NewYmaxxmlpath = './Annotations/'
imgpath = './JPEGImages/'
rotated_imgpath = './motionblur/'
rotated_xmlpath = './xmlmotion/'for i in os.listdir(imgpath):a, b = os.path.splitext(i)# img = cv2.imread(imgpath + a + '.jpg',0)img = cv2.imread(imgpath + a + '.bmp')w = img.shape[1]h = img.shape[0]UDFlipIm = cv2.flip(img, 1)cv2.imwrite(rotated_imgpath + a + '_flip' + '.bmp', UDFlipIm)tree = ET.parse(xmlpath + a + '.xml')root = tree.getroot()for file1 in root.findall('filename'):# filename=str(file1.find('filename').text)file1.text = str(a + '_flip' + '.bmp')for box in root.iter('bndbox'):xmin = int(box.find('xmin').text)ymin = int(box.find('ymin').text)xmax = int(box.find('xmax').text)ymax = int(box.find('ymax').text)NewXmin, NewYmin, NewXmax, NewYmax = GetUDFlipLoc(h, xmin, ymin, xmax, ymax)box.find('xmin').text = str(NewXmin)box.find('ymin').text = str(NewYmin)box.find('xmax').text = str(NewXmax)box.find('ymax').text = str(NewYmax)# cv2.imwrite("E:/test/VOC07/3/" + a + "_" + str(angle) +".jpg",rotated_img)tree.write(rotated_xmlpath + a + '_flip' + '.xml')print(str(a) + '.xml has been flip for ' + '_flip' + '°')
4.5 ✅任意角度旋转增强(Arbitrary Angle Rotation)
# -*- coding: utf-8 -*-
import cv2
import math
import numpy as np
import xml.etree.ElementTree as ET
import osdef rotate_image(src, angle, scale=1):w = src.shape[1]h = src.shape[0]# 角度变弧度rangle = np.deg2rad(angle)  # angle in radians# now calculate new image width and heightnw = (abs(np.sin(rangle) * h) + abs(np.cos(rangle) * w)) * scalenh = (abs(np.cos(rangle) * h) + abs(np.sin(rangle) * w)) * scale# ask OpenCV for the rotation matrixrot_mat = cv2.getRotationMatrix2D((nw * 0.5, nh * 0.5), angle, scale)# calculate the move from the old center to the new center combined# with the rotationrot_move = np.dot(rot_mat, np.array([(nw - w) * 0.5, (nh - h) * 0.5, 0]))# the move only affects the translation, so update the translation# part of the transformrot_mat[0, 2] += rot_move[0]rot_mat[1, 2] += rot_move[1]dst = cv2.warpAffine(src, rot_mat, (int(math.ceil(nw)), int(math.ceil(nh))), flags=cv2.INTER_LANCZOS4)# 仿射变换return dst# 对应修改xml文件
def rotate_xml(src, xmin, ymin, xmax, ymax, angle, scale=1.):w = src.shape[1]h = src.shape[0]rangle = np.deg2rad(angle)  # angle in radians# now calculate new image width and height# 获取旋转后图像的长和宽nw = (abs(np.sin(rangle) * h) + abs(np.cos(rangle) * w)) * scalenh = (abs(np.cos(rangle) * h) + abs(np.sin(rangle) * w)) * scale# ask OpenCV for the rotation matrixrot_mat = cv2.getRotationMatrix2D((nw * 0.5, nh * 0.5), angle, scale)# calculate the move from the old center to the new center combined# with the rotationrot_move = np.dot(rot_mat, np.array([(nw - w) * 0.5, (nh - h) * 0.5, 0]))# the move only affects the translation, so update the translation# part of the transformrot_mat[0, 2] += rot_move[0]rot_mat[1, 2] += rot_move[1]  # rot_mat是最终的旋转矩阵# point1 = np.dot(rot_mat, np.array([xmin, ymin, 1]))          #这种新画出的框大一圈# point2 = np.dot(rot_mat, np.array([xmax, ymin, 1]))# point3 = np.dot(rot_mat, np.array([xmax, ymax, 1]))# point4 = np.dot(rot_mat, np.array([xmin, ymax, 1]))point1 = np.dot(rot_mat, np.array([(xmin + xmax) / 2, ymin, 1]))  # 获取原始矩形的四个中点,然后将这四个点转换到旋转后的坐标系下point2 = np.dot(rot_mat, np.array([xmax, (ymin + ymax) / 2, 1]))point3 = np.dot(rot_mat, np.array([(xmin + xmax) / 2, ymax, 1]))point4 = np.dot(rot_mat, np.array([xmin, (ymin + ymax) / 2, 1]))concat = np.vstack((point1, point2, point3, point4))  # 合并np.array# 改变array类型concat = concat.astype(np.int32)rx, ry, rw, rh = cv2.boundingRect(concat)  # rx,ry,为新的外接框左上角坐标,rw为框宽度,rh为高度,新的xmax=rx+rw,新的ymax=ry+rhreturn rx, ry, rw, rh# 使图像旋转60,90,120,150,210,240,300度xmlpath = './Annotations/'
imgpath = './JPEGImages/'
rotated_imgpath = './rotate/'
rotated_xmlpath = './rotatexml/'
# for angle in (90,270):
for angle in (5, 10):for i in os.listdir(imgpath):a, b = os.path.splitext(i)  # 分离出文件名a# img = cv2.imread(imgpath + a + '.jpg',0)img = cv2.imread(imgpath + a + '.jpg')rotated_img = rotate_image(img, angle)cv2.imwrite(rotated_imgpath + a + '_' + str(angle) + '.jpg', rotated_img)# print str(i) + ' has been rotated for '+ str(angle)+'°'tree = ET.parse(xmlpath + a + '.xml')root = tree.getroot()for file1 in root.findall('filename'):# filename=str(file1.find('filename').text)file1.text = str(a + '_' + str(angle) + '.jpg')for box in root.iter('bndbox'):xmin = float(box.find('xmin').text)ymin = float(box.find('ymin').text)xmax = float(box.find('xmax').text)ymax = float(box.find('ymax').text)x, y, w, h = rotate_xml(img, xmin, ymin, xmax, ymax, angle)cv2.rectangle(rotated_img, (x, y), (x + w, y + h), [0, 0, 255], 2)  # 可在该步骤测试新画的框位置是否正确# cv2.imshow('xmlbnd',rotated_img)# cv2.waitKey(200)box.find('xmin').text = str(x)box.find('ymin').text = str(y)box.find('xmax').text = str(x + w)box.find('ymax').text = str(y + h)# cv2.imwrite("E:/test/VOC07/3/" + a + "_" + str(angle) +".jpg",rotated_img)tree.write(rotated_xmlpath + a + '_' + str(angle) + '.xml')print(str(a) + '.xml has been rotated for ' + str(angle) + '°')
5.🌟 标签转化(将VOC XML标注转换为YOLO格式)
- 查看路径放置脚本
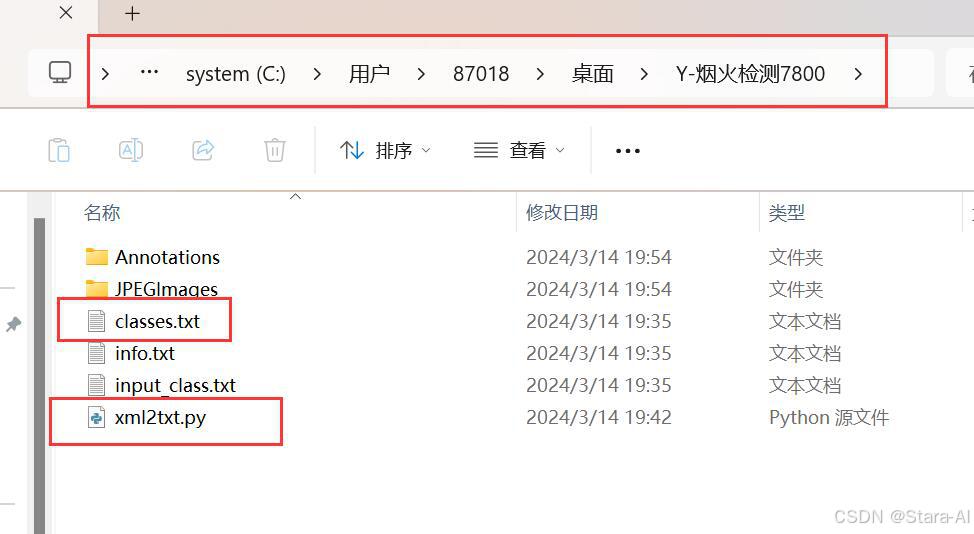
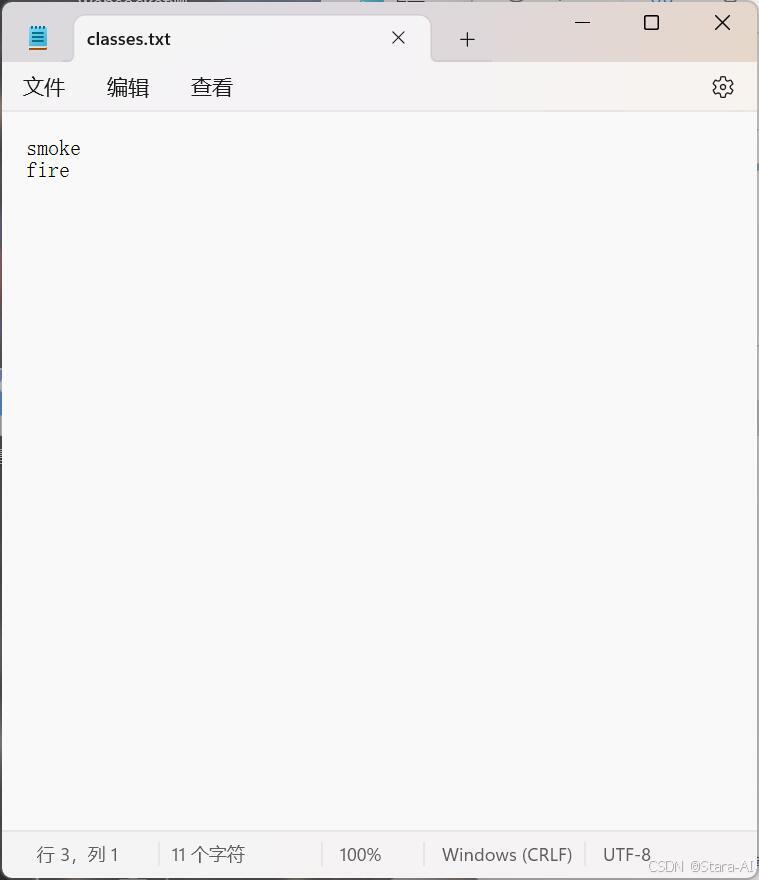
2. 查看数据集分类名
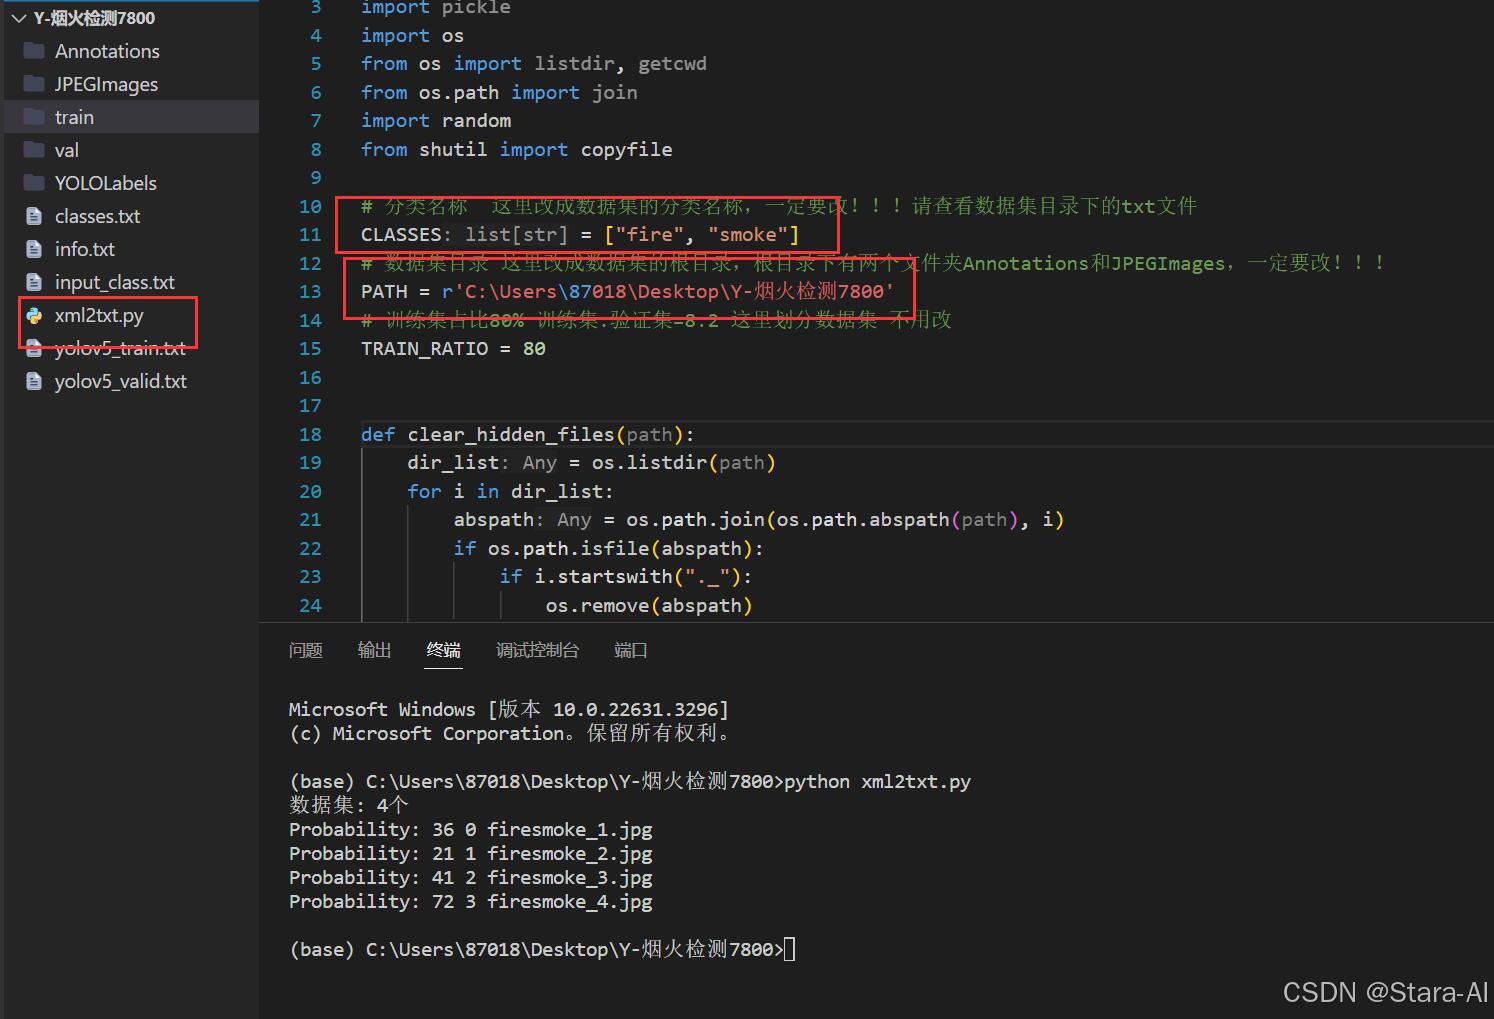
3. 执行脚本
# xml2txt.pyimport xml.etree.ElementTree as ET
import os
from os import listdir, getcwd
from os.path import join
import random
from shutil import copyfile# 分类名称  这里改成数据集的分类名称,一定要改!!!请查看数据集目录下的txt文件
CLASSES = ["fire", "smoke"]
# 数据集目录 这里改成数据集的根目录,根目录下有两个文件夹Annotations和JPEGImages,一定要改!!!
PATH = r'C:\Users\87018\Desktop\Y-烟火检测7800'
# 训练集占比80% 训练集:验证集:测试集=8:1:1 这里划分数据集 不用改
TRAIN_RATIO = 80
VALID_RATIO = 10
TEST_RATIO = 10def clear_hidden_files(path):dir_list = os.listdir(path)for i in dir_list:abspath = os.path.join(os.path.abspath(path), i)if os.path.isfile(abspath):if i.startswith("._"):os.remove(abspath)else:clear_hidden_files(abspath)def convert(size, box):dw = 1. / size[0]dh = 1. / size[1]x = (box[0] + box[1]) / 2.0y = (box[2] + box[3]) / 2.0w = box[1] - box[0]h = box[3] - box[2]x = x * dww = w * dwy = y * dhh = h * dhreturn (x, y, w, h)def convert_annotation(image_id):in_file = open(os.path.join(PATH, 'Annotations', f'{image_id}.xml'), encoding='utf-8')out_file = open(os.path.join(PATH, 'YOLOLabels', f'{image_id}.txt'), 'w', encoding='utf-8')tree = ET.parse(in_file)root = tree.getroot()size = root.find('size')w = int(size.find('width').text)h = int(size.find('height').text)difficult = 0for obj in root.iter('object'):if obj.find('difficult'):difficult = obj.find('difficult').textcls = obj.find('name').textif cls not in CLASSES or int(difficult) == 1:continuecls_id = CLASSES.index(cls)xmlbox = obj.find('bndbox')b = (float(xmlbox.find('xmin').text), float(xmlbox.find('xmax').text), float(xmlbox.find('ymin').text),float(xmlbox.find('ymax').text))bb = convert((w, h), b)out_file.write(f"{cls_id} " + " ".join([str(a) for a in bb]) + '\n')in_file.close()out_file.close()wd = os.getcwd()
work_space_dir = os.path.join(wd, PATH)annotation_dir = os.path.join(work_space_dir, "Annotations/")
if not os.path.isdir(annotation_dir):os.mkdir(annotation_dir)
clear_hidden_files(annotation_dir)image_dir = os.path.join(work_space_dir, "JPEGImages/")
if not os.path.isdir(image_dir):os.mkdir(image_dir)
clear_hidden_files(image_dir)yolo_labels_dir = os.path.join(work_space_dir, "YOLOLabels/")
if not os.path.isdir(yolo_labels_dir):os.mkdir(yolo_labels_dir)
clear_hidden_files(yolo_labels_dir)yolov5_train_dir = os.path.join(work_space_dir, "train/")
if not os.path.isdir(yolov5_train_dir):os.mkdir(yolov5_train_dir)
clear_hidden_files(yolov5_train_dir)yolov5_images_train_dir = os.path.join(yolov5_train_dir, "images/")
if not os.path.isdir(yolov5_images_train_dir):os.mkdir(yolov5_images_train_dir)
clear_hidden_files(yolov5_images_train_dir)yolov5_labels_train_dir = os.path.join(yolov5_train_dir, "labels/")
if not os.path.isdir(yolov5_labels_train_dir):os.mkdir(yolov5_labels_train_dir)
clear_hidden_files(yolov5_labels_train_dir)yolov5_valid_dir = os.path.join(work_space_dir, "val/")
if not os.path.isdir(yolov5_valid_dir):os.mkdir(yolov5_valid_dir)
clear_hidden_files(yolov5_valid_dir)yolov5_images_valid_dir = os.path.join(yolov5_valid_dir, "images/")
if not os.path.isdir(yolov5_images_valid_dir):os.mkdir(yolov5_images_valid_dir)
clear_hidden_files(yolov5_images_valid_dir)yolov5_labels_valid_dir = os.path.join(yolov5_valid_dir, "labels/")
if not os.path.isdir(yolov5_labels_valid_dir):os.mkdir(yolov5_labels_valid_dir)
clear_hidden_files(yolov5_labels_valid_dir)yolov5_test_dir = os.path.join(work_space_dir, "test/")
if not os.path.isdir(yolov5_test_dir):os.mkdir(yolov5_test_dir)
clear_hidden_files(yolov5_test_dir)yolov5_images_test_dir = os.path.join(yolov5_test_dir, "images/")
if not os.path.isdir(yolov5_images_test_dir):os.mkdir(yolov5_images_test_dir)
clear_hidden_files(yolov5_images_test_dir)yolov5_labels_test_dir = os.path.join(yolov5_test_dir, "labels/")
if not os.path.isdir(yolov5_labels_test_dir):os.mkdir(yolov5_labels_test_dir)
clear_hidden_files(yolov5_labels_test_dir)train_file = open(os.path.join(wd, "yolov5_train.txt"), 'w', encoding='utf-8')
valid_file = open(os.path.join(wd, "yolov5_valid.txt"), 'w', encoding='utf-8')
test_file = open(os.path.join(wd, "yolov5_test.txt"), 'w', encoding='utf-8')list_imgs = os.listdir(image_dir)  # list image files
print("数据集: %d个" % len(list_imgs))for i in range(0, len(list_imgs)):path = os.path.join(image_dir, list_imgs[i])if os.path.isfile(path):image_path = image_dir + list_imgs[i](nameWithoutExtention, extention) = os.path.splitext(os.path.basename(image_path))annotation_name = nameWithoutExtention + '.xml'annotation_path = os.path.join(annotation_dir, annotation_name)label_name = nameWithoutExtention + '.txt'label_path = os.path.join(yolo_labels_dir, label_name)prob = random.randint(1, 100)print("Probability: %d" % prob, i, list_imgs[i])if os.path.exists(annotation_path):if prob < TRAIN_RATIO:# train datasettrain_file.write(image_path + '\n')convert_annotation(nameWithoutExtention)  # convert labelcopyfile(image_path, yolov5_images_train_dir + list_imgs[i])copyfile(label_path, yolov5_labels_train_dir + label_name)elif prob < TRAIN_RATIO + VALID_RATIO:# validation datasetvalid_file.write(image_path + '\n')convert_annotation(nameWithoutExtention)  # convert labelcopyfile(image_path, yolov5_images_valid_dir + list_imgs[i])copyfile(label_path, yolov5_labels_valid_dir + label_name)else:# test datasettest_file.write(image_path + '\n')convert_annotation(nameWithoutExtention)  # convert labelcopyfile(image_path, yolov5_images_test_dir + list_imgs[i])copyfile(label_path, yolov5_labels_test_dir + label_name)train_file.close()
valid_file.close()
test_file.close()
本文系统梳理并实现了基于 YOLOv 的目标检测训练数据构建全流程,涵盖了图像采集、标注、划分与增强等关键环节。通过对数据集进行标准化处理与增强优化,有效提升了模型对复杂场景的适应能力。本研究构建的数据集结构清晰、格式统一,能够直接适配 YOLOv8 等主流目标检测框架,具有良好的可扩展性和工程实用性。未来将进一步探索自动标注、多模态数据融合以及更高效的增强策略,以提升数据集质量与模型训练效率,推动目标检测技术在工业、安防、遥感等领域的广泛应用。
相关文章:

基于YOLOv的目标检测训练数据构建方法研究—图像采集、标注、划分与增强一体化流程设计
在目标检测任务中,高质量的训练数据是模型性能提升的关键。本文围绕 YOLOv 系列模型,系统性地研究了目标检测训练数据的构建方法,提出了一套从图像采集、标注、数据集划分到数据增强的一体化流程设计 。通过多源图像采集策略确保样本多样性&a…...

c++类【开端】
运算符重载 方式:operator运算符(参数列表){}。 运算符就是:-*/[]等。 运算符重载,和定义一个方法效果是一样的,只是,重载运算符让类的-*/等操作看起来和普通数字的-*/一样。仅是看起来一样。我们重载运算符…...

wordperss AI插件:AI图文+视频+长尾关键词自动生成,已内置deepseek、kimi全模型,支持简单一键接入更多自定义API
【2.17最新版】Linkreate wordperss AI插件:AI图文视频长尾关键词自动生成,已内置deepseek、kimi全模型。 支持自定义接入其它API,包括但不限于腾讯云API和它的deepseek模型 后台只需要设置对应的API url 、模型 、API key,就可以让插件调用…...

【免费分享无广告】刷视频助手抖音快手小红书视频号自动脚本刷视频养号
养号可做极速版刷视频任务支持最新版软件 【资 源 名 称】刷视频助手 【资 源 版 本】1.0.2 【资 源 大 小】11.66M 【资 源 系 统】安卓 【资 源 介 绍】刷视频养号助手,操作简单,就一个页面。亲测无广纯净,打开即用 ———————————…...

Javascript大致框架
一、JavaScript简介 JavaScript,简称JS,是一种高级的、解释型的编程语言,主要用于为网页添加动态功能。它最初由Netscape公司于1995年推出,最早名为LiveScript,后更名为JavaScript。尽管名字中带有“Java”࿰…...

Linux 权限
目录 一、Linux 权限概念 1.1 用户 1.2 用户切换 1.3 sudo指令提权 1.4 文件访问者的分类(人) 1.5 文件类型和访问权限(事物属性) 1.6 文件访问权限和相关设置方法 1) chmod 2)chown 3)chgrp 二…...

linux stm32mp157 GIC-V2 中断处理过程分析
/* ** 中断触发时,调用的 handle_arch_irq 入口地址。 ** 因为此时,挂接的就是 gic_handle_irq 函数!gic_handle_irq 是个全局函数指针, ** static void __exception_irq_entry gic_handle_irq(struct pt_regs *regs) ** 它是Lin…...

Linux安装RTL8215网卡驱动
一、下载RTL8215驱动 下载地址:https://www.realtek.com/Download/ToDownload?typedirect&downloadid3763 二、安装编译工具 找一台能够访问互联网的linux服务器,下载对应的deb包 sudo apt-get install --download-only make gcc bzip2这将只下…...

用 Python 分析 IRIS 数据集:概率论与数理统计实战教程
一、引言 在数据科学的世界里,IRIS 数据集就像是一位常客,频繁出现在各种数据分析和机器学习的案例中。它包含 150 条记录,分属 Setosa、Versicolour、Virginica 这 3 种鸢尾花类别,每条记录还带有萼片长度、萼片宽度、花瓣长度、…...
:阅读与注释表盘 QDial 的源码,其是基类QAbstractSlider 的子类,及其刻度线的属性举例)
QT6 源(79):阅读与注释表盘 QDial 的源码,其是基类QAbstractSlider 的子类,及其刻度线的属性举例
(1)源代码来自于头文件 qdial . h : #ifndef QDIAL_H #define QDIAL_H#include <QtWidgets/qtwidgetsglobal.h>#include <QtWidgets/qabstractslider.h>QT_REQUIRE_CONFIG(dial);QT_BEGIN_NAMESPACEclass QDialPrivate; class Q…...
)
Python 函数装饰器和闭包(闭包)
本章内容: Python 如何计算装饰器句法 Python 如何判断变量是不是局部的 闭包存在的原因和工作原理 nonlocal 能解决什么问题 掌握这些基础知识后,我们可以进一步探讨装饰器: 实现行为良好的装饰器 标准库中有用的装饰器 实现一个参数化装饰器…...

linux种文件名usr的含义是什么?
在Linux操作系统中,/usr目录是一个核心且容易引发困惑的概念。它既承载着历史演变的痕迹,又在现代系统中承担着关键功能。本文将从定义、结构、历史演变及常见问题等角度,全面解析usr的含义及其在Linux中的作用。 一、usr的起源与定义 1. 词…...

2025年中国光电子器件产业链分析
中商情报网讯:光电子器件作为信息时代的“光子引擎”,正从通信领域向消费电子、工业、医疗等全场景渗透。未来,随着材料科学、光子集成技术的突破,光电子器件将进一步重塑人类的信息交互方式,成为数字经济的关键基础设…...

基于 jQuery 实现灵活可配置的输入框验证功能
在 Web 表单开发中,输入框验证是保障数据准确性和安全性的关键环节。无论是用户注册、信息提交还是数据录入场景,都需要对用户输入内容进行合法性检查。本文将介绍如何使用 HTML、CSS 和 jQuery 构建一个可灵活配置的输入框验证系统,轻松应对…...

GPU性能加速的隐藏魔法:Dual-Issue Warp Schedule全解析
一、先来点"前菜":什么是Warp Schedule? 想象你是一个GPU的老板(比如NVIDIA老黄),手下有几万个"线程员工"要管理。直接让几万人同时开会?那得疯。于是你发明了"Warp"&#…...

无人机 | 无人机设计概述
无人机设计是一个复杂的系统工程,涉及空气动力学、电子技术、材料科学、控制算法等多个领域的综合应用。以下是无人机设计的主要模块和关键要素概述: 一、总体设计目标 任务需求定义 用途:航拍、物流、农业、军事侦察、环境监测等性能指标&am…...

电子邮件相关协议介绍
0 Preface/Foreword 1 协议介绍 电子邮件包含的主要协议: SMTPPOPIMAP 1.1 SMPT SMPT: Simple Mail Transfer Protocol,电子邮件传输的标准协议,负责将邮件从发送方传输到接收方邮件服务器。 1.2 POP POP: Post Office Protoc…...

标题:试验台铁地板:革新之路
在铁路行业中,地板是一项至关重要的元素,直接关系到列车的安全、舒适性以及使用寿命。近年来,试验台铁地板的开发和应用成为了铁路行业的热门话题之一。试验台铁地板的出现标志着铁路行业在技术创新方面迈出了重要的一步。本文将从试验台铁地…...
:安装)
【C++】grpc(一):安装
因为接触了一些第三方项目和其他原因,我需要了解一些 RPC 相关的知识,首选的就是 Google 的 gRPC 库了。 安装 依然是使用WSL,发行版为Ubuntu 22.04.5 LTS gRPC的官网如下:https://grpc.org.cn/docs/languages/cpp/quickstart/…...
:深入解读移动应用商业模式的关键指标与策略)
精益数据分析(41/126):深入解读移动应用商业模式的关键指标与策略
精益数据分析(41/126):深入解读移动应用商业模式的关键指标与策略 在创业与数据分析的学习征程中,我们不断探索不同商业模式的核心要点,以挖掘其中的商业价值。今天,我依旧带着与大家共同进步的初心&#…...

Python字符串全解析:从基础操作到高级应用的技术指南
引言 Python字符串作为编程领域的核心数据类型,其丰富的操作方法直接影响代码效率和可维护性。本文基于Python 3.10环境,结合工程实践中的高频需求,深度解析12类字符串操作技术,涵盖驻留机制、高效查询、编码…...

直方图反向投影
目录 一、概念 二、OpenCV C实现 2.1 基础实现代码 2.2 优化实现(带遮罩) 三、应用场景 3.1 目标跟踪 3.2 图像分割 3.3 工业检测 四、性能优化技巧 一、概念 直方图反向投影(Histogram Back Projection)是一种基于概率的图…...

TCP/IP协议深度解析:从分层架构到TCP核心机制
TCP/IP协议深度解析:从分层架构到TCP核心机制 一、TCP/IP协议族架构与核心概念 1. 协议族四层架构概述 TCP/IP是互联网的基础架构,采用四层分层模型,每层分工明确,协同实现网络通信: 层次核心功能关键协议/技术典…...

【动态规划】子序列问题
个人主页 : zxctscl 专栏 【C】、 【C语言】、 【Linux】、 【数据结构】、 【算法】 如有转载请先通知 文章目录 前言1 300. 最长递增子序列(经典)3.1 分析3.2 代码 2 376. 摆动序列2.1 分析2.2 代码 3 673. 最长递增子序列的个数3.1 分析3.…...

【C++】什么是头文件?
在 C 中,头文件(通常以 .h 或 .hpp 为扩展名)是用于声明类、函数、变量、宏和其他代码结构的文件。头文件的主要目的是提供接口定义,使得这些声明可以在多个源文件(.cpp 文件)中共享,从而避免重…...
)
shell(9)
流程控制(if) 1.if判断 i.基本语法(单分支) if [ 条件判断式 ] then 代码 fi ii.基本语法(多分支) if [ 条件判断式 ] then 代码 elif [ 条件判断式 ] 代码 ...... fi 注意事项:[ 条…...

Java设计模式: 工厂模式与策略模式
Java设计模式: 工厂模式与策略模式 在软件开发领域,设计模式是一种可重复使用的解决方案,用来解决常见的设计问题。工厂模式和策略模式是常用的设计模式之一,它们能够帮助开发人员更好地组织和管理代码,提高代码的可维护性和可扩展…...

大模型微调Fine-tuning:从概念到实践的全面解析
目录 引言 一、什么是大模型微调? 1.1 预训练与微调的区别 1.2 微调的技术演进 二、为什么需要微调? 2.1 解决大模型的固有局限 2.2 微调的优势 三、主流微调方法 3.1 全参数微调 3.2 参数高效微调(PEFT) 四、微调实践指…...

5月5日日记
今天是假期的最后一天,早上爽睡到11点起床。其实九点多就醒了,但是不愿意起来,睡了俩小时又。起来之后就点了外卖,西红柿打卤面两个卤蛋,11块钱很实惠。 起来之后洗袜子,简单策划了一下红色合唱。 给电动…...

TopK题-快速选择方法
代码 class Solution {public int findKthLargest(int[] nums, int k) {//k 就是对应的是下标 n - k 的位置 也就是说我们要的是下标n-k的元素return quickselect(nums, 0, nums.length - 1, nums.length - k);}public int quickselect(int[] nums, int left, int right, int …...

【SpringBoot篇】详解短信验证码登录功能实现
一:需求分析与设计 1.1 发送短信验证码 (1)产品原型 (2)业务逻辑 (3)接口设计 1.2 短信验证码登录 (1)业务逻辑 …...

深入理解 Bash 中的 $‘...‘ 字符串语法糖
在 Bash 脚本编程中,字符串处理是不可或缺的一部分。为了让开发者更高效地处理特殊字符和控制字符,Bash 引入了一种独特的字符串语法糖:$(带单引号的 ANSI-C 风格字符串)。这种语法来源于 C 语言的 ANSI-C 标准&#x…...
)
机器人强化学习入门学习笔记(二)
基于上一篇的《机器人强化学习入门学习笔记》,在基于 MuJoCo 的仿真强化学习训练中,除了 PPO(Proximal Policy Optimization)之外,还有多个主流强化学习算法可用于训练机器人直行或其他复杂动作。 🧠 一、常见强化学习算法对比(可用于 MuJoCo) 算法类型特点适合场景PP…...

Vue3携手Echarts,打造炫酷数据可视化大屏
一、引言 在数字化时代,数据如同企业的血液,蕴含着巨大的价值。而如何将这些抽象的数据转化为直观、易懂的信息,以便更好地支持决策和展示成果,成为了众多开发者和企业关注的焦点。数据可视化大屏应运而生,它以直观、醒…...

Java Web项目部署指南2025
Java Web项目部署指南 适用场景:本地 Windows 开发打包 → 远程 Ubuntu 服务器部署(2025年最佳实践) 适合人群:Java Web初学者、运维新手、需要一站式部署流程的开发者 🚀 部署流程横向流程图 #mermaid-svg-aznXsajzfU…...

STC单片机与淘晶驰串口屏通讯例程之04【密码登录与修改】
大家好,我是『芯知识学堂』的SingleYork,上一讲笔者给大家介绍了STC单片机与淘晶驰串口屏通讯例程之03【单片机程序解析】,今天笔者要跟大家分享的淘晶驰串口屏的密码登录与密码修改功能的实现。 很多项目中,为了保护某些参数不被随意修改,往往需要增加密码来保护,这也是…...

青听音乐 1.0.6| 全网音乐免费听,无损下载,4条音源,界面简洁无广告
一款强大的音乐播放器,内部集成了相当丰富的功能,可以一键搜索任何想要的歌曲或歌手专辑,同时还支持下载和收藏,拥有非常流畅的速度,使用起来没有任何限制!软件自带有大厂的解析音源,运行非常稳…...

FISCO BCOS【初体验笔记】
飞梭区块链搭建初体验笔记 环境部署创建四个节点的飞梭区块链用的VMware17 centos 7.9 区块链是飞梭2.0用的webase-frontJava环境的正确安装Webase-front搭建 智能合约设计一点合约调试笔记 智能合约abi文件转为go文件后端项目配置相关工具linux常用命令(防忘记&…...

56.[前端开发-前端工程化]Day03-webpack构建工具
邂逅Webpack和打包过程 1 认识webpack工具 前端开发的流程 内置模块path path常见的API 在webpack中的使用 认识webpack 脚手架依赖webpack Webpack到底是什么呢 Webpack官方的图片 Vue项目加载的文件有哪些呢? Webpack的使用前提 Webpack的安装 2 webpack基本打包…...

两次解析格式化字符串 + 使用SQLAlchemy的relationship执行任意命令 -- link-shortener b01lersCTF 2025
题目描述: A fast and reliable link shortener service, with a new feature to add private links! 我们走一遍逻辑 注册 app.route("/register", methods[GET, POST]) def register(): """ 用户注册路由,处理用户注册请求ÿ…...

双目测量中的将视差图重投影成三维坐标图
双目测距主要步骤如下: 左右两张图片 → 匹配 → 得到视差图 disp; 使用 cv2.reprojectImageTo3D(disp, Q) 将视差图 重投影 成三维坐标图 → 得到 points_3d 什么是 points_3d? points_3d cv2.reprojectImageTo3D(disp, Q)points_3d.shap…...
:现代Web开发的超级加速器)
WebAssembly(Wasm):现代Web开发的超级加速器
在当今的Web开发领域,性能和效率是开发者们永恒的追求目标。随着Web应用的复杂度不断增加,传统的JavaScript在某些场景下已经难以满足高性能计算和复杂逻辑处理的需求。此时,WebAssembly(Wasm)作为一种新兴的Web技术&a…...

学习黑客Nmap 命令法诀
筑基期第二重 — Nmap 命令法诀 修炼目标 这一重我们要把上一阶段学到的“神识探查原理”化成 实战招式:掌握日常最常用的 Nmap 命令,并能随心组合。每条命令都配上“修仙比喻”,让你边笑边记。 1. 基础法诀速查表(凡修版…...

基于思考过程评价的心理问题咨询对话记性评估
基于思考过程评价的心理问题咨询对话记性评估 摘要: 在心理问题咨询的对话场景中,传统记性评价多局限于对话结果的相似度计算,无法全面捕捉来访者及咨询师在对话过程中的思维动态。本文提出一种聚焦此对话场景的记性评价新方法,将思考过程纳入评估范畴。详细阐释其基于认知…...

SQL数据库操作大全:从基础到高级查询技巧
大家好,欢迎来到程序视点!我是你们的老朋友.小二! SQL数据库操作核心语法精要 数据库基础操作 创建/删除数据库:CREATE DATABASE / DROP DATABASE 备份SQL Server:使用sp_addumpdevice和BACKUP DATABASE命令 数据库…...

基于MATLAB图像中的圆形目标识别和标记
一、前言 在数字图像处理中,有些图像类别可以使用圆形度进行区分。圆度有时被称为圆形度,其定义为:圆度 4πA / P,其中A是面积,P是周长。这个公式的来源是,对于圆来说,这个值等于1,…...
: linux开发机有线连接android设备)
android-ndk开发(4): linux开发机有线连接android设备
android-ndk开发(4): linux开发机有线连接android设备 2025/05/05 1. 概要 linux 系统, 例如最常见的 ubuntu, 在通过 USB 线把 android 设备连接到开发机上时, 仅仅是 ”物理上的连接”。 这时候 adb 是无法识别到 android 设备的。 需要…...

相机biaoding
需要先安装linux客户端(海康机器人官网),sudo dpkg -i MVS-2.1.2_x86_64_20221208.deb cd /opt/MVS/bin/ 再./MVS.sh运行,客户端启动。 打开海康相机客户端 cd /opt/MVS/bin export LD_LIBRARY_PATH/opt/MVS/bin/:$LD_LIBRARY_PATH ./MVS …...

linux 中inotify与inode的关系是什么?
在 Linux 系统中,inotify 和 inode 是两个密切相关但功能不同的概念,它们共同构成了文件系统的核心机制。以下是它们的关系解析: 一、基本概念 1. inode(索引节点) 定义:inode 是 Linux 文件系统中存储文…...

Paramiko 核心类关系图解析
类图关键说明 SSHClient 核心类 用户主要交互入口,聚合 Transport 对象依赖策略类处理主机密钥验证(AutoAddPolicy/RejectPolicy) Transport 引擎 管理底层连接生命周期组合 AuthHandler 处理认证逻辑组合 KexBase 实现密钥交换可创建多个 C…...